P5525QC Monitor Ethernet Firmware Cannot Update Using the Dell ISP Firmware Update Tool, Dell Display Manager, or Dell Display and Peripheral Manager
Summary: Information about using the Dell ISP Firmware Update Tool, Dell Display Manager (DDM), or Dell Display and Peripheral Manager (DDPM) to update the Dell P5525QC monitor.
This article applies to
This article does not apply to
This article is not tied to any specific product.
Not all product versions are identified in this article.
Symptoms
When updating the monitor firmware using the "Monitor Firmware Update Utility," if the network firmware is version 0.18 or below. Dell Display Manager (DDM) and Dell Display and Peripheral Manager (DDPM) Users encounter an error during the update process.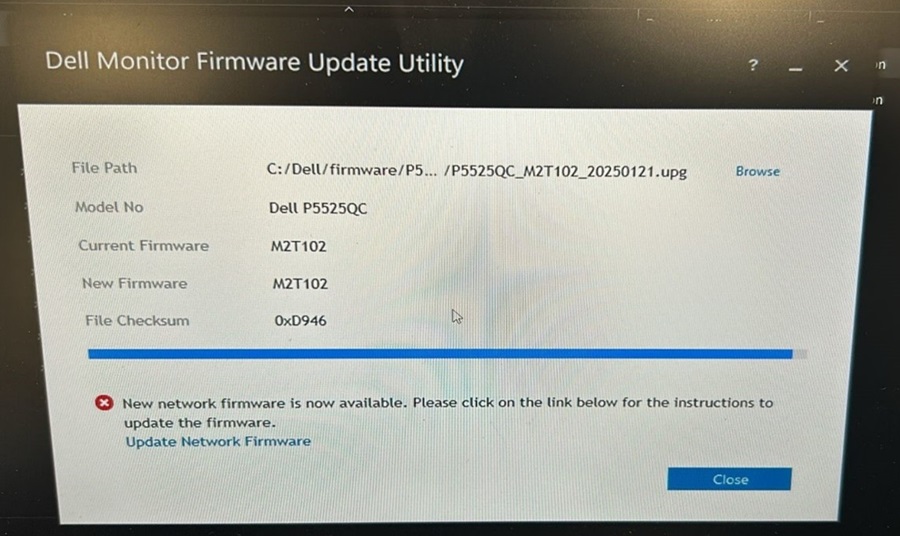
Cause
This happens because the firmware version of 0.18 or below of the current monitor does not support the USB HID mode for updating network firmware.
Only network firmware version 0.20 and above support the USB HID mode for the use of the Dell "Monitor Firmware Update Utility."
Resolution
To update the Ethernet firmware on the Dell P5525QC monitor, use a network connection to the RJ45 port.
- Download the latest firmware from the Dell Support site: Dell P5525QC Drivers & Downloads
- Connect the monitor and the computer with an RJ45 cable, Ethernet Enable.
Press the joystick button for 3 seconds to turn on. A network icon appears, and is shown on the center for 3 seconds. +Link

- To access the Dell Display Web Management tool, you must set the IP Addresses for your computer and the display.
- To display the IP address of the display, navigate to the On Screen Display (OSD) Menu > Others. By default, the IP Address is 10.0.50.100.

- In the computer’s IP Properties tab, specify an IP Address by selecting Use the following IP Address and enter the following values: For IP Address: 10.0.50.101 and for Subnet Mask: 255.0.0.0 (leave all other entries as blanks).

- The IP Address configuration (example) would now look like this:

- To access the web management:
Open a web browser and type the display’s IP Address (10.0.50.100) in the address bar. - The web Management home page is is shown as below. You can check the current network FW version.

- Select the Firmware Update option.

- Click Update and select the firmware file that you downloaded.

- Click the Upgrade button and the firmware starts to update.

- After the update is complete, Device Reboot will be automatically displayed.

- The Network firmware version has been updated.

Note: When the Dell P5525QC monitor network firmware is at version 0.2 or above, you can use a USB-C connection to update the network firmware using DDM, DDPM, or the Monitor Firmware Update utility.
Affected Products
Dell Display Manager 2.x, Dell Display and Peripheral Manager, Dell P5525QCArticle Properties
Article Number: 000231242
Article Type: Solution
Last Modified: 16 Apr 2025
Version: 3
Find answers to your questions from other Dell users
Support Services
Check if your device is covered by Support Services.