How to Run the Dell D1918H, D2421H, D2421DS, and D2721H Monitor Self-Test
Summary: The following article provides information about running the self-test on Dell D1918H, D2421H, D2421DS, and D2721H monitors.
This article applies to
This article does not apply to
This article is not tied to any specific product.
Not all product versions are identified in this article.
Instructions
Monitor Self-Test
The self-test (integrated diagnostic tool) helps you determine if any screen abnormality you experience is an inherent problem with: (For example: Your monitor, video cable, video card, driver, or computer.)
Steps for running the self-test:
- Disconnect all video cables from the monitor and turn off your monitor.
- Turn on the monitor.
- When the Dell logo disappears and the screen shows "No signal," press buttons 2 + 3 + 5 on the monitor simultaneously.
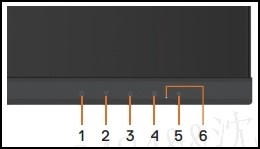
The monitor enters the self-test screen. - Carefully inspect the screen for abnormalities as the display turns to red, green, blue, black, and white automatically.
- Press button 5 to exit the self-test screen.
If you do not detect any screen abnormalities while using the self-test tool, the monitor is functioning properly. Check your video cable, video card, drivers, and computer.
Affected Products
Dell D1918H, Dell D2421H, Dell D2721HArticle Properties
Article Number: 000188980
Article Type: How To
Last Modified: 13 Nov 2025
Version: 12
Find answers to your questions from other Dell users
Support Services
Check if your device is covered by Support Services.