NVP vProxy: How to get the exact command syntax for running a VM recovery from CLI with debug
Summary: This KB provides an overview of how to get the exact "nsrvproxy_recover" command syntax needed for performing a CLI debug Virtual Machine (VM) restore.
Instructions
nsrvproxy_recover commands require several switches and VMware Managed Object Reference (MoRef) values. This article provides several methods for either generating the nsrvproxy_recover command or collecting the information needed to perform a CLI based restore.
The methods outlined in this article assumes:
- Valid VM backups exist on a Data Domain device:
mminfo -kot -q vmname=VM_NAME - The Data Domain devices where the backup resides is mounted in NetWorker:
nsrmm - The target vCenter (if different from the source) is registered in NetWorker as a NSR Hypervisor resource (Created in NetWorker VMware View).
- NetWorker VMware Protection (NVP) vProxy appliances are deployed in the target vCenter, registered with the NetWorker server, and are enabled.
Expand each of the following sections for more details:
Option One - Getting The Command From a Previous Restore Attempt:
The following method can be used if you recently attempted a restore from the NetWorker Management Console (NMC). It can be used if you would like to perform the recover command from CLI with additional debugging or monitoring the session from a terminal.
This method relies on the NetWorker server jobquery query command which interacts with the NetWorker server jobs database (jobsdb).
- Open a elevated shell or Administrator prompt on the NetWorker server.
- Run the command:
jobquery - From the
jobqueryprompt, enter:show name; command - To list the recover jobs, run:
print type: recover job
The full command the NetWorker server used to initiate the UI-based restore is returned:
[root@nsr ~]# jobquery
NetWorker jobs query utility.
Use the "help" command for help.
jobquery> show name; command
jobquery> print type: recover job
                     command: \
"nsrvproxy_recover -m I -c vcsa.amer.lan -M vm-4007 -V rhel-client01.amer.lan_\
1 -A datacenter-3 -L domain-c8 -F group-v4 -d \"Hard disk 1/2000/datastore-12\"\
 -E datastore-12 -S 3735418268";
                        name: Test_Restore2;
NOTE: Thejobqueryoutput is not showing multiple commands. Instead, it displays a single command that has been wrapped across multiple lines using backslash (\) continuation characters. These continuation characters can be used to reconstruct the original single-line command.
- Enter
quitto exit thejobqueryprompt. - Go to Performing the CLI Restore.
Option Two - Using the NMC or NWUI to Create the Command:
The following method may be used if there is currently no restore records in the jobsdb. In this scenario the NetWorker Management Console (NMC) or NetWorker Web User Interface (NWUI) are used to create the create the recover syntax that can then be used from command line.
- Log in to the NetWorker Management Console (NMC):
NOTE: Alternatively, you can start the recovery from the NetWorker Web User Interface (NWUI). We are only using a UI to configure the nsrvproxy_recover command. Use your preferred UI.

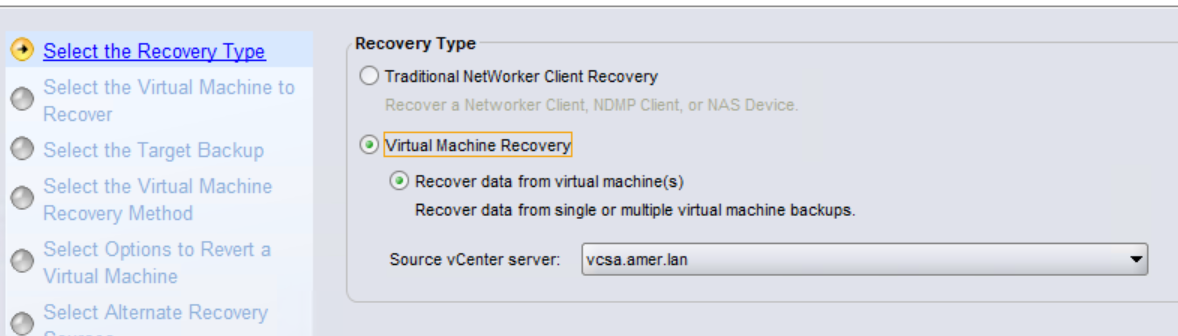
- Choose The Virtual Machine Recovery type, then select the vCenter server the VM was backed up from:
- Search for the VM and select it. Once selected it, appear in the Source virtual machine window:

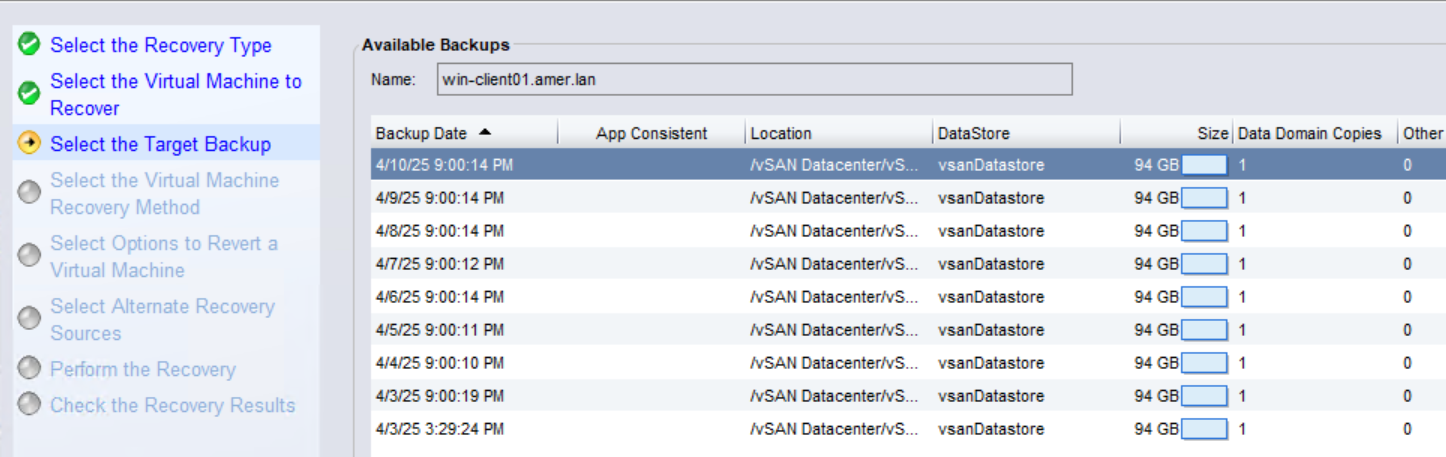
- Choose the save set date from the list of Available backups:
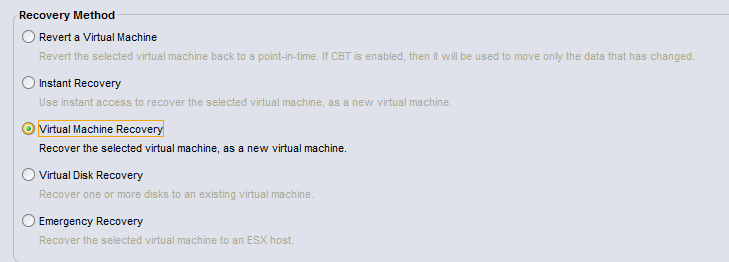
- Choose the VM image recovery (In this example Virtual Machine Recovery):
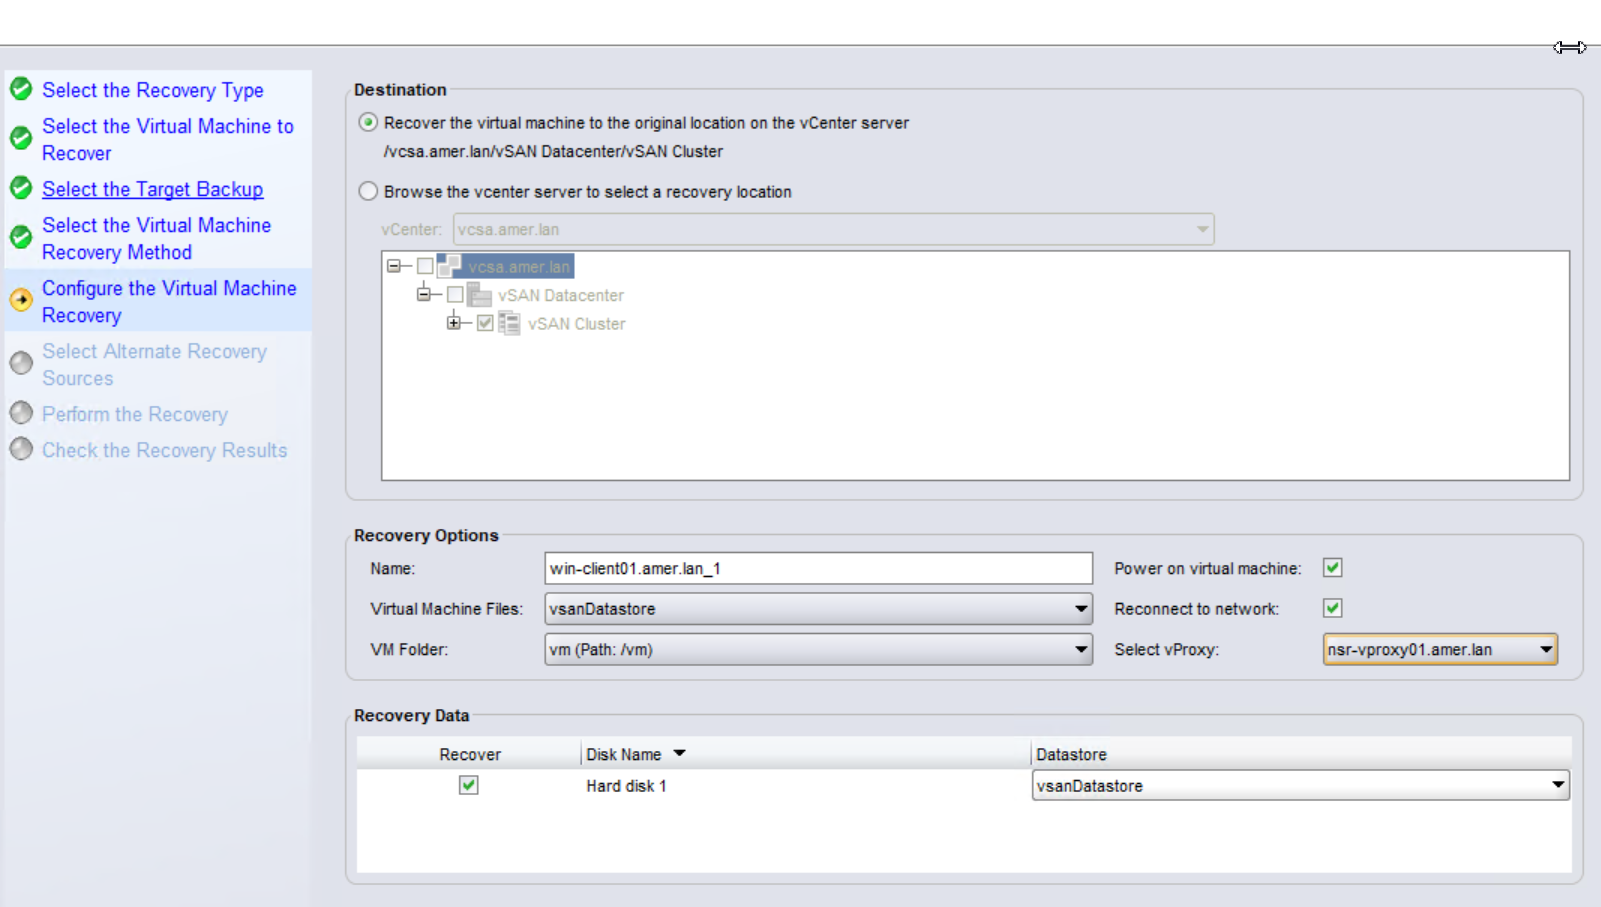
- Configure the Recovery options:
- Choose a target vCenter and location.
- Specify a name for the new VM.
- Select datastore locations for the VM files and disks.
- (Optional) Select if you would like for the VM to be powered on (default is no.)
- (Optional) Select if you would like for the VM to be connected to the network. This option is only available if you have also chosen to power on the VM.
- (Optional) Specify a vProxy appliance if you would like the restore to use a specific vProxy.
- Choose the volume that you want to restore from:

- Provide a Recover Name and select the option to Schedule recovery start at. Set the date a few days after the current date.
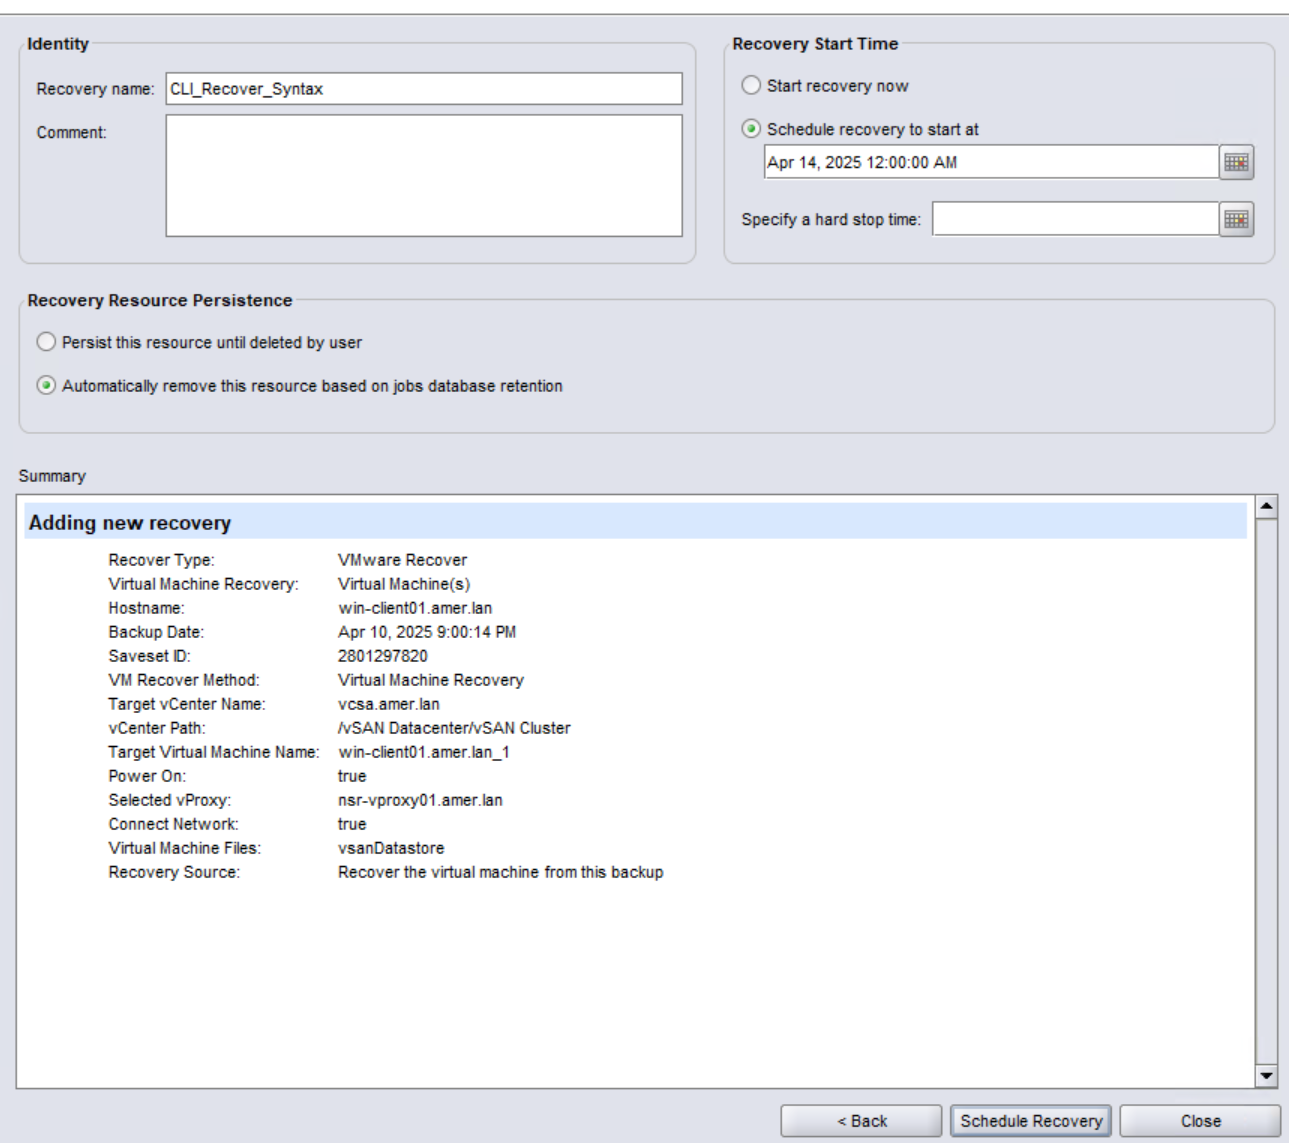
- Click Schedule Recovery.
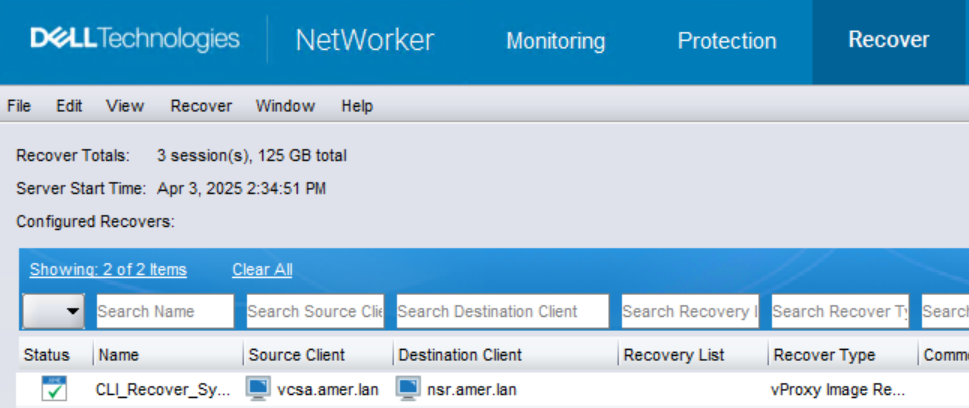
- You should see the scheduled recovery job on NMC now:
- On the NetWorker server, open an Administrator command prompt or root shell.
- Use the
nsradminorjobquerycommand to get thensrvproxy_recovercommand syntax:
For jobs scheduled from the NMC use nsradmin:
- From the elevated prompt, run:
nsradmin - From the
nsradminprompt, enter:show recover command; recover options - From the
nsradminprompt, use theprintcommand to display the recovery resource created from the NMC.
print type: nsr recover; name: RECOVER_NAME_FROM_STEP_8
Example:
[root@nsr ~]# nsradmin
NetWorker administration program.
Use the "help" command for help, "visual" for full-screen mode.
nsradmin> show recover command; recover options
nsradmin> print type: nsr recover; name: CLI_Recover_Syntax
             recover command: nsrvproxy_recover;
             recover options: \
" -m I  -c vcsa.amer.lan -M vm-17020 -V 'win-client01.amer.lan_1' -A datacente\
r-3 -L domain-c8 -F 'group-v4' -o P -o N -d 'Hard disk 1/2000/datastore-12' -E\
 datastore-12 -p nsr-vproxy01.amer.lan  -S 2801297820";
For jobs started from NWUI use jobquery:
- From the elevated prompt, run:
jobquery - From the
jobqueryprompt, enter:show name; command - From the
jobqueryprompt, enter:print type: recover job
Example:
[root@nsr ~]# jobquery
NetWorker jobs query utility.
Use the "help" command for help.
jobquery> show name; command
jobquery> print type: recover job
                     command: \
"nsrvproxy_recover -m I -c vcsa.amer.lan -M vm-4007 -V rhel-client01.amer.lan_\
1 -A datacenter-3 -L domain-c8 -F group-v4 -d \"Hard disk 1/2000/datastore-12\"\
 -E datastore-12 -S 1971497009";
                        name: Image_Restore;
jobquery> quit
jobquery and nsradmin output is not showing multiple commands. Instead, it displays a single command that has been wrapped across multiple lines using backslash (\) continuation characters. These continuation characters can be used to reconstruct the original single-line command.
- Go to Performing the CLI Restore.
Option Three - Collecting VMware Managed Object Reference (MoRef) Values:
This method does not require an existing recover record in the jobsdb or creating a new one by first initiating a restore from one of the NetWorker UIs. Instead, you must determine the recover command syntax required. See the NetWorker Command Reference Guide nsrvproxy_recover section for more information. NetWorker documentation is available through: Support for NetWorker | Manuals & Documents (You must sign-in with your Dell support account).
The standard syntax to perform a full VM restore to a new VM is:
nsrvproxy_recover [-v] [-D <debug_level>] -m I -c vcsa.amer.lan -M vm-4007 -V rhel-client01.amer.lan_1 -A datacenter-3 -L domain-c8 -F group-v4 -E datastore-12 -S 1971497009 [-k]
-v: (Optional) Add verbosity.-D: (Optional) Add debug. Debug levels are outlined in: NetWorker: Debug information levels-m I: Virtual Machine Image Recovery to a new VM. Other-moptions are outlined in the NetWorker Command Reference Guide.-c:Target vCenter hostname or IP address (Must be registered as a NSR Hypervisor resource on the NetWorker server.-M:Specify the VMware MoRef value of the VM being recovered.-V:Specify the name of the recovered VM. When performing "New VM" restore operations, the recovery fails if a VM with the same name already exists.-A:Specify the target VMware Datacenter MoRef.-L:Specify the target VMware Cluster Compute Resource.-F:(Optional) Specify the target VMware folder MoRef.-E:Specify the target VMware Datastore MoRef.-S:Specify the NetWorker save set ID (SSID) of the VM backup to be recovered.-k:(Optional) Perform concurrent VM disk restore if the VM has two or more disks. If unspecified, the VM disks are performed one-at-a-time sequentially. See: NVP-vProxy: How To Perform Concurrent Virtual Machine Disk (VMDK) Restores
Nearly all of the VMware Managed Object Reference (MoRef) Ids can be collected using the mminfo command;
- Get the VM save set ids:
mminfo -kot -q vmname=VM_NAME - Get the expanded details of the VM save set ID identified for restore:
mminfo -aS -q ssid=SAVE-SET-ID#
However, this assumes you are putting the recovered VM in the exact same location from which it was backed up. Other methods to collect VMware MoRef values, such as from another vCenter or alternate location from the source backups are outlined in the following article: NetWorker: How To Collect MoReF (Managed Object Reference) Values for VMware Objects
Performing the CLI Restore:
The command can be reconstructed to a single line and run from an elevated prompt on the NetWorker server. Additional options such as debug levels or verbosity can be added:
nsrvproxy_recover -vvv -D9 -m I -c vcsa.amer.lan -M vm-4007 -V rhel-client01.amer.lan_1 -A datacenter-3 -L domain-c8 -F group-v4 -d "Hard disk 1/2000/datastore-12" -E datastore-12 -S 3735418268 > /tmp/nsrvproxy_recover-rhel-client-$(date -I).log 2<&1Alternatively, the command can be run in the background so that it is not closed if the terminal session closes, example:
- Linux:
nohup nsrvproxy_recover -vvv -D9 -m I -c vcsa.amer.lan -M vm-4007 -V rhel-client01.amer.lan_1 -A datacenter-3 -L domain-c8 -F group-v4 -d "Hard disk 1/2000/datastore-12" -E datastore-12 -S 3735418268 > /tmp/nsrvproxy_recover-rhel-client-$(date -I).log &
- Windows (PowerShell):
$LogFile = "C:\Temp\nsrvproxy_recover-rhel-client-$(Get-Date -Format 'yyyy-MM-dd').log"

Start-Process -FilePath "nsrvproxy_recover.exe" `
    -ArgumentList '-vvv -D9 -m I -c vcsa.amer.lan -M vm-4007 -V rhel-client01.amer.lan_1 -A datacenter-3 -L domain-c8 -F group-v4 -d "Hard disk 1/2000/datastore-12" -E datastore-12 -S 3735418268' `
    -RedirectStandardOutput $LogFile `
-NoNewWindowvrecoverd engine and functions on the vProxy appliance actually moving the data between Data Domain and VMware, see: NetWorker VMware Protection-vProxy: How to Enable Debug Logging.
Additional Information
- NVP vProxy: How to perform parallel (concurrent) recovery of multiple VMDKs
- NVP-vProxy: How to use the nsrvproxy_flr command for File Level Recovery from the NetWorker Server
- NVP-vProxy: How To Identify a VM Name From the UUID Presented In NetWorker
- NetWorker: How To Collect MoReF (Managed Object Reference) Values for VMware Objects
- NVP vProxy: How to manually clone a VM save set from a non-Data Domain device to a Data Domain clone device?
- NetWorker VMware Protection-vProxy: How to Enable Debug Logging.