PowerVault ME4: Installing And Removing Custom Certificates
Summary: This article covers the steps to install a custom certificate through FTP for Dell PowerVault ME Series storage products.
Instructions
Installing or Removing Custom Certificates on ME4
- Installing the Certificate
- Viewing certificate information
- Removing Custom Certificates
- CLI Only Example using Linux and ME4 SSH session
Installing the Certificate.
Perform the following steps to install a third-party or self-signed security certificate:
-
In the PowerVault Manager, prepare to use FTP or Secure File Transfer Protocol (SFTP):
-
Determine the network port IP addresses of the controllers under ME4 System Settings > Network.
-
Verify that the FTP or SFTP service is enabled on the storage under the ME4 System Settings > Services. If using SFTP, record which port SFTP is set to use.
-

-
ME4 System Settings > Manage Users can be used to verify that the user account has Manage and FTP/SFTP roles.
-
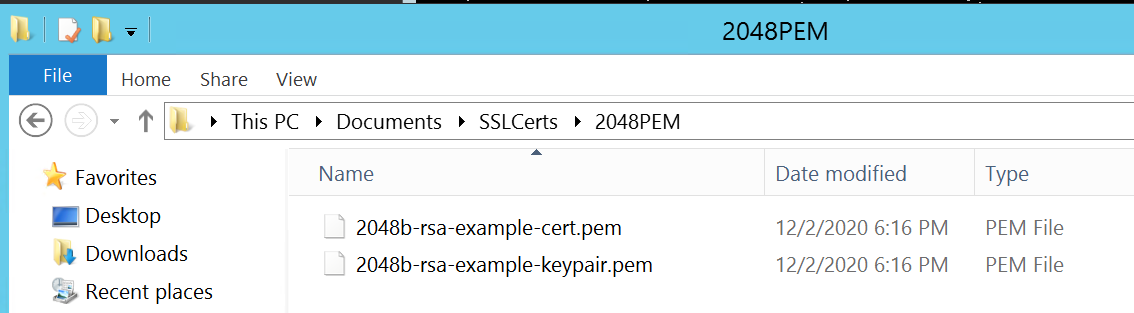
Put your certificate file and key file in a directory that is accessible to the FTP client. The format of the certificate and key file must be Privacy Enhanced Mail (PEM) format. Customers can upload Distinguished Encoding Rules (DER) files, but they cannot be used when restarting the management on the controllers. Note: ME4 does support wildcard certificates.
-
Open a Command Prompt (Windows) or a terminal window (UNIX) and go to the directory that contains the certificate files. The UI cannot be used like the Filezilla client because the "put" line requires command parameters after the file name.
Windows FTP cannot do passive FTP if the firewall is enabled. It may be able to log in to the ME4 array, but then errors out with a port connection issue when trying to send files. If trying to use the Windows command line FTP, the Windows firewall must be disabled before starting.)
-
Type:
sftp controller-network-address -P port or ftp controller-network-address. The files must be uploaded to both controllers for it to be used on both controllers.
For example: sftp 10.235.XXX.XXX -P 1022 or ftp 10.X.0.X X.
Log in as a user with manage role permissions and FTP or SFTP interface permissions. In these examples, the WinSCP FTP command-line client is used but if Windows firewall is disabled, the Windows FTP client can be used. A Linux client can also be used.
C:\Users\Administrator\Documents\SSLCerts\2048PEM>"c:\Program Files (x86)\WinSCP\WinSCP.com"

     winscp> open ftp://100.85.XXX.X

     Prompting for credentials...

     Username: manage

     Connecting to 100.85.XXX.X ...

     Password:

     Connected

     Starting the session...

     Session started.

     Active session: [1] 100.85.XXX.X

     winscp>
-
Type:
put certificate-file-name cert-filewhere certificate file name is the name of the certificate file for your specific storage unit. File errors can occur if the directory the certificate is put into is a hidden directory that the FTP user does not have permissions to modify.
winscp> put 2048b-rsa-example-cert.pem cert-file

     2048b-rsa-example-cert.pe |           1 KB |    0.0 KB/s | binary | 100%

     winscp>
-
Type:
put key-file-name cert-key-filewhere key-file-name is the name of the security key file for your specific storage.
winscp> put 2048b-rsa-example-keypair.pem cert-key-file

     2048b-rsa-example-keypair |           1 KB |    0.0 KB/s | binary | 100%

     winscp>
-
Note if a directory listing is done on the array FTP site after uploading these files they are not seen. They are stored in hidden directories the FTP user cannot look at.
winscp> ls

     D---------   0                           0              ..

     Lrwxrwxrwx   0 0        0               12 Dec  2 13:19:33 2020 .banner ->

     -rw-rw-rw-   0 0        10               0 Dec  2 14:46:49 2020 0

     -rw-r--r--   0 0        0             8436 Dec  2 13:19:33 2020 README

     winscp>
-
Repeat steps 4, 5, 6, and 7 for the other controller.
-
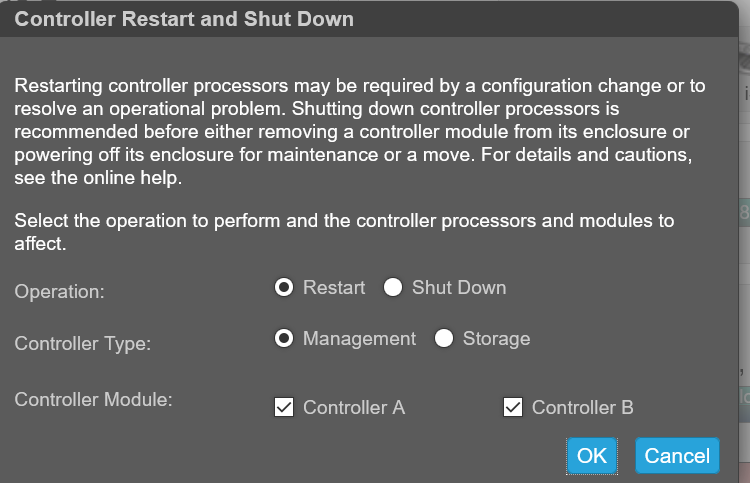
Restart both Management Controllers to have the new security certificate take effect. After the management controllers have restarted, the certificate can be viewed through the UI as shown below or by the SSH command "show certificate".
Viewing certificate information.
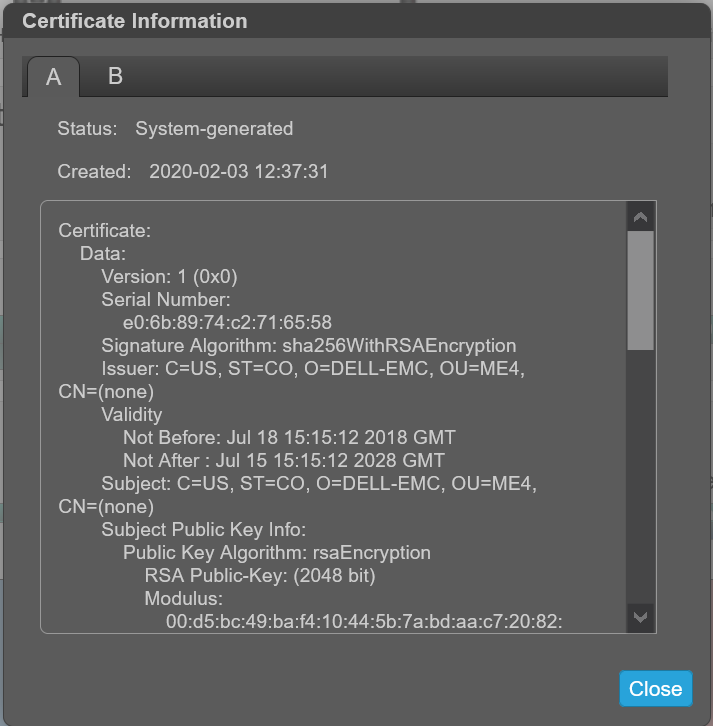
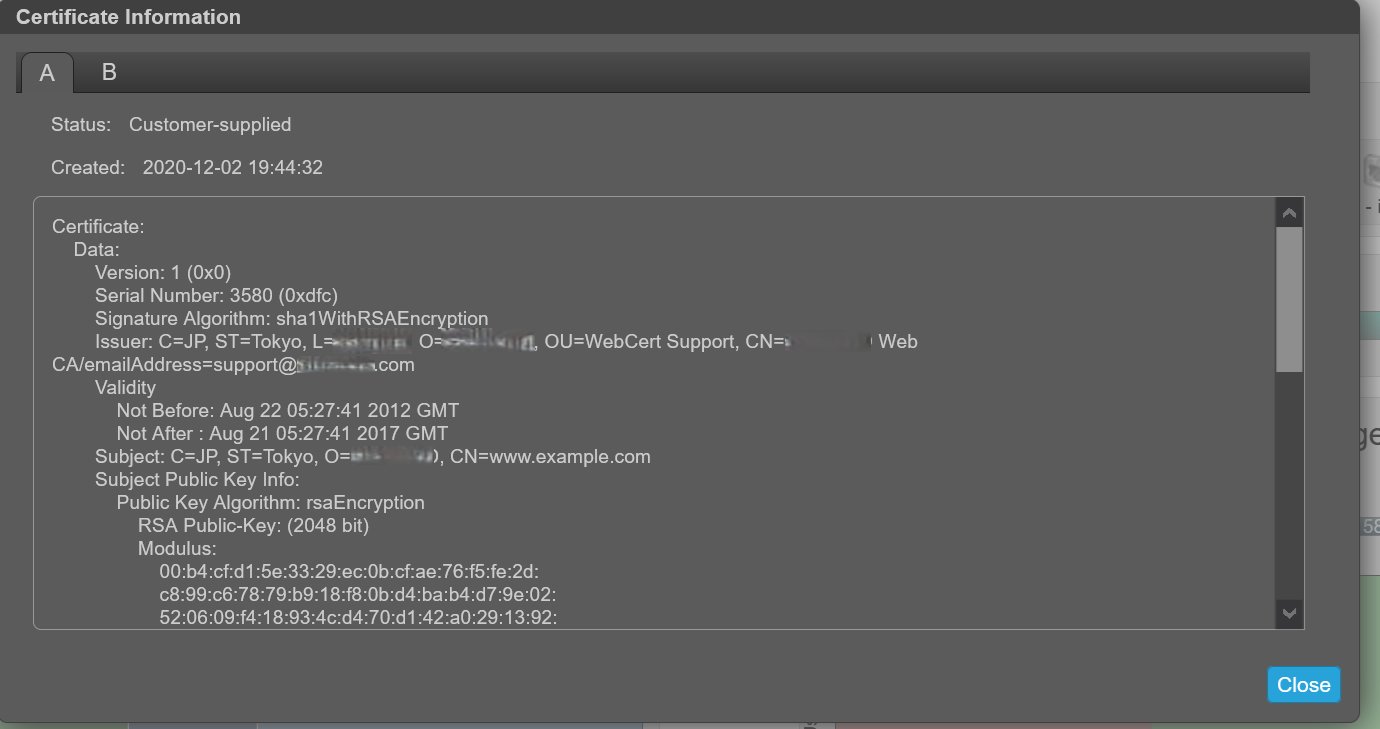
By default, the storage generates a unique SSL certificate for each controller. For the strongest security, replace the default system-generated certificate with a certificate issued from a trusted certificate authority.
The Certificate Information panel shows information for the active SSL certificates that are stored on the system for each controller. Tabs A and B contain unformatted certificate text for each of the corresponding controllers. The panel also shows one of the following status values and the creation date for each certificate:
-
Customer supplied-Indicates that the controller is using a certificate that the customer has uploaded.
-
System generated-Indicates that the controller is using an active certificate and key that the controller generated.
-
Unknown status-Indicates that the controller's certificate cannot be read. This most often occurs when a controller is restarting, the certificate replacement process is still in process, or the user has selected the tab for a partner controller in a single-controller system.
Custom certificates can be used by uploading them through FTP or SFTP or by using the contents parameter of the create certificate CLI command. This allows the user to create certificates with their own unique certificate content. For a new certificate to take effect, restart the management controller for it.
Verify that the certificate replacement was successful and the controller is using the certificate that was supplied:
- Confirm that the certificate status is "customer-supplied"
- The creation date is correct
- The certificate content is the expected text
View Certificate Information:
-
In the banner, click the system panel and select Show Certificate Information. The Certificate Information panel opens.
-
Once viewing certificate information is complete, click Close.
Prior to installing a certificate, the information shows "System Generated".
After installing your own certificate, it will identify as Customer Supplied:
Removing Custom Certificates.
To restore the system-generated certificate and remove the custom certificate from both controllers, log in to each controller and run the command:# create certificate restore
To make the certificate change take effect, restart Management Controller on all controllers the command was used on.
CLI Only Example using Linux and ME4 SSH session
-
Create the certificate and put the "PEM .cer" and ".key" on your Linux machine.
-
From an SSH session on the Linux box, transfer the files using FTP to the array and then open an SSH session to the array to restart both controllers on the ME4. It takes about two minutes after restarting the ME4 management controllers before the user is able to log back in to the ME4 and show the new certificate. Note: One controller may take longer to come up than the other. Until both controllers are fully up, the storage may show one controller on a system certificate and one on a customer certificate.
In the example below, the ME4 controller IPs are:
A:  100.85.XXX.X

     B:  100.85.XXX.XX8
For both controllers to have the certificate:
- Upload the cert and key file to both controllers using FTP
- Restart the management controller on both controllers
[grpadmin@WWWWWWW certs]$ pwd
/home/grpadmin/Documents/certs
[grpadmin@WWWWWWW certs]$ ls
2048b-rsa-example-cert.pem  2048b-rsa-example-keypair.pem  put
[grpadmin@WWWWWWW certs]$ ftp 100.85.QQQ.ZZZ
Connected to 100.85.QQQ.ZZZ (100.85.QQQ.ZZZ).
220-Welcome to Pure-FTPd.
220-You are user number 1 of 5 allowed.
220-Local time is now 23:29. Server port: 21.
220-This is a private system - No anonymous login
220-IPv6 connections are also welcome on this server.
220 You will be disconnected after 15 minutes of inactivity.
Name (100.85.QQQ.ZZZ:grpadmin): manage
331 User manage OK. Password required
Password:
230-OK. Current restricted directory is /.
.
.
230-Instructions for loading security certificate files:
230-    1. The security certificate files will consist of a pair of files.
230-       You will have a certificate file and a key file.
230-    2. Log in with a user name and password.
230-    3. Type 'put <certificate-file-name> cert-file'
230-        where <certificate-file-name> is the name of the certificate file
230-        for your specific system.
230-    4. Type 'put <key-file-name> cert-key-file'
230-       where <key-file-name> is the name of the security key file for
230-        your specific system.
230-    5.  Restart both Management Controllers to have the new security
230-        certificate take effect.
230-
230
Remote system type is UNIX.
Using binary mode to transfer files.
ftp> put 2048b-rsa-example-cert.pem cert-file
local: 2048b-rsa-example-cert.pem remote: cert-file
227 Entering Passive Mode (100,85,QQQ,ZZZ,127,0)
150 Accepted data connection
226-File Transfer Complete. Starting Operation: (2020-12-10 17:40:12)
STATUS: Loading security certificate file
226-
226 Operation Complete. (2020-12-10 17:40:18)
1050 bytes sent in 9.4e-05 secs (11170.21 Kbytes/sec)
ftp> put 2048b-rsa-example-keypair.pem cert-key-file
local: 2048b-rsa-example-keypair.pem remote: cert-key-file
227 Entering Passive Mode (100,85,QQQ,ZZZ,204,57)
150 Accepted data connection
226-File Transfer Complete. Starting Operation: (2020-12-10 17:40:37)
STATUS: Loading security certificate file
Verifying uploaded certificate and key.

The uploaded SSL certificate and key have been installed. Reboot the controller to apply.
226-
226 Operation Complete. (2020-12-10 17:40:45)
1679 bytes sent in 8.5e-05 secs (19752.94 Kbytes/sec)
ftp> ls
227 Entering Passive Mode (100,85,QQQ,ZZZ,189,193)
150 Accepted data connection
-rw-rw-rw-    1 0          users               0 Dec 10 17:40 0
-rw-r--r--    1 0          0                8436 Dec  2 20:39 README
226-Options: -l
226 2 matches total
ftp> bye
221-Goodbye. You uploaded 3 and downloaded 0 kbytes.
221 Logout.
[grpadmin@WWWWWWW certs]$ ftp 100.85.XXX.YYY
Connected to 100.85.XXX.YYY (100.85.XXX.YYY).
220-Welcome to Pure-FTPd.
220-You are user number 1 of 5 allowed.
220-Local time is now 23:30. Server port: 21.
220-This is a private system - No anonymous login
220-IPv6 connections are also welcome on this server.
220 You will be disconnected after 15 minutes of inactivity.
Name (100.85.XXX.YYY:grpadmin): manage
331 User manage OK. Password required
Password:
230-OK. Current restricted directory is /
.
.
.
Remote system type is UNIX.
Using binary mode to transfer files.
ftp> put 2048b-rsa-example-cert.pem cert-file
local: 2048b-rsa-example-cert.pem remote: cert-file
227 Entering Passive Mode (100,85,XXX,YYY,126,144)
150 Accepted data connection
226-File Transfer Complete. Starting Operation: (2020-12-11 23:30:22)
STATUS: Loading security certificate file
226-
226 Operation Complete. (2020-12-11 23:30:28)
1050 bytes sent in 4.7e-05 secs (22340.42 Kbytes/sec)
ftp> put 2048b-rsa-example-keypair.pem cert-key-file
local: 2048b-rsa-example-keypair.pem remote: cert-key-file
227 Entering Passive Mode (100,85,XXX,YYY,200,227)
150 Accepted data connection
226-File Transfer Complete. Starting Operation: (2020-12-11 23:30:40)
STATUS: Loading security certificate file
Verifying uploaded certificate and key.

The uploaded SSL certificate and key have been installed. Reboot the controller to apply.
226-
226 Operation Complete. (2020-12-11 23:30:47)
1679 bytes sent in 5.2e-05 secs (32288.46 Kbytes/sec)
ftp> bye
221-Goodbye. You uploaded 3 and downloaded 0 kbytes.
221 Logout.
[grpadmin@WWWWWWW certs]$ ssh manage@100.85.QQQ.ZZZ
Password:

DELL EMC ME4024
System Name: NDC-ME4
System Location: NDC
Version: GT280R008-01
# restart mc both
During the restart process you will briefly lose communication with the specified Management Controller(s).
Do you want to continue? (y/n) y
Info: Restarting the local MC (A)...
Success: Command completed successfully. - Both MCs were restarted. (2020-12-11 23:31:26)
# Killed
Connection to 100.85.QQQ.ZZZ closed.
.
.  Will take about 2 minutes for you to be able to log back into the array to
.  see the certificates
.
[grpadmin@WWWWWWW certs]$ ssh manage@100.85.QQQ.ZZZ
Password:

DELL EMC ME4024
System Name: NDC-ME4
System Location: NDC
Version: GT280R008-01
# show certificates
Error: The command was not recognized. (2020-12-11 23:36:35)
# show certificate
Certificate Status
------------------
Controller: A
Certificate Status: Customer-supplied
Time Created: 2020-12-11 23:29:29
Certificate Text: Certificate:
    Data:
        Version: 1 (0x0)
        Serial Number: 3580 (0xdfc)
        Signature Algorithm: sha1WithRSAEncryption
        Issuer: C=JP, ST=Tokyo, L=RRRRRRR, O=SSSSSSSSS, OU=WebCert Support, CN=SSSSSSSSS Web CA/emailAddress=support@SSSSSSSSS.com
        Validity
            Not Before: Aug 22 05:27:41 2012 GMT
            Not After : Aug 21 05:27:41 2017 GMT
        Subject: C=JP, ST=Tokyo, O=SSSSSSSSS, CN=www.example.com
        Subject Public Key Info:
            Public Key Algorithm: rsaEncryption
                RSA Public-Key: (2048 bit)
                Modulus:
                    00:b4:cf:d1:5e:33:29:ec:0b:cf:ae:76:f5:fe:2d:
                    c8:99:c6:78:79:b9:18:f8:0b:d4:ba:b4:d7:9e:02:
                    52:06:09:f4:18:93:4c:d4:70:d1:42:a0:29:13:92:
                    73:50:77:f6:04:89:ac:03:2c:d6:f1:06:ab:ad:6c:
                    c0:d9:d5:a6:ab:ca:cd:5a:d2:56:26:51:e5:4b:08:
                    8a:af:cc:19:0f:25:34:90:b0:2a:29:41:0f:55:f1:
                    ---REDACTED---
                    9a:24:79:49:17:27:d7:89:4b:6a:2e:0d:87:51:d9:
                    23:3d:06:85:56:f8:58:31:0e:ee:81:99:78:68:cd:
                    6e:44:7e:c9:da:8c:5a:7b:1c:bf:24:40:29:48:d1:
                    03:9c:ef:dc:ae:2a:5d:f8:f7:6a:c7:e9:bc:c5:b0:
                    59:f6:95:fc:16:cb:d8:9c:ed:c3:fc:12:90:93:78:
                    5a:75:b4:56:83:fa:fc:41:84:f6:64:79:34:35:1c:
                    ac:7a:85:0e:73:78:72:01:e7:24:89:25:9e:da:7f:
                    65:bc:af:87:93:19:8c:db:75:15:b6:e0:30:c7:08:
                    f8:59
                Exponent: 65537 (0x10001)
    Signature Algorithm: sha1WithRSAEncryption
         40:cb:fe:04:5b:c6:74:c5:73:91:06:90:df:ff:b6:9e:85:73:
         fe:e0:0a:6f:3a:44:2f:cc:53:73:16:32:3f:79:64:39:e8:78:
         ---REDACTED---
         1b:d7:eb:c0:31:6c:86:a0:f6:55:a8:f8:10:d0:42:06:1e:94:
         a5:e0:68:a7:9f:b6:f3:9c:d0:e1:22:3b:ab:85:3d:a1:27:9b:
         50:32:62:b8:ec:7a:fa:d6:7d:2b:29:e6:ad:b2:69:4d:28:b4:
         f8:13


Certificate Status
------------------
Controller: B                        Certificate Status: Customer-supplied
Time Created: 2020-12-11 23:30:22
Certificate Text: Certificate:
    Data:
        Version: 1 (0x0)
        Serial Number: 3580 (0xdfc)
        Signature Algorithm: sha1WithRSAEncryption
        Issuer: C=JP, ST=Tokyo, L=RRRRRRR, O=SSSSSSSSS, OU=WebCert Support, CN=SSSSSSSSS Web CA/emailAddress=support@SSSSSSSSS.com
        Validity
            Not Before: Aug 22 05:27:41 2012 GMT
            Not After : Aug 21 05:27:41 2017 GMT
        Subject: C=JP, ST=Tokyo, O=SSSSSSSSS, CN=www.example.com
        Subject Public Key Info:
            Public Key Algorithm: rsaEncryption
                RSA Public-Key: (2048 bit)
                Modulus:
                    00:b4:cf:d1:5e:33:29:ec:0b:cf:ae:76:f5:fe:2d:
                    c8:99:c6:78:79:b9:18:f8:0b:d4:ba:b4:d7:9e:02:
                    52:06:09:f4:18:93:4c:d4:70:d1:42:a0:29:13:92:
                    73:50:77:f6:04:89:ac:03:2c:d6:f1:06:ab:ad:6c:
                    c0:d9:d5:a6:ab:ca:cd:5a:d2:56:26:51:e5:4b:08:
                    8a:af:cc:19:0f:25:34:90:b0:2a:29:41:0f:55:f1:
                    ---REDACTED---
                    9a:24:79:49:17:27:d7:89:4b:6a:2e:0d:87:51:d9:
                    23:3d:06:85:56:f8:58:31:0e:ee:81:99:78:68:cd:
                    6e:44:7e:c9:da:8c:5a:7b:1c:bf:24:40:29:48:d1:
                    03:9c:ef:dc:ae:2a:5d:f8:f7:6a:c7:e9:bc:c5:b0:
                    59:f6:95:fc:16:cb:d8:9c:ed:c3:fc:12:90:93:78:
                    5a:75:b4:56:83:fa:fc:41:84:f6:64:79:34:35:1c:
                    ac:7a:85:0e:73:78:72:01:e7:24:89:25:9e:da:7f:
                    65:bc:af:87:93:19:8c:db:75:15:b6:e0:30:c7:08:
                    f8:59
                Exponent: 65537 (0x10001)
    Signature Algorithm: sha1WithRSAEncryption
         40:cb:fe:04:5b:c6:74:c5:73:91:06:90:df:ff:b6:9e:85:73:
         fe:e0:0a:6f:3a:44:2f:cc:53:73:16:32:3f:79:64:39:e8:78:
         ---REDACTED---
         1b:d7:eb:c0:31:6c:86:a0:f6:55:a8:f8:10:d0:42:06:1e:94:
         a5:e0:68:a7:9f:b6:f3:9c:d0:e1:22:3b:ab:85:3d:a1:27:9b:
         50:32:62:b8:ec:7a:fa:d6:7d:2b:29:e6:ad:b2:69:4d:28:b4:
         f8:13


Success: Command completed successfully. (2020-12-11 23:36:41)
#