How do I connect multiple Dell™ PowerConnect™ 3024 switches together? - Technical Tip - 147324
Symptoms
How to create a stacked configuration of PowerConnect 3024 switch
The PowerConnect 3024 switch supports stacking (daisy-chaining) up to 6 total switches in order to create an expanded configuration. When stacked together, the switches will behave as one switch. The root switch is the only one that will maintain any configuration information in its NVRAM and it will perform all processing functions for the whole stack.
| NOTE: | Only 6 PowerConnect 3024 switches can be stacked. If a 7th switch is added to the stack, the stack will not see or use it. |
To create a stacked configuration of PowerConnect 3024 switches, perform the following steps:
 |
NOTICE: | Be sure all of the switches are unplugged and powered off before chaining them together with LVDS cables. |
Begin the daisy chain from the parent switch (root) with an LVDS cable routed from the Stack Out port on the root switch to the Stack In port on the child switch (leaf).
- Continue this pattern until all switches have been cabled. (Figure 1)
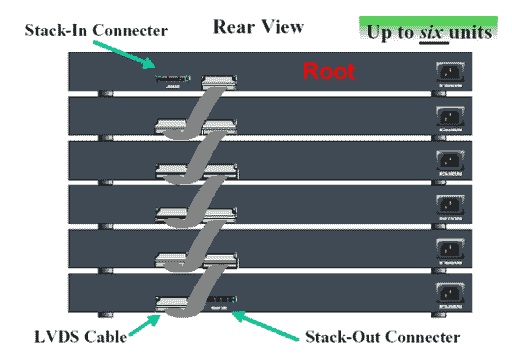
Figure 1 - Stacking Configuration - Verify that the root switch does not have an LVDS cable connected to the Stack In port.
- Once the LVDS cables have been connected, proceed to plug in the power cables of the switches beginning with the last leaf and working your way back towards the root switch.
Once the root switch’s power cable is connected, the stack of switches will begin to boot up.
NOTICE: Never add or remove an LVDS cable while the switches are powered on.