IDPA: Fixing IDPA Internal VM Backups and RUCK avproxy_internal_backup_check failure using GOAV automated remediation Utility
Summary: This process walks through the steps to re-create the Integration Data Protection Appliance (IDPA) Virtual Machine (VM) Backup policies in Avamar in case they are lost.
This article applies to
This article does not apply to
This article is not tied to any specific product.
Not all product versions are identified in this article.
Instructions
The following procedure can be used to re-create Integration Data Protection Appliance Internal VMs Backup Policies.
Method # 1: Automated Procedure: GoAv Tool
1) Download and install the latest release of GoAv. Instructions and more information about this tool can be found here: Avamar: Goav tool
2) Confirm that version is 1.69 or above:
3) Now that we confirmed we have version 1.69 (or above) of GoAv, run the following command to run a check on the IDPA Avamar Policies:
IDPA Backup Preferences:
The output may look like this:

In this example, we can see the VCenter Backup Policy does not exist.
The Second Section is called: IDPA client VMs

In this example, you can see that the DPA Application VM is missing, has no backups, and is not part of a policy. The vCenter is also not part of a Policy.
4) Fix the IDPA Internal VM Backup issues by running this command:
You notice the following in the output:
For IDPA Backup Preferences:

We can see that the vCenter Policy was Fixed.
for IDPA client VMs:

We now see that the DPA Application server is now part of a policy (notice the different color of the text)
GoAv is also indicating: "attempting backup, check gui."
As part of the fix, GoAv started a backup of the DPA Application VM.
Method # 1: Automated Procedure: GoAv Tool
1) Download and install the latest release of GoAv. Instructions and more information about this tool can be found here: Avamar: Goav tool
2) Confirm that version is 1.69 or above:
./goav version showThe output should look like this:
admin@avamar:~/>: ./goav version show
===========================================================
GoAv    :        1.69
Avamar  :        19.4
Date    :        30 May 2024 12:47 -03
===========================================================
COMMAND :  ./goav version show
NOTE: This is not an official tool
===========================================================
GoAV : 1.69
3) Now that we confirmed we have version 1.69 (or above) of GoAv, run the following command to run a check on the IDPA Avamar Policies:
./goav idpa check multipleThe GoAv utility covers many topics, we want to focus on two:
IDPA Backup Preferences:
The output may look like this:
In this example, we can see the VCenter Backup Policy does not exist.
The Second Section is called: IDPA client VMs
In this example, you can see that the DPA Application VM is missing, has no backups, and is not part of a policy. The vCenter is also not part of a Policy.
4) Fix the IDPA Internal VM Backup issues by running this command:
./goav idpa fix multiple
You notice the following in the output:
For IDPA Backup Preferences:
We can see that the vCenter Policy was Fixed.
for IDPA client VMs:
We now see that the DPA Application server is now part of a policy (notice the different color of the text)
GoAv is also indicating: "attempting backup, check gui."
As part of the fix, GoAv started a backup of the DPA Application VM.
NOTE: If you are following this KB because RUCK identified VMs without backups, the RUCK tool will not clear the Error until the backup is completed.
Additional Information
Method # 2: Manually using the Command Line:
Here is an alternative way to automate the Integration Data Protection Appliance backup policy creation process:
=============================================================
Step 1: Log in to the Avamar using SSH/PUTTY as admin.
Step 2: Set a variable for vcsa_domain. Set this to the vCenter FQDN for your system.
Step 3: Create Integration Data Protection Appliance datasets:
Step 4: Create Integration Data Protection Appliance schedules:
Step 5: Create Integration Data Protection Appliance retentions:
Step 6: Create Integration Data Protection Appliance Policies:
Step 7: Manually add VMs into each backup policy group created in the above steps.
Method #3: Manually using the Avamar AUI:
The following procedure can be used to re-create Integration Data Protection Appliance Internal VMs Backup Policies.
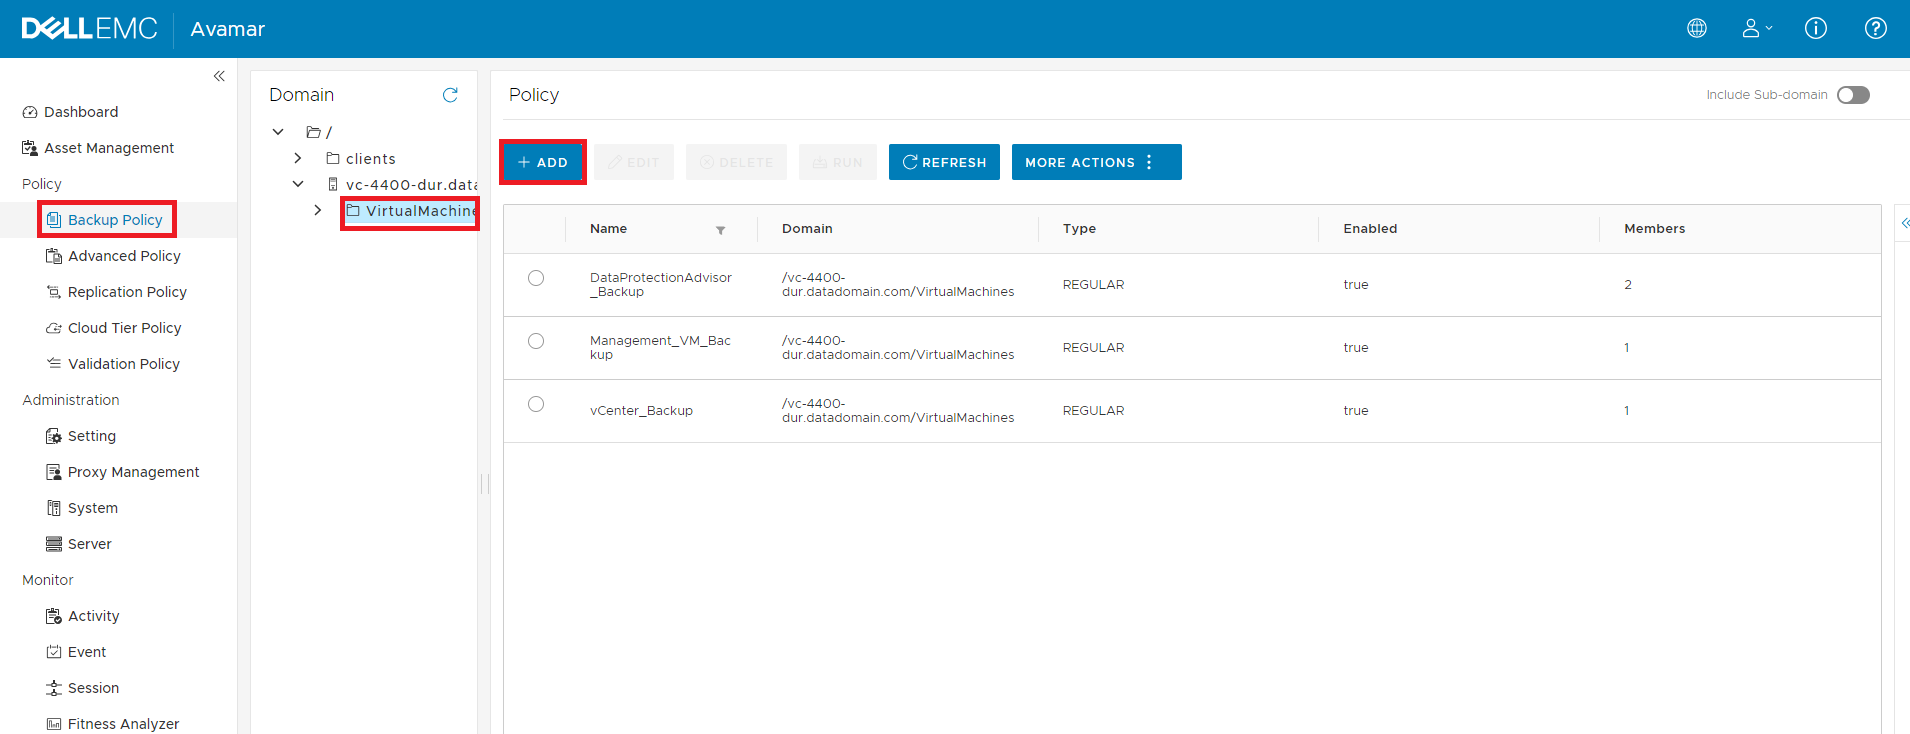
There are six steps to create the Backup Policy.
This lists all Backup Policies for that domain. There should be four to six Policies there:
DataProtectionAdvisor_Backup
DataProtectionCentra_Backup
Management_VM_Backup
vCenter_Backup
DataProtectionSearch_Backup (If Search is installed).
DataDomainCloudDisasterRecovery_Backup (If CDRA is installed).
If any of these are missing use the below procedure to create them.
Click the +ADD button in the Policy pane to create a policy.
In the popup box, it is on item one, put in the Name for the policy, use the following names:
DataProtectionAdvisor_Backup
DataProtectionCentra_Backup
Management_VM_Backup
vCenter_Backup
DataProtectionSearch_Backup
DataDomainCloudDisasterRecovery_Backup
Then click the NEXT button.

The second item is to add the Members to the policy. Click the check mark next to the servers that must be added to this policy.
For the DataProtectionAdvisor_Backup policy, select both the DPAApplicationServer and the DPADatastoreServer.
For the DataProtectionCenteral_Backup policy, select the DPC.
For the Management_VM_Backup policy, select the DataProtection-ACM.
For the vCenter_Backup policy, select the DataProtection-VCSA.
For the DataProtectionSearch_Backup, select the Search_index.
For the DataDomainCloudDisasterRecovery_Backup, select the CDR.
Then click the NEXT button.

The third item is to create the dataset. Set the Dataset name, use the following names:
DataProtectionAdvisor_Backup
DataProtectionCentra_Backup
Management_VM_Backup
vCenter_Backup
DataProtectionSearch_Backup
DataDomainCloudDisasterRecovery_Backup
Check the box next to Linux VMware Image and open the Source Data tab, ensure that All Virtual disks item is selected.
Click the NEXT button.

The fourth item is to create the Schedule. Put in the schedule name, use the following names:
DataProtectionAdvisor_Backup
DataProtectionCentra_Backup
Management_VM_Backup
vCenter_Backup
DataProtectionSearch_Backup
DataDomainCloudDisasterRecovery_Backup
Set the Backup Window to 23 hours.
Under By time point, select 23:55 and click the ADD link to add that time for the schedule.
Click the NEXT button.

The fifth item is setting retention on the backup. Put in the Retention Name, use the following:
DataProtectionAdvisor_Backup
DataProtectionCentra_Backup
Management_VM_Backup
vCenter_Backup
DataProtectionSearch_Backup
DataDomainCloudDisasterRecovery_Backup
Set the Retention period to 30 days.
Click the NEXT button.

Item six is the summary, check this to ensure it is correct and that the correct server is at the bottom of the screen, then click the FINISH button.

This moves back to the Backup Policy screen. Ensure the new policy that was created is shown in the Policy pane.

Repeat the process for all missing internal backup policies.
Here is an alternative way to automate the Integration Data Protection Appliance backup policy creation process:
=============================================================
Step 1: Log in to the Avamar using SSH/PUTTY as admin.
Step 2: Set a variable for vcsa_domain. Set this to the vCenter FQDN for your system.
vcsa_domain="vc1.sample.com"
Step 3: Create Integration Data Protection Appliance datasets:
mccli dataset add --name=DataProtectionAdvisor_Backup --domain=/$vcsa_domain/VirtualMachines
mccli dataset add --name=DataProtectionCentral_Backup --domain=/$vcsa_domain/VirtualMachines
mccli dataset add --name=DataProtectionSearch_Backup --domain=/$vcsa_domain/VirtualMachines
mccli dataset add --name=Management_VM_Backup --domain=/$vcsa_domain/VirtualMachines
mccli dataset add --name=vCenter_Backup --domain=/$vcsa_domain/VirtualMachines
mccli dataset add --name=DataDomainCloudDisasterRecovery_Backup --domain=/$vcsa_domain/VirtualMachines
Step 4: Create Integration Data Protection Appliance schedules:
mccli schedule add --name=DataProtectionAdvisor_Backup --domain=/$vcsa_domain/VirtualMachines --time="19:00" --duration="23:00"
mccli schedule add --name=DataProtectionCentral_Backup --domain=/$vcsa_domain/VirtualMachines --time="19:00" --duration="23:00"
mccli schedule add --name=DataProtectionSearch_Backup --domain=/$vcsa_domain/VirtualMachines --time="19:00" --duration="23:00"
mccli schedule add --name=Management_VM_Backup --domain=/$vcsa_domain/VirtualMachines --time="19:00" --duration="23:00"
mccli schedule add --name=vCenter_Backup --domain=/$vcsa_domain/VirtualMachines --time="19:00" --duration="23:00"
mccli schedule add --name=DataDomainCloudDisasterRecovery_Backup --domain=/$vcsa_domain/VirtualMachines --time="19:00" --duration="23:00"
Step 5: Create Integration Data Protection Appliance retentions:
mccli retention add --name=DataProtectionAdvisor_Backup --domain=/$vcsa_domain/VirtualMachines --basic="+60D"
mccli retention add --name=DataProtectionCentral_Backup --domain=/$vcsa_domain/VirtualMachines --basic="+60D"
mccli retention add --name=DataProtectionSearch_Backup --domain=/$vcsa_domain/VirtualMachines --basic="+60D"
mccli retention add --name=Management_VM_Backup --domain=/$vcsa_domain/VirtualMachines --basic="+60D"
mccli retention add --name=vCenter_Backup --domain=/$vcsa_domain/VirtualMachines --basic="+60D"
mccli retention add --name=DataDomainCloudDisasterRecovery_Backup --domain=/$vcsa_domain/VirtualMachines --basic="+60D"
Step 6: Create Integration Data Protection Appliance Policies:
mccli group add --name=DataProtectionAdvisor_Backup --enabled --domain=/$vcsa_domain/VirtualMachines --auto-proxy-mapping=true --dataset=DataProtectionAdvisor_Backup --dataset-domain=/$vcsa_domain/VirtualMachines/ --schedule=DataProtectionAdvisor_Backup --schedule-domain=/$vcsa_domain/VirtualMachines/ --retention=DataProtectionAdvisor_Backup --retention-domain=$vcsa_domain/VirtualMachines/

mccli group add --name=DataProtectionCentral_Backup --enabled --domain=/$vcsa_domain/VirtualMachines --auto-proxy-mapping=true --dataset=DataProtectionCentral_Backup --dataset-domain=/$vcsa_domain/VirtualMachines/ --schedule=DataProtectionCentral_Backup --schedule-domain=/$vcsa_domain/VirtualMachines/ --retention=DataProtectionCentral_Backup --retention-domain=$vcsa_domain/VirtualMachines/

mccli group add --name=DataProtectionSearch_Backup --enabled --domain=/$vcsa_domain/VirtualMachines --auto-proxy-mapping=true --dataset=DataProtectionSearch_Backup --dataset-domain=/$vcsa_domain/VirtualMachines/ --schedule=DataProtectionSearch_Backup --schedule-domain=/$vcsa_domain/VirtualMachines/ --retention=DataProtectionSearch_Backup --retention-domain=$vcsa_domain/VirtualMachines/

mccli group add --name=Management_VM_Backup --enabled --domain=/$vcsa_domain/VirtualMachines --auto-proxy-mapping=true --dataset=Management_VM_Backup --dataset-domain=/$vcsa_domain/VirtualMachines/ --schedule=Management_VM_Backup --schedule-domain=/$vcsa_domain/VirtualMachines/ --retention=Management_VM_Backup --retention-domain=$vcsa_domain/VirtualMachines/

mccli group add --name=vCenter_Backup --enabled --domain=/$vcsa_domain/VirtualMachines --auto-proxy-mapping=true --dataset=vCenter_Backup --dataset-domain=/$vcsa_domain/VirtualMachines/ --schedule=vCenter_Backup --schedule-domain=/$vcsa_domain/VirtualMachines/ --retention=vCenter_Backup --retention-domain=$vcsa_domain/VirtualMachines/

mccli group add --name=DataDomainCloudDisasterRecovery_Backup --enabled --domain=/$vcsa_domain/VirtualMachines --auto-proxy-mapping=true --dataset=DataDomainCloudDisasterRecovery_Backup --dataset-domain=/$vcsa_domain/VirtualMachines/ --schedule=DataDomainCloudDisasterRecovery_Backup --schedule-domain=/$vcsa_domain/VirtualMachines/ --retention=DataDomainCloudDisasterRecovery_Backup --retention-domain=$vcsa_domain/VirtualMachines/
Step 7: Manually add VMs into each backup policy group created in the above steps.
Method #3: Manually using the Avamar AUI:
The following procedure can be used to re-create Integration Data Protection Appliance Internal VMs Backup Policies.
There are six steps to create the Backup Policy.
- Create a Backup Group Policy.
- Add Systems to Policy.
- Create Datasets.
- Create Backup Schedules
- Create Retention Policies.
- Summary
This lists all Backup Policies for that domain. There should be four to six Policies there:
DataProtectionAdvisor_Backup
DataProtectionCentra_Backup
Management_VM_Backup
vCenter_Backup
DataProtectionSearch_Backup (If Search is installed).
DataDomainCloudDisasterRecovery_Backup (If CDRA is installed).
If any of these are missing use the below procedure to create them.
Click the +ADD button in the Policy pane to create a policy.
In the popup box, it is on item one, put in the Name for the policy, use the following names:
DataProtectionAdvisor_Backup
DataProtectionCentra_Backup
Management_VM_Backup
vCenter_Backup
DataProtectionSearch_Backup
DataDomainCloudDisasterRecovery_Backup
Then click the NEXT button.
The second item is to add the Members to the policy. Click the check mark next to the servers that must be added to this policy.
For the DataProtectionAdvisor_Backup policy, select both the DPAApplicationServer and the DPADatastoreServer.
For the DataProtectionCenteral_Backup policy, select the DPC.
For the Management_VM_Backup policy, select the DataProtection-ACM.
For the vCenter_Backup policy, select the DataProtection-VCSA.
For the DataProtectionSearch_Backup, select the Search_index.
For the DataDomainCloudDisasterRecovery_Backup, select the CDR.
Then click the NEXT button.
The third item is to create the dataset. Set the Dataset name, use the following names:
DataProtectionAdvisor_Backup
DataProtectionCentra_Backup
Management_VM_Backup
vCenter_Backup
DataProtectionSearch_Backup
DataDomainCloudDisasterRecovery_Backup
Check the box next to Linux VMware Image and open the Source Data tab, ensure that All Virtual disks item is selected.
Click the NEXT button.
The fourth item is to create the Schedule. Put in the schedule name, use the following names:
DataProtectionAdvisor_Backup
DataProtectionCentra_Backup
Management_VM_Backup
vCenter_Backup
DataProtectionSearch_Backup
DataDomainCloudDisasterRecovery_Backup
Set the Backup Window to 23 hours.
Under By time point, select 23:55 and click the ADD link to add that time for the schedule.
Click the NEXT button.
The fifth item is setting retention on the backup. Put in the Retention Name, use the following:
DataProtectionAdvisor_Backup
DataProtectionCentra_Backup
Management_VM_Backup
vCenter_Backup
DataProtectionSearch_Backup
DataDomainCloudDisasterRecovery_Backup
Set the Retention period to 30 days.
Click the NEXT button.
Item six is the summary, check this to ensure it is correct and that the correct server is at the bottom of the screen, then click the FINISH button.
This moves back to the Backup Policy screen. Ensure the new policy that was created is shown in the Policy pane.
Repeat the process for all missing internal backup policies.
Affected Products
PowerProtect Data Protection Appliance, Integrated Data Protection Appliance FamilyProducts
PowerProtect DP4400, PowerProtect DP5300, PowerProtect DP5800, PowerProtect DP8300, PowerProtect DP8800, PowerProtect Data Protection Software, Integrated Data Protection Appliance Family, Integrated Data Protection Appliance SoftwareArticle Properties
Article Number: 000021318
Article Type: How To
Last Modified: 13 Jun 2024
Version: 8
Find answers to your questions from other Dell users
Support Services
Check if your device is covered by Support Services.