SourceOne for File System - Isilon SMB共有の「リストア リストに追加」を使用したファイルのリストアに失敗する
Summary: SourceOne-for-File-System-Restoring-files-using-add-to-restore-list-failed-for-Isilon-SMB-share-less-for-Isilon-SMB-share-を-リストア-する-で-失敗する-----
Symptoms
「リストア リストに追加」を使用したファイルのリストアは、Isilon SMB共有にあるファイルに対して失敗しますが、Windows共有フォルダーにあるファイルのリストアは機能します。
ExJBRestoreでは、次のエラーが表示されます。CExFileSystem::iWriteFileProperties|
VERBOSE|
iWriteFileProperties calling ::CreateDirectory with perm for \\?\UNC\SMBPath\sourceone_test\|
CExFileSystem::iWriteFileProperties|
VERBOSE|
Checking that user 'SourceOneServiceAccount' has write permissions to the directory '\\\?\UNC\SMBPath\sourceone_test\'|
CExFileSystem::iWriteFileProperties|
ERROR|
Error encountered checking permissions (0x80072147)|
CoExFileProvider::StoreDoc|
ERROR|
Failed to restore file to original location (MessageID). (0x86044701) The specified property 20 does not exist (0x86044002)|
CExRestoreThread::ProcessRun|
WARNING|
Failed restore item: Unable to verify that the user has required file system permissions to restore the file. Try restoring to an alternate location. (0x86044710)|
CExRestoreThread::ProcessRun|
ERROR|
CExRestoreThread failed msgid: MessageID result hr=86044710|
Cause
これは、Isilon側からSourceOneサービス アカウントに対する権限が不足していることが原因で発生します。Isilonには認証のための参照ポイントが必要です。それはLDAP、NIS、またはローカル ユーザーです。認識するには、UIDにソースが必要です。
Resolution
OneFSに接続します。SourceOneサービス アカウントのユーザーがない場合は、次の手順を使用して作成する必要があります。
SourceOneユーザーを作成する手順:
1- OneFSから[アクセス]に移動し、[メンバーシップと役割]をクリックします
2 - [Current Access Zone]を選択します。System
3 - [user]タブをクリックし、プロバイダーを選択します。「LOCAL: System"
4- 右側の[ Create a User ]をクリックします。
5 - 次のように入力します:
ユーザー名: "service Account name"
パスワード: "service account password"
氏名: SourceOneサービス アカウント
プライマリー グループ: --->グループ の選択をクリックし、 プロバイダー「 LOCAL:system」 を選択して検索を開始します。[Isilon Users]を選択し
Create Userをクリックします。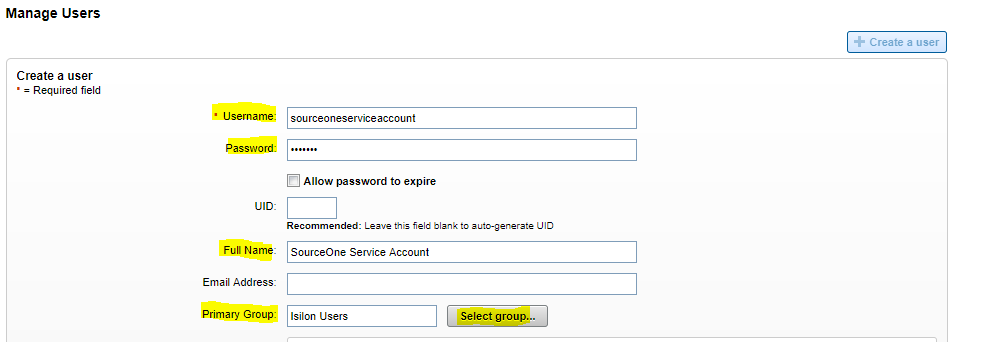
6- ユーザーを有効にします
次に、そのユーザーをSMB共有に追加する必要があります。
1 - [プロトコル]に移動してから 、[SMB共有]に移動します
2 - [Current Access Zone]を選択します。システム
3 - SourceOne SMB共有で、[編集]
4 - ユーザーとグループの編集を選択し、[ユーザーまたはグループの追加]を選択します。[Local:]システム プロバイダーを選択すると、以前に作成したSourceOneサービス アカウントが表示されます。完全な権限を付与し、ユーザーを追加します。サービス アカウントを最初に入力して保存します
5 - OneFS側からの許可が有効になりました