La guía de implementación de Dell no admite la implementación de un clúster de Windows con Windows Admin Center
Summary: Windows Admin Center tiene una función de implementación de clúster que Dell no admite. En este artículo, se describe cómo realizar la configuración antes de configurar el clúster.
This article applies to
This article does not apply to
This article is not tied to any specific product.
Not all product versions are identified in this article.
Instructions
Windows Admin Center tiene una función de implementación de clústeres. Dell no es compatible con esta función.
Haga que todos los nodos coincidan y, a continuación, haga que las redes coincidan.
Básico no convergente:
Dos NIC de almacenamiento sin clúster, cada una con una subred IP y un gateway con subredes únicas.
Equipo
directivoUse la Guía para conocer los pasos de PowerShell.
Debe establecer todas las direcciones IP y varias otras configuraciones. Esto da como resultado funciones básicas para recuperar al usuario.
Una vez realizados todos los pasos, cree el pool y el clúster.
Complete estos pasos, pero realice primero los pasos anteriores.
¡No os olvidéis de introducir vuestros nombres y vuestras tallas!
Además, no olvide que debe haber alguna configuración de red para cada nodo antes de ejecutar estos.
Haga que todos los nodos coincidan y, a continuación, haga que las redes coincidan.
Básico no convergente:
Dos NIC de almacenamiento sin clúster, cada una con una subred IP y un gateway con subredes únicas.
- VLAN independientes
- Configuración habilitada para RDMA, QOS si es necesario
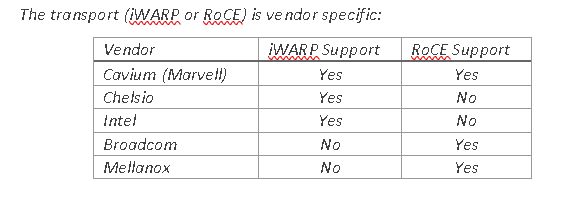
- Asegúrese de que las NIC de almacenamiento obtengan el PowerShell correcto para habilitar RoCE o iWARP.
Figura 1: Transporte específico del proveedor
- Borre las configuraciones antiguas antes de implementar un pool.
- Asigne un nombre a las NIC y asígneles una dirección IP.
$S1Nic = Get-netadapter -name "slot1 port1"
$S2Nic = Get-Netadapter  -name "slot2 port2"
$S1vlan = "12"
$S1vlan= "21"

Set-NetAdapter -Name $S1Nic -VlanID $S1vlan -Confirm:$false
Set-NetAdapter -Name $S2Nic -VlanID $S2vlan -Confirm:$false
Equipo
directivoUse la Guía para conocer los pasos de PowerShell.
$MgmtNicName = Management
$MgmtNic1= get-netadapter -name Nic1
$MgmtNic1 = Get-netadapter2 -name Nic2
$mgmtvlan = "31"
Install-WindowsFeature -Name Hyper-V,Failover-Clustering,Data-Center-Bridging,BitLocker -IncludeManagementTools -IncludeAllSubFeature -Confirm:$false

New-VMSwitch -Name $VMSwitchName -AllowManagementOS 0 -NetAdapterName $MgmtNic1 ,$MgmtNic2 -MinimumBandwidthMode Weight -Verbose -Confirm:$false

Add-VMNetworkAdapter -ManagementOS -name $MgmtNicName -SwitchName $VMSwitchName –StaticMacAddress $RMAC -Confirm:$false
   Set-VmNetworkadapterVlan -name $mgmtNicName -managementOS -access -vlanid $mgmtvlan
Debe establecer todas las direcciones IP y varias otras configuraciones. Esto da como resultado funciones básicas para recuperar al usuario.
#Enable Jumbo Frames
    Set-NetAdapterAdvancedProperty -Name $S1Nic,$S2Nic -DisplayName "Jumbo Packet" -DisplayValue "9014" -Confirm:$false

#Set RDMA
    If((Get-NetAdapter $S1Nic,$S2Nic | Select InterfaceDescription) -imatch "QLogic"){
        Set-NetAdapterAdvancedProperty -Name $S1Nic -DisplayName 'NetworkDirect Technology' -DisplayValue 'iWarp' -Confirm:$false
        Set-NetAdapterAdvancedProperty -Name $S2Nic -DisplayName 'NetworkDirect Technology' -DisplayValue 'iWarp' -Confirm:$false
    }
    If((Get-NetAdapter $S1Nic,$S2Nic | Select InterfaceDescription) -imatch "Mellanox"){
        Set-NetAdapterAdvancedProperty -Name $S1Nic -DisplayName 'DcbxMode' -DisplayValue 'Host In Charge' -Confirm:$false
        Set-NetAdapterAdvancedProperty -Name $S2Nic -DisplayName 'DcbxMode' -DisplayValue 'Host In Charge' -Confirm:$false
    }
Una vez realizados todos los pasos, cree el pool y el clúster.
Complete estos pasos, pero realice primero los pasos anteriores.
New-Cluster –Name MyCLuster1  –Node MYNODE1,MYNODE2 –NoStorage

Enable-ClusterStorageSpacesDirect –CimSession  MyCLuster1

1..(Get-ClusterNode).count| % {New-Volume -FriendlyName Volume$_ -FileSystem CSVFS_ReFS -StoragePoolFriendlyName $(Get-StoragePool -IsPrimordial $false).FriendlyName -StorageTierSizes 1GB -StorageTierFriendlyNames Performance}
¡No os olvidéis de introducir vuestros nombres y vuestras tallas!
Además, no olvide que debe haber alguna configuración de red para cada nodo antes de ejecutar estos.
Affected Products
Storage Spaces Direct R440 Ready Node, Storage Spaces Direct R640 Ready Node, Storage Spaces Direct R740xd Ready Node, Storage Spaces Direct R740xd2 Ready node, Microsoft Windows Server 2019, Microsoft Windows Server 2022
, Microsoft Windows Server 2025, PowerEdge XR2, Poweredge C4140, PowerEdge C6420, PowerEdge C6520, PowerEdge C6525, PowerEdge C6615, PowerEdge C6620, PowerEdge FC640, PowerEdge M640, PowerEdge M640 (for PE VRTX), PowerEdge MX740C, PowerEdge MX750c, PowerEdge MX760c, PowerEdge MX840C, PowerEdge R240, PowerEdge R250, PowerEdge R260, PowerEdge R340, PowerEdge R350, PowerEdge R360, PowerEdge R440, PowerEdge R450, PowerEdge R470, PowerEdge R540, PowerEdge R550, PowerEdge R640, PowerEdge R6415, PowerEdge R650, PowerEdge R650xs, PowerEdge R6515, PowerEdge R6525, PowerEdge R660, PowerEdge R660xs, PowerEdge R6615, PowerEdge R6625, PowerEdge R670, PowerEdge R740, PowerEdge R740XD, PowerEdge R740XD2, PowerEdge R7415, PowerEdge R7425, PowerEdge R750, PowerEdge R750XA, PowerEdge R750xs, PowerEdge R7515, PowerEdge R7525, PowerEdge R760, PowerEdge R760XA, PowerEdge R760xd2, PowerEdge R760xs, PowerEdge R7615, PowerEdge R7625, PowerEdge R770, PowerEdge R7715, PowerEdge R7725, PowerEdge R840, PowerEdge R860, PowerEdge R940, PowerEdge R940xa, PowerEdge R960, PowerEdge T140, PowerEdge T150, PowerEdge T160, PowerEdge T340, PowerEdge T350, PowerEdge T360, PowerEdge T440, PowerEdge T550, PowerEdge T560, PowerEdge T640, PowerEdge XR11, PowerEdge XR12, PowerEdge XR5610, PowerEdge XR7620
...
Products
Gateways & Embedded PCs, Laptops, Networking, Security, Servers, Software, Solutions, Storage, Tablets, Thin Clients, WorkstationsArticle Properties
Article Number: 000210175
Article Type: How To
Last Modified: 02 Jan 2025
Version: 4
Find answers to your questions from other Dell users
Support Services
Check if your device is covered by Support Services.