NVP-vProxy: Log Collection Processes for VMware Protection Issues
Summary: This article outlines how to collect vProxy support bundles, NetWorker logs for VMware Protection, and logs needed when a vProxy system crash occurs.
Instructions
vProxy bundles contain vProxy engine state, previous backup sessions, and engine log files. The bundles also provide command outputs for common troubleshooting commands.
The NetWorker Management Console (NMC) can be used to generate a bundle and download it to your system. The tar command can also be used to manually create a tarball; however, the NMC-generated log bundle is preferred.
General vProxy Log Collection:
Collecting a vProxy log bundle can be used to review issues observed during vProxy backup or restore operations. Specific log files are detailed in: NVP-vProxy Triage Guide: NetWorker VMware Protection vProxy Triage and Log Collection Guide
Expand each section in this article for specific instructions:
Option 1: Collect the bundle using the NMC:
Option 1: Collect the bundle using the NMC:
- Log in to NMC and select Devices tab
- Select VMware proxies
- Right-click your proxy and select Log Bundle

- Click Yes to collect the vProxy's recycled logs. Virtual Machine (VM) session logs are sent here upon completion.
- Open an SSH session to the vProxy and log in as admin
- Switch to root:
sudo su - - Check the /opt/emc/vproxy/runtime/state/logbundle/ to see if a bundle exists with the timestamp from when the bundle was generated in the NMC:
nsr-vproxy01:~ # ls -lh /opt/emc/vproxy/runtime/state/logbundle/
total 616K
-rw-r----- 1 root root 616K Jul 10 09:03 logbundle-5679cd0c-0262-46e9-b99a-97ae336f8ff2.tar.gz
- If the bundle exists, perform the following steps to copy it off with a Secure Copy Protocol (SCP) agent; otherwise, see option 2.
- Move the bundle to the admin user's home directory (Example):
nsr-vproxy01:~ # mv /opt/emc/vproxy/runtime/state/logbundle/logbundle-5679cd0c-0262-46e9-b99a-97ae336f8ff2.tar.gz /home/admin
- Change the permissions on the bundle so that the admin user can copy the file off the vProxy (Example):
nsr-vproxy01:~ # chmod 777 /home/admin/logbundle-5679cd0c-0262-46e9-b99a-97ae336f8ff2.tar.gz
- Use an SCP agent (WinSCP, and so forth) to copy the bundle from the user's home directory to your system. Required settings in SCP agent:
Protocol: SCP
User: Admin
Optionally, it may be possible to SCP the bundle from your Windows workstation using command-line:
scp admin@vProxyAddress:/path/to/logbundle .
See: NetWorker (Linux): How to copy files to or from a Linux NetWorker server.
Option 2: Use tar on the vProxy:
Option 2: Use tar on the vProxy:
- Connect to the vProxy using SSH and log in as admin.
- Switch to root:
sudo su - - Run:
tar cvzfP /home/admin/$(hostname)_$(date -I).tgz /opt/emc/vproxy/runtime /var/log/messages* /etc/hosts ; chmod 755 /home/admin/$(hostname)_$(date -I).tgz
nsr-vproxy01:~ # tar cvzfP /home/admin/$(hostname)_$(date -I).tgz /opt/emc/vproxy/runtime /var/log/messages* /etc/hosts ; chmod 755 /home/admin/$(hostname)_$(date -I).tgz
/opt/emc/vproxy/runtime
/var/log/messages
/etc/hosts
nsr-vproxy01:~ #

nsr-vproxy01:~ # ls -lh /home/admin/ | grep tgz
-rwxr-xr-x 1 root  root  107K Sep  1 13:36 nsr-vproxy01_2026-09-01.tgz
- Use an SCP agent (WinSCP, and so forth) to copy the bundle from the user's home directory to your system. Required settings in SCP agent:
Protocol: SCP
User: Admin
Optionally, it may be possible to SCP the bundle from your Windows workstation using command-line:
scp admin@vProxyAddress:/home/admin/BUNDLE_NAME.tgz .
Example:
PS C:\Users\Administrator\Downloads> scp admin@nsr-vproxy01:/home/admin/nsr-vproxy01_2026-09-01.tgz .
The authenticity of host 'nsr-vproxy01 (192.168.X.X)' can't be established.
ED25519 key fingerprint is SHA256:ZsV1JnrdzQ2DdcY1gH9bOrCFnEgBsABruninvAGaPEg.
This key is not known by any other names.
Are you sure you want to continue connecting (yes/no/[fingerprint])?
Warning: Permanently added 'nsr-vproxy01' (ED25519) to the list of known hosts.
admin@nsr-vproxy01's password: HIDDEN PASSWORD
nsr-vproxy01_2026-09-01.tgz                                                           100%  106KB   9.4MB/s   00:00
PS C:\Users\Administrator\Downloads>
VM Logs (FLR and MSVMAPPAGENT):
The Virtual Machine (VM) contains logs specific to File Level Restore (FLR) and SQL-Consistent (MSVMAPPAGENT) Protection.
| FLR Engine Logs: |
|
File Level Restore (FLR) logs. |
| Microsoft SQL Agent (MSVMAPPAGENT) |
SQL Virtual Machine (VM):
|
SQL VM app-consistent protection operations. |
NetWorker Server-Side Logs:
NetWorker Server-Side Logs:
NetWorker server-side logs can be reviewed for the following types of issues:
- vProxy reports as unavailable in NetWorker daemon logs or NMC
- vProxy upgrade performed using
nsrvproxy_mgmtcommand has failed - VMware inventory issues/errors
- VMware backup errors observed during a VMware protection policy failure
- Performing VM File Level Restore (FLR) or SQL-consistent (MSVMAPPAGENT) restores from the Data Protection Restore Client web interface:
https://networker-server-address:9090/flr
General Server Logs:
| Log Name | Location | Purpose |
daemon.raw |
|
General NetWorker server daemon messages - This contains logging about vProxy availability or unavailability and registration status messages: |
<job-uuid>.log |
|
vProxy management job log file is created during the redeployment of the associated vProxy. |
vproxy_upgrade_session__< jobuuid> |
|
Associated nsrvisd log file is created during redeployment of the vProxy. |
nsrvisd-daemon.log |
|
Associated nsrvisd detailed log file is created. |
ProxySessions- .log |
|
Associated ProxySessions log file is created during redeployment of the vProxy. |
nsrvisd logs |
|
Associated inventory sessions log file is created. |
| VM backup logs |
|
The VM backup session logs are retained as per the jobsdb retention window (default 72 hours). The session logs are the same logs found on the vProxy under /opt/emc/vproxy/runtime/logs/recycle. The logs from the vProxy are not removed by the NetWorker jobsdb log rotation. |
| Data Protection Restore Client Log |
|
These logs are associated with the Data Protection Restore Client web interface used to perform FLR or SQL-consistent (MSVMAPPAGENT) restores. |
vCenter Inventory:
On the NetWorker server, run the following command from a root prompt (Linux) or Administrator Command-Prompt (Windows):
nsrvim -d --names vCenter_Name
Where vCenter_Name matches how the vCenter/Hypervisor was added to NetWorker. This command generates .xml files in the following directories:
Linux: /nsr/cores/nsrvim
Windows: Files are generated in the same directory that the nsrvim command was run.
[root@nsr ~]# ls -l /nsr/cores/nsrvim
total 48
-rw-r--r--. 1 root root    47 Jul 10 10:30 vcsa.amer.lan-cat_tags.xml
-rw-r--r--. 1 root root  4175 Jul 10 10:30 vcsa.amer.lan-mapping.xml
-rw-r--r--. 1 root root 32913 Jul 10 10:30 vcsa.amer.lan.xml
See: NetWorker (Linux): How to copy files to or from a Linux NetWorker server.
vProxy System Crashes:
vProxy System Crashes:
If a vProxy is being unresponsive, the following logs and bundles can be collected to review why the crash occurred.
- Collect the SUSE support bundle.
- Connect to the vProxy over SSH as admin.
- Switch to root: sudo su -
- Run the following command:
supportconfig
.txz bundle under /var/log, for example:
-vproxy01:~ # ls -l /var/log | grep scc
-rw------- 1 root     root     945064 Jul 10 13:40 scc_nsr-vproxy01.amer.lan_240710_1338.txz
-rw------- 1 root     root         33 Jul 10 13:40 scc_nsr-vproxy01.amer.lan_240710_1338.txz.md5
- Move the
.txzbundle somewhere the admin user can access, for example/tmp:
nsr-vproxy01:~ # mv /var/log/scc_nsr-vproxy01.amer.lan_240710_1338.txz /tmp
- Change permissions of the
.txzbundle so that the admin user can copy the bundle off of the vProxy:
nsr-vproxy01:~ # chmod 777 /tmp/scc_nsr-vproxy01.amer.lan_240710_1338.txz
- Use an SCP agent (WinSCP, and so forth) to copy the bundle from the user's home directory to your system. Required settings in SCP agent:
Protocol: SCP
User: Admin
Optionally, it may be possible to SCP the bundle from your Windows workstation using command-line:
scp admin@vProxyAddress:/path/to/logbundle .
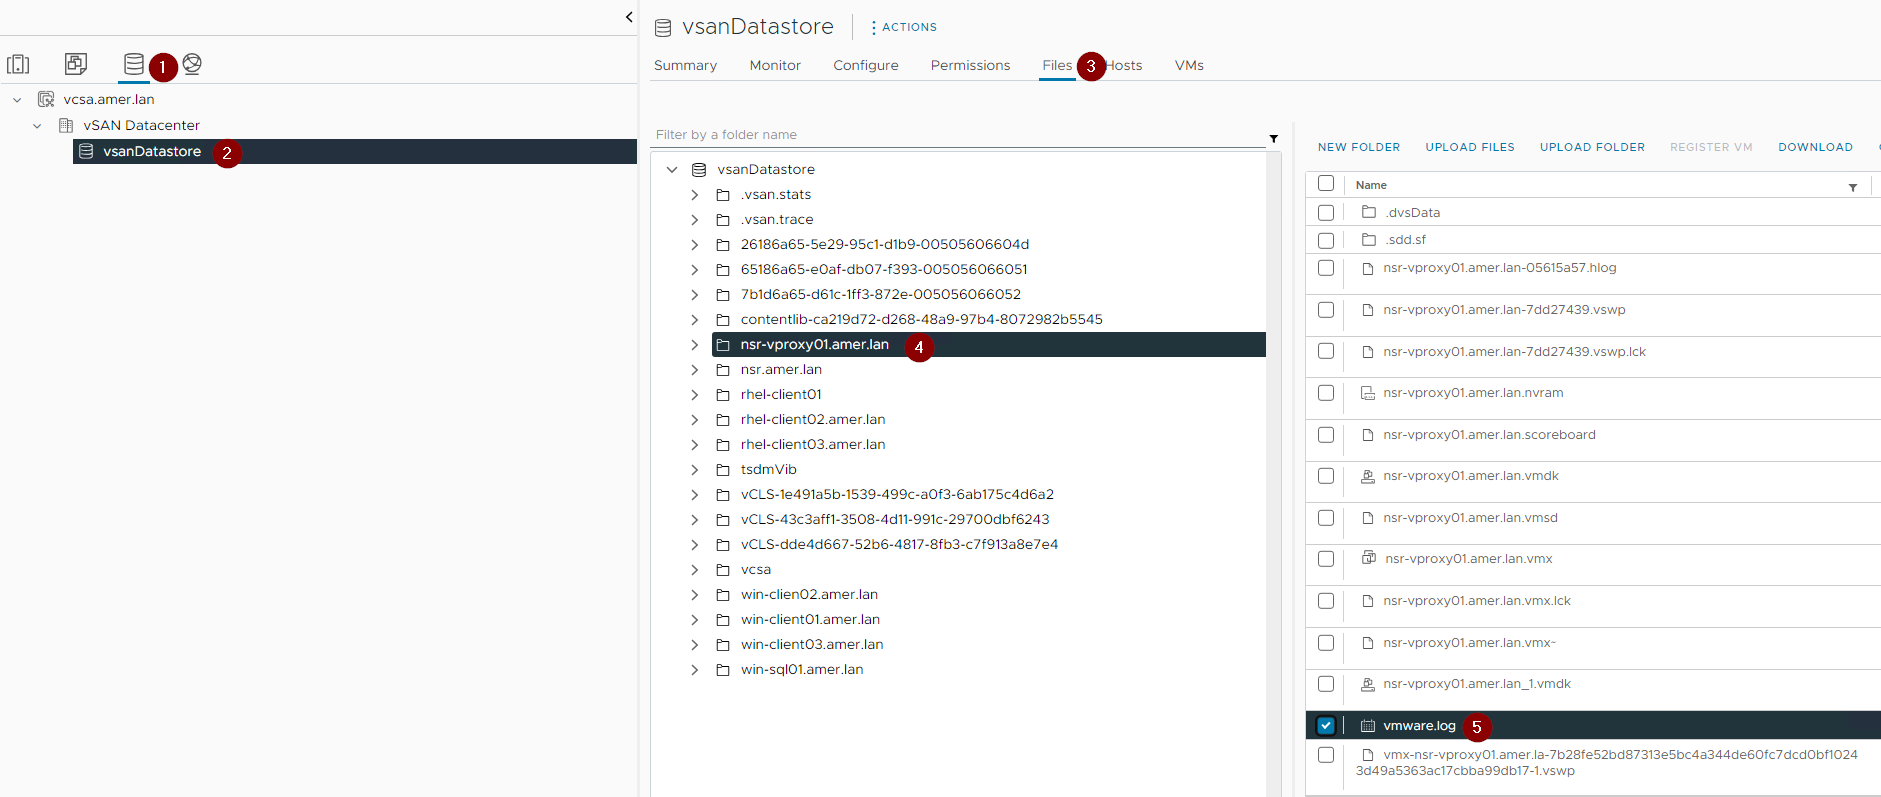
- From vSphere, collect the vmware.log files from the vProxy VMs VMware datastore folder:
- vSphere support bundle:
vCenter Server Support Bundle:
Collecting the vCenter and relevant ESXi host log bundles is optional. This is not typically required for standard NetWorker protection troubleshooting. This may be requested by NetWorker support while investigating support cases.
- Log in to the vCenter's vSphere web interface using an administrative user.
- Go to the Inventory tab.
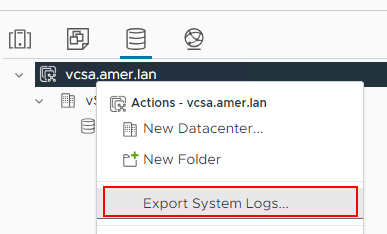
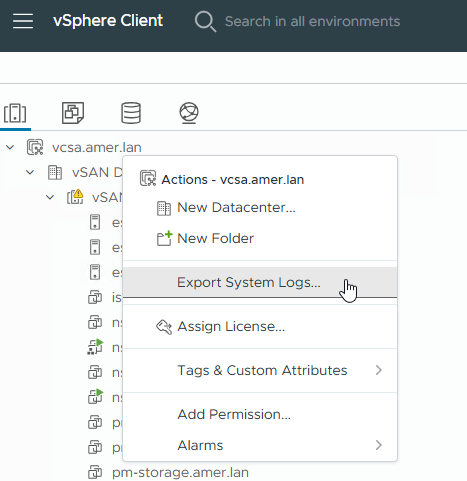
- Right-click the vCenter server, then click Export System Logs:
- Include relevant ESXi host logs:
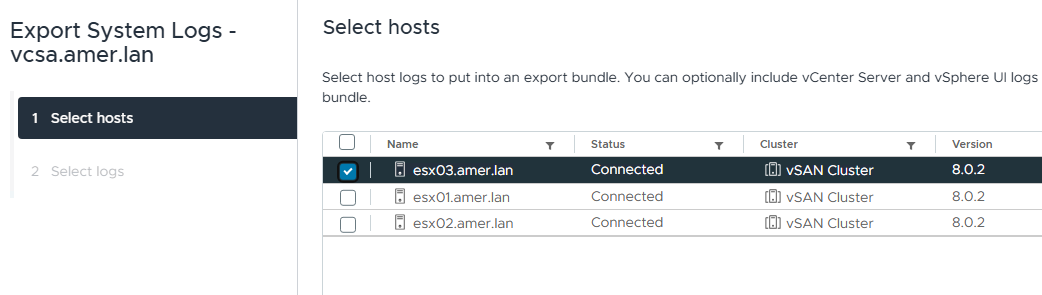
- Click Finish to generate the bundle.
- The bundle can be uploaded directly to your NetWorker Service Request, or to a support-provided MFT location.
Data Domain Logs:
Data Domain logs are optional and depend on the issue faced; for example, communication issues observed between vProxy and DD, or VMware and DD during a backup or recover operation.
The Data Domain ddfs.info log is the main log to focus on while performing initial diagnosis of suspected Data Domain related issues. The ddfs.info log can be collected and reviewed following: NetWorker: How To Collect ddfs.info log from Data Domain
For suspected performance issues, ddboost_precert logging can be enabled on the vProxy, see the DD Boost Precert Debugging section of: NetWorker VMware Protection-vProxy: How to Enable Debug Logging
Alternatively, collect a Full Data Domain Support Bundle:
- From a web browser, access the PowerProtect DD System Manager web interface:
https://DD_ADDRESS/ddem - Log in as an administrative user, for example:
sysadmin - Go to Maintenance -> Support Bundles -> then click Generate Support Bundle.
- From the Bundle Type drop down, select Full Bundle.
- From the Duration drop down, select All or a time range. When specifying a time range it is important that the range spans the time period the issue was observed.
- Click Generate.
- After the bundle has generated it can be downloaded to your system.
A DD support bundle can be uploaded to your NetWorker service request or a support-provided MFT.
Additional Information
Related articles:
- NetWorker VMware Protection (NVP)-vProxy: How to Enable Debug Logging
- NVP-vProxy: How to use health check tool ProxyHC on vProxy appliance
- NVP vProxy: Troubleshooting Network Connectivity For Backup and Restore Operations
- NetWorker: NVP vProxy Troubleshooting VM Backup and Restore Performance and Throughput
- NVP vProxy: Troubleshooting VMware Snapshot Issues during NetWorker backups.
- NVP vProxy: Understanding VMware VM backup levels shown in NetWorker