Dell Command Updateを使用した高度なドライバーのリストア
Summary: この記事では、Dell Command Updateツールで高度なドライバーの復元を開始する方法について説明します。高度なドライバーのリストアでは、ワンクリックでドライバーをインストールできます。高度なドライバーのリストアではWindowsの再インストール後に、すべてのドライバーをインストールすることができます。また、システム ドライバーを再インストールして、ドライバーの破損の問題を修正するためにも使用できます。 ...
This article applies to
This article does not apply to
This article is not tied to any specific product.
Not all product versions are identified in this article.
Instructions
Dell Command UpdateでAdvanced Driver Restoreを使用する方法:
- Dell Command Updateアプリケーションを開きます。
- 高度なドライバーの復元(ADR)を許可する設定が有効になっている場合は、メイン画面に[Windows再インストールのための高度なドライバーの復元]というセクションが表示されます。
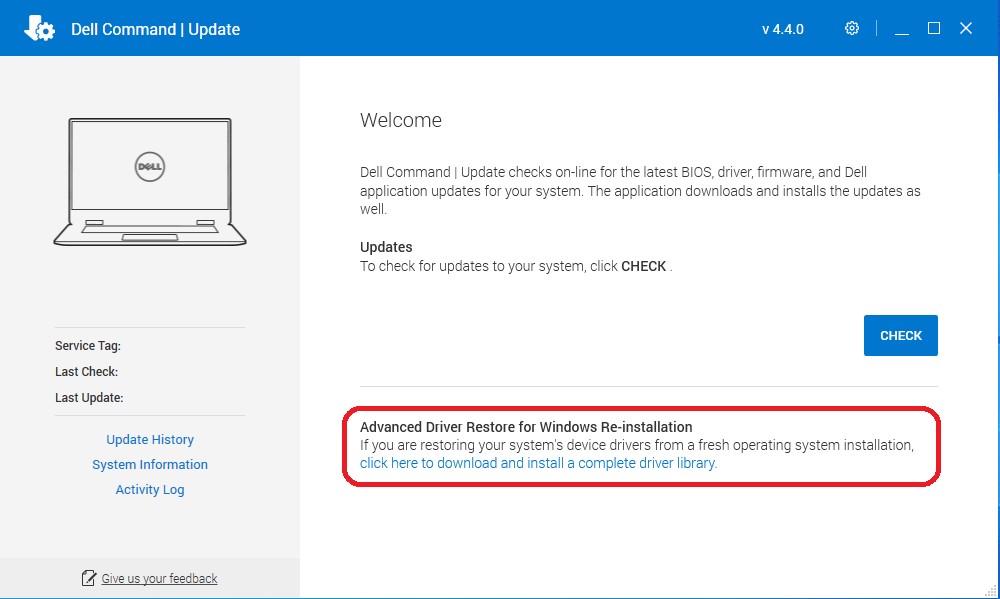
- [click here to download and install a complete driver library]をクリックします。
注:メニュー画面に表示されない場合は、以下に示す[Settings]セクションに進んで[Enable]を選択します。
- インストールが完了したら、システムを再起動する必要があります。
有効にする設定:
- Dell Command Updateを管理者として実行します。Dell Command Updateで、右上隅にある歯車アイコンをクリックして [Settings]を選択します 。
- 選択 左側のペインに[Advanced Driver Restore]が表示されます。
- スライダー ボタン[Enable]をクリックして、アプリケーションでADRが有効になっていることを確認します。
- Dellテクニカル サポートでは、「Dellサポート サイトからドライバー ライブラリーをダウンロードする(推奨)」を推奨しています。
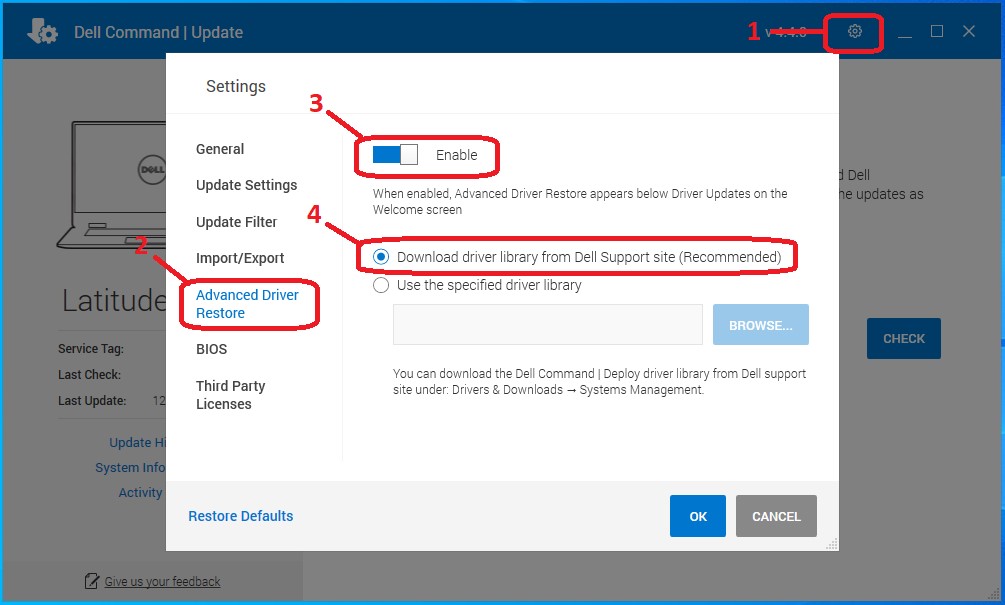
- [OK]をクリックします。記事の上部にあるように、オプションが表示されているはずです。
これらの手順で問題が解決しない場合は、Dellテクニカル サポートにお問い合わせください。
関連情報については、次のDellナレッジベース記事を参照してください。
Additional Information
推奨記事
ここでは、このトピックに関連した役立つ可能性のある推奨記事をいくつか紹介します。
Affected Products
OptiPlex, Dell Pro Plus, Latitude, Dell Pro Rugged, XPS, Fixed Workstations, Mobile Workstations, Dell Command | UpdateArticle Properties
Article Number: 000177525
Article Type: How To
Last Modified: 06 May 2026
Version: 17
Find answers to your questions from other Dell users
Support Services
Check if your device is covered by Support Services.