Come eseguire l'autotest del monitor Dell D1918H, D2421H, D2421DS e D2721H
Summary: L'articolo seguente fornisce informazioni sull'esecuzione del test automatico sui monitor Dell D1918H, D2421H, D2421DS e D2721H.
This article applies to
This article does not apply to
This article is not tied to any specific product.
Not all product versions are identified in this article.
Instructions
Test automatico del monitor
L'autotest (strumento di diagnostica integrato) consente di determinare se un'anomalia dello schermo è un problema intrinseco con: Ad esempio, Monitor, cavo video, scheda video, driver o computer.)
Passaggi per l'esecuzione del test automatico:
- Scollegare tutti i cavi video dal monitor e spegnere il monitor.
- Accendere il monitor.
- Quando il logo Dell scompare e viene visualizzato il messaggio "No signal", premere contemporaneamente i pulsanti2 + 3 + 5 sul monitor.
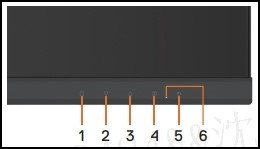
Il monitor accede alla schermata di test automatico. - Ispezionare attentamente lo schermo per verificare la presenza di eventuali anomalie mentre il display diventa rosso, verde, blu, nero e bianco automaticamente.
- Premere il tasto 5 per uscire dalla schermata di autotest.
Se non si rilevano anomalie sullo schermo durante l'utilizzo dello strumento di test automatico, il monitor funziona correttamente. Controllare il cavo video, la scheda video, i driver e il computer.
Additional Information
Articoli consigliati
Di seguito sono riportati alcuni articoli consigliati correlati a questo argomento che potrebbero essere di interesse per l'utente.
Affected Products
Dell D1918H, Dell D2421H, Dell D2721HArticle Properties
Article Number: 000188980
Article Type: How To
Last Modified: 13 Nov 2025
Version: 12
Find answers to your questions from other Dell users
Support Services
Check if your device is covered by Support Services.