PowerProtect: IDPA: No Boot Device Available or Operating System Not Detected and Booting from Hard Drive C: Errors on IDPA 13G and 14G Systems
Summary: This knowledge article addresses the issue where the system stops responding during boot-up with the message "Booting from Hard drive C:", and no boot device or operating system is detected. This article focuses on the causes related to incorrect boot order and BIOS UEFI settings issues. ...
Symptoms
Errors you can get:The system stops responding at "Booting from Hard drive C:"
No boot device available or Operating System detected

Cause
The issue of the system stopping at "Booting from Hard drive C:", with no boot device or operating system detected, can be attributed to the following causes:
Incorrect Boot Order: The BIOS or UEFI firmware might be configured to boot from an incorrect device instead of the hard drive where the operating system is installed.
BIOS or UEFI Settings Issue: There could be an issue with BIOS or UEFI settings, such as Secure Boot settings preventing the system from recognizing the bootable media correctly.
These issues can arise due to various factors, including incorrect configuration, system updates, or external factors that disrupt the boot processes. Sometimes, the operating system itself may be corrupted, making it unable to boot properly.
In this scenario, we focus on the Incorrect Boot Order and BIOS/UEFI Settings Issue.
Resolution
Process for 14G systems
Press "F2" to enter the System Setup (BIOS) menu.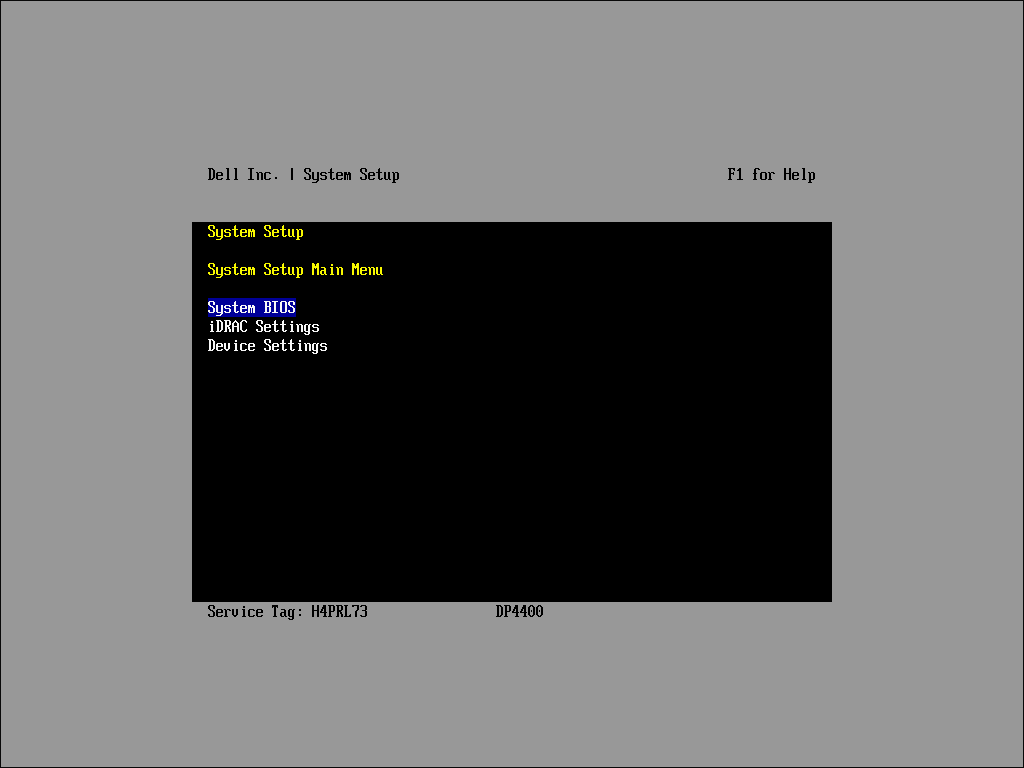
Select "System BIOS" to enter the "System BIOS" menu.
Select "Boot Settings" to enter the "Boot Settings" menu.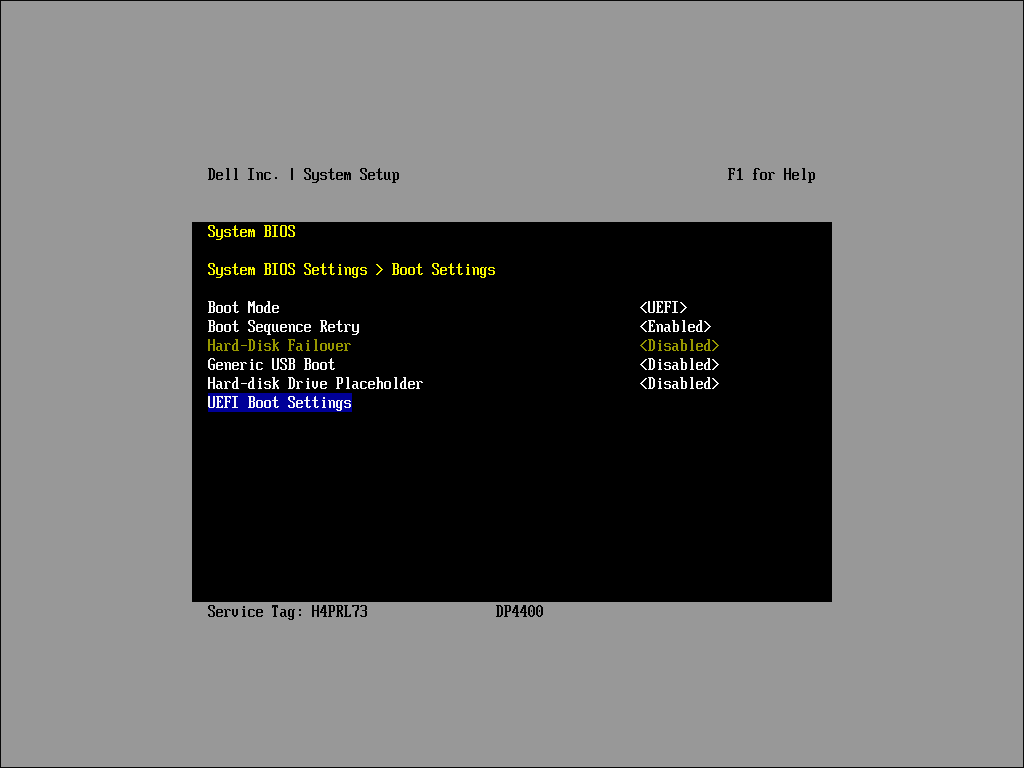
Select either "UEFI Boot Settings" or "BIOS Boot Settings" (If BIOS Boot Mode is enabled) to edit the boot device sequence.
UEFI Boot Settings Sequence.

Steps for Configuring UEFI Boot Mode:
-
Enable UEFI Boot Mode:
- From the "UEFI Boot Settings" sub-menu, ensure that UEFI Boot Mode is enabled.
-
Verify UEFI Boot Sequence:
- Ensure that "[AHCI Controller…]" is the first item in the "UEFI Boot Sequence" list.
- Confirm that it is enabled under the "Boot Option Enable Disable" menu.
-
Modify the Order of Lists (if needed):
- Use the keyboard or console arrow keys to select the wanted list.
- Press "Enter" to select the list.
-
Adjust Item Positions:
- Use the "-" key to move an item down in the list.
- Use the "Shift+" key to move an item up in the list.
-
Confirm Changes:
- Press "Enter" to save and confirm any changes.
Press "Esc" to exit and save the configuration. Press "Esc" again to return to the System Setup (BIOS) menu. Confirm again to initiate reboot. The system should boot into ESXi.
BIOS Boot Settings Sequence.
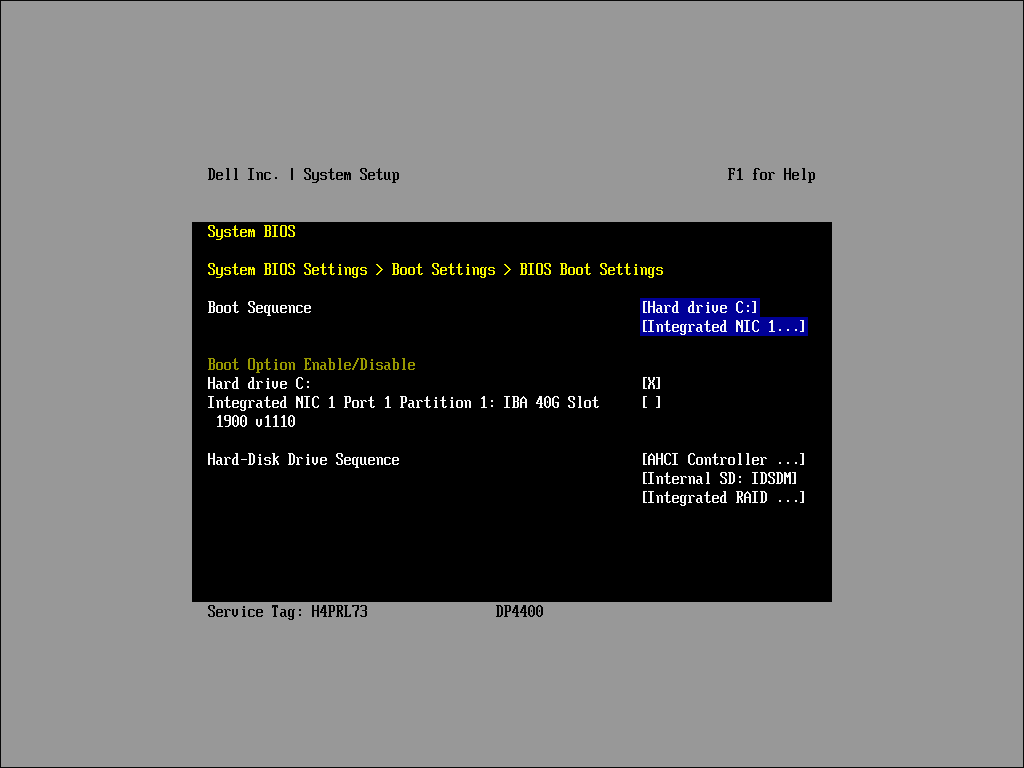
Steps for Configuring BIOS Boot Mode:
-
Enable BIOS Boot Mode:
- From the "BIOS Boot Settings" sub-menu, ensure that BIOS Boot Mode is enabled.
-
Verify Boot Sequence:
- Ensure that "[Hard drive C:]" is the first item in the "Boot Sequence" list.
- Confirm that it is enabled under the "Boot Option Enable Disable" menu.
-
Check Hard-Disk Drive Sequence:
- Ensure "[AHCI Controller…]" is listed as the first item under the "Hard-Disk Drive Sequence" list.
-
Modify the Order of Lists (if needed):
- Use the keyboard or console arrow keys to select the wanted list.
- Press "Enter" to select the list.
-
Adjust Item Positions:
- Use the "-" key to move an item down in the list.
- Use the "Shift+" key to move an item up in the list.
-
Confirm Changes:
- Press "Enter" to save and confirm any changes.
Press "Esc" to exit and save the configuration. Press "Esc" again to return to the System Setup (BIOS) menu. Confirm again to initiate reboot. The system should boot into ESXi.
Process for 13G systems
The boot configuration and sequence should be the same as the below capture.
Ensure "[Integrated RAID…]" is listed as the first item under the "Hard-Disk Drive Sequence" list and the second "[Internal SD: IDSDM…]"
For more information about 13G systems, see 000181982.