PowerEdge: How to Use the Serial Over Lan on the iDRAC9
Summary: How to Use Serial Over Lan (SOL) capability to perform remote troubleshooting on PowerEdge systems.
This article applies to
This article does not apply to
This article is not tied to any specific product.
Not all product versions are identified in this article.
Instructions
iDRAC must be configured and remotely accessible. It could also be used with a cable plugged in tough micro USB cable or ethernet to iDRAC. This allows remote troubleshooting using Serial Over Lan (SOL). It is akin to having a serial connection but remotely through the iDRAC’s terminal (racadm).
It may not be enabled by default and requires some changes in iDRAC and BIOS settings to work
Note: Enabling SOL may disable the physical serial port on the Server. Revert settings back to default to enable the serial port:

1. In the iDRAC Web interface, make sure the iDRAC user you are logged into has proper admin and SOL privileges. iDRAC Settings > Users > Local Users:

- Make sure SOL is enabled by matching these settings, go to iDRAC Settings > Connectivity > Serial Over LAN.

Configuring BIOS Settings
After verifying the settings for all systems above, you must edit the BIOS settings using iDRAC.
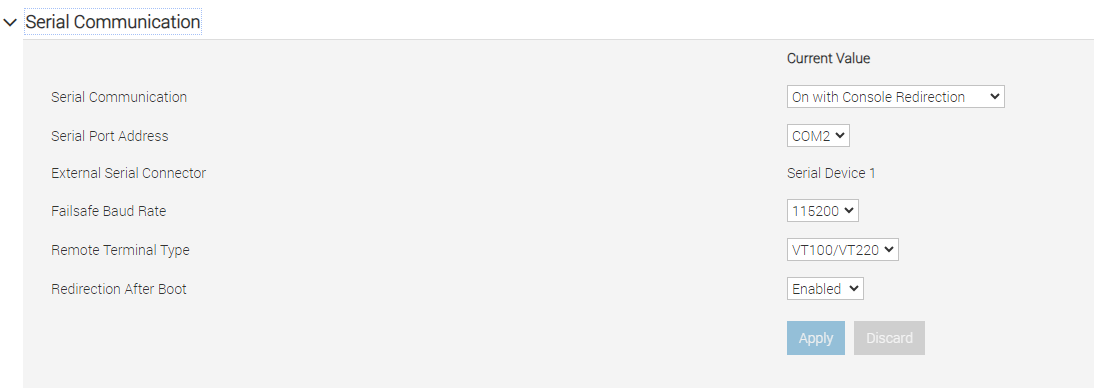
- Log in to the iDRAC web GUI and go to Configuration > BIOS Setting > Serial Communication
The settings must match these:
- Click Apply after changing the Serial Communication settings and then scroll to the bottom of the page and click At Next Reboot or Apply and Reboot. The server must be rebooted so iDRAC can apply the new BIOS settings.

- Reboot the server and during boot up, you can watch the BIOS configuration job through the iDRAC virtual console. It will reboot again after applying the new BIOS settings.
- Now SOL should be properly configured and usable by using putty/ssh to connect to the iDRAC terminal (racadm).
- Connect to iDRAC
racadmusing ssh/putty with the sameip/hostname/usbconnection you would use to log in to the iDRAC web GUI and use the iDRAC credentials to log in. - Then type
# console com2to open the SOL connection to the Server:

- You should now see the same output that you would normally see only on the physical serial port. If you see no output, try hitting enter.
- SOL allows for entering single user mode remotely and other tasks that could only be accomplished with a physical serial connection before.
Example:
Affected Products
PowerEdge XR2, PowerEdge R240, PowerEdge R250, PowerEdge R340, PowerEdge R350, PowerEdge R440, PowerEdge R450, PowerEdge R540, PowerEdge R550, PowerEdge R640, PowerEdge R6415, PowerEdge R650, PowerEdge R650xs, PowerEdge R6515, PowerEdge R6525
, PowerEdge R740, PowerEdge R740XD, PowerEdge R740XD2, PowerEdge R7415, PowerEdge R7425, PowerEdge R750, PowerEdge R750XA, PowerEdge R750xs, PowerEdge R7515, PowerEdge R7525, PowerEdge R840, PowerEdge R940, PowerEdge R940xa, PowerEdge T140, PowerEdge T150, PowerEdge T340, PowerEdge T350, PowerEdge T40, PowerEdge T440, PowerEdge T550, PowerEdge T640, PowerEdge XR11, PowerEdge XR12, PowerEdge XR4000r, PowerEdge XR4000w, PowerEdge XR4000z, PowerEdge XR4510c, PowerEdge XR4520c
...
Article Properties
Article Number: 000224291
Article Type: How To
Last Modified: 17 Feb 2025
Version: 2
Find answers to your questions from other Dell users
Support Services
Check if your device is covered by Support Services.