Avamar: Clean up orphaned Hyper-V vmgroups manually
Summary: KB article provides detailed procedures for removing orphaned Hyper-V vmgroups using various methods.
Instructions
Hyper-V backups may fail due to orphaned vmgroups with messages similar to the following:
avhypervvss Info <0000>: Exception! WMI API returned error: 'The method call failed.'
avhypervvss Info <0000>: WMI API RemoveMember returned Error! Exception in removing VMGroup Memeber 'PPDM01' from VM Group AvamarBackup_HYPERV10-app-20240301180052-0 and error message is 'The method call failed.'.
avhypervvss Info <0000>: Exception in Removing VM 'PPDM01' from group 'AvamarBackup_HYPERV10-app-20240301180052-0' with error 'The method call failed.'.
avhypervvss Info <0000>: Failed to RemoveVMGroupMember for groupname AvamarBackup_HYPERV10-app-20240301180052-0.
avhypervvss Info < 43394 >: Checking for Stale entries from previous backup.

avhypervvss Error < 43417 >: Failed to cleanup Stale checkpoint entries for the targets
Orphaned Resilient Change Tracking (RCT) extents and backup failures may occur when virtual machines (VM) Live Migrate to a different cluster node during backups.
If a Hyper-V virtual machine (VM) resides on a particular cluster node, it gets added to that node’s virtual machine group (vmgroup) during the backup. If the VM Live Migrates to a different cluster node during the backup, it still exists as a vmgroup member on the source node. Before the end of the backup, the Windows operating system attempts to remove the vmgroups on all cluster nodes.
If the VM that Live Migrated previously is no longer running on the original source node, the Windows operating system fails to remove the vmgroup. This orphaned vmgroup may cause subsequent Hyper-V backups to fail as a consequence.
Before performing manual cleanup procedures, check the following Microsoft URL below. The KB article provides solutions that may address Live Migration failures due to environmental factors:
- https://learn.microsoft.com/en-us/troubleshoot/windows-server/virtualization/troubleshoot-live-migration-issues (External Link)
get-vmgroup
To check for orphaned vmgroup on all cluster nodes simultaneously, run the following command in PowerShell (run as Administrator):
Invoke-Command -computername (get-clusternode).name -scriptblock { get-vmgroup }
If there is any orphaned vmgroups, then the output should look similar to the following:
PS C:\> get-vmgroup

Name           : AvamarBackup_Win2019-H4-crash-20240311112148-0
InstanceId     : 416dd21c-e8b7-4f9e-8359-c78068cc0c69
GroupType      : VMCollectionType
VMMembers      : {win7-cl2}
VMGroupMembers :
CimSession     : CimSession: .
ComputerName   : WIN2019-H1
IsDeleted      : False

Name           : AvamarBackup_Win2019-H2-crash-20240311112148-0
InstanceId     : 88c419c0-ceb8-46d2-af17-6560c55e0d06
GroupType      : VMCollectionType
VMMembers      : {}
VMGroupMembers :
CimSession     : CimSession: .
ComputerName   : WIN2019-H1
IsDeleted      : False
I. Standard vmgroup removal procedures
To remove all orphaned vmgroups on a standalone Hyper-V server, run the following commands in PowerShell (run as Administrator):
Get-VMGroup | remove-vmgroup

Get-VMGroup | remove-vmgroup -Force
vmgroups on all Hyper-V cluster nodes, run the following commands in PowerShell (run as Administrator):
Invoke-Command -computername (get-clusternode).name -scriptblock { get-vmgroup | remove-vmgroup }

Invoke-Command -computername (get-clusternode).name -scriptblock { get-vmgroup | remove-vmgroup -Force }
If the above commands fail, then use the following PowerShell script (VMGrpCln.ps1) to automate vmgroup removal across all cluster nodes:
Downloading the script:
See the following article for information about locating and downloading the script: Avamar: How to find and download Avamar scripts and tools from the Dell Central Avamar page
- Download the PowerShell script to a directory such as
"C:\temp"on one of the nodes in the cluster. - Open the PowerShell prompt (run as Administrator) and change to the directory containing the PowerShell (PS) script.
- Verify that the Windows server allows PS scripts to run by typing the following command in PowerShell (run as Administrator):
Get-ExecutionPolicy
If the output displays "Restricted" or "Allsigned," then run the following PowerShell command (run as Administrator) to temporarily allow the current session to run PS scripts:
Set-ExecutionPolicy -Scope Process -ExecutionPolicy Bypass
4. Run the PS script from the directory where it is located:
If these commands or scripts fail to remove the orphaned vmgroups, then the next step is to remove the orphaned groups manually.
II Manual vmgroup removal procedures
vmgroups are located in the local directory on each cluster node (C:\ProgramData\Microsoft\Windows\Hyper-V\Groups).
Avamar: Hyper-V VSS plug-in - Configuration and installation of latest cumulative hotfixes for version 19.4 and higher
For Hyper-V clusters where the "shared storage path" parameter is configured, these procedures are not applicable. Contact Customer Support for further troubleshooting
Step# 1: Run the following command on each Hyper-V cluster node:
get-VMGroup
Alternatively, run the following command to get the vmgroups from each cluster node:
Invoke-Command -computername (get-clusternode).name -scriptblock { get-vmgroup }
Step#2a: If the VMMembers field is populated, then run the following command on each cluster node:
Get-VMGroup | % {Remove-VMGroupMember -VMGroup $_ -VM (Get-VM)}
Step#2b: If VMMembers is not populated:
- Go to the
C:\ProgramData\Microsoft\Windows\Hyper-V\Groupsfolder. Either type in the location manually in Windows Explorer or change the options to view hidden files and folders. - Edit the Virtual Machine Configuration file
"*.vmcx"that matches the VM Group's InstanceID with a text editor such as Notepad or Notepad++. Click View in the Menu bar and then select 'Word wrap' option for better readability. - Copy the Virtual Machine's (VMs) Globally Unique Identifiers (GUIDs) into the text editor; they follow the
'GUID H'text in the*.vmcxfile. - In the text editor, click Edit and then Replace. Then in the
'Find what'field press spacebar on the keyboard and then click 'Replace All.'This cleanup provides a list of problematic VM GUIDs that must be Live Migrated back to the previous cluster node. - Run the following PowerShell command to find the VM tied to those GUIDs, along with the cluster nodes hosting it:
Invoke-Command -ComputerName (Get-ClusterNode).Name -ScriptBlock { Get-VM | ? VMID -eq "VM GUID Previously Collected" }
For example, use the below command syntax to find the Virtual Machine (VM) name that is assigned to the following GUID:
Invoke-Command -ComputerName (Get-ClusterNode).Name -ScriptBlock { Get-VM | ? VMID -eq "A6209559-F08F-440E-9AAE-21AEF4AF7E9D" }
The output from the command should include the VM name and the cluster node it is running on. If the output is blank, then the GUID no longer exists and can be safely ignored.
6. Live migrate the VM to the host that has the stale VM Group using Failover Cluster Manager tool.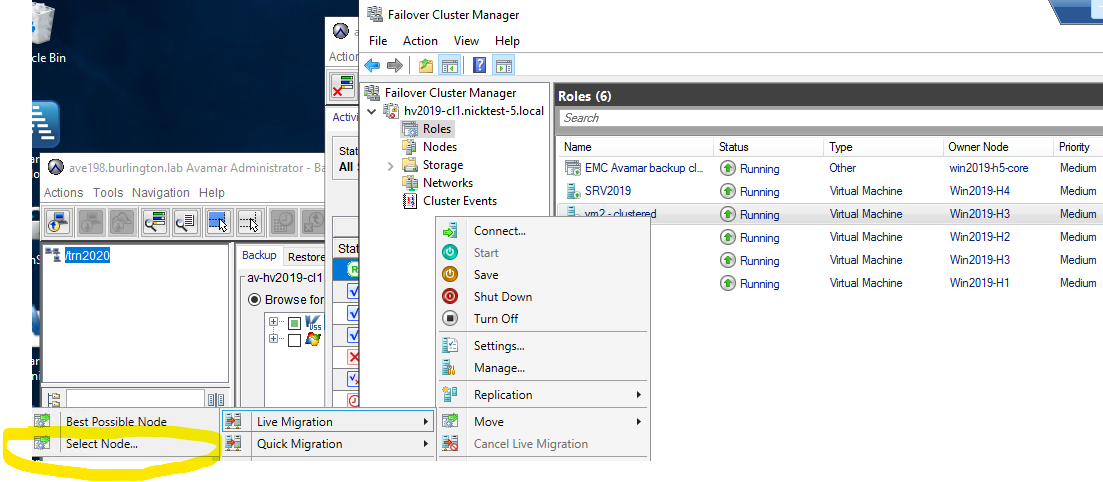
Repeat steps for each VM identified in the vmgroup's "*.vmcx" file.
7. Run the following PowerShell command to remove the VMs from the VMMembers field in each of the orphaned vmgroups:
Get-VMGroup | % {Remove-VMGroupMember -VMGroup $_ -VM (Get-VM)}
Confirm that the 'vmmembers' field for each of the vmgroups is blank by running the following command on each cluster node:
get-vmgroup
Alternatively, run the following command to confirm that the 'vmmembers' field is blank for all vmgroups on all nodes:
Invoke-Command -computername (get-clusternode).name -scriptblock { get-vmgroup }
Once confirmed, then go to Step#3.
Step#3: Run the following PowerShell command to remove the orphaned vmgroups on the cluster node or standalone Hyper-V server:
get-VMGroup | Remove-VMGroup
Repeat the same procedures for other cluster nodes that have orphaned vmgroups.
Alternatively, use the following command to remove orphaned vmgroups on all cluster nodes simultaneously:
Invoke-Command -computername (get-clusternode).name -scriptblock { get-vmgroup | remove-vmgroup }
Once all nodes are completed, verify that all orphaned vmgroups have been removed:
Invoke-Command -computername (get-clusternode).name -scriptblock { get-vmgroup }
The "remove-vmgroupmember" and "remove-vmgroup" commands may fail on the first cluster node with an error similar to the following:
Remove-VMGroup : The operation cannot be performed while the object is in its current state
If that is the case, then try the commands on the remaining cluster nodes. If the procedures complete successfully, then go back to the first node and retry the PowerShell commands.
If the above commands fail on all cluster nodes, then restart the Hyper-V Virtual Machine Management service on the affected node. Alternatively, reboot each of the Hyper-V cluster nodes. Once done, then retry the PowerShell commands again to remove the VM members and vmgroups.
If the standard or manual procedures fail to remove the orphaned vmgroups, then the final option is to remove the vmgroup files themselves.
Additional Information
References:
Hyper-V Live Migration between hosts may fail as a result of recovery checkpoints.
Avamar Hyper-V Incremental RCT backup is failing with the error "Failed to get RCT extents for the disk file" and/or "Reference point creation for Virtual machine failed"