如何驗證安全元件驗證 (在裝置上) 憑證
Summary: 瞭解如何使用平台憑證和驗證程式平台,在裝置上進行安全元件驗證,以驗證裝置的完整性。
This article applies to
This article does not apply to
This article is not tied to any specific product.
Not all product versions are identified in this article.
Instructions
注意:下列步驟僅可用於執行您自己的驗證,而非使用 Dell Technologies 的服務。若要使用 Dell Technologies 服務,請參閱 安全元件驗證 (雲端上) 指南。
您可以使用平台憑證和驗證程式平台驗證 Dell 電腦的完整性和真實性。當為裝置訂購安全元件驗證 (在裝置上) 時,即可完成此作業。美國國防部(DoD)開發了驗證者平臺。驗證程式平臺稱為運行時和啟動時的主機完整性 (HIRS) 工具。HIRS 工具由兩個元件組成:證明證書頒發機構 (ACA) 門戶和 HIRS 預配程式。必須為 HIRS 預配程式設定以下內容才能驗證結果:
- HIRS 工具
- 執行 Windows 10 或 Windows 11 的端點裝置
- HIRS 設定程式已設定
- ACA 入口網站
- 簽署與上傳至 ACA 的平台憑證
- ACA 中設定的原則,用於指定應驗證裝置和憑證的哪些部分
驗證設備完整性需要 安裝 HIRS ACA 門戶、 收集證書、 將證書上傳到 ACA 門戶、 設置 ACA 策略、 下載並安裝 HIRS 預配程式、 運行預配程式,然後 驗證結果。
安裝 HIRS ACA 入口網站
注意:這需要 Docker 桌面授權,以及使用網際網路或內部網路連線能力進行測試的系統。如需更多有關 Docker 桌面的資訊,請參閱 Docker 桌面 。
。
在受測系統上安裝 HIRS ACA 門戶意味著你在本地運行證明。此方法可能是最簡單的部署模型,但不是最安全的。為了獲得更安全的方法,請在遠端設備或伺服器上安裝 HIRS ACA 門戶。
- 在受測系統或伺服器上下載並安裝 Docker Desktop。
注意:在受測系統上運行 ACA 驗證程式稱為本地驗證,與在網路伺服器上運行 ACA 是一種不同的威脅模型。
- 搜尋 Windows PowerShell,以滑鼠右鍵按一下,選取 以系統管理員身分執行,輸入下列命令,然後按下 Enter 鍵。
docker pull ghcr.io/nsacyber/hirs/aca:616fc06 - 在 Docker 中,若要確認 HIRS ACA 映像已建立,請輸入下列命令,然後按下 Enter 鍵。
docker images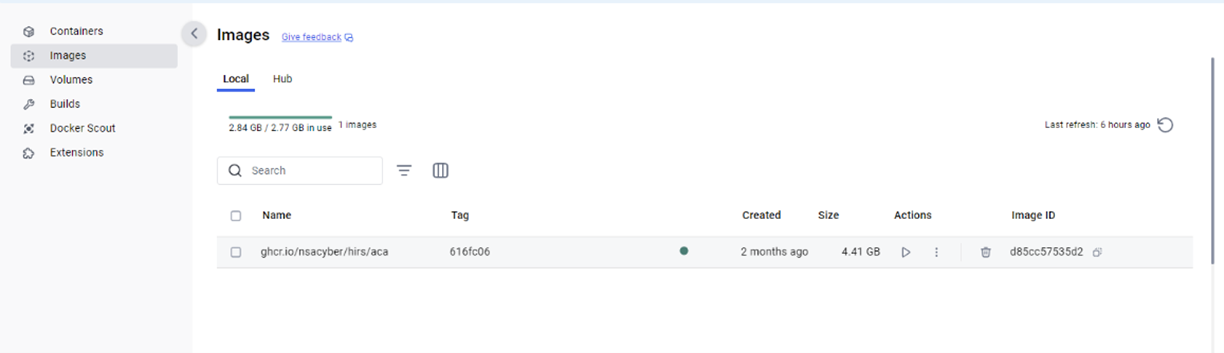
- 在 PowerShell 中,若要驗證儲存庫,請在 儲存庫 下檢查
repository gchr.io/nsacyber/hirs/aca。
- 在 PowerShell 中,輸入下列命令,然後按下 Enter 鍵。
docker run --name=aca -p 8443:8443 ghcr.io/nsacyber/hirs/aca:616fc06 - 在 Docker 中,若要確認伺服器映像是否在容器內執行,請輸入下列命令,然後按 Enter 鍵。
docker container ls -a - 確認
aca顯示在 「名稱 」類別下。
- 打開瀏覽器並轉到 ACA 門戶以驗證 Docker 映像是否正常工作。如果執行本機驗證,請使用本機主機 IP 位址 127.0.0.1。
 注意:
注意:- 如果執行本機驗證,請前往 https://127.0.0.1:8443/HIRS_AttestationCAPortal/
- 入口網站可能需要幾分鐘時間才能連線。
- 入口網站連線後,您可能會收到“您的連接不是專用的”消息。這是執行本機驗證時的預期行為。
- 如果執行本機驗證,請前往 https://127.0.0.1:8443/HIRS_AttestationCAPortal/
收集憑證
- 收集 SCV 平台屬性憑證。SCV (在裝置上) 會將憑證儲存在硬碟的 UEFI 分割區上。
- 搜尋命令提示字元,以滑鼠右鍵按一下,然後選取 以系統管理員身分執行。
- 輸入下列命令,然後按下 Enter 鍵。
mountvol o: /S - 輸入下列命令,然後按下 Enter 鍵。
copy o:\EFI\tcg\cert\platform\*.cer c:\dell\platcert}注意:如果購買了 SCV (雲端上),憑證會位於 Dell 受信任裝置中,無法在本機透過 HIRS ACA 進行驗證。
- 收集 Dell 中繼 CA 簽署憑證。
- 屬性證書和簽名證書在出廠時在 SCV 平台證書中連接在一起,必須先分開,然後才能上傳到 HIRS ACA 門戶。從 PowerShell 執行下列命令,然後按下 Enter 鍵。
PowerShell :> $i=0; Get-Content c:\dell\platcert\*.cer -ReadCount 3 | %{$i++; $_ | Out-File out_$i.crt} - 收集檔案名稱
out_1.crt和out _2.crt。
- 屬性證書和簽名證書在出廠時在 SCV 平台證書中連接在一起,必須先分開,然後才能上傳到 HIRS ACA 門戶。從 PowerShell 執行下列命令,然後按下 Enter 鍵。
- 前往受信任裝置支援以收集 CA 簽署根憑證 |驅動程式與下載 ,以及下載安全元件驗證程式。
- 從下列來源收集環境中 TPM 型號的 TPM 根和中繼簽署憑證:
- STMicro: https://www.st.com/resource/en/technical_note/tn1330-st-trusted-platform-module-tpm-endorsement-key-ek-certificates-stmicroelectronics.pdf
- Nuvoton: https://www.nuvoton.com/export/sites/nuvoton/files/security/Nuvoton_TPM_EK_Certificate_Chain.pdf注意:系統管理員可能沒有環境中使用的 TPM 機型的記錄。如果發生這種情況,系統管理員可以在 STMicro 和 Nuvoton 提供的文件中下載所有 TPM root 和中繼簽署憑證。
- STMicro: https://www.st.com/resource/en/technical_note/tn1330-st-trusted-platform-module-tpm-endorsement-key-ek-certificates-stmicroelectronics.pdf
將憑證上傳至 ACA 入口網站
- 載入 Dell SCV 平台屬性憑證 (
c:\dell\platcert\out_1.crt) 進入 ACA 門戶,方法是單擊「平台證書」選項卡上的 + 號。
- 載入 Dell 原廠中間 CA 簽署憑證 (
c:\dell\platcert\out_2.crt)、CA 簽署根憑證 (PROD-CSG-SCV-Root.cer),然後按一下「信任鏈管理」標籤上「信任鏈 CA 憑證」旁的 + 符號,以進行 TPM 根簽署憑證。
設定 ACA 原則
- 前往 原則 標籤。
- 按一下鉛筆圖示,並將下列項目設為 啟用:
- 背書認證驗證
- 平台認證驗證
- 平台屬性認證驗證
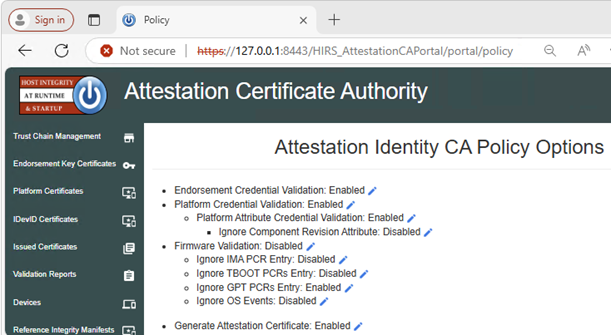 注意:如果執行本機驗證,請前往 https://127.0.0.1:8443/HIRS_AttestationCAPortal/portal/policy
下載並安裝 HIRS 預配程式
此步驟必須在包含憑證的每個系統上執行。
- 從 HIRS 隨需分配程式版本
- 從 Windows 檔案總管,前往
c:\Program Files(x86)\HIRS_Provisioner.NET\plugins\scripts\windows。 - 以滑鼠右鍵按一下
allcomponents.ps1,然後選擇 在記事本中編輯,然後通過添加#行前面的符號。注意:例如:#$NVME_SCRIPT="$APP_HOME/nvme.ps1" # For NVMe。 - 通過添加註釋掉第 30 行
#行前面的符號。注意:例如:#. $NVME_SCRIPT。 - 全部更換”
### Gather HDD details“(第669-744行),案文如下:### Gather HDD details Write-Progress -Id 1 -Activity "Gathering component details" -PercentComplete 70 Write-Progress -Id 2 -ParentId 1 -Activity "Gathering HDD information" -CurrentOperation "Querying" -PercentComplete 0 function parseHddData() { $RS=(Get-CimInstance -ClassName CIM_DiskDrive | select serialnumber,mediatype,pnpdeviceid,manufacturer,model | where mediatype -eq "Fixed hard disk media") $component="" $replaceable=(jsonFieldReplaceable "true") $numRows=1 if ($RS.Count -gt 1) { $numRows=($RS.Count)} for($i=0;$i -lt $numRows;$i++) { Write-Progress -Id 2 -ParentId 1 -Activity "Gathering Hard Disk information" -CurrentOperation ("Cleaning output for HDD " + ($i+1)) -PercentComplete ((($i+1) / $numRows) * 100) $hddClass=(jsonComponentClass "$COMPCLASS_REGISTRY_TCG" "$COMPCLASS_HDD") $pnpDevID="" if(isIDE($RS[$i].PNPDeviceID)) { $pnpDevID=(ideDiskParse $RS[$i].PNPDeviceID) } elseif(isSCSI($RS[$i].PNPDeviceID)) { $pnpDevID=(scsiDiskParse $RS[$i].PNPDeviceID) } else {Continue } if(($pnpDevID -eq $null) -or (($pnpDevID -eq "(Standard disk drives)") -and ($pnpDevID.product -eq $null))) { $regex="^.{,16}$" $pnpDevID=[pscustomobject]@{ product=($RS[$i].model -replace '^(.{0,16}).*$','$1') # Strange behavior for this case, will return } } $tmpManufacturer=$pnpDevID.vendor # PCI Vendor ID $tmpModel=$pnpDevID.product # PCI Device Hardware ID $tmpSerial=$RS[$i].serialnumber $tmpRevision=$pnpDevID.revision if ([string]::IsNullOrEmpty($tmpManufacturer) -or ($tmpManufacturer.Trim().Length -eq 0)) { $tmpManufacturer="$NOT_SPECIFIED" } $tmpManufacturer=$(jsonManufacturer "$tmpManufacturer".Trim()) if ([string]::IsNullOrEmpty($tmpModel) -or ($tmpModel.Trim().Length -eq 0)) { $tmpModel="$NOT_SPECIFIED" } $tmpModel=$(jsonModel "$tmpModel".Trim()) if (![string]::IsNullOrEmpty($tmpSerial) -and ($tmpSerial.Trim().Length -ne 0)) { $tmpSerial=(jsonSerial "$tmpSerial".Trim()) } else { $tmpSerial="" } if (![string]::IsNullOrEmpty($tmpRevision) -and ($tmpRevision.Trim().Length -ne 0)) { $tmpRevision=(jsonRevision "$tmpRevision".Trim()) } else { $tmpRevision="" } $tmpComponent=(jsonComponent $hddClass $tmpManufacturer $tmpModel $replaceable $tmpSerial $tmpRevision) $component+="$tmpComponent," } Write-Progress -Id 2 -ParentId 1 -Activity "Gathering Hard Disk information" -CurrentOperation "Done" -PercentComplete 100 return "$component".Trim(",") }
執行隨需分配程式
在隨需分配器上按右鍵,然後在包含憑證的系統上選取 以系統管理員身分執行 。
注意:隨需分配程式可從以下網址取得:
c:\Program Files(x86)\HIRS_Provisioner.NET\tpm_aca_provision.exe。
驗證結果
檢查 驗證報告 ACA 門戶頁面以獲取通過結果。
Affected Products
Dell Trusted DeviceArticle Properties
Article Number: 000293241
Article Type: How To
Last Modified: 24 Mar 2025
Version: 5
Find answers to your questions from other Dell users
Support Services
Check if your device is covered by Support Services.