Windows 10에서 파일을 백업 및 복원하는 방법 알아보기
Summary: 파일 히스토리를 사용하여 Windows 10에서 백업 및 복원하는 방법에 대해 알아봅니다.
This article applies to
This article does not apply to
This article is not tied to any specific product.
Not all product versions are identified in this article.
Instructions
Windows 10 Dell에서 파일을 백업하는 방법(공식 Dell 기술 지원)
시간: 2분 42초
선택 자막: 영어로만 제공
파일 히스토리를 사용하여 컴퓨터 백업
Windows 10의 파일 히스토리 기능을 사용하여 외부 드라이브 또는 네트워크 위치에 백업할 수 있습니다. 시작>, 설정>, 업데이트 및 보안 > 백업>, 드라이브 추가를 선택한 다음 백업에 사용할 외부 드라이브 또는 네트워크 위치를 선택합니다.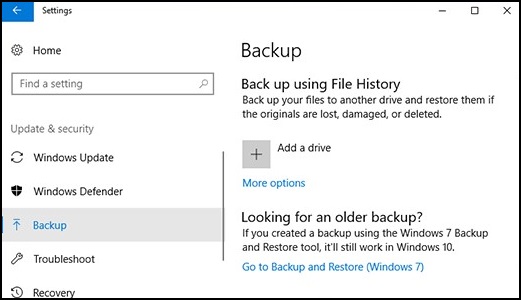
파일 히스토리를 사용하여 파일을 복원합니다.
백업한 중요한 파일이나 폴더가 누락된 경우 복구하는 방법은 다음과 같습니다.
- 작업 표시줄의 검색 상자에: Restore Files를 입력한 다음
Restore your files with File History를 선택합니다. - 필요한 파일을 찾은 다음 화살표로 해당 파일의 모든 버전을 확인합니다.
- 원하는 버전을 찾으면 Restore를 선택하여 원래 위치에 저장합니다. 다른 위치에 저장하려면 복원을 오른쪽 클릭하고 복원 위치를 선택한 다음 새 위치를 선택합니다.
이전 버전의 Windows에서 만든 백업을 찾습니다.
이전 버전의 Windows에서 백업 및 복원을 사용하여 파일을 백업하거나 컴퓨터 이미지 백업을 만든 경우 Windows 10에서 이전 백업을 계속 사용할 수 있습니다. 작업 표시줄의 검색 상자에: Control Panel을 입력합니다.
그런 다음 Control Panel > System and Security > Backup and Restore (Windows 7)를 선택합니다.
추가 정보:
Additional Information
권장 문서
다음은 사용자가 관심 있을 만한, 이 주제와 관련된 몇 가지 권장 문서입니다.
Affected Products
Alienware, Dell All-in-One, Dell Pro All-in-One, Dell Pro Max Micro, Dell Pro Max Slim, Dell Pro Max Tower, Dell Pro Micro, Dell Pro Slim, Dell Pro Tower, Dell Slim, Dell Tower, Inspiron, OptiPlex, Vostro, XPS, G Series, G Series, Alienware
, Dell Plus, Dell Pro, Dell Pro Max, Dell Pro Plus, Dell Pro Premium, Inspiron, Latitude, Dell Pro Rugged, Vostro, XPS, Fixed Workstations, Mobile Workstations, Dell Pro Max Micro XE FCM2250, Dell Pro Max Slim XE FCS1250, Dell Pro Max Tower T2 XE FCT2250, Dell Pro Max 16 XE MC16250, Dell Pro Micro Plus XE QBM1250, Dell Pro Slim Plus XE5 QBS1250, Dell Pro Tower Plus XE5 QBT1250
...
Article Properties
Article Number: 000193501
Article Type: How To
Last Modified: 22 Jul 2025
Version: 8
Find answers to your questions from other Dell users
Support Services
Check if your device is covered by Support Services.