Can't Turn On BitLocker After Hard Drive Replacement
Summary: BitLocker may not enable after a Hard Drive replacement.
Symptoms
What's happening
You recently had your hard drive replaced on your Dell computer, and now you're trying to turn on BitLocker (Windows drive encryption) but it's not working. You might see an error message saying that Windows can't communicate with the TPM (Trusted Platform Module), or BitLocker simply won't activate.
This happens even though:
- Windows is freshly installed on your new drive
- BitLocker worked fine on your old drive before it failed
- Everything else on your computer seems to work normally
Cause
Why this happens
Your computer uses a security chip called the TPM (Trusted Platform Module) to help protect your data with BitLocker. Think of the TPM as a digital vault that stores encryption keys.
When your old hard drive was removed, the TPM still remembers the old encryption keys from your previous drive. These old keys are now causing a conflict because they don't match your new drive. Windows can't set up BitLocker on your new drive because the TPM is holding onto information from the drive that's no longer there.
To fix this, you need to clear out the old information from the TPM so it's ready to work with your new drive.
Resolution
How to fix it
We'll guide you through resetting the TPM chip so BitLocker can work with your new hard drive. This process takes about 5 minutes.
Important note: This won't affect your current Windows installation or any files on your new drive. It only clears the security keys from the TPM chip.
Step 1: Access your computer's BIOS
- Restart your computer.
- As soon as the Dell logo appears, press the F2 key repeatedly until the BIOS setup screen opens.
Step 2: Find the TPM settings
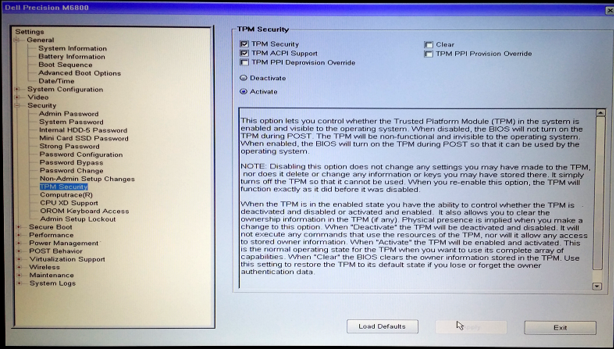
- In the BIOS menu, look for the Security section.
- Select TPM 2.0 Security or Trusted Platform Module (the exact name varies by computer model).
- You'll see options related to TPM control.

Step 3: Clear the TPM
- Select Clear TPM or Clear (depending on your BIOS version).
- When asked to confirm, select Yes to remove all keys from the TPM. Note: Make sure the TPM remains Active or Enabled. You're only clearing the old keys, not turning off the TPM.

- Select Apply to save the changes.
- Select Exit to restart your computer.
Step 4: Verify the TPM is active
- When the computer restarts, press F2 again to enter the BIOS.
- Go back to the TPM settings and check that the TPM shows as Active or Enabled.
- Select Exit to restart and boot into Windows.
Step 5: Turn on BitLocker
Now that the TPM is cleared and ready, you can set up BitLocker:
- In Windows, select Start > Settings.
- Select Privacy & security > Device encryption (or search for "BitLocker" in the Start menu).
- Follow the on-screen prompts to turn on BitLocker.
BitLocker should now activate without any errors.
What is the TPM?
The TPM (Trusted Platform Module) is a small security chip built into your computer's motherboard. It stores encryption keys and helps keep your data safe. When you use BitLocker, the TPM works together with Windows to protect your drive.
Videos
- To clear the TPM, boot into the BIOS and locate the area with the TPM control. (Located in the same location for TPM but may have various options under TPM)
- Choose to clear the TPM and then click yes to remove all keys from the TPM. (TPM must remain active)

- Then exit and reboot into BIOS again and verify that the TPM is still seen as active.
- Exit and reboot into the operating system and then configure BitLocker using the normal process.