보안 구성 요소 검증(디바이스에서) 인증서를 검증하는 방법
Summary: Secured Component Verification on Device를 위해 플랫폼 인증서 및 검증 도구 플랫폼을 사용하여 디바이스의 무결성을 검증하는 방법에 대해 알아봅니다.
This article applies to
This article does not apply to
This article is not tied to any specific product.
Not all product versions are identified in this article.
Instructions
참고: 다음 단계는 Dell Technologies의 서비스를 사용하는 것이 아니라 자체 검증을 수행하기 위한 것입니다. Dell Technologies의 서비스를 사용하려면 Guide to Secured Component Verification (On Cloud)를 참조하십시오.
Dell 컴퓨터의 무결성 및 신뢰성은 플랫폼 인증서 및 검증 도구 플랫폼을 사용하여 검증할 수 있습니다. 이 작업은 디바이스와 함께 Secured Component Verification(On Device)을 주문할 때 수행할 수 있습니다. 미국 국방부(DoD)는 검증 도구 플랫폼을 개발했습니다. 검증 도구 플랫폼을 HIRS(Host Integrity at Runtime and Start-up) 도구라고 합니다. HIRS 도구는 ACA(증명 인증 기관) 포털과 HIRS 프로비저너의 두 가지 구성 요소로 구성됩니다. HIRS 프로비저너가 결과를 확인하려면 다음을 설정해야 합니다.
- HIRS 도구
- Windows 10 또는 Windows 11을 실행하는 엔드포인트 디바이스
- HIRS 프로비저너 구성됨
- ACA 포털
- ACA에 업로드된 서명 및 플랫폼 인증서
- 디바이스 및 인증서의 어느 부분을 검증해야 하는지 지정하기 위해 ACA 내에 설정된 정책
디바이스 무결성을 검증하려면 HIRS ACA 포털을 설치하고, 인증서를 수집하고, ACA 포털에 인증서를 업로드하고, ACA 정책을 설정하고, HIRS 프로비저너를 다운로드 및 설치하고, 프로비저너를 실행한 다음, 결과를 확인해야 합니다.
HIRS ACA 포털 설치
참고: 이를 위해서는 Docker Desktop 라이선스와 인터넷 또는 인트라넷 연결을 사용하여 테스트 중인 시스템이 필요합니다. Docker Desktop에 대한 자세한 내용은 Docker Desktop 을 참조하세요.
테스트 중인 시스템에 HIRS ACA 포털을 설치한다는 것은 로컬에서 증명을 실행한다는 것을 의미합니다. 이 방법은 가장 쉬운 배포 모델일 수 있지만 가장 안전하지는 않습니다. 보다 안전한 방법을 위해 원격 디바이스 또는 서버에 HIRS ACA 포털을 설치합니다.
- 테스트 중인 시스템 또는 서버에 Docker Desktop을 다운로드하고 설치합니다.
참고: 테스트 중인 시스템에서 ACA 검증 도구를 실행하는 것을 로컬 검증이라고 하며 네트워크 서버에서 ACA를 실행하는 것과는 다른 위협 모델입니다.
- Windows PowerShell을 검색하여 마우스 오른쪽 단추로 클릭하고 관리자 권한으로 실행을 선택한 다음 다음 명령을 입력하고 Enter 키를 누릅니다.
docker pull ghcr.io/nsacyber/hirs/aca:616fc06 - Docker에서 HIRS ACA 이미지가 생성되었는지 확인하려면 다음 명령을 입력한 다음 Enter 키를 누릅니다.
docker images
- PowerShell에서 리포지토리를 확인하려면 리포지토리 아래에서
repository gchr.io/nsacyber/hirs/aca참조하십시오.
- PowerShell에서 다음 명령을 입력한 다음 Enter 키를 누릅니다.
docker run --name=aca -p 8443:8443 ghcr.io/nsacyber/hirs/aca:616fc06 - Docker에서 서버 이미지가 컨테이너 내에서 실행 중인지 확인하려면 다음 명령을 입력한 후 Enter 키를 누릅니다.
docker container ls -a - 다음을 확인합니다.
acaNAMES 범주 아래에 표시됩니다.
- 브라우저를 열고 ACA 포털로 이동하여 Docker 이미지가 작동하는지 확인합니다. 로컬 검증을 실행하는 경우 로컬 호스트 IP 주소 127.0.0.1을 사용합니다.
 참고:
참고:- 로컬 확인을 실행하는 경우 https://127.0.0.1:8443/HIRS_AttestationCAPortal/
- 포털 사이트가 온라인 상태가 되는 데 몇 분 정도 걸릴 수 있습니다.
- 포털 사이트가 온라인 상태가 되면 "연결이 비공개가 아닙니다"라는 메시지를 받을 수 있습니다. 이는 로컬 확인을 실행할 때 예상된 동작입니다.
- 로컬 확인을 실행하는 경우 https://127.0.0.1:8443/HIRS_AttestationCAPortal/
인증서 수집
- SCV 플랫폼 특성 인증서를 수집합니다. SCV(On Device)는 인증서를 하드 드라이브의 UEFI 파티션에 저장합니다.
- 명령 프롬프트를 검색하고 마우스 오른쪽 버튼으로 클릭한 다음 관리자 권한으로 실행을 선택합니다.
- 다음 명령을 입력하고 Enter 키를 누릅니다.
mountvol o: /S - 다음 명령을 입력하고 Enter 키를 누릅니다.
copy o:\EFI\tcg\cert\platform\*.cer c:\dell\platcert}참고: SCV(on Cloud)를 구매한 경우 인증서가 Dell Trusted Device에 있으며 HIRS ACA를 통한 검증을 위해 로컬에서 사용할 수 없습니다.
- Dell 중간 CA 서명 인증서를 수집합니다.
- 공장에서 특성 인증서와 서명 인증서는 SCV 플랫폼 인증서 내에 연결되며 HIRS ACA 포털에 업로드하기 전에 분리해야 합니다. PowerShell에서 다음 명령을 실행한 다음 Enter 키를 누릅니다.
PowerShell :> $i=0; Get-Content c:\dell\platcert\*.cer -ReadCount 3 | %{$i++; $_ | Out-File out_$i.crt} - 파일 이름 수집
out_1.crt및out _2.crt참조하십시오.
- 공장에서 특성 인증서와 서명 인증서는 SCV 플랫폼 인증서 내에 연결되며 HIRS ACA 포털에 업로드하기 전에 분리해야 합니다. PowerShell에서 다음 명령을 실행한 다음 Enter 키를 누릅니다.
- Trusted Device 지원 | Drivers & Downloads 및 Secure Component Validator 다운로드
- 다음 소스에서 사용자 환경의 TPM 모델에 대한 TPM 루트 및 중간 서명 인증서를 수집합니다.
- STMicro: https://www.st.com/resource/en/technical_note/tn1330-st-trusted-platform-module-tpm-endorsement-key-ek-certificates-stmicroelectronics.pdf
- Nuvoton: https://www.nuvoton.com/export/sites/nuvoton/files/security/Nuvoton_TPM_EK_Certificate_Chain.pdf참고: 관리자는 환경에서 사용되는 TPM 모델에 대한 기록을 가지고 있지 않을 수 있습니다. 이 경우 관리자는 STMicro 및 Nuvoton에 대해 제공된 문서에서 모든 TPM 루트 및 중간 서명 인증서를 다운로드할 수 있습니다.
- STMicro: https://www.st.com/resource/en/technical_note/tn1330-st-trusted-platform-module-tpm-endorsement-key-ek-certificates-stmicroelectronics.pdf
ACA 포털에 인증서 업로드
- Dell SCV 플랫폼 특성 인증서(
c:\dell\platcert\out_1.crt)을 클릭하여 Platform Certificates(플랫폼 인증서) 탭에서 + 기호를 클릭하여 ACA 포털로 이동합니다.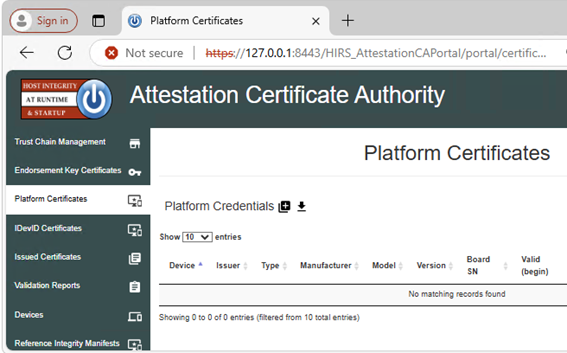 참고: 로컬 확인을 실행하는 경우 https://127.0.0.1:8443/HIRS_AttestationCAPortal/portal/certificate-request/platform-credentials
 - Dell Factory Intermediate CA 서명 인증서(
c:\dell\platcert\out_2.crt), CA 서명 루트 인증서(PROD-CSG-SCV-Root.cer) 및 TPM 루트 서명 인증서를 클릭하여 Trust Chain Management 탭에서 Trust Chain CA Certificates 옆에 있는 + 기호를 클릭합니다. 참고: 로컬 확인을 실행하는 경우 https://127.0.0.1:8443/HIRS_AttestationCAPortal/portal/certificate-request/trust-chain
ACA 정책 설정
- 정책 탭으로 이동합니다.
- 연필 아이콘을 클릭하고 다음을 Enabled로 설정합니다.
- 인증 자격 증명 검증
- 플랫폼 자격 증명 유효성 검사
- 플랫폼 특성 자격 증명 유효성 검사
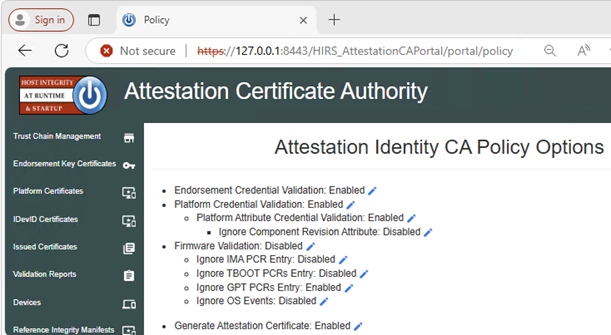 참고: 로컬 확인을 실행하는 경우 https://127.0.0.1:8443/HIRS_AttestationCAPortal/portal/policy
HIRS 프로비저너 다운로드 및 설치
인증서가 포함된 각 시스템에서 이 단계를 수행해야 합니다.
- HIRS Provisioner Releases
- Windows 탐색기에서 다음으로 이동합니다.
c:\Program Files(x86)\HIRS_Provisioner.NET\plugins\scripts\windows참조하십시오. - 오른쪽 클릭하고
allcomponents.ps1을 클릭하고 메모장에서 편집을 선택한 다음 15행을 추가하여 주석 처리합니다.#줄 앞의 기호.참고: 예를 들어 다음과 같습니다.#$NVME_SCRIPT="$APP_HOME/nvme.ps1" # For NVMe참조하십시오. - 30행을 주석 처리하려면
#줄 앞의 기호.참고: 예를 들어 다음과 같습니다.#. $NVME_SCRIPT참조하십시오. - "를 모두 교체합니다.
### Gather HDD details" (669-744행) 아래 텍스트와 함께 :### Gather HDD details Write-Progress -Id 1 -Activity "Gathering component details" -PercentComplete 70 Write-Progress -Id 2 -ParentId 1 -Activity "Gathering HDD information" -CurrentOperation "Querying" -PercentComplete 0 function parseHddData() { $RS=(Get-CimInstance -ClassName CIM_DiskDrive | select serialnumber,mediatype,pnpdeviceid,manufacturer,model | where mediatype -eq "Fixed hard disk media") $component="" $replaceable=(jsonFieldReplaceable "true") $numRows=1 if ($RS.Count -gt 1) { $numRows=($RS.Count)} for($i=0;$i -lt $numRows;$i++) { Write-Progress -Id 2 -ParentId 1 -Activity "Gathering Hard Disk information" -CurrentOperation ("Cleaning output for HDD " + ($i+1)) -PercentComplete ((($i+1) / $numRows) * 100) $hddClass=(jsonComponentClass "$COMPCLASS_REGISTRY_TCG" "$COMPCLASS_HDD") $pnpDevID="" if(isIDE($RS[$i].PNPDeviceID)) { $pnpDevID=(ideDiskParse $RS[$i].PNPDeviceID) } elseif(isSCSI($RS[$i].PNPDeviceID)) { $pnpDevID=(scsiDiskParse $RS[$i].PNPDeviceID) } else {Continue } if(($pnpDevID -eq $null) -or (($pnpDevID -eq "(Standard disk drives)") -and ($pnpDevID.product -eq $null))) { $regex="^.{,16}$" $pnpDevID=[pscustomobject]@{ product=($RS[$i].model -replace '^(.{0,16}).*$','$1') # Strange behavior for this case, will return } } $tmpManufacturer=$pnpDevID.vendor # PCI Vendor ID $tmpModel=$pnpDevID.product # PCI Device Hardware ID $tmpSerial=$RS[$i].serialnumber $tmpRevision=$pnpDevID.revision if ([string]::IsNullOrEmpty($tmpManufacturer) -or ($tmpManufacturer.Trim().Length -eq 0)) { $tmpManufacturer="$NOT_SPECIFIED" } $tmpManufacturer=$(jsonManufacturer "$tmpManufacturer".Trim()) if ([string]::IsNullOrEmpty($tmpModel) -or ($tmpModel.Trim().Length -eq 0)) { $tmpModel="$NOT_SPECIFIED" } $tmpModel=$(jsonModel "$tmpModel".Trim()) if (![string]::IsNullOrEmpty($tmpSerial) -and ($tmpSerial.Trim().Length -ne 0)) { $tmpSerial=(jsonSerial "$tmpSerial".Trim()) } else { $tmpSerial="" } if (![string]::IsNullOrEmpty($tmpRevision) -and ($tmpRevision.Trim().Length -ne 0)) { $tmpRevision=(jsonRevision "$tmpRevision".Trim()) } else { $tmpRevision="" } $tmpComponent=(jsonComponent $hddClass $tmpManufacturer $tmpModel $replaceable $tmpSerial $tmpRevision) $component+="$tmpComponent," } Write-Progress -Id 2 -ParentId 1 -Activity "Gathering Hard Disk information" -CurrentOperation "Done" -PercentComplete 100 return "$component".Trim(",") }
프로비저너 실행
Provisioner를 마우스 오른쪽 버튼으로 클릭하고 인증서가 포함된 시스템에서 관리자 권한으로 실행 을 선택합니다.
참고: Provisioner는 다음에서 사용할 수 있습니다.
c:\Program Files(x86)\HIRS_Provisioner.NET\tpm_aca_provision.exe참조하십시오.
결과 확인
검증 보고서 ACA 포털 페이지에서 통과 결과를 확인합니다.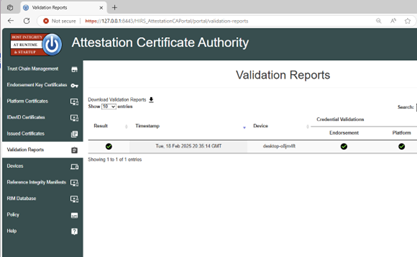
참고: 로컬 확인을 실행하는 경우 https://127.0.0.1:8443/HIRS_AttestationCAPortal/portal/validation-reports 로 이동합니다.
Affected Products
Dell Trusted DeviceArticle Properties
Article Number: 000293241
Article Type: How To
Last Modified: 24 Mar 2025
Version: 5
Find answers to your questions from other Dell users
Support Services
Check if your device is covered by Support Services.