NetWorker: How to configure "AD over SSL" (LDAPS) from The NetWorker Web User Interface (NWUI)
Summary: This KB details the process that is required for configuring "AD over SSL" (LDAPS) from the NetWorker Web User Interface (NWUI).
Instructions
To configure SSL authentication, import the root CA (or CA chain) into the cacerts file used by NetWorker's authentication (AUTHC) server. In single NetWorker server environments, the NetWorker server is the authentication server. In larger datazones, one AUTHC server can be the primary authentication server for multiple servers. For more information, see: NetWorker: How To Identify Which Server is the Authentication Server Used By NMC and NWUI
Setting up the NetWorker Authentication Server for SSL Authentication With an External Authority
Linux NetWorker servers:
- Open an SSH session to the NetWorker AUTHC server.
- Switch to root:
$ sudo su -
- Use OpenSSL to get the CA certificate (or certificate chain) from the domain server:
# openssl s_client -connect DOMAIN_SERVER_ADDRESS:636 -showcerts > /dev/null
-----BEGIN CERTIFICATE----- and -----END CERTIFICATE-----. If a chain certificate is used, multiple certificates where the first certificates listed are intermediate certificates and the last certificate listed is the root CA.
- Single certificate: Copy the certificate including the
-----BEGIN CERTIFICATE-----and-----END CERTIFICATE-----and put it in a file called RCAcert.crt in a location of your choosing. - Certificate chain: Copy each certificate (including their
-----BEGIN CERTIFICATE-----and-----END CERTIFICATE-----fields) and put them into individual files. For example ICA3cert.crt, ICA2cert.crt, ICA1cert.crt, and lastly RCAcert.crt.
- To help facilitate the process, set the following command-line variables:
# java_bin=<path to java bin dir>
*NOTE* For NetWorker Runtime Environment (NRE) this is /opt/nre/java/latest/bin. If you are using Oracle licensed Java Runtime Environment, specify the path to your JRE bin directory.
# RCAcert=<path to RCAcer.crt>
# ICA1cert=<path to ICA2cert.crt>
*NOTE* Only required if you are using a certificate chain, repeat this for each intermediate cert ICA2cert.crt, ICA3.crt and so forth.
[root@nsr certs]# java_bin=/opt/nre/java/latest/bin
[root@nsr certs]# RCAcert=/root/certs/RCAcert.crt
[root@nsr certs]#
- Import the certificates:
For NetWorker 19.12 (and older):
# $java_bin/keytool -import -alias ICA3 -keystore $java_bin/../lib/security/cacerts -file $ICA3cert -storepass changeit
# $java_bin/keytool -import -alias ICA2 -keystore $java_bin/../lib/security/cacerts -file $ICA2cert -storepass changeit
# $java_bin/keytool -import -alias ICA1 -keystore $java_bin/../lib/security/cacerts -file $ICA1cert -storepass changeit
# $java_bin/keytool -import -alias RCA -keystore $java_bin/../lib/security/cacerts -file $RCAcert -storepass changeit
B. If you are alerted of a duplicate alias (previous, expired certificate), delete the existing certificate with the same alias:
# $java_bin/keytool -delete -alias ALIAS_NAME -keystore $java_bin/../lib/security/cacerts -storepass changeit
For NetWorker 19.13 (and later):
# $java_bin/keytool -import -alias ICA3 -cacerts -storepass changeit -file $ICA3cert
# $java_bin/keytool -import -alias ICA2 -cacerts -storepass changeit -file $ICA2cert
# $java_bin/keytool -import -alias ICA1 -cacerts -storepass changeit -file $ICA1cert
# $java_bin/keytool -import -alias RCA -cacerts -storepass changeit -file $RCAcert
B. If you are alerted of a duplicate alias (previous, expired certificate), delete the existing certificate with the same alias:
# $java_bin/keytool -delete -alias ALIAS_NAME -cacerts -storepass changeit
- Restart NetWorker server services. Restarting services reloads the
cacertsfile during AUTHC startup. If NetWorker services are not restarted after importing the certificates, the process to configure the external authority in NetWorker fails with a certificate-related error.
# nsr_shutdown
# systemctl start networker
- Go to Creating "AD over SSL" external authority resource from NWUI.
Windows NetWorker Servers:
Windows does not have OpenSSL installed by default. If it is installed on your system, you can follow the same instructions from the above Linux section. If it is not installed, you can install it from a third-party platform, or use the following steps to collect the certificate without OpenSSL.
- Open an elevated PowerShell prompt on the NetWorker Authentication (AUTHC) server.
- Run the following script, replacing
EXTERNAL_AUTH_SERVER_ADDRESSwith your LDAP or Active Directory (AD) hostname or IP:
$server = "EXTERNAL_AUTH_SERVER_ADDRESS"
$port   = 636

$tcp = New-Object System.Net.Sockets.TcpClient
$tcp.Connect($server, $port)

$ssl = New-Object System.Net.Security.SslStream(
    $tcp.GetStream(),
    $false,
    { param($sender,$cert,$chain,$errors) $true }
)

try {
    $ssl.AuthenticateAsClient($server)

    "=== Protocol ==="
    $ssl.SslProtocol
    "=== Cipher ==="
    "$($ssl.CipherAlgorithm) ($($ssl.CipherStrength)-bit)"
    ""
    "=== Server Certificate ==="

    $remoteCert = New-Object System.Security.Cryptography.X509Certificates.X509Certificate2($ssl.RemoteCertificate)

    "Subject  : $($remoteCert.Subject)"
    "Issuer   : $($remoteCert.Issuer)"
    "NotBefore: $($remoteCert.NotBefore)"
    "NotAfter : $($remoteCert.NotAfter)"
    ""

    $b64 = [Convert]::ToBase64String($remoteCert.RawData, [Base64FormattingOptions]::InsertLineBreaks)
    "-----BEGIN CERTIFICATE-----"
    $b64
    "-----END CERTIFICATE-----"
}
finally {
    $ssl.Dispose()
    $tcp.Dispose()
}
PS C:\Users\administrator.AMER> $server = "dc.amer.lan"
PS C:\Users\administrator.AMER> $port   = 636
PS C:\Users\administrator.AMER>
PS C:\Users\administrator.AMER> $tcp = New-Object System.Net.Sockets.TcpClient
PS C:\Users\administrator.AMER> $tcp.Connect($server, $port)
PS C:\Users\administrator.AMER>
PS C:\Users\administrator.AMER> $ssl = New-Object System.Net.Security.SslStream(
>>     $tcp.GetStream(),
>>     $false,
>>     { param($sender,$cert,$chain,$errors) $true }
>> )
PS C:\Users\administrator.AMER>
PS C:\Users\administrator.AMER> try {
>>     $ssl.AuthenticateAsClient($server)
>>
>>     "=== Protocol ==="
>>     $ssl.SslProtocol
>>     "=== Cipher ==="
>>     "$($ssl.CipherAlgorithm) ($($ssl.CipherStrength)-bit)"
>>     ""
>>     "=== Server Certificate (exactly what the DC sends) ==="
>>
>>     $remoteCert = New-Object System.Security.Cryptography.X509Certificates.X509Certificate2($ssl.RemoteCertificate)
>>
>>     "Subject  : $($remoteCert.Subject)"
>>     "Issuer   : $($remoteCert.Issuer)"
>>     "NotBefore: $($remoteCert.NotBefore)"
>>     "NotAfter : $($remoteCert.NotAfter)"
>>     ""
>>
>>     $b64 = [Convert]::ToBase64String($remoteCert.RawData, [Base64FormattingOptions]::InsertLineBreaks)
>>     "-----BEGIN CERTIFICATE-----"
>>     $b64
>>     "-----END CERTIFICATE-----"
>> }
>> finally {
>>     $ssl.Dispose()
>>     $tcp.Dispose()
>> }
=== Protocol ===
Tls13
=== Cipher ===
Aes256 (256-bit)

=== Server Certificate ===
Subject  : CN=DC.amer.lan
Issuer   : CN=amer-DC-CA, DC=amer, DC=lan
NotBefore: 11/29/2025 01:17:22
NotAfter : 11/29/2026 01:17:22

-----BEGIN CERTIFICATE-----
MIIGDDCCBPSgAwIBAgITNAAAAAT93FoJVZwLkQAAAAAABDANBgkqhkiG9w0BAQsFADBAMRMwEQYK
...REMOVED FOR BREVITY...
c1HhZw24yOwFSOtTQg==
-----END CERTIFICATE-----
- Copy the certificate starting from
---BEGIN CERTIFICATE---and ending with---END CERTIFICATE---and paste it into a new file. If there is a chain of certificates, you must do this with each certificate. - Set command-line variables for the root CA, and any intermediate certificate (if used):
$RCAcert = "<path to RCAcert.crt>"
$ICA1cert = "<path to ICA1cert.crt>"
$JAVA_BIN = "<path to NetWorker's JAVA bin directory>"
PS C:\Users\Administrator> $RCAcert = "C:\tmp\certs\RCAcert.crt"
PS C:\Users\Administrator> $JAVA_BIN = "C:\Program Files\NRE\java\jdk-17.0.17\bin"
- Import the certificates:
For NetWorker 19.12 (and older):
& $JAVA_BIN\keytool.exe -import -alias ICA3 -keystore $JAVA_BIN\..\lib\security\cacerts -file $ICA3cert -storepass changeit
& $JAVA_BIN\keytool.exe -import -alias ICA2 -keystore $JAVA_BIN\..\lib\security\cacerts -file $ICA2cert -storepass changeit
& $JAVA_BIN\keytool.exe -import -alias ICA1 -keystore $JAVA_BIN\..\lib\security\cacerts -file $ICA1cert -storepass changeit
& $JAVA_BIN\keytool.exe -import -alias RCA -keystore $JAVA_BIN\..\lib\security\cacerts -file $RCAcert -storepass changeit
& $JAVA_BIN\keytool.exe -delete -alias ALIAS_NAME -keystore $JAVA_BIN\..\lib\security\cacerts -storepass changeit
For NetWorker 19.13 (and later):
& $JAVA_BIN\keytool.exe -import -alias ICA3 -cacerts -storepass changeit -file $ICA3cert
& $JAVA_BIN\keytool.exe -import -alias ICA2 -cacerts -storepass changeit -file $ICA2cert
& $JAVA_BIN\keytool.exe -import -alias ICA1 -cacerts -storepass changeit -file $ICA1cert
& $JAVA_BIN\keytool.exe -import -alias RCA -cacerts -storepass changeit -file $RCAcert
& $JAVA_BIN\keytool.exe -delete -alias ALIAS_NAME -cacerts -storepass changeit
- Restart NetWorker server services. Restarting services reloads the cacerts file during AUTHC startup. If NetWorker services are not restarted after importing the certificates, the process to configure the external authority in NetWorker fails with a certificate-related error.
net stop nsrd
net start nsrd
Creating "AD over SSL" external authority resource from NWUI.
- From a web browser, access the NWUI server: https://nwui-server-name:9090/nwui
- Log in using the NetWorker Administrator account.
- From the menu, expand Authentication Server and click External Authorities.
- From External Authorities, click Add+.
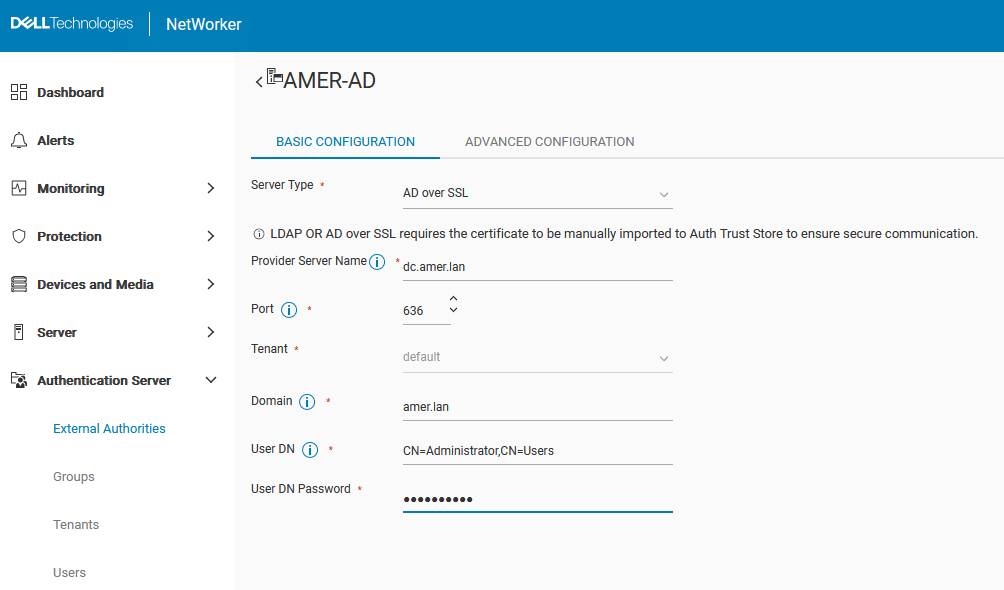
- Populate the configuration fields:
|
Field
|
Value
|
|
Name
|
A descriptive name, without spaces for the LDAP or AD configuration. The maximum number of characters is 256. Specify ASCII characters in the configuration name only.
|
|
Server Type
|
AD over SSL
|
|
Provider Server Name
|
Specifies the hostname or IP address of the Active Directory Server.
|
|
Port
|
Port 636 is used for SSL, this field should populate automatically if "AD over SSL" is selected.
|
|
Tenant
|
Select the tenant if configured. If no tenant is configured or required, you can use the "default."
Configuring a tenant requires the following login syntax " tenant_name\domain_name\user_name" If the default tenant is used (common), then the login syntax is "domain_name\user_name"
Tenant—Top-level organizational container for the NetWorker Authentication Service. Each external authentication authority in the local database is assigned to a tenant. A Tenant can contain one or more Domains, but the domain names must be unique within the tenant. NetWorker Authentication Service creates one integrated tenant name Default, which contains the Default domain. Creating multiple tenants helps you to manage complex configurations. For example, service providers with restricted datazones (RDZ) can create multiple tenants to provide isolated data protection services to tenant users. |
|
Domain
|
The full domain name including all DC values; for example: example.com
|
|
User DN
|
Specifies the full Distinguished Name  (DN) of a user account that has full read access to the AD directory. For example: (DN) of a user account that has full read access to the AD directory. For example: CN=Administrator,CN=Users,DC=example,DC=com.
|
|
User DN Password
|
Specifies the password of the user account that is used to access and read the AD direct.
|
|
Group Object Class
|
Required. The object class that identifies groups in the LDAP or AD hierarchy.
● For LDAP, use groupOfUniqueNames or groupOfNames
● For AD, use group
|
|
Group Search Path (optional)
|
A DN that specifies the search path that the authentication service should use when searching for groups in the LDAP or AD hierarchy.
|
|
Group Name Attribute
|
The attribute that identifies the group name; For example, cn.
|
|
Group Member Attribute
|
The group membership of the user within a group:
● For LDAP:
○ When the Group Object Class is
groupOfNames the attribute is commonly member.
○ When the Group Object Class is groupOfUniqueNames the attribute is commonly uniquemember.
● For AD, the value is commonly member.
|
|
User Object Class
|
The object class that identifies the users in the LDAP or AD hierarchy. For example, person.
|
|
User Search Path (optional)
|
The DN that specifies the search path that the authentication service should use when searching for users in the LDAP or AD hierarchy. Specify a search path that is relative to the base DN that you specified in the configserver-address option. For example, for AD, specify cn=users.
|
|
User ID Attribute
|
The user ID that is associated with the user object in the LDAP or AD hierarchy.
For LDAP, this attribute is commonly uid.
For AD, this attribute is commonly sAMAccountName.
|
NOTE: Consult with your AD/LDAP admin to confirm which AD/LDAP specific fields are needed for your environment.
- When done click save.
- A summary of the configured external authority resource should now appear:
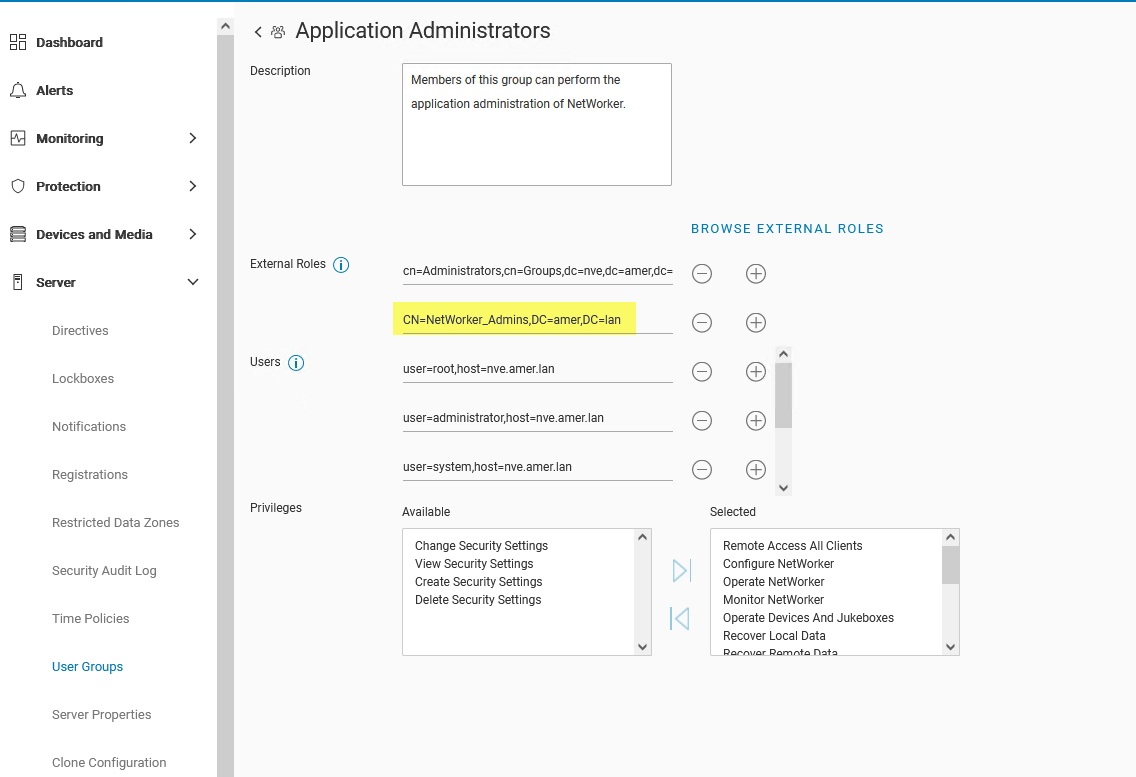
- From the Server > User Groups menu, Edit the User Groups that contain the rights that you want to delegate to AD/LDAP Groups or Users. To grant full Admin rights, specify the AD group/user DN in the External Roles field of the Application Administrators and Security Administrators roles.
For example, CN=NetWorker_Admins,DC=amer,DC=lan
This can also be done from the command line:
nsraddadmin -e "Distinguished_Name"
nsr:~ # nsraddadmin -e "CN=NetWorker_Admins,OU=Groups,dc=amer,dc=lan"
134751:nsraddadmin: Added role 'CN=NetWorker_Admins,OU=Groups,dc=amer,dc=lan' to the 'Security Administrators' user group.
134751:nsraddadmin: Added role 'CN=NetWorker_Admins,OU=Groups,dc=amer,dc=lan' to the 'Application Administrators' user group.
- Once the AD group or user DNs have been specified, click Save.
- Log out of the NWUI interface and log back in using the AD account:
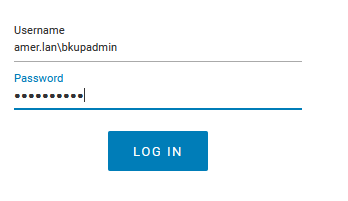
- The user icon in the upper-right corner indicates which user account is signed in.
Additional Information
How to check AD group membership and get the Distinguished Name (DN) values needed for NetWorker permissions:
You can use the authcmgmt command on your NetWorker server to confirm that the AD/LDAP groups/users are visible:
authc_mgmt -u Administrator -p 'NetWorker_Admin_Pass' -e query-ldap-users -D query-tenant=tenant_name -D query-domain=domain_name
authc_mgmt -u Administrator -p 'NetWorker_Admin_Pass' -e query-ldap-groups -D query-tenant=tenant_name -D query-domain=domain_name
authc_mgmt -u Administrator -p 'NetWorker_Admin_Pass' -e query-ldap-groups-for-user -D query-tenant=tenant_name -D query-domain=domain_name -D user-name=ad_username
Example:
[root@nsr ~]# authc_mgmt -u Administrator -p '!Password1' -e query-ldap-users -D query-tenant=default -D query-domain=amer.lan
The query returns 47 records.
User Name            Full Dn Name
Administrator        CN=Administrator,CN=Users,dc=amer,dc=lan
...
bkupadmin            CN=Backup Administrator,CN=Users,dc=amer,dc=lan

[root@nsr ~]# authc_mgmt -u Administrator -p '!Password1' -e query-ldap-groups -D query-tenant=default -D query-domain=amer.lan
The query returns 72 records.
Group Name                              Full Dn Name
Administrators                          CN=Administrators,CN=Builtin,dc=amer,dc=lan
...
NetWorker_Admins                        CN=NetWorker_Admins,OU=Groups,dc=amer,dc=lan

[root@nsr ~]# authc_mgmt -u Administrator -p '!Password1' -e query-ldap-groups-for-user -D query-tenant=default -D query-domain=amer.lan -D user-name=bkupadmin
The query returns 1 records.
Group Name       Full Dn Name
NetWorker_Admins CN=NetWorker_Admins,OU=Groups,dc=amer,dc=lan
NOTE: On some systems, the
authc commands may fail with an "incorrect password" error even when the correct password is given. This is due to the password being specified as visible text with the -p option. If you encounter this, remove -p password from the commands. You will be prompted to enter the password hidden after running the command.
Other Relevant Articles:
- NetWorker: How To Set up LDAP/AD using authc_config scripts
- NetWorker: How To Set up AD/LDAP Authentication
- NetWorker: How to reset the Administrator password
- NetWorker: LDAPS integration fails with "An SSL handshake error occurred while attempting to connect to LDAPS server: Unable to find valid certification path to requested target"
- NetWorker: How to Import or Replace Certificate Authority Signed Certificates for "AUTHC" and "NWUI" (Linux)
- NetWorker: How to Import or Replace Certificate Authority Signed Certificates for "AUTHC" and "NWUI" (Windows)