「IDPA:DPAの再導入後にDPAでデータ コレクションが失敗する
Summary: このKB記事では、IDPA DPAを再導入した後のDPAデータ コレクションの問題を解決する手順について説明します。
This article applies to
This article does not apply to
This article is not tied to any specific product.
Not all product versions are identified in this article.
Symptoms
DPAはIDPAシステムに再導入されましたが、レポートにデータがありません。デバッグ データ コレクションを実行しようとすると失敗します。
dpaagent.logが停止したか、「ストア アンド フォワード キューがいっぱいです」と表示されます。これは、エージェントがAPPサーバーと通信できないことを示します。
Cause
エージェントは、APPサービスへの接続を失いました。原因は不明です。
Resolution
メモ: この問題の修正がgoidpaツールに追加されました。次のKBに従ってgoidpaをインストールしてください。
次に、ACMで次のコマンドを実行します。
./goidpa dpa agent-register
goidpa コマンドでこの問題が解決しない場合は、次の手順を使用して、エージェントを手動で構成し、APP サーバに再登録します。
- DPA UIで、Administrator>System>Configure System Settingsに移動します。ポップアップ ボックスで、 Data Collection Agents の横にある矢印をクリックしてリストを展開します。使用されているエージェント、APP、または個別のデータ コレクション サーバーをハイライト表示します。次に、「 エージェントの削除 」ボタンをクリックします。

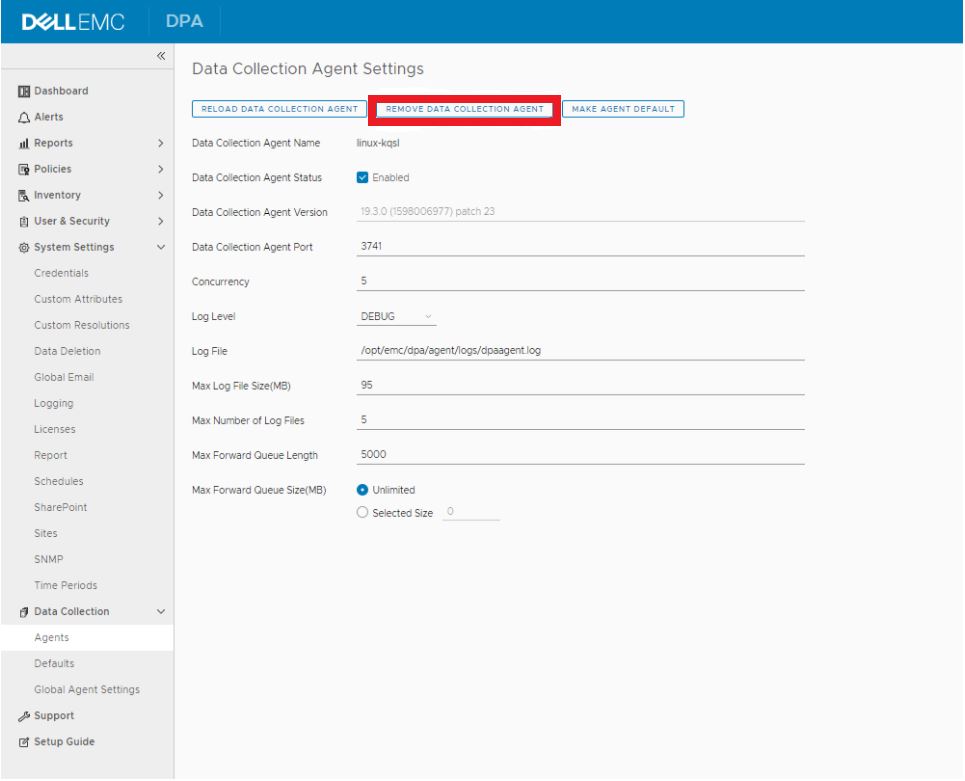
IDPA 2.6またはDPA 19.3では、 Data Collection>Agents に移動し、エージェントをハイライト表示してData Collections Agent Settings ボタンをクリックします。次に、「 エージェントの削除」ボタンをクリックします。
- DPA APPサーバーにログインし、に移動します。
/opt/emc/dpa/services/bin directory次のコマンドを実行します。
./dpa.sh app agentpassword
パスワード(通常はIDPA共通パスワード)を入力し、パスワードを確認します。
./dpa.sh app restart - DPAエージェント サーバーにログインします(DP 4400の場合、これはAPPサーバーです)。
- 下記にアクセスします。
/opt/emc/dpa/agent/etcをクリックし、次のコマンドを実行します。
- 下記にアクセスします。
vi dpaagent_config.xml
#Check the <servername> tag, is this the DPA APP IP address? If it is not then change to the DPA APP IP. Once this is the DPA APP IP save and exit.
./dpa stop-
- 下記にアクセスします。
/opt/emc/dpa/agent/dataをクリックし、次のコマンドを実行します。
- 下記にアクセスします。
mkdir olddata
mv * olddata/-
- 下記にアクセスします。
/opt/emc/dpa/agent/etcをクリックし、次のコマンドを実行します。
- 下記にアクセスします。
./dpa start -
- 下記にアクセスします。
/opt/emc/dpa/agent/binをクリックし、次のコマンドを実行します。
- 下記にアクセスします。
./dpaagent --set-credentials
#put in the passwork you set in step 2, confirm the password -
- 下記にアクセスします。
/opt/emc/dpa/agent/etcをクリックし、次のコマンドを実行します。
- 下記にアクセスします。
./dpa start -
- 下記にアクセスします。
/opt/emc/dpa/agent/logsdpaagent.logを確認して、再起動後にエラーが発生したかどうかを確認します。
- 下記にアクセスします。
- DPA UIをもう一度開き、管理者>システム>システム設定の構成の順に移動します。ポップアップ ボックスで、 Data Collection Agents の横にある矢印をクリックしてリストを展開します。エージェントが再び表示されるかどうかを確認します。
Inventory>Object Library>Applicationsタブに移動します。Avamarを選択し、 プロパティ ボタンをクリックして、 プロパティ ポップアップ ボックスで データ コレクション タブをクリックします。Avamar Job Monitor収集を選択し、履歴ボタンをクリックします。最後のデータ コレクションが成功したかどうかを確認します。
ご不明な点がある場合は、Dellサポートにお問い合わせください。
Affected Products
Integrated Data Protection Appliance FamilyProducts
Data Protection Advisor, PowerProtect Data Protection SoftwareArticle Properties
Article Number: 000181653
Article Type: Solution
Last Modified: 02 Dec 2025
Version: 3
Find answers to your questions from other Dell users
Support Services
Check if your device is covered by Support Services.