Create and Manage Custom Groups
Summary: This article provides information about how to create and manage custom groups to help customize your online support experience.
This article applies to
This article does not apply to
This article is not tied to any specific product.
Not all product versions are identified in this article.
Instructions
My Groups allow you to customize your online support experience by creating a unique filter of products and/or locations to personalize your view in many areas of our online support site such as MyService360. You can create custom groupings by individual products or by locations and/or product families.
There are two build flows a user can leverage:
-
Automatic - The group is created using either locations, product families, or a combination of the two. Any additional products appearing in the ecosystem matching the group build would automatically be included after the group is built.
-
Manual - The group is created by selecting specific products from the ecosystem. The asset visibility will remain the same unless manually changed.

Figure 1: Person Icon Manage Company
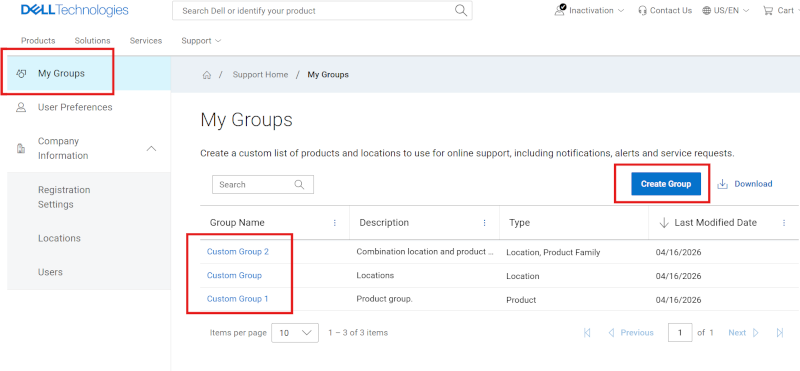
Figure 2: My Groups
Create a product group
-
Log in to Dell Support Site.
-
From the top-right corner, click the person icon menu
 and select Manage Company Information. The Company Information Registration Settings module should be displayed.
 -
Select the My Groups module to view the My Groups landing page.
-
Select Create Group.
-
Select Create Group -> in the Manual tile.
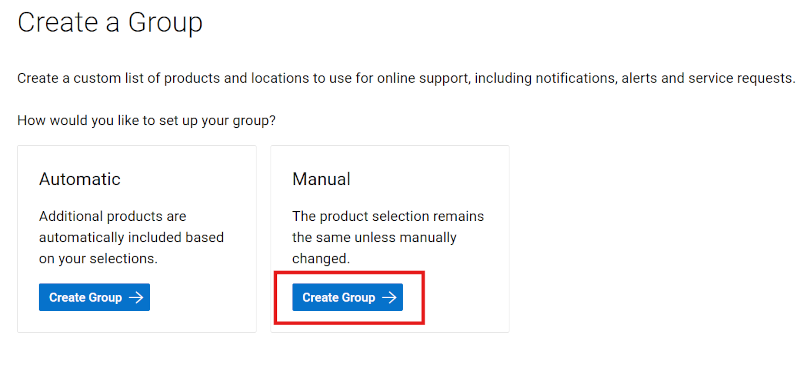
Figure 3: Create Product Group
-
Enter a name (required) and description (optional) for the group.
-
From sub-tabs you can select the preferred method to find your products.
NOTE: You can find products by location search (location name, address, or Location ID) or by product (serial number or service tag).
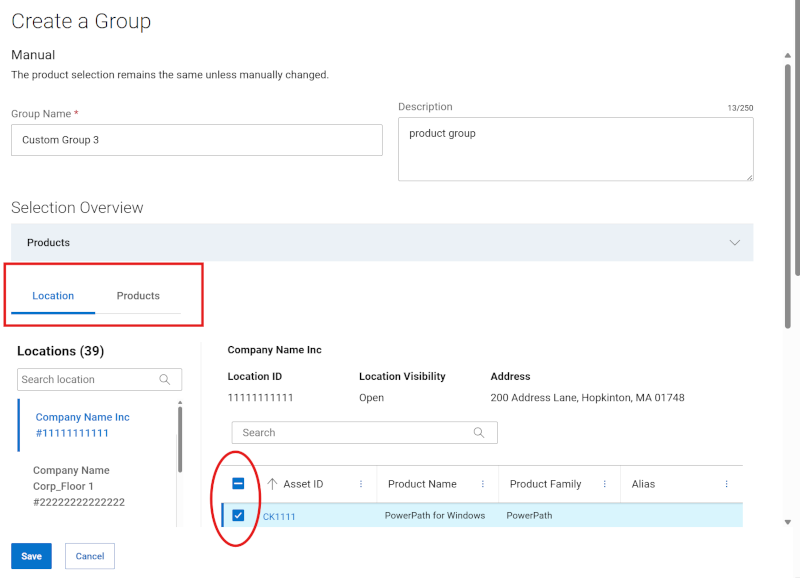
Figure 4: Create Product Group Locations
-
If searching by product, enter the serial number or service tag you want to add into the Product search box (minimum of five characters required) and click enter, or click the magnifying glass button to complete the search.
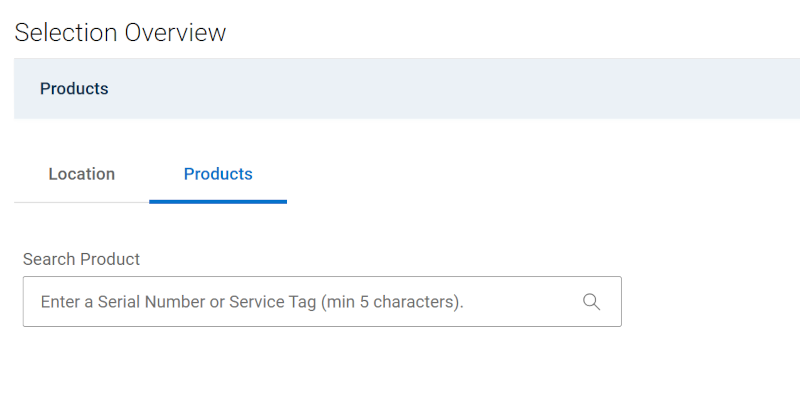
Figure 5: Create Product Group Product Search
-
From the search results, selecting the checkboxes beside the products will add them to the group build and appear in the Products expandable section above the search area.
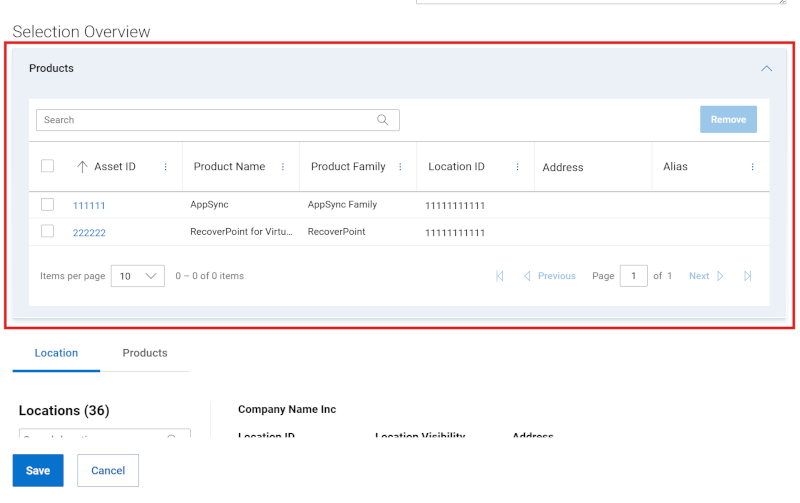
Figure 6: Create Product Group Product Preview
-
If finding products by location, use the Location sub-tab, and click a location from the list of available locations to see the available products for that location in the pane to the right.
-
Selecting the checkboxes beside the products will add them to the group build and appear in the Products expandable section above the search area.
-
When finished selecting products for the group, expand the Products section to review the products that have been added during the build.
-
Click Save found at the bottom of the build drawer. The group is created, and the My Groups page is displayed.
Create a product families group
-
Log in to Dell Support Site.
-
From the top-right corner, click the person icon menu
 and select Manage Company Information. The Company Information Registration Settings module should be displayed.
 -
Select the My Groups module to view the My Groups landing page.
-
Select Create Group.
-
Select Create Group -> in the Automatic tile.

Figure 7: Create Product Family Group
-
Enter a name (required) and description (optional) for the group.
-
Click on the Product Family sub-tab.
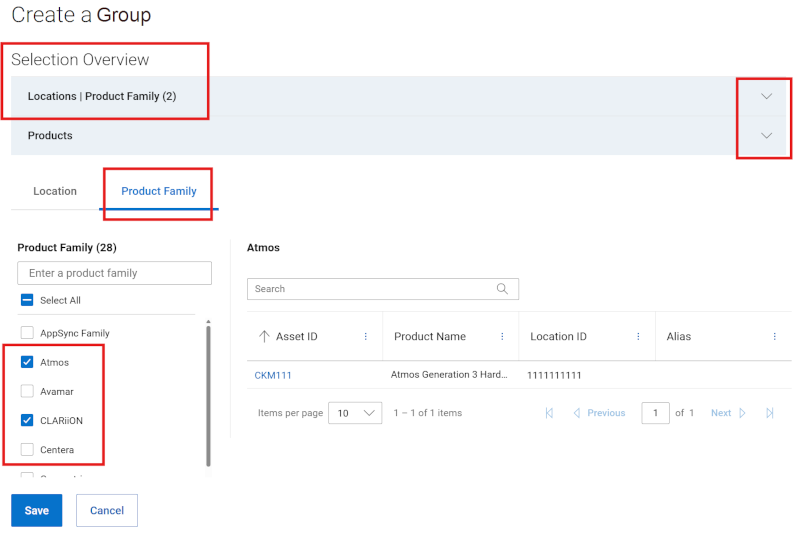
Figure 8: Create Product Family Group
-
From the list of available product families, select the checkboxes beside one or more product families you want to add. The filter option can be used to narrow the list by entering a product family name or partial name and click enter.
Selecting the checkboxes beside any product families will add them to the group build and appear in the Location | Product Family expandable section above the search area.
NOTE: You can click on a selected product family in the list without selecting its checkbox to see more details in the right pane.
-
When finished selecting product families for the group, expand the Location | Product Family section to review the product families that have been added during the build.
-
Click Save found at the bottom of the build drawer. The group is created, and the My Groups page is displayed.
Create a group with both locations and product families
-
Log in to Dell Support Site.
-
From the top-right corner, click the person icon menu
 and select Manage Company Information. The Company Information Registration Settings module should be displayed.
 -
Select the My Groups module to view the My Groups landing page.
-
Select Create Group.
-
Select Create Group -> in the Automatic tile.
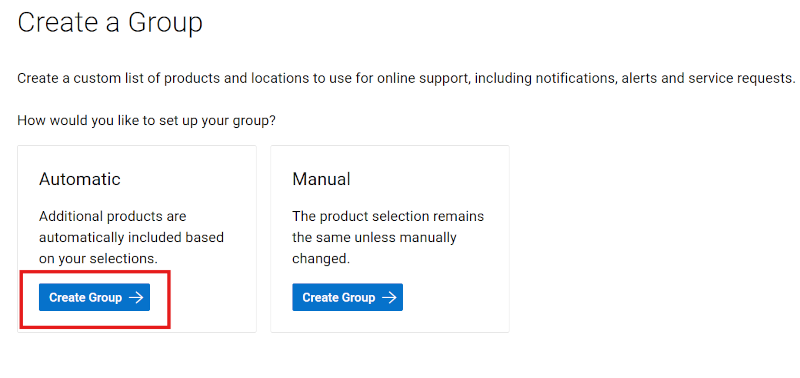
Figure 9: Create Combo Group
-
Enter a name (required) and description (optional) for the group.
-
From the Location sub-tab, select the checkboxes beside the location{s} you want to add. The filter option can be used to narrow the list by entering a location name, address, or Location ID (minimum four characters) and click enter.
Selecting the checkboxes beside any locations will add them to the group build and appear in the Location | Product Family expandable section above the search area.

Figure 10: Create Combo Group Drawer
-
Click on the Product Family sub-tab.
-
From the list of available product families, select the checkboxes beside one or more product families you want to add. The filter option can be used to narrow the list by entering a product family name or partial name and click enter.
Selecting the checkboxes beside any product families will add them to the group build and appear in the Location | Product Family expandable section above the search area.
NOTE: You can click on a selected product family in the list without selecting its checkbox to see more details in the right pane.
-
When finished selecting locations and product families for the group, expand the Location | Product Family section to review records that have been added during the build.
-
Click Save found at the bottom of the build drawer. The group is created, and the My Groups page is displayed.
-
Alternatively, locations can be added in “bulk” by clicking the batch search button found to the right of the Search field in the Location sub-tab. The user can then add a comma delimited list of Location IDs, and click Apply to Search. There is a 200 maximum per upload attempt, and you will see result messaging after submission.
Location IDs that are found from the batch search submission, will be displayed and selected in the Location sub-tab and added to the group build which will then need to be saved or edited further.

Figure 11: Create Combo Group Drawer Batch
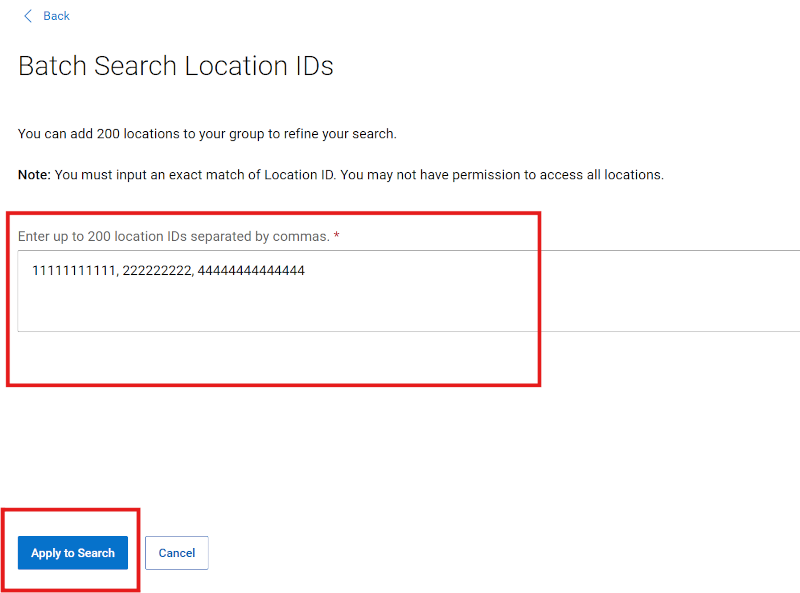
Figure 12: Create Combo Group Drawer Batch
Create a location group
-
Log in to Dell Support Site.
-
From the top-right corner, click the person icon menu
 and select Manage Company Information. The Company Information Registration Settings module should be displayed.
 -
Select the My Groups module to view the My Groups landing page.
-
Select Create Group.
-
Select Create Group in the Automatic tile.

Figure 13: Create Location Group
-
Enter a name (required) and description (optional) for the group.
-
From the Location sub-tab, select the checkboxes beside the location{s} you want to add. The filter option can be used to narrow the list by entering a location name, address, or Location ID (minimum four characters) and click enter.
Selecting the checkboxes beside any locations will add them to the group build and appear in the Location | Product Family expandable section above the search area.
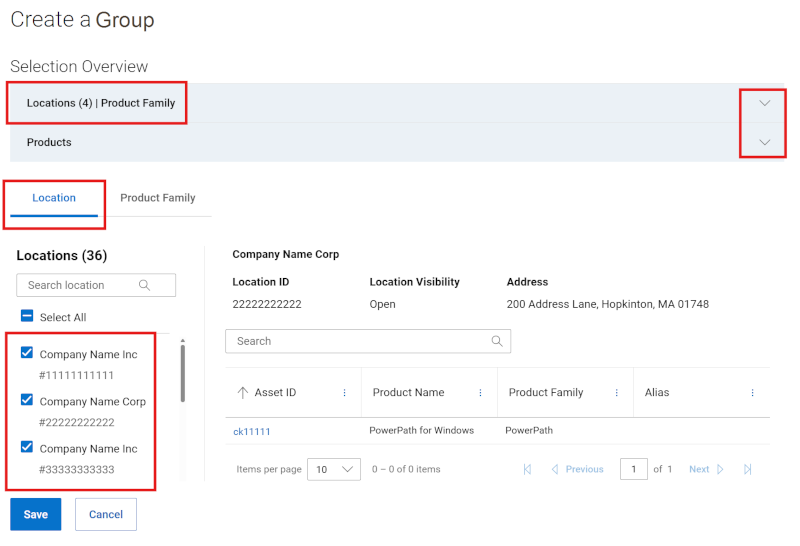
Figure 14: Create Location Group Drawer
-
When finished selecting locations for the group, expand the Location | Product Family section to review locations that have been added during the build.
-
Click Save found at the bottom of the build drawer. The group is created, and the My Groups page is displayed.
-
Alternatively, locations can be added in “bulk” by clicking the batch search button found to the right of the Search field in the Location sub-tab. The user can then add a comma delimited list of Location IDs, and click Apply to Search. There is a 200 maximum per upload attempt, and you will see result messaging after submission.
Location IDs that are found from the batch search submission, will be displayed and selected in the Location sub-tab and added to the group build which will then need to be saved or edited further.
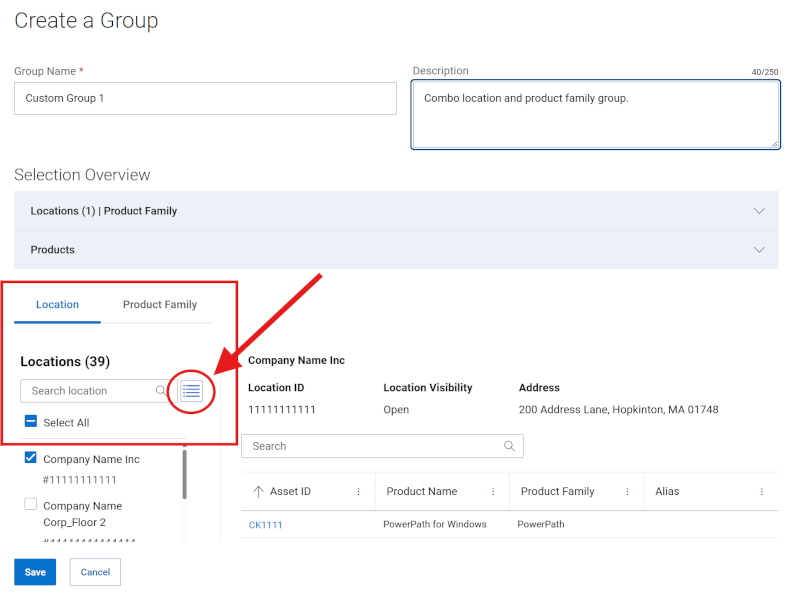
Figure 15: Create Location Group Drawer Batch

Figure 16: Create Location Group Drawer Batch
Edit product group
-
Log in to Dell Support Site.
-
From the top-right corner, click the person icon menu
 and select Manage Company Information. The Company Information Registration Settings module should be displayed.
 -
Select the My Groups module to view the My Groups landing page.
-
Click on a group name from the Group column which has a group Type of Product.

Figure 17: Edit Product Group
-
Click Edit.
-
To edit the name or description of the group, enter the new names in the Name and Description boxes.
-
To add products to the groups, select the method by which you want to find your products by choosing either the Location or Product sub-tab.
NOTE: You can find products by location search (location name, address, or Location ID) or by product (serial number or service tag).
-
If searching by product, enter the serial number or service tag you want to add into the Product search box (minimum of five characters required) and click enter, or click the magnifying glass button to complete the search.

Figure 18: Edit Product Group Product Search
-
From the search results, selecting the checkboxes beside the products will add them to the group build and appear in the Products expandable section above the search area.
-
If finding products by location, use the Location sub-tab, and click a location from the list of available locations to see the available products for that location in the pane to the right.
Selecting the checkboxes beside the products will add them to the group build and appear in the Products expandable section above the search area.

Figure 19: Edit Product Group by Location
-
To remove products from the group, perform the following:
-
Expand the Products module under Selection Overview to display the products currently associated with the group.
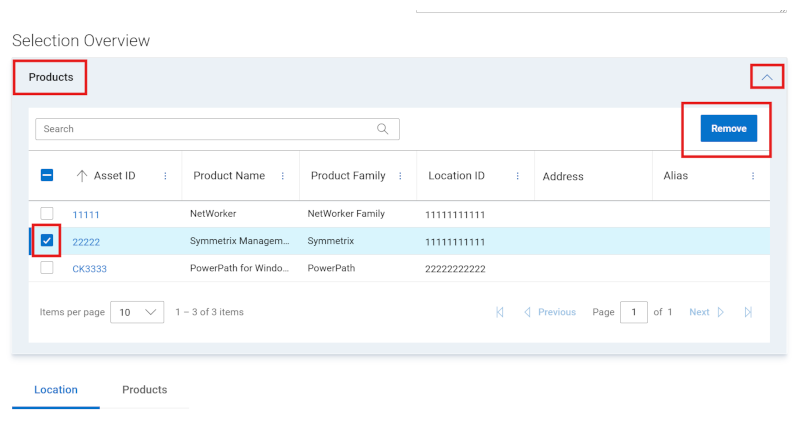
Figure 20: Edit Product Group Remove Assets
-
Select the checkbox beside any products that you want to remove. You can use the search field to find specific products.
-
Click Remove.
-
Once all edits are complete, click Save Changes. The product group is updated, and a success message is displayed.
Edit location group
-
Log in to Dell Support Site.
-
From the top-right corner, click the person icon menu
 and select Manage Company Information. The Company Information Registration Settings module should be displayed.
 -
Select the My Groups module to view the My Groups landing page.
-
Click on a group name from the Group column which has a group Type of Location.
-
Click Edit.
-
To edit the name or description of the group, enter the new names in the Name and Description boxes.
-
From the Location sub-tab, select the checkboxes beside the location{s} you want to add. The filter option can be used to narrow the list by entering a location name, address, or Location ID (minimum four characters) and click enter.
Selecting the checkboxes beside any locations will add them to the group build and appear in the Location | Product Family expandable section above the search area.
NOTE: To preview the products related to the group, you can expand the Products module with is found under Selection Overview.
-
To remove locations from the group, perform the following:
-
You can deselect any locations from the Location | Product Family expandable section above the search area.
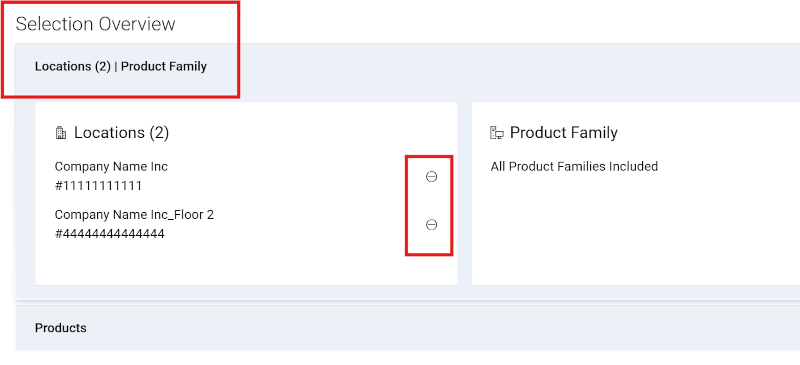
Figure 21: Edit Location Group RemoveClick on the 'circle with minus' icon beside each location that you want to remove.
Alternatively, from the Location sub-tab, deselect the checkboxes beside any location{s} you want to remove. The filter option can be used to narrow the list by entering a location name, address, or Location ID (minimum four characters) and click enter.
Deselecting the checkboxes beside any locations will remove them from the group build and remove them from the Location | Product Family expandable section above the search area.
-
Once all edits are complete, click Save Changes. The group is updated, and you are taken to the My Groups page.
Edit product families group
-
Log in to Dell Support Site.
-
From the top-right corner, click the person icon menu
 and select Manage Company Information. The Company Information Registration Settings module should be displayed.
 -
Select the My Groups module to view the My Groups landing page.
-
Click on a group name from the Group column which has a group Type of Product Families.
-
Click Edit.
-
To edit the name or description of the group, enter the new names in the Name and Description boxes.
-
Click on the Product Family sub-tab.
-
From the list of available product families, select the checkboxes beside one or more product families you want to add. The filter option can be used to narrow the list by entering a product family name or partial name and click enter.
Selecting the checkboxes beside any product families will add them to the group build and appear in the Location | Product Family expandable section above the search area.
NOTE: You can click on a selected product family in the list without selecting its checkbox to see more details in the right pane.
-
To remove product families from the group, you can deselect any product families from the Location | Product Family expandable section above the search area (you may need to collapse and re-expand the module to get the removal icons).
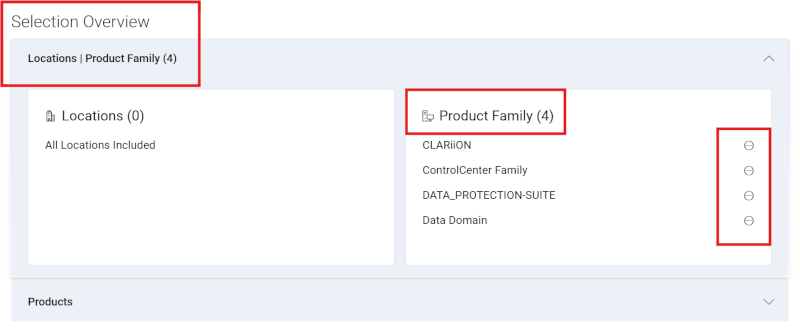
Figure 22: Edit Family Group RemoveClick on the 'circle with minus' icon beside each product family that you want to remove.
Alternatively, from the Product Family sub-tab, deselect the checkboxes beside any product family you want to remove. The filter option can be used to narrow the list by entering a product family name or partial name and click enter.
Deselecting the checkboxes beside any product families will remove them from the group build and remove them from the Location | Product Family expandable section above the search area.
-
Once all edits are complete, click Save Changes. The group is updated, and you are taken to the My Groups page.
Edit location and product families group
-
Log in to Dell Support Site.
-
From the top-right corner, click the person icon menu
 and select Manage Company Information. The Company Information Registration Settings module should be displayed.
 -
Select the My Groups module to view the My Groups landing page.
-
Click on a group name from the Group column which has a group Type of Locations, Product Families.
-
Click Edit.
-
To edit the name or description of the group, enter the new names in the Name and Description boxes.
-
From the Location sub-tab, select the checkboxes beside the location{s} you want to add. The filter option can be used to narrow the list by entering a location name, address, or Location ID (minimum four characters) and click enter.
Selecting the checkboxes beside any locations will add them to the group build and appear in the Location | Product Family expandable section above the search area.
NOTE: Once you have added a new location, you may have to reselect product families.
-
To add product families, click on the Product Family sub-tab.
From the list of available product families, select the checkboxes beside one or more product families you want to add. The filter option can be used to narrow the list by entering a product family name or partial name and click enter.
Selecting the checkboxes beside any product families will add them to the group build and appear in the Location | Product Family expandable section above the search area.
-
To remove locations or product families from the group, you can deselect either from the Location | Product Family expandable section above the search area.
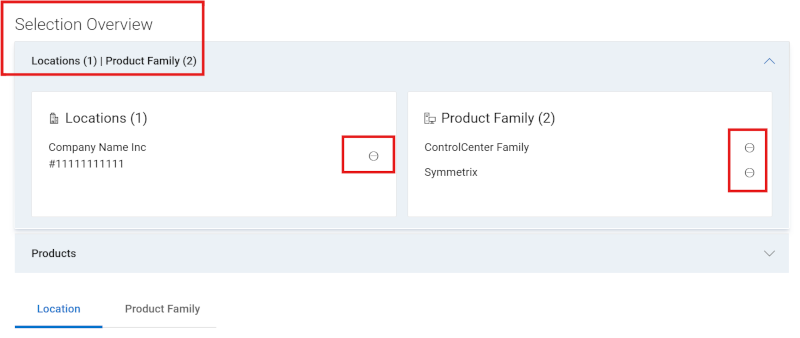
Figure 23: Edit Combo Group RemoveClick on the 'circle with minus' icon beside each location or product family that you want to remove.
Alternatively, from either the Location or Product Family sub-tab, deselect the checkboxes beside any location or product family you want to remove. The filter option can be used to narrow the list by entering various search criteria and clicking enter.
Deselecting the checkboxes beside any location or product families will remove them from the group build and remove them from the Location | Product Family expandable section above the search area.
-
Once all edits are complete, click Save Changes. The group is updated, and you are taken to the My Groups page.
Delete a group
-
Log in to Dell Support Site.
-
From the top-right corner, click the person icon menu
 and select Manage Company Information. The Company Information Registration Settings module should be displayed.
 -
Select the My Groups module to view the My Groups landing page.
-
Click on a group name from the Group Name column.
-
Click Delete.
-
You will be given a warning asking if you are sure that you want to delete the group.
-
Click Delete.
-
The group is deleted and after clicking Close you are taken to the My Groups page which should reflect the changes.
Download Custom Group data
You can download the list of all the Custom Groups in your account to a CSV file.
-
Log in to Dell Support Site.
-
From the top-right corner, click the person icon menu
 and select Manage Company Information. The Company Information Registration Settings module should be displayed.
 -
Select the My Groups module to view the My Groups landing page.
-
To download information about all the custom groups in your account, perform the following:
-
Click Download.
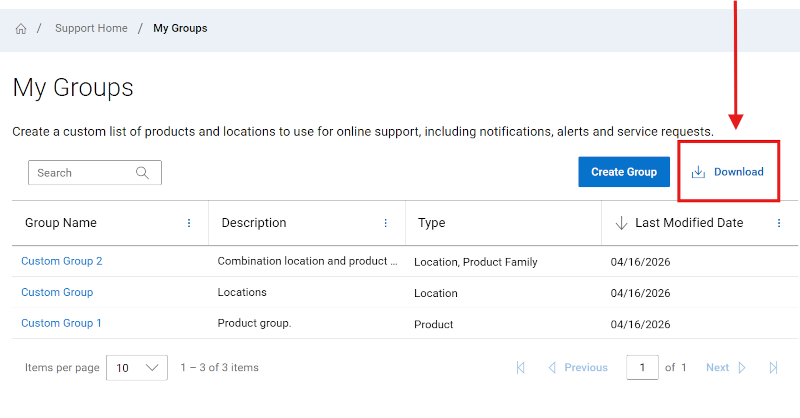
Figure 24: My Group Download-
Name the .csv file and click Save. The following information is downloaded:
-
Name of the custom group.
-
Description that is provided for the group.
-
Type of custom group.
-
Date when the custom group was created.
-
Online Support help options
Need help? Get started from the Online Support links below. If applicable, please contact your Service Account Manager or Customer Success Manager.
Topics
Help Links
Tip: Be sure to sign in to the Online Support site to view all available support options.
Get Technical Support for your products.
Enterprise Online Account assistance
View and manage company information, contacts, and service requests.
Administrative Support- Sign in before triggering the link above.
- Select Enterprise Online Account Help
- Open Tell us more menu & select the appropriate option
Asset / Install Base management.
Product registrations
Site/location transfers
Asset and Install Base management.- Select More Support & Solutions
- Open Tell us more menu & select Product Registration & Transfer option
-
<
Article Properties
Article Number: 000109784
Article Type: How To
Last Modified: 21 Apr 2026
Version: 12
Find answers to your questions from other Dell users
Support Services
Check if your device is covered by Support Services.