Create and Manage Access Groups
Summary: Set up Access Groups to control which locations and assets your team can see — keep your account secure and organized
This article applies to
This article does not apply to
This article is not tied to any specific product.
Not all product versions are identified in this article.
Instructions
Overview
Access Groups give you fine-grained control over which locations and assets each user in your organization can see, enabling improved security to your ecosystem. They are the recommended way to manage location visibility and security.
A Business User not assigned to any Access Group can see all locations with an Open visibility.
NOTE: Users with the Company Administrator role always retain full visibility of all locations and assets, and cannot be assigned to an Access Group.
Controlling access with Access Groups
Access Groups can be built in several variations including:
- Specific locations
- Specific product families
- Combination of specific locations and specific product families
- Specific assets
Users are assigned to an Access Group by a Company Administrator who determines what locations and/or assets the assigned business users can view.
To get started, you must first create Access Groups, which can then be assigned to users.
Access Group Structure
NOTE:; The Access Group functionality is available only to the Company Administrators. Business Users will not see the Access Group tab in the Users module.
There are 3 main areas of an Access Group build:
- Selection Tile Cards – focus the data for search and selection
- Left-pane search and selection – locations, product families, or assets depending on the selected Tile Card)
- Right-pane asset preview – resulting from items you’ve selected in the Left-pane.
The build of an access group is driven by 3 distinct tile cards:
- Selected Locations
- Selected Categories [Product Families]
- Selected Assets
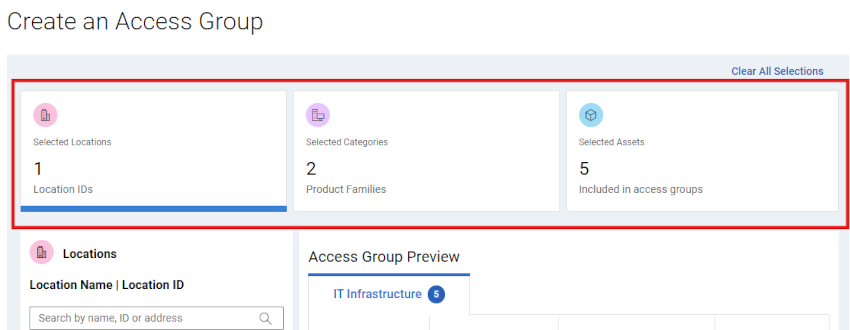
Figure 1: Create Access Group - Tile Cards
Clicking on a particular tile will allow you to search for and select data related to each tile (locations, product families, or individual assets).
The cards will update impacted counts as items are selected during the access group build.
When creating an Access Group, it is important to consider what type of Access Group you wish to build:
- Dynamic – The access group is created using either locations, product families, or a combination of the two. Any additional products appearing in the ecosystem in the future matching the locations and/or product families, would automatically be included in the group.
OR
- Static / Manual – The access group is a static list of assets from the ecosystem. The asset list and visibility will remain the same unless manually changed.
Creating And Managing Access Groups
- Sign in to Dell.com/support.
- Select Manage Company Information from the person icon menu
 in the upper-right corner.
 - Open the Company Information dropdown and select Users.
- Click the Access Groups sub-tab.
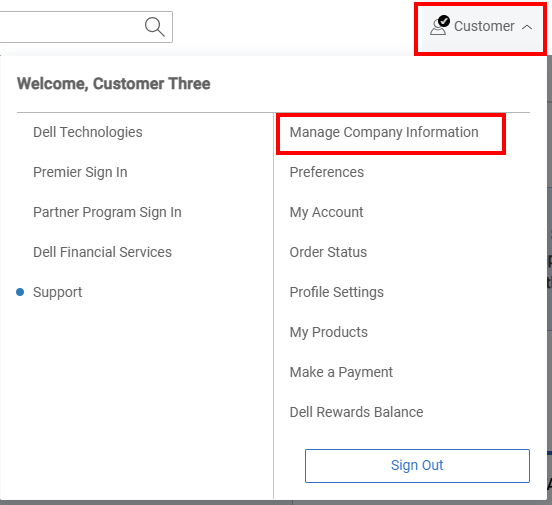
Figure 2: Person Icon Manage Company
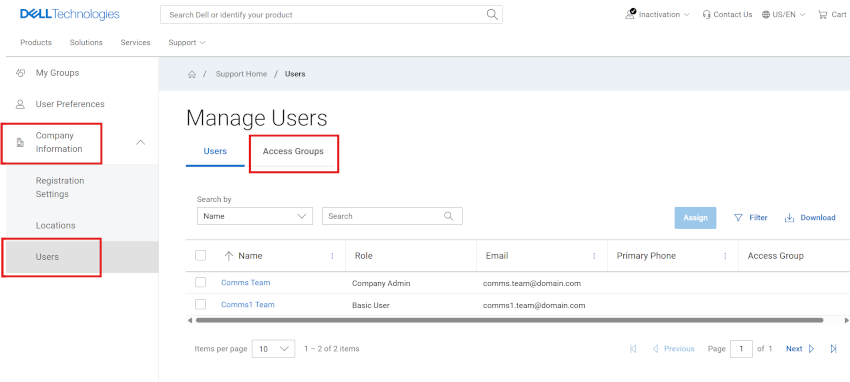
Figure 3: Users module
Create a Dynamic Access Group with Locations
- Select the Users module and then the Access Groups sub-tab.
- Select Create Access Group.
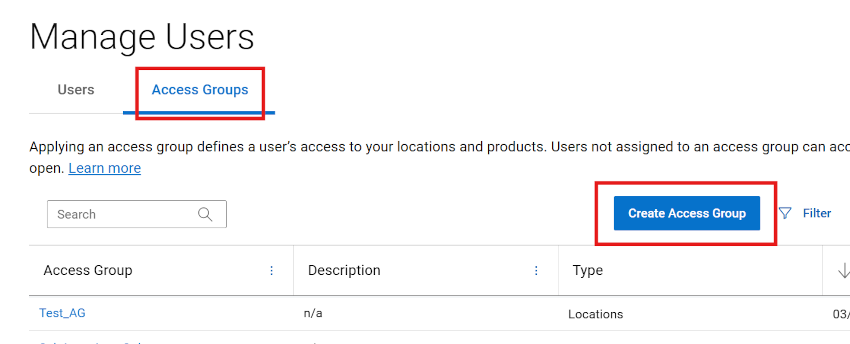
Figure 4: Users create access group
- Click the Selected Locations tile card.
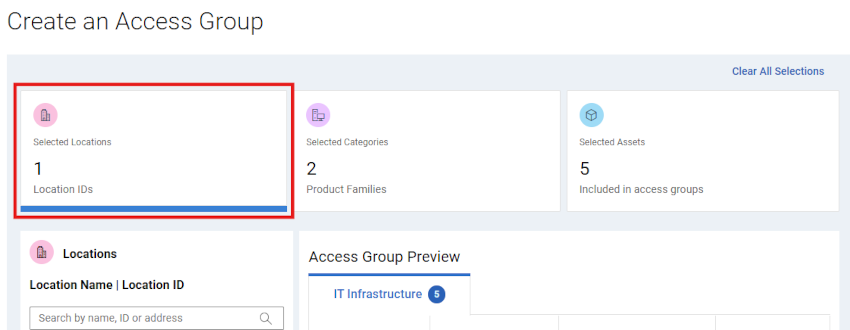
Figure 5: Create Access Group - Dynamic Location Family tile
- Search for and select locations in the Left-pane Locations area of the group build.
You can search by Location ID, Location Name, or Address.
The resulting asset list will be presented in the Preview area as selections are made.
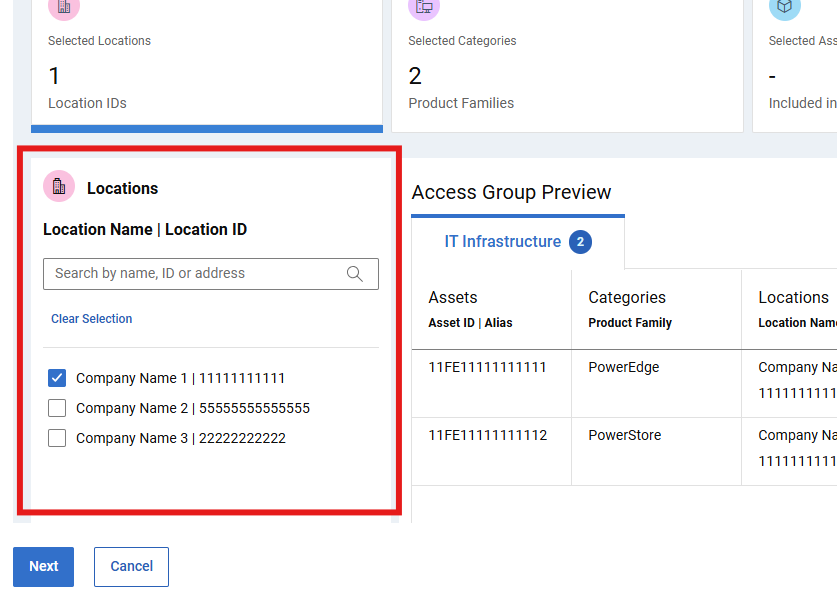
Figure 6: Create Access Group - Dynamic Location Search
- When you are comfortable with the group build and resulting asset list, select NEXT, then enter a Name (required) and a Description (optional).
The preview pane will also be available to review the content of the group.
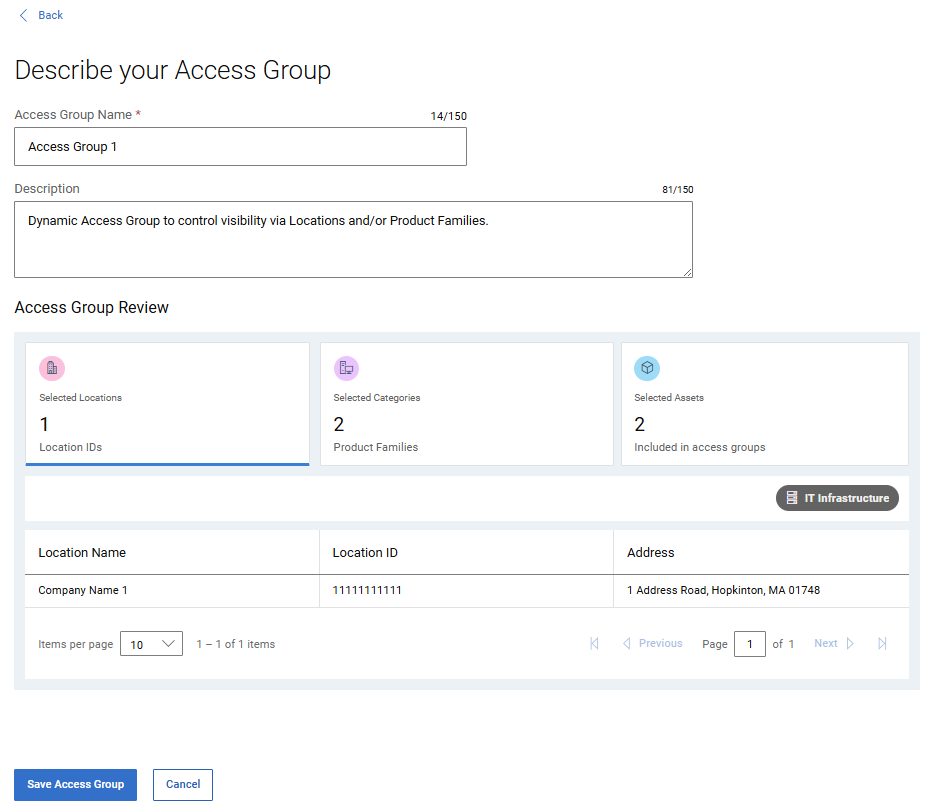
Figure 7: Create Access Group - Dynamic 2nd Page Name and Save
- Select Save Access Group. After confirmation, the access group is created, and the Access Groups page is displayed.
Create a Dynamic Access Group with Product Families
- Select the Users module and then the Access Groups sub-tab.
- Select Create Access Group.
- Select the Selected Categories tile card.
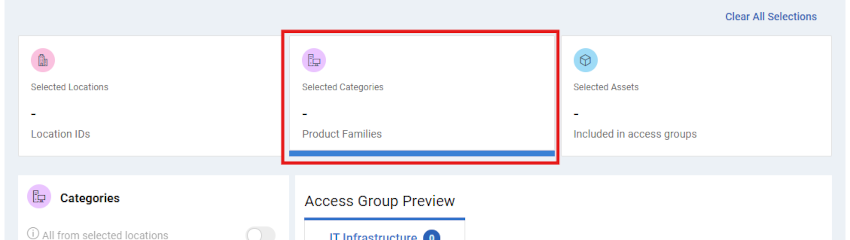
Figure 8: Create Access Group - Dynamic Product Family tile
- Search for and select product families in the Left-pane Categories area of the group build.
The resulting asset list will be presented in the Preview area as selections are made.
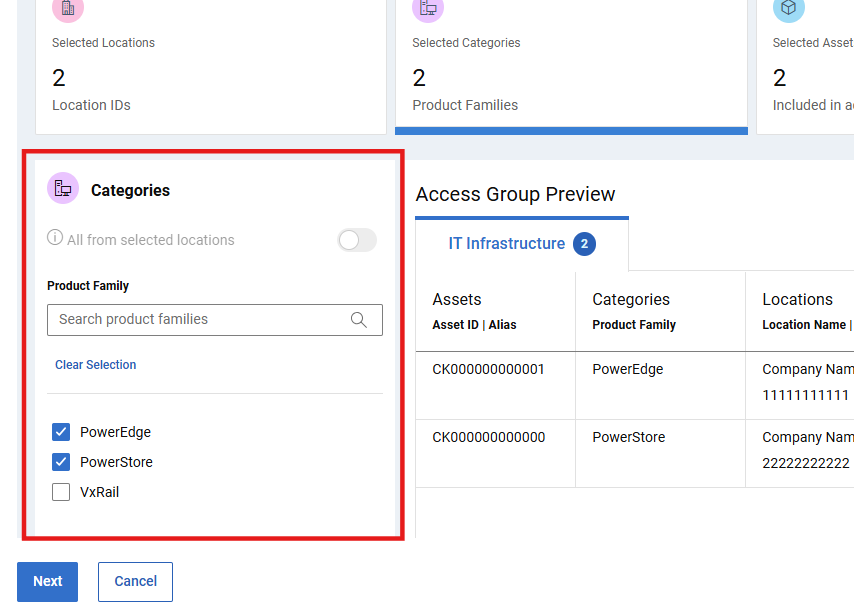
Figure 9: Create Access Group - Dynamic Product Family selected
NOTE: If you select the Select Locations tile and make changes, your current Product Families selections will be cleared, and you will need to reselect any required families.
- When you are comfortable with the group build and resulting asset list, select NEXT, then enter a Name (required) and a Description (optional).
The preview pane will also be available to review the content of the group.
- Select Save Access Group. After confirmation, the access group is created, and the Access Groups page is displayed.
Create a Dynamic Access Group with Locations and Product Families
- Select the Users module and then the Access Groups sub-tab.
- Select Create Access Group.
- Click the Selected Locations tile card.
- Search for and select locations in the Left-pane Locations area of the group build.
You can search by Location ID, Location Name, or Address.
The resulting asset list will be presented in the Preview area as selections are made.
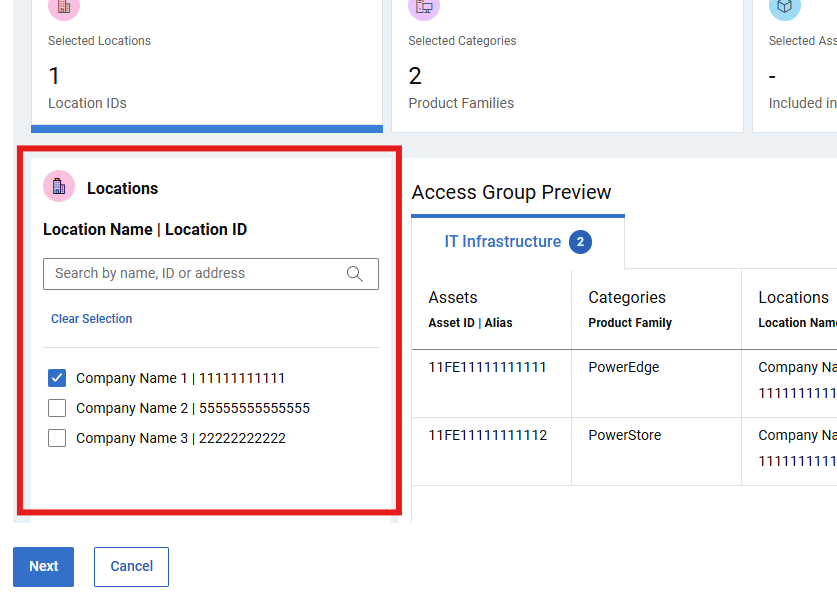
Figure 10: Create Access Group - Dynamic Location Search
- Search for and select product families in the Left-pane Categories area of the group build. If necessary, Toggle off the ‘All from selected locations’ toggle.
The resulting asset list will be presented in the Preview area as selections are made.
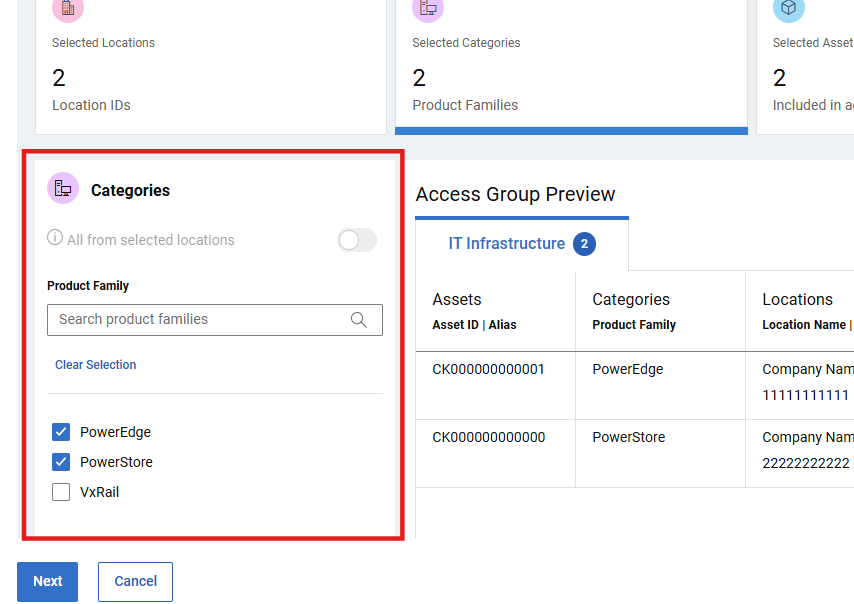
Figure 11: Create Access Group - Dynamic Product Family selected
NOTE: If you select the Select Locations tile and make changes, your current Product Families selections will be cleared, and you will need to reselect any required families.
- When you are comfortable with the group build and resulting asset list, select NEXT, then enter a Name (required) and a Description (optional).
The preview pane will also be available to review the content of the group.
- Select Save Access Group. After confirmation, the access group is created, and the Access Groups page is displayed.
Create a Static / Manual Access Group
- Select the Users module and then the Access Groups sub-tab.
- Select Create Access Group.
- Select the Selected Assets tile card.
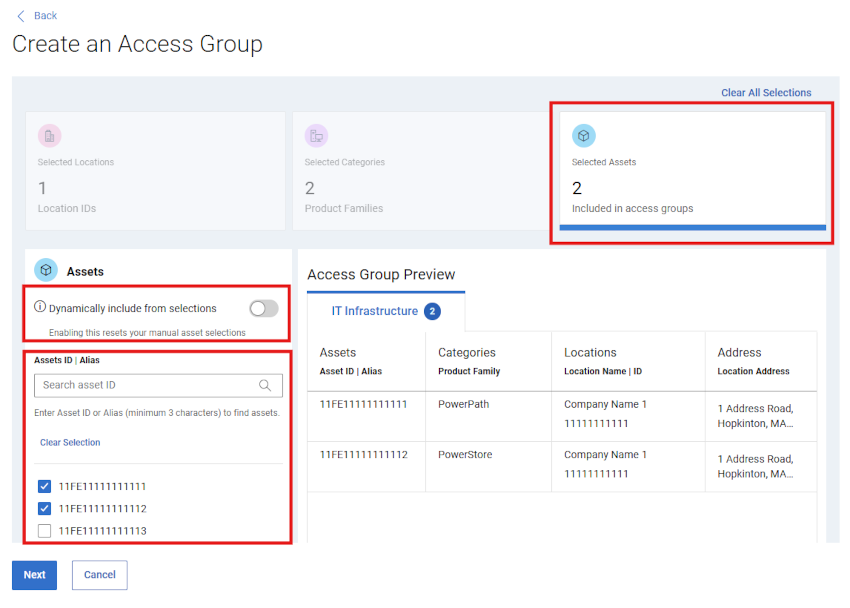
Figure 12: Create Access Group - initial drawer Manual _ assets selected
- Search for and select granular assets in the Left-pane Assets area of the group build.
The resulting asset list will be presented in the Preview area as selections are made
- Alternatively, you could start building the Access Group in a “Dynamic” way via the Selected Locations and/or Selected Categories (Product Families) tile cards.
Then click the Selected Assets tile card, and turn the “Dynamic” toggle off in the Left-pane Assets area.
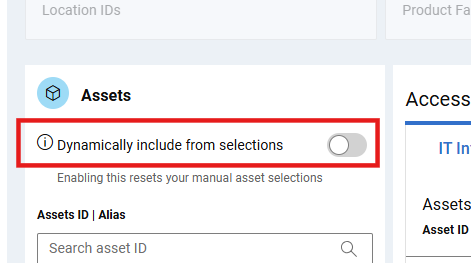
Figure 13: Create Access Group - TOGGLE Dynamic v Manual
This will preserve the asset list from the previous choices, but enable the ability to add or remove individual assets to/from the now static list.
- When you are comfortable with the asset list, select NEXT, then enter a Name (required) and a Description (optional).
The preview pane will also be available to review the content of the group.
- Select Save Access Group. After confirmation, the access group is created, and the Access Groups page is displayed.
Edit Access Groups
- Select the Users module and then the Access Groups sub-tab.
- Select a group name from the Access Group column.
- If desired, select the Edit Description to update the Name (required) or Description (optional) of the group.
Select Edit Selections above the preview of the group to make changes to the build of the group.
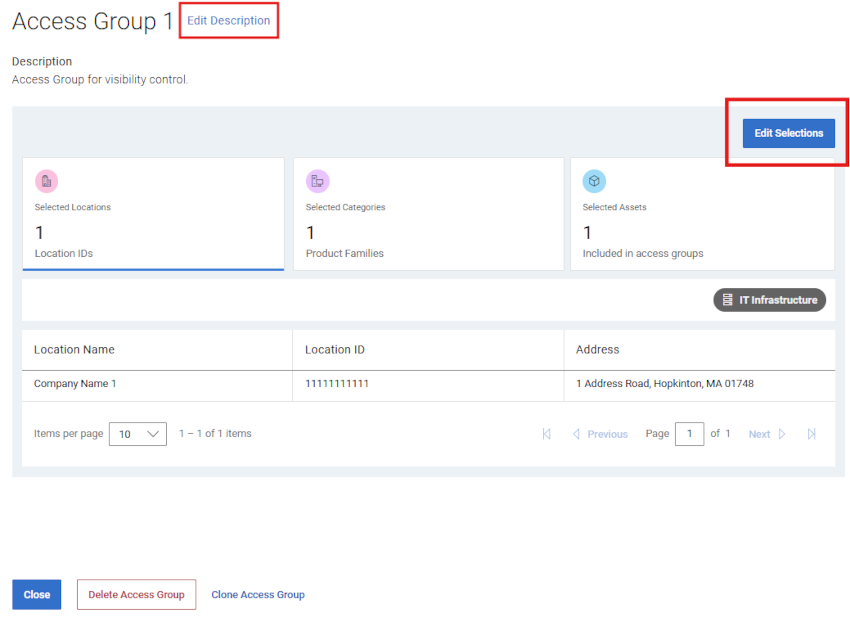
Figure 14: Edit Access Group - Edit Selections
- Use any of the three Selection Tile Cards to adjust the group as desired.
NOTE: Any changes made could alter the behavior of the group (ex. from Dynamic to Static), or the build structure of the group.
- Select Cancel before saving to discard any changes made during the edit.
- Select Save Access Group to save the changes. After confirmation, the access group is saved, and the Access Groups page is displayed.
Download Access Group Data
- Select the Users module and then the Access Groups sub-tab.
- To download information about all the access groups in your account, perform the following:
- Select Download.
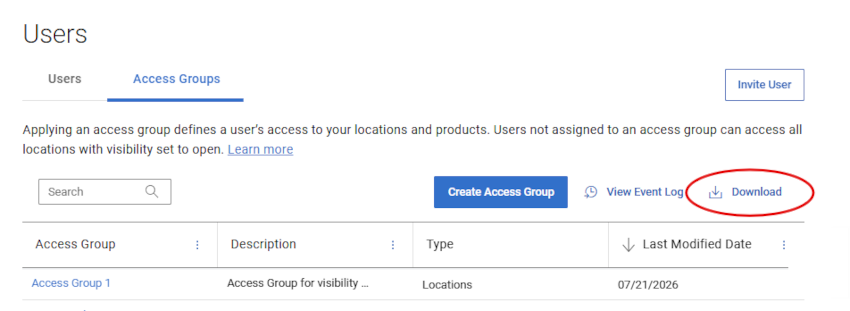
Figure 15: Access Group - Download Group Data
- Name the .csv file and select Save. The following information is downloaded:
- Group Name
- Description
- Type (Products, Locations, Product Families, or Locations , Product Families)
- Modified Date
Show Access Group History
- Select the Users module and then the Access Groups sub-tab.
- Select View Event Log.
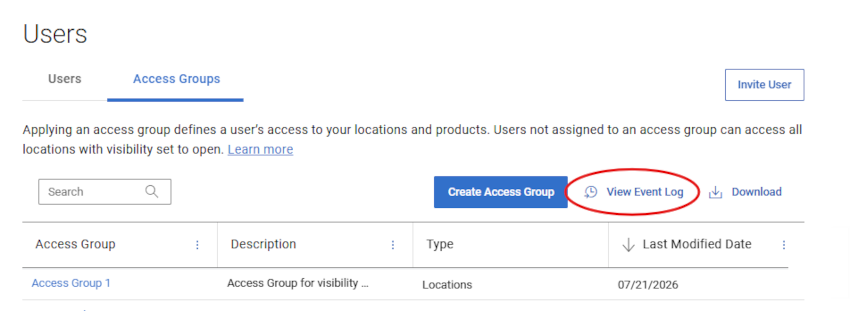
Figure 16: Access Group - View Event Log
- The history of your access groups is displayed via Access Group Modifications and User Assignments sub-tabs including:
- Access Group impacted
- Event (description of what you created, modified, assigned, or deleted)
- Modified By (details of the Administrator that made the change)
- Modified On (date and time the change was made)
- You can select an Access Group’s dropdown to expand grouped Events.
- Select Download to download a .csv file with full Event Log information for your Access Groups.
Delete Access Group
- Select the Users module and then the Access Groups sub-tab.
- Select a group name from the Access Group column.
- Select Delete Access Group.
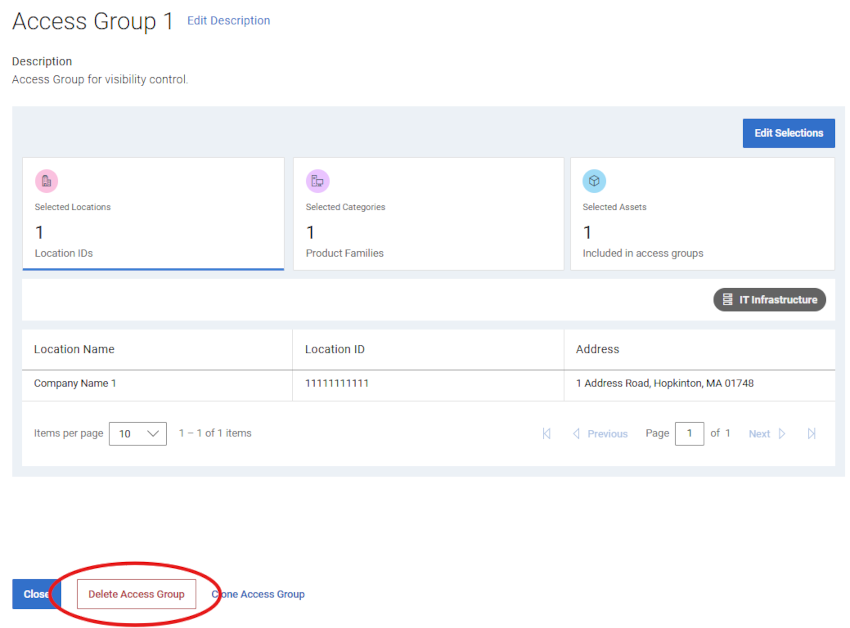
Figure 17: Delete Access Group - Delete button
- You will be able to review if any users are assigned to the access group, and receive a warning that they will be removed and receive full visibility access with the access group deletion.
- Select Delete to continue with the group deletion.
- The access group is deleted, any assigned users are removed from the group, and you are taken to the Access Groups page which should reflect the changes.
Apply Access Groups to a User (user association)
Once an Access Group is created, users can then be assigned to the appropriate Access Group. Applying an access group defines a Business User’s access to your company’s locations and products. Users not assigned to an access group can access all locations with visibility set to open.
- Select the Users module and then the Users sub-tab.
- Select the Name of the user you wish to assign an access group to. This will open the User Details drawer.
In the drawer, select the Access Group drop-down and select the group you would like to assign.
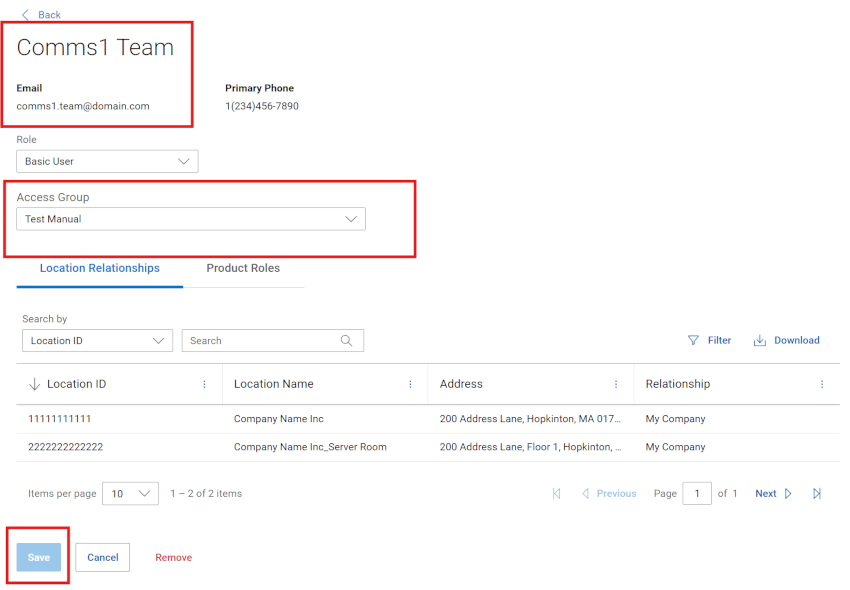
Figure 18: Access group assignment
Select Save.
- A confirmation message appears and changes should be reflected in the grid.
NOTE: Use the Search by option to filter the list of users by various attributes.
- To assign a single Access Group to multiple users in one transaction, first select the multiple applicable checkboxes from the user list.
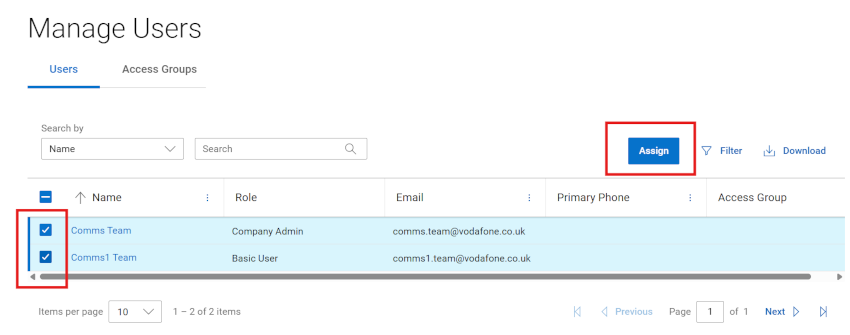
Figure 19: Access group multi assignment
- Select Assign.
- When the assignment drawer opens, select an Access Group to assign from the drop-down list.
Take note of the messaging in the drawer which shows summaries of the users impacted.
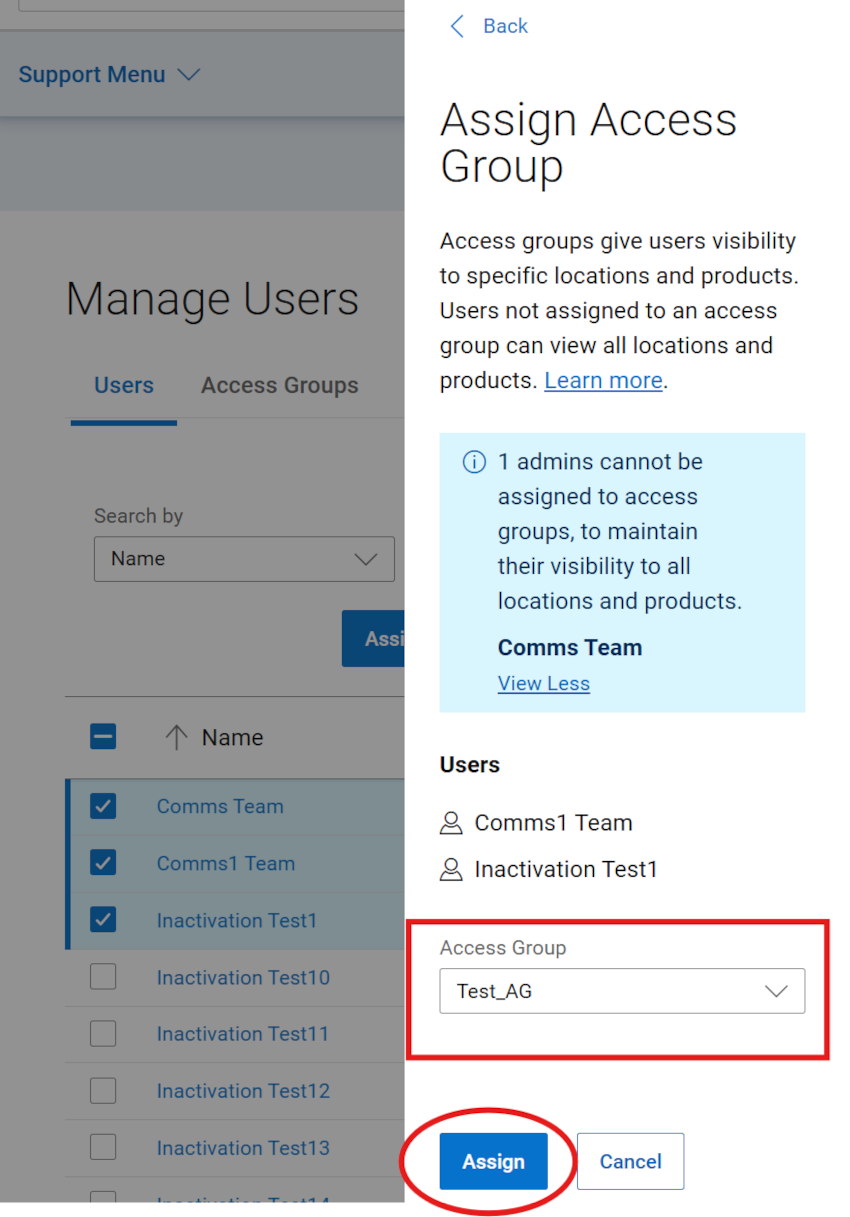
Figure 20: Assign access group
NOTE: Company Administrators cannot be assigned to access groups, to maintain their visibility to all locations and products. Multi-assignment inclusive of Administrators will filter them out of the assignment transaction and provide a summary of impacted users in the assignment drawer.
- Select Assign. A confirmation message is displayed and the changes should be reflected in the grid.
Create an “empty” Access Group with no Locations, Families, or Assets
NOTE: Associated users would see no locations or assets in their online experience until locations, product families, or products are added to the group, or the user is removed from the group / moved to a different group.
- Select the Users module and then the Access Groups sub-tab.
- Select Create Access Group.
- Without selecting a location, product family, or asset, Select Next, then enter a Name (required) and a Description (optional).
- Select Save Access Group. After confirmation, the empty access group is created, and the Access Groups page is displayed.
Clone an existing Access Group
- Select the Users module and then the Access Groups sub-tab.
- Select a group name from the Access Group column.
- Select Clone Access Group.
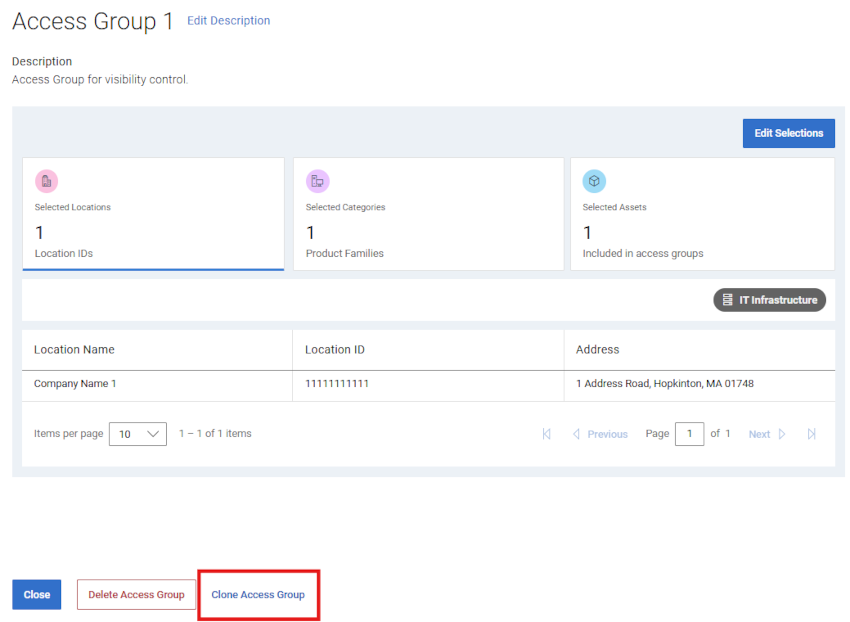
Figure 21: Clone Access Group - Clone button
- Use any of the three Selection Tile Cards to adjust the new group build as desired.
NOTE: Any changes made could alter the behavior of the group (ex. from Dynamic to Static), or the build structure of the group.
- When you are comfortable with the group build and resulting asset list, select NEXT, then enter a Name (required) and a Description (optional).
The preview pane will also be available to review the content of the group.
- Select Save Access Group. After confirmation, the access group is created, and the Access Groups page is displayed.
Invite User
The Invite User option allows you to send an invitation to create a Dell online account to a new user in your organization. This streamlines their registration process. For companies that have chosen the Restricted company profile type, all users must be set up by using the Invite User feature; they cannot directly register for access.
- The Invite User feature can be found via the Registration Settings and Users modules of Company information.
Please review Dell Knowledge Base article Administrator Roles and Company Registration Settings for guidance on the Invite User feature.
Online Support help options
Need help? Get started from the Online Support links below. If applicable, please contact your Service Account Manager or Customer Success Manager.
|
Topics |
Help Links Tip: Be sure to sign in to the Online Support site to view all available support options. |
|---|---|
|
Get Technical Support for your products.
|
|
|
Enterprise Online Account assistance View and manage company information, contacts, and service requests.
|
Administrative Support
|
|
Asset / Install Base management. Product registrations
|
|
Affected Products
CloudIQArticle Properties
Article Number: 000179622
Article Type: How To
Last Modified: 27 Jul 2026
Version: 14
Find answers to your questions from other Dell users
Support Services
Check if your device is covered by Support Services.