NVP vProxy: How To Upgrade or Redeploy the NVP vProxy Appliance
Summary: This article provides a general overview of how to upgrade the NetWorker VMware Protection (NVP) vProxy appliance.
This article applies to
This article does not apply to
This article is not tied to any specific product.
Not all product versions are identified in this article.
Instructions
The NVP vProxy appliance can be upgraded directly from the NetWorker server operating system, or the NetWorker Web User Interface (NWUI).
NOTE: The vProxy appliance has regular releases published on the Dell NetWorker Product Pages. You MUST keep the vProxy appliance up to date to ensure that optimum performance, compatibility, and security enhancements are applied. See: NVP vProxy: NetWorker vProxy Version Information
Limitations
- Concurrent vProxy redeployment is not supported using CLI; however, you can sequentially redeploy multiple vProxies using a script.
- vProxy redeployment is not supported for vProxies that are directly deployed in the ESXi bypassing the vCenter. If the vProxy is deployed on the ESXi bypassing the vCenter, then you must manually redeploy the vProxy.
- vProxy redeployment is not supported for VMware Cloud; For example, Azure VMware Services (AVS), Amazon VMware Cloud (VMC), so forth. If the vCenter is cloud-based, you must manually redeploy the vProxy.
- The root and admin password length of the vProxy should be in between 8–20 characters only. Before redeployment, you must change the root and admin password and update the vProxy resource in NetWorker with the updated vProxy admin password.
- Deploying new vProxies using CLI is not supported.
- During vProxy redeployment, the manual settings that were performed on the previous vProxy are not retained.
The process for manually replacing or upgrading a vProxy appliance is detailed in this article: NetWorker VMware Protection-vProxy: How to Manually Upgrade or Redeploy vProxy.
Process
- Download the vProxy OVA that you want to deploy from the Dell Support NetWorker Product Page.
- On the NetWorker server, create the following directory:
Linux:
/nsr/vproxy_ova/ovas
Windows:
C:\Program Files\EMC NetWorker\nsr\vproxy\vproxy_ova\ovas\
NOTE: This is the repository location that is used to redeploy the vProxy appliance. In Windows, you must manually create the
ovas folder. On Linux, you must manually create the vproxy_ova/ovas directory.
- Place the extracted OVA file in the
ovasdirectory. - Open an administrative or root command prompt on the NetWorker server.
- Use one of the following options:
Option One - NWUI Redeployment:
NOTE: This option requires that the NWUI Server package is installed and configured: NetWorker Management Web UI (NWUI): How to Install
- Access NWUI from a web browser:
https://NETWORKER_ADDRESS:9090/nwui - Log in using the default Administrator account, or other administrative user account.
- Go to Protection->VMware Proxies,
- Click the Redeploy option, the select the vProxies you want to redeploy.
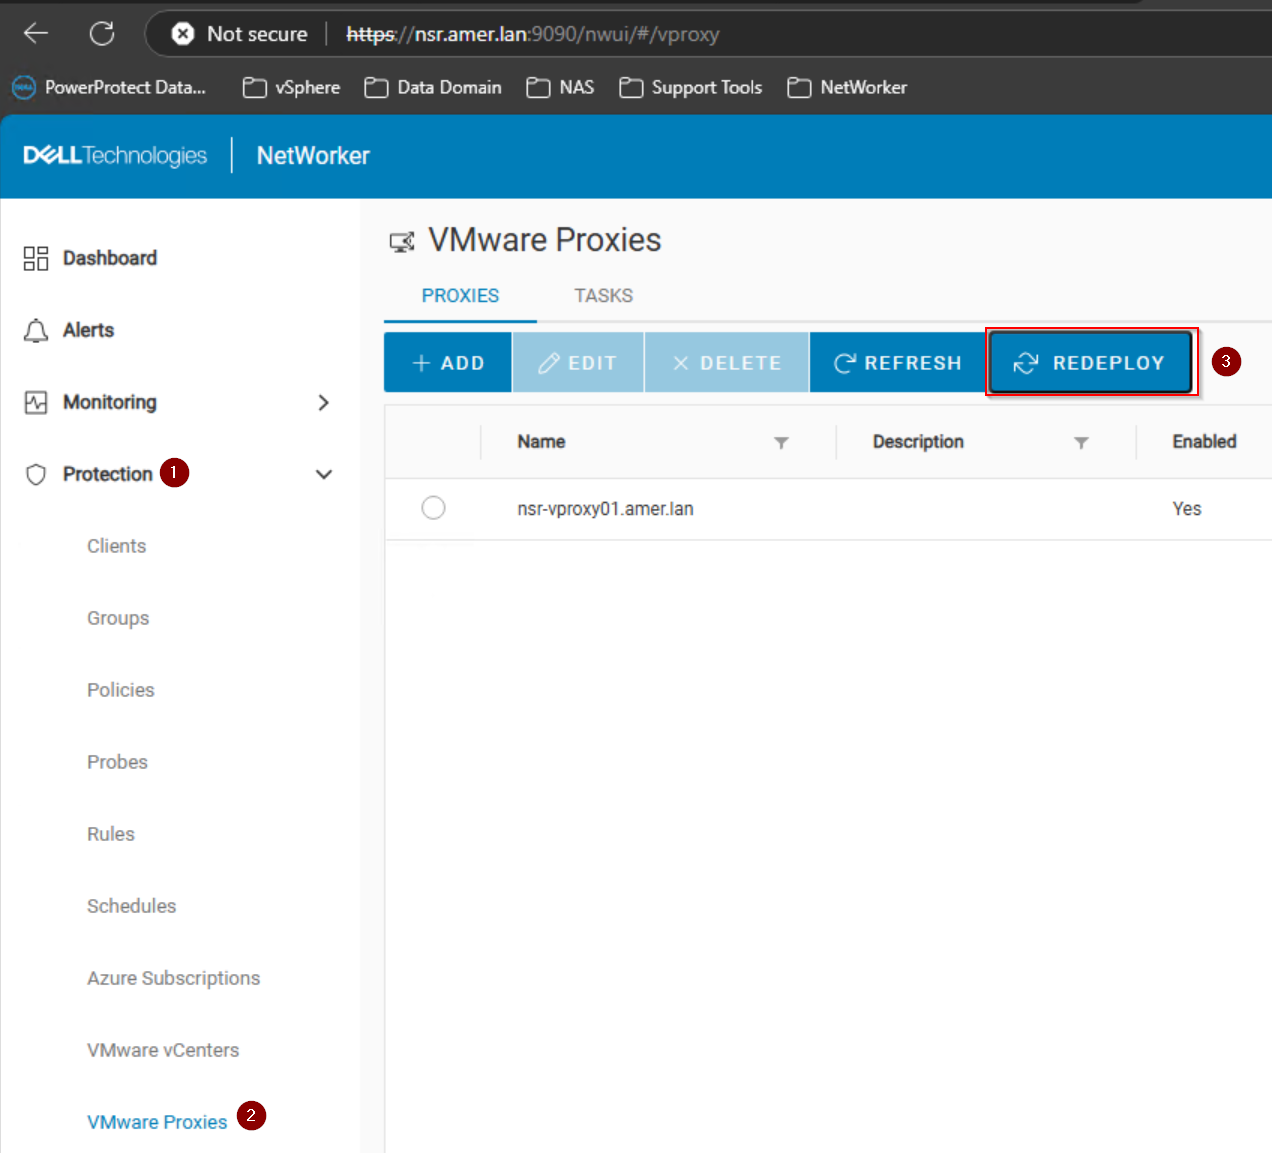
- Enter the root user credentials for each vProxy selected for redeployment.
- Click Finish and monitor the redeployment process.
Option Two - nsrvproxy_mgmt Command-Line Redeployment:
- Open an elevated command window on the NetWorker server.
- Run the following command, replacing the environment-specific fields:
nsrvproxy_mgmt redeploy -h vProxy-host-name -z vProxy-root-password [-x] [-f] [-u comments] [-t timeout in minutes] [-D debug-level]
Where:
-t specifies the maximum timeout value for any active vProxy session to get over and then start the redeployment. The default timeout value is ten minutes.

-x can be used when the vProxy admin password is the same as the root password on the existing vProxy.

-z is used when specifying the vProxy root password of the existing vProxy.

-h vProxy-host-name is the vProxy name that was used for registration and exists in the RAP resource.

-f is used to disable the confirmation prompt.

-D is used to set the debug level. By default, the debug level is 0.

-u is used to display the comments.
NOTE: The vProxy hostname value must be specified as it is configured in the NMC. If vProxy was registered with a short name, use that for the -h value. If registered with the FQDN, use the FQDN instead.
- If redeploying multiple vProxies, sequential redeployment can be accomplished by creating a .bat (Windows) or .sh (Linux) script on the NetWorker server. The script can then be run from an administrative or root command prompt.
Windows
.bat script contains something like:
nsrvproxy_mgmt redeploy -h blrv027b075 -z 'Welcome@123' -f
nsrvproxy_mgmt redeploy -h blrv027b076 -x -f
nsrvproxy_mgmt redeploy -h blrv027b077 -z 'P@ssw0rd123' -f
Linux
.sh script contains something like:
#!/bin/bash
nsrvproxy_mgmt redeploy -h blrv027b075 -z 'Welcome@123' -f
nsrvproxy_mgmt redeploy -h blrv027b076 -x -f
nsrvproxy_mgmt redeploy -h blrv027b077 -z 'P@ssw0rd123' -f
NOTE: Some special characters in the password field may cause the upgrade process to fail. For example, see article: NVP-vProxy: nsrvproxy_mgmt redeploy fails with "vProxy deployment error: Invalid value '' specified for property vami.rootpassword.vProxy If the password contains special characters, enclose it in single quotes ' '. This passes the password as literal text and should prevent the special characters from causing issues.
Additional Information
- NVP-vProxy: How to update or change vProxy admin or root password
- NVP vProxy: How to manually change the vProxy Appliance network interface settings
- NVP vProxy: How To Unregister/Re-Register a vProxy Appliance?
- The NetWorker VMware Integration Guide also contains information about vProxy deployment and upgrades; this guide is available through the Dell Support NetWorker Product Page.
Redeployment Logs:
| Log file | Default log location (NetWorker Server) | Description |
<job-uuid>.log |
|
vProxy management job log file is created during the redeployment of the associated vProxy. |
vproxy_upgrade_session__<jobuuid> |
|
Associated nsrvisd log file is created during redeployment of the vProxy. |
nsrvisd-daemon.log |
|
Associated nsrvisd detailed log file is created. |
ProxySessions- .log |
|
Associated ProxySessions log file is created during redeployment of the vProxy. |
Affected Products
NetWorkerProducts
NetWorker Family, NetWorker Series, VMwareArticle Properties
Article Number: 000197385
Article Type: How To
Last Modified: 28 Jun 2026
Version: 22
Find answers to your questions from other Dell users
Support Services
Check if your device is covered by Support Services.