La Guida al deployment di Dell non supporta il deployment di un cluster Windows con Windows Admin Center
Summary: Windows Admin Center dispone di una funzionalità di deployment dei cluster non supportata da Dell. Questo articolo descrive come configurare prima di configurare il cluster.
This article applies to
This article does not apply to
This article is not tied to any specific product.
Not all product versions are identified in this article.
Instructions
Windows Admin Center dispone di una funzionalità di deployment del cluster. Dell non supporta questa funzione.
Far corrispondere tutti i nodi, quindi fare in modo che le reti corrispondano.
Unconverged di base:
Due schede di rete di storage unclustered dispongono ciascuna di una subnet IP e di un gateway con subnet univoche.
Team
di gestioneUtilizzare la Guida per la procedura di PowerShell.
È necessario impostare tutti gli indirizzi IP e diverse altre impostazioni. Ciò si traduce in funzioni di base per recuperare l'utente.
Al termine di tutti i passaggi, creare il pool e il cluster.
Completa questi passaggi ma prima esegui i passaggi precedenti.
Non dimenticate di inserire i vostri nomi e le vostre taglie!
Inoltre, non dimenticare che prima di eseguirli deve essere necessaria una configurazione di rete per ogni nodo.
Far corrispondere tutti i nodi, quindi fare in modo che le reti corrispondano.
Unconverged di base:
Due schede di rete di storage unclustered dispongono ciascuna di una subnet IP e di un gateway con subnet univoche.
- VLAN separate
- Configurazione abilitata per RDMA, QOS se necessario
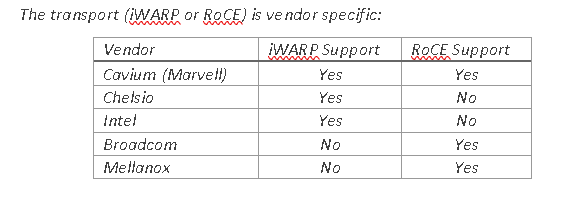
- Assicurarsi che le schede di rete di storage dispongano del PowerShell corretto per abilitare RoCE o iWARP.
Figura 1: Trasporto specifico del fornitore
- Cancellare eventuali configurazioni obsolete prima di implementare un pool.
- Assegnare un nome alle schede di rete e assegnare loro un indirizzo IP.
$S1Nic = Get-netadapter -name "slot1 port1"
$S2Nic = Get-Netadapter  -name "slot2 port2"
$S1vlan = "12"
$S1vlan= "21"

Set-NetAdapter -Name $S1Nic -VlanID $S1vlan -Confirm:$false
Set-NetAdapter -Name $S2Nic -VlanID $S2vlan -Confirm:$false
Team
di gestioneUtilizzare la Guida per la procedura di PowerShell.
$MgmtNicName = Management
$MgmtNic1= get-netadapter -name Nic1
$MgmtNic1 = Get-netadapter2 -name Nic2
$mgmtvlan = "31"
Install-WindowsFeature -Name Hyper-V,Failover-Clustering,Data-Center-Bridging,BitLocker -IncludeManagementTools -IncludeAllSubFeature -Confirm:$false

New-VMSwitch -Name $VMSwitchName -AllowManagementOS 0 -NetAdapterName $MgmtNic1 ,$MgmtNic2 -MinimumBandwidthMode Weight -Verbose -Confirm:$false

Add-VMNetworkAdapter -ManagementOS -name $MgmtNicName -SwitchName $VMSwitchName –StaticMacAddress $RMAC -Confirm:$false
   Set-VmNetworkadapterVlan -name $mgmtNicName -managementOS -access -vlanid $mgmtvlan
È necessario impostare tutti gli indirizzi IP e diverse altre impostazioni. Ciò si traduce in funzioni di base per recuperare l'utente.
#Enable Jumbo Frames
    Set-NetAdapterAdvancedProperty -Name $S1Nic,$S2Nic -DisplayName "Jumbo Packet" -DisplayValue "9014" -Confirm:$false

#Set RDMA
    If((Get-NetAdapter $S1Nic,$S2Nic | Select InterfaceDescription) -imatch "QLogic"){
        Set-NetAdapterAdvancedProperty -Name $S1Nic -DisplayName 'NetworkDirect Technology' -DisplayValue 'iWarp' -Confirm:$false
        Set-NetAdapterAdvancedProperty -Name $S2Nic -DisplayName 'NetworkDirect Technology' -DisplayValue 'iWarp' -Confirm:$false
    }
    If((Get-NetAdapter $S1Nic,$S2Nic | Select InterfaceDescription) -imatch "Mellanox"){
        Set-NetAdapterAdvancedProperty -Name $S1Nic -DisplayName 'DcbxMode' -DisplayValue 'Host In Charge' -Confirm:$false
        Set-NetAdapterAdvancedProperty -Name $S2Nic -DisplayName 'DcbxMode' -DisplayValue 'Host In Charge' -Confirm:$false
    }
Al termine di tutti i passaggi, creare il pool e il cluster.
Completa questi passaggi ma prima esegui i passaggi precedenti.
New-Cluster –Name MyCLuster1  –Node MYNODE1,MYNODE2 –NoStorage

Enable-ClusterStorageSpacesDirect –CimSession  MyCLuster1

1..(Get-ClusterNode).count| % {New-Volume -FriendlyName Volume$_ -FileSystem CSVFS_ReFS -StoragePoolFriendlyName $(Get-StoragePool -IsPrimordial $false).FriendlyName -StorageTierSizes 1GB -StorageTierFriendlyNames Performance}
Non dimenticate di inserire i vostri nomi e le vostre taglie!
Inoltre, non dimenticare che prima di eseguirli deve essere necessaria una configurazione di rete per ogni nodo.
Affected Products
Storage Spaces Direct R440 Ready Node, Storage Spaces Direct R640 Ready Node, Storage Spaces Direct R740xd Ready Node, Storage Spaces Direct R740xd2 Ready node, Microsoft Windows Server 2019, Microsoft Windows Server 2022
, Microsoft Windows Server 2025, PowerEdge XR2, Poweredge C4140, PowerEdge C6420, PowerEdge C6520, PowerEdge C6525, PowerEdge C6615, PowerEdge C6620, PowerEdge FC640, PowerEdge M640, PowerEdge M640 (for PE VRTX), PowerEdge MX740C, PowerEdge MX750c, PowerEdge MX760c, PowerEdge MX840C, PowerEdge R240, PowerEdge R250, PowerEdge R260, PowerEdge R340, PowerEdge R350, PowerEdge R360, PowerEdge R440, PowerEdge R450, PowerEdge R470, PowerEdge R540, PowerEdge R550, PowerEdge R640, PowerEdge R6415, PowerEdge R650, PowerEdge R650xs, PowerEdge R6515, PowerEdge R6525, PowerEdge R660, PowerEdge R660xs, PowerEdge R6615, PowerEdge R6625, PowerEdge R670, PowerEdge R740, PowerEdge R740XD, PowerEdge R740XD2, PowerEdge R7415, PowerEdge R7425, PowerEdge R750, PowerEdge R750XA, PowerEdge R750xs, PowerEdge R7515, PowerEdge R7525, PowerEdge R760, PowerEdge R760XA, PowerEdge R760xd2, PowerEdge R760xs, PowerEdge R7615, PowerEdge R7625, PowerEdge R770, PowerEdge R7715, PowerEdge R7725, PowerEdge R840, PowerEdge R860, PowerEdge R940, PowerEdge R940xa, PowerEdge R960, PowerEdge T140, PowerEdge T150, PowerEdge T160, PowerEdge T340, PowerEdge T350, PowerEdge T360, PowerEdge T440, PowerEdge T550, PowerEdge T560, PowerEdge T640, PowerEdge XR11, PowerEdge XR12, PowerEdge XR5610, PowerEdge XR7620
...
Products
Gateways & Embedded PCs, Laptops, Networking, Security, Servers, Software, Solutions, Storage, Tablets, Thin Clients, WorkstationsArticle Properties
Article Number: 000210175
Article Type: How To
Last Modified: 02 Jan 2025
Version: 4
Find answers to your questions from other Dell users
Support Services
Check if your device is covered by Support Services.