How to Implement NetWorker with Data Domain Cloud Tier
Summary: Instructions on how to implement NetWorker with a Data Domain Cloud Tier solution. Data Domain Cloud Tier moves data from the Active Tier to low‑cost, high‑capacity object storage in public, private, or hybrid clouds for long‑term retention. ...
Instructions
What is NetWorker with Data Domain Cloud Tier?
NetWorker can be used to send backup data to the cloud using DD Cloud Tier for long-term retention. Data Domain Cloud Tier moves data from the Active Tier to low‑cost, high‑capacity object storage. It supports public, private, and hybrid clouds for long‑term retention. Data Domain Cloud Tier is managed using a single Data Domain namespace. There is no separate cloud gateway or virtual appliance required. Cloud storage functions as an additional storage tier attached to the Data Domain system. Data moves between tiers as needed. File system metadata associated with the data stored in the cloud is maintained in local storage, and it is also mirrored to the cloud.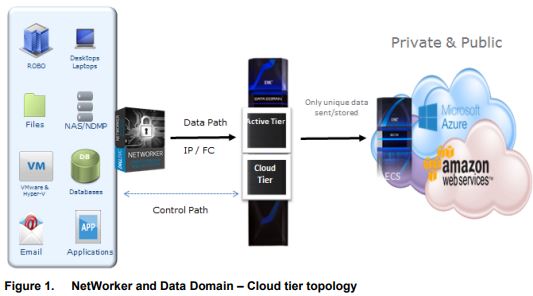
How to Implement NetWorker with Data Domain Cloud Tier.
1) Check System Requirements and Compatibility:
- NetWorker compatibility documentation is available through: E-Lab Interoperability Navigator 2.0-HOME
- For each version of NetWorker and DD, there is specific disk; DDOS, CPU, and Memory requirements for your version. Check the NetWorker DD Boost Integration Guide for your NetWorker version in order to validate the exact system requirements. NetWorker documentation is available through: Support for NetWorker | Manuals & Documents
2) Check Licensing Requirements.
The required licenses are listed in the NetWorker DD Boost Integration Guide for your NetWorker version. A Cloud Tier Capacity license is required on the Data Domain and the standard Data Domain licenses. The implemented licenses can be checked (and updated if required) in:
PowerProtect DD System Manager -> Administration - Licenses
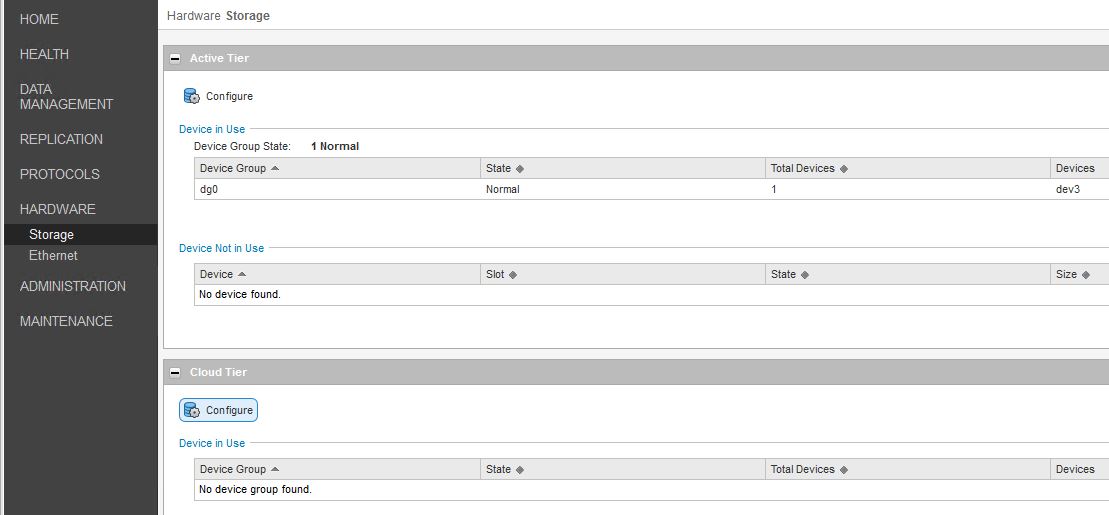
3) On DD: Add Devices to the Active Tier and Cloud Tier.
There must be storage added to the Data Domain system on both the Active Tier and the Cloud Tier. The Cloud Tier storage must be on the same DD Storage Unit as the Active Tier.
PowerProtect DD System Manager -> Hardware -> Storage -> Active Tier & Cloud Tier -> Configure.
Select the 'Addable Storage' and 'Add to Tier'. If there is no addable storage on your DDVE, then you must assign a new disk to the DDVE Virtual Machine at the VMware level.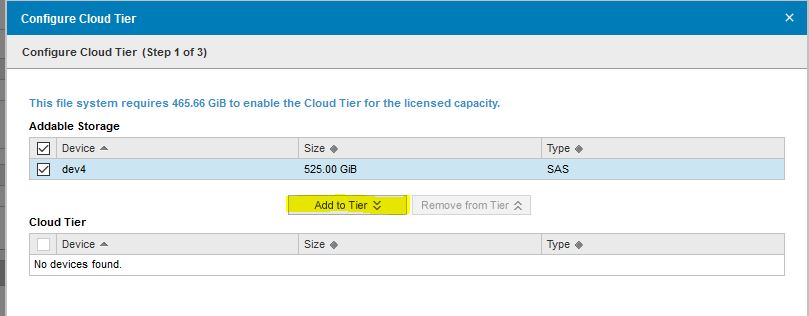
Once configured, there are devices in use on both the active tier and the cloud tier.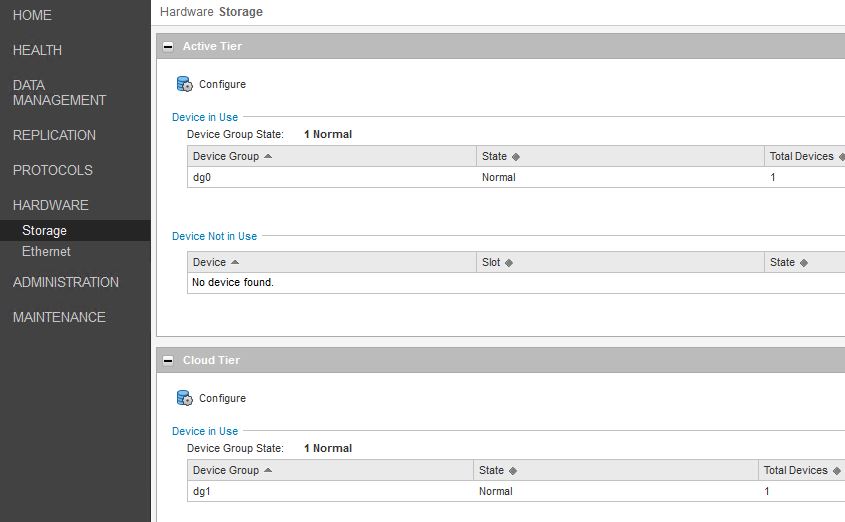
4) On DD: Create the Cloud Unit and Cloud Profile.
For some cloud storage providers, you may need to import the cloud certificate. Instructions on this for your cloud storage provider are to be found in the NetWorker DD Boost Integration Guide for your NetWorker version.
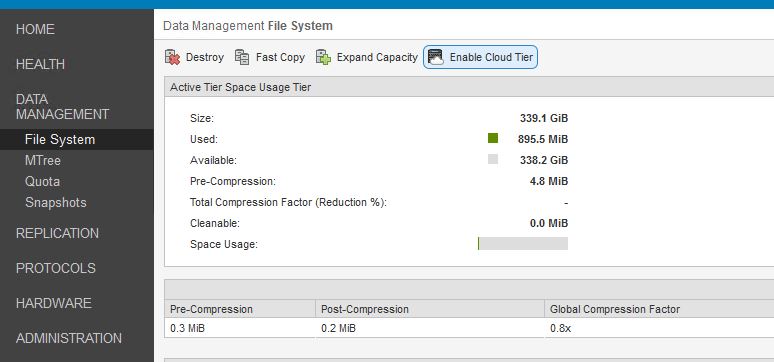
Enable the Cloud Tier: PowerProtect DD System Manager -> Data Management -> File System -> Enable Cloud Tier.
Define a new passphrase to encrypt cloud access: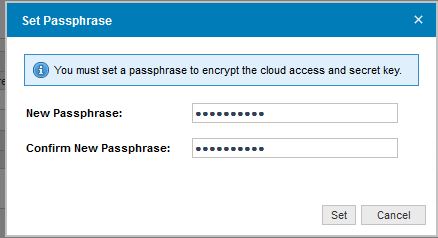
Create a new Cloud Unit: PowerProtect DD System Manager -> Data Management -> File System -> Cloud Units tab -> Add

The name is a new name to describe the cloud unit. The access details are provided by the cloud storage provider.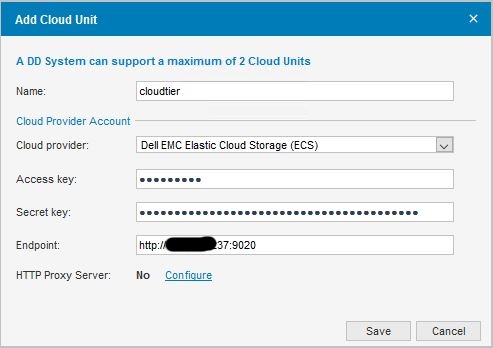
Check that the cloud unit has been successfully created and is active:
5) On DD: Set Data movement schedule
The data movement schedule determines the frequency at which data moves from the DD Cloud Tier to the cloud provider.
PowerProtect DD System Manager -> File System -> Summary -> Settings

The data movement command moves all data that is available on the DD Cloud Tier to the cloud provider. This should be scheduled for a relatively quiet time. The time defined here is when the physical movement of data to the cloud storage provider takes place.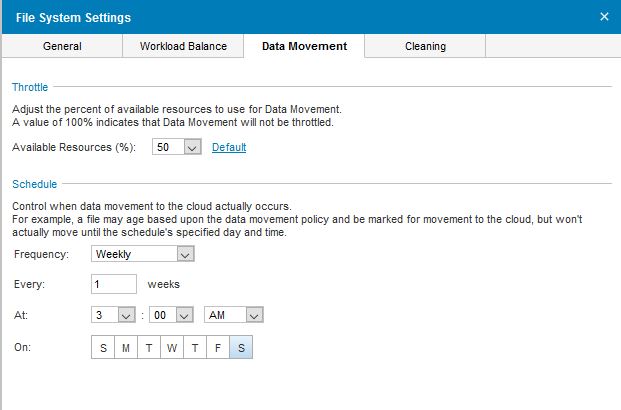
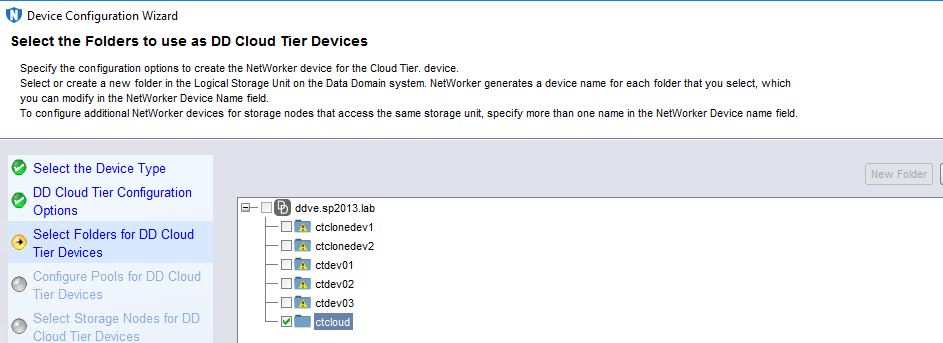
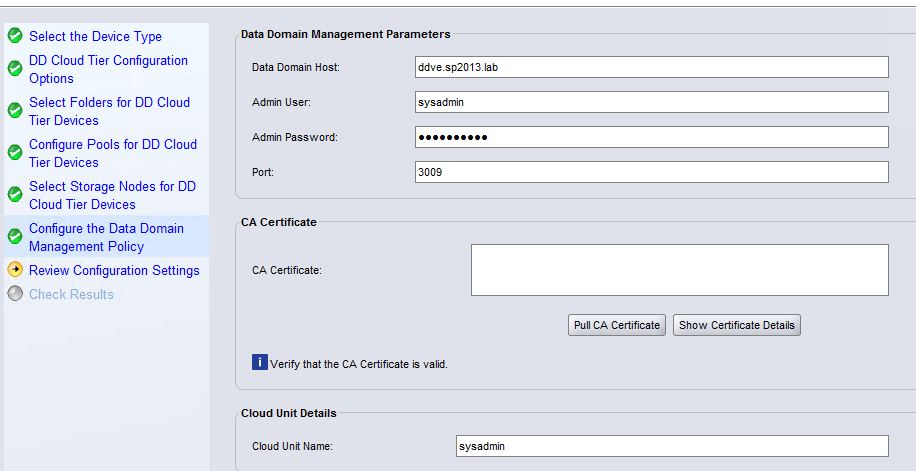
6) On NetWorker: Create a NetWorker Cloud Tier Device.
In the NetWorker Management Console (NMC): Devices -> Data Domain Systems -> New Device Wizard
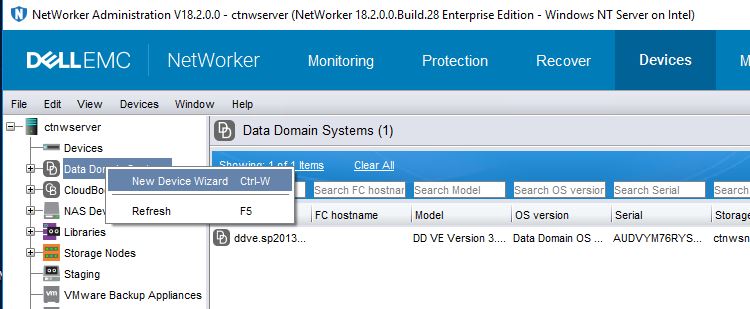
The device type is DD Cloud Tier.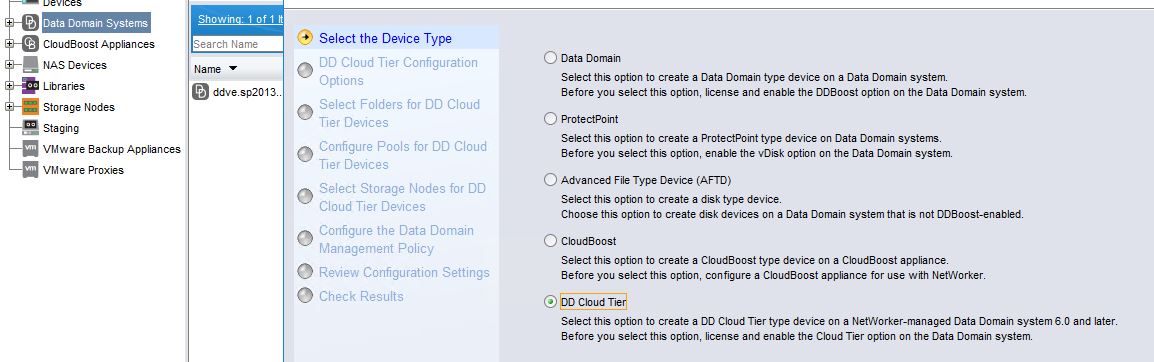
There must be a pool dedicated to Cloud Tier volumes: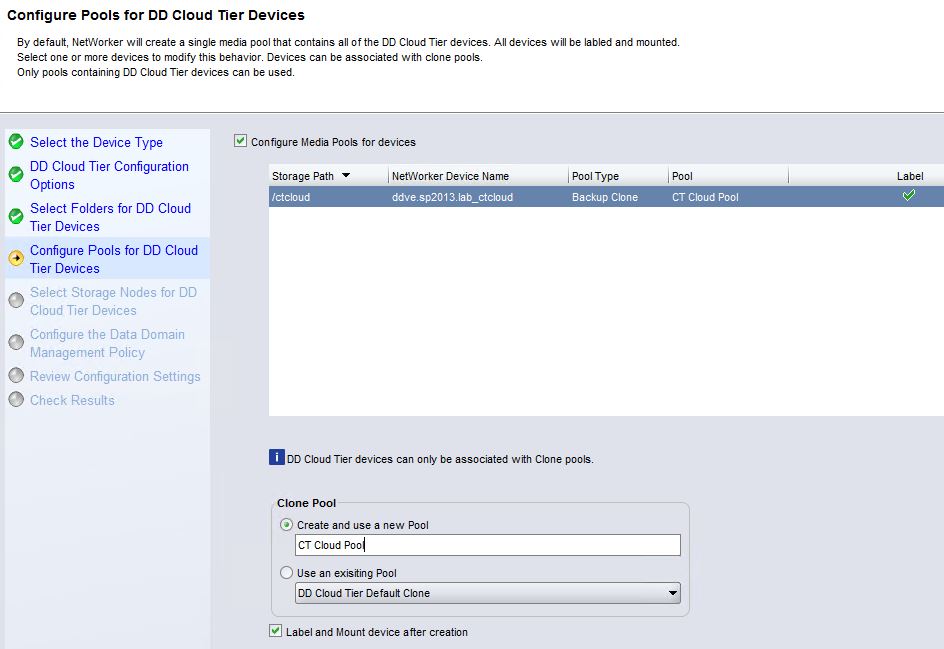
The Cloud Unit Name is listed using Data Domain command: cloud unit list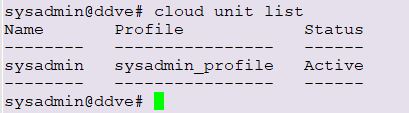
7) On NetWorker: Configure NetWorker Cloning.
Configure NetWorker cloning in the normal way. There are several options on how to configure cloning in NetWorker. The version-specific NetWorker Administration Guide provides full details.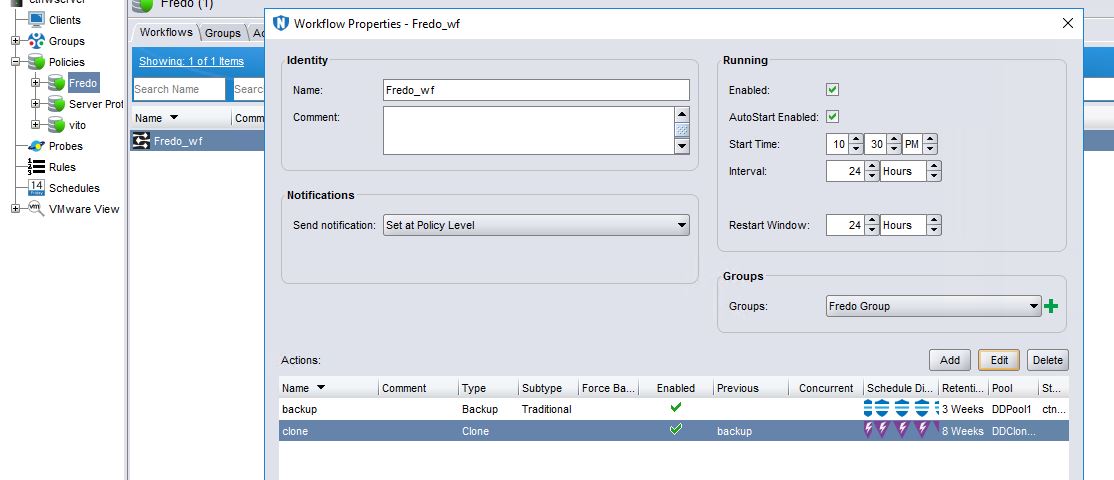
The destination pool for the cloning operation is the new NetWorker Cloud Tier pool.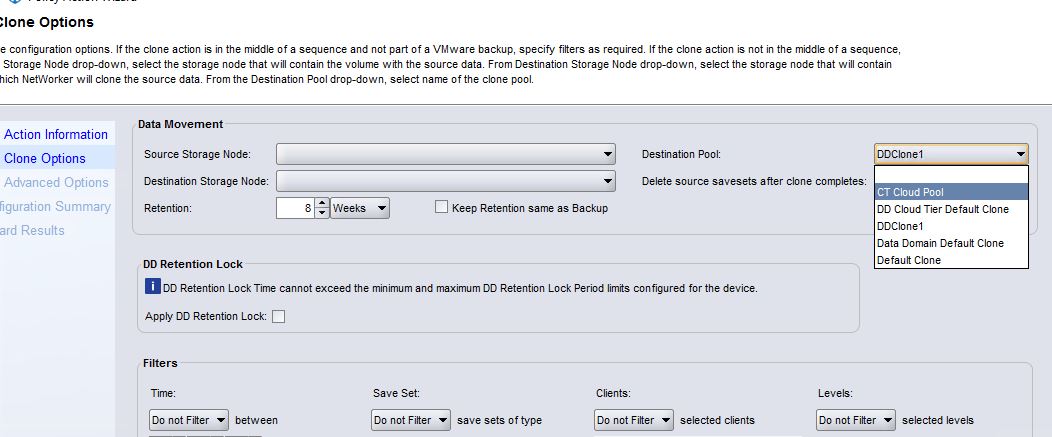
8) On NetWorker: Validate correct operation of NetWorker with Cloud Tier.
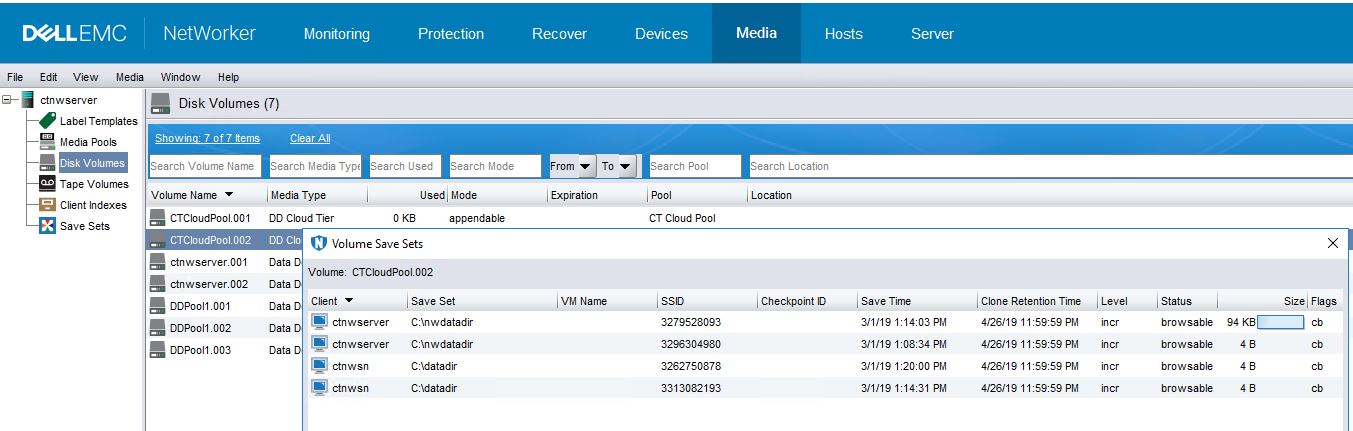
- Once the cloning operation is complete, we can see save sets in the Cloud Tier volumes.
Checking the data in the NetWorker cloud tier pool, we can see that the 'clflags' column shows 'T' for those save set instances which have not yet been moved to the cloud storage. Those without the 'T' flag have already been moved as they were in the Cloud Tier at the time of the latest data movement on the DD.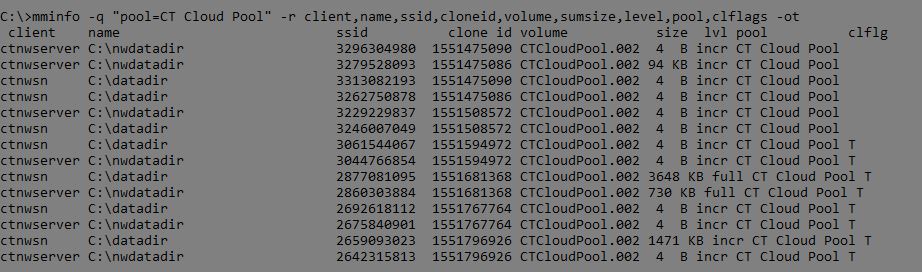
The full process is:
- NetWorker client data is backed up to a NetWorker backup pool.
- NetWorker cloning operation creates a copy of the backup save set on the DD Cloud Tier, by cloning to a NetWorker cloud tier pool.
- Those save set instances which are in the Cloud Tier but which have not yet been moved to the cloud storage have a clone flag 'T'.
- DD data movement moves all data from the Cloud Tier to the cloud storage as per the schedule defined in Data Domain.
- NetWorker save set instances in the Cloud Tier now show no 'T' clone flag. These save sets are no longer on the Data Domain. They are in the cloud.
- NetWorker save sets will be retained until their retention time has been reached (
clretentvalue inmminfo).
Additional Information
The NetWorker Administration and DD Boost Integration Guides are available through: Support for NetWorker | Manuals & Documents (You must sign in with your Dell support account to access these materials).
NetWorker with Data Domain Cloud Tier: Triage and Troubleshooting Guide