Ubuntu Linux BIOS Update, BIOS Reset or Motherboard Replacement, No Boot Error in Precision and XPS
Summary: This article describes a no boot issue that affects XPS and Precision computers running Ubuntu Linux. This occurs after replacing the motherboard or updating/restoring the BIOS to default settings. ...
This article applies to
This article does not apply to
This article is not tied to any specific product.
Not all product versions are identified in this article.
Symptoms
XPS and Precision computers running Ubuntu Linux may fail to boot immediately after replacing the motherboard or restoring the BIOS default settings. This issue may also occur when running a BIOS update from Ubuntu/Canonical resulting in a "No boot device was found" error message.
Cause
The reason for this is that the default BIOS setting for Serial AT Attachment (SATA) operation in these computers is RAID On. As a result, replacement motherboards are set to the BIOS default for SATA operation of RAID On. Updating the BIOS, or re-setting the BIOS to "default" also resets SATA operation to RAID On. This default RAID On setting prevents Ubuntu Linux from detecting the Hard Drive.
Ubuntu Linux systems require the SATA operation to be set to Advance Host Controller Interface (AHCI). Changing this setting back to AHCI enables the computer to boot as normal by correctly detecting the Hard Drive again.
Ubuntu Linux systems require the SATA operation to be set to Advance Host Controller Interface (AHCI). Changing this setting back to AHCI enables the computer to boot as normal by correctly detecting the Hard Drive again.
Resolution
If the boot options were deleted, they must be manually re-created with the following steps:
- In the BIOS go to System Configuration, SATA operation and enable AHCI. This allows the drive to be seen in Ubuntu and Ubuntu installers.
- Go to General, Boot Sequence, and select Add Boot Option.
- Under File Name, click the button to the right to bring up the EFI Boot Selection window.
- The EFI Boot Selection window is split into two sections, Directories and Files. Under Directories click efi, Ubuntu.
- Under Files click
shimx64.efithen click Okay, then click Okay again.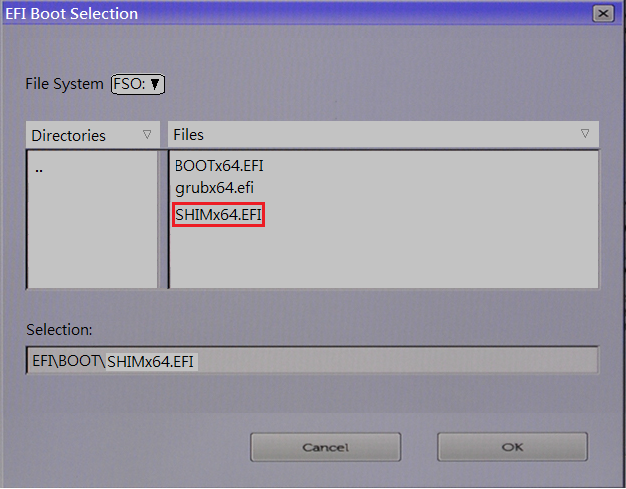
- Type UBUNTU in the Boot Option Name field:

- Clear all other boot options to ensure that our new boot option is the only one selected.
- Click Apply and then Okay to save changes, then click Exit to reboot the computer.
Affected Products
XPS, XPS, Fixed Workstations, Mobile Workstations, Dell Canvas 27, Red Hat Enterprise Linux Version 8, Ubuntu Server LTS, XPS 13 9350 (End of Life)Article Properties
Article Number: 000177068
Article Type: Solution
Last Modified: 17 Apr 2025
Version: 12
Find answers to your questions from other Dell users
Support Services
Check if your device is covered by Support Services.