Avamar: How to configure Standalone Exchange VSS Plugin
Summary: The article provides steps to configure Exchange VSS Plugin on Standalone Windows server Note: The KB does not apply for Exchange - Cluster, Federated, and DAG configurations.
Instructions
Requirements:
Download the two plugins from the Downloads page of Avamar Server and place it in a temporary location.
- File 1: AvamarClient-windows-x86_64-19.10.100-135.msi
- File 2: AvamarExchangeVSS-windows-x86_64-19.10.100-135.exe

Procedure Overview:
- Install the Avamar Client for Windows on each Microsoft Exchange server with the Mailbox server role. Click here
- Install the Avamar Plug-in for Exchange VSS on each Microsoft Exchange server with the Mailbox server role. Click here
- Register each Exchange server as a client with the Avamar server. Click here
- Create and configure the AvamarBackupUser account. Click here
- Create Dataset, Schedule, Retention, and assign to the newly created Policy. This would be optional if the user would like to add the client to the existing Policy. Click here
1. Installing the Avamar Client for Windows
(Optional) Before installing the plug-in, create a User-defined Domain under /domain, if the user would like to register to the new domain.
-
Log in to the Exchange server with the Mailbox server role as an administrator.
-
Go to the temporary folder that contains the Avamar installation files that you downloaded.
-
Start the installer by using the appropriate method:
- If User Account Control (UAC) is enabled, open a command prompt as an administrator. Then change the directory to the location of the installation package, and then type the following command:
msiexec /i AvamarClient-windows-x86_64-version.msi
Where version is the Avamar client version. - If UAC is disabled, double-click the installation file to open it.
The installation wizard opens at the welcome page.
- If User Account Control (UAC) is enabled, open a command prompt as an administrator. Then change the directory to the location of the installation package, and then type the following command:
-
Click Next.
The End-User License Agreement page appears.

-
Review the license agreement.
-
To accept the terms in the license agreement, select the checkbox, and click Next.
The Custom Setup page appears.
-
Ensure that the Avamar Client User Interface is selected for installation.
-
(Optional) Specify a folder for the Avamar client installation by clicking Browse and selecting a location.

-
Click Next on the Custom Setup page.
The "Please enter server information" page appears.
-
Complete the information about the Avamar server and click Next on the Please enter server information page.

The Ready to Install for Windows page appears.
-
Click Install.
-
When the installation is completed, click Finish.
2. Installing the Exchange VSS plug-in
-
Log in to the Exchange server with the Mailbox server role as an administrator.
-
Go to the temporary folder that contains the Avamar installation files. (AvamarExchangeVSS-windows-x86_64-19.10.100-135.exe)
-
Start the installer by double-clicking the file.
-
(Optional) For Granular Lever Recoveries (GLR) support, choose from the following two options:
- GLR using ItemPoint for Exchange
- GLR using Native Microsoft Exchange Messaging Application Programming Interface (MAPI) Collaboration Data Objects (CDO)
(For Exchange 2016 and 2019 GLR, ItemPoint for Exchange must be selected. )

-
Click Install.

-
A message indicates that the installation was successful. After clearing the message, the Avamar Backup Plug-in for Exchange VSS Setup page appears.


-
Click Next.
Selecting the Exchange GLR plug-in option displays the WriteCache Folder page.
Specify the WriteCache folder and select Next.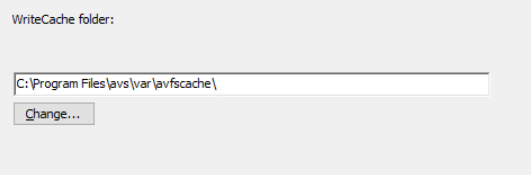
-
A message appears to confirm the installation of EldoS.
Click Install
The EldoS components are required for granular and message level recovery.
-
When the installation is completed, click Finish.
3. Registering the client
-
Log in to the Microsoft Exchange server.
-
Right-click the Avamar client system tray icon.
A menu appears.

-
Select Manage > Activate Client.

The Activate Client Setup dialog box appears.

-
In the Administrator Address box, type the DNS name or IP address for the Avamar server.
-
In the Administrator Server Port box, specify the port on the Avamar server for client/server communication.
-
In the Client Domain box, type the name of the Avamar domain for the client.
The default name is clients. -
Click Activate.
A confirmation message appears.
-
Click OK.
4. AvamarBackupUser account
Creating and configuring the account with the Avamar Exchange Backup User Configuration Tool
Run the Avamar Exchange Backup User Configuration Tool on one Exchange server. This action is performed to create the AvamarBackupUser account and configure the Avamar Backup Agent and Exchange GLR services on the Exchange server to log in as the account.
-
Ensure the existing AvamarBackupUser account is a member of the specified Active Directory groups:
- Avamar Roles
- Domain Users
- Exchange Servers
- Exchange Trusted Subsystem

-
Log in to the Exchange server as a domain administrator.
-
Start the Avamar Exchange Backup User Configuration Tool:
- On Windows Servers 2012, 2016, and 2019, open the Start screen and select Backup User Configuration Tool.
The Dell Avamar Exchange Backup User Configuration Tool appears.

-
Specify whether to create an account or use an existing account:
- Select New user to create an account.
- Select Existing user to configure an existing account.
-
Specify the name for the account in the Username box.
-
In the Password box, type a password for the account.
-
Retype the password in the Confirm box.
The password must comply with domain password policy settings. Otherwise, activation of the mailbox fails. Typically the domain administrator sets the password policy by using Group Policy at the domain level.
-
Select the Exchange server for the account from the Exchange Server list.
-
Select the Mailbox Store for the account from the Mailbox store lists.
-
Leave the Configure Backup Agent checkbox selected.
This option automatically configures the Avamar Backup Agent service to log in as the AvamarBackupUser account.
-
Click Configure Services.
The tool performs the following tasks as shown in the above screenshot:
- Creates, enables, and adds the AvamarBackupUser account to the necessary domain groups
- Creates a mailbox for the user
- Configures the Backup Agent service to run as the AvamarBackupUser account (when you select the Configure Backup Agent checkbox).
- On servers with the Exchange GLR plug-in, configures the GLR service to run as the AvamarBackupUser account.
- Verifies that the user can successfully log in
-
Click Check to test the user settings.
The message log lists the test results.
-
If all the tests are successful, click Close.
If any of the tests fail engage the Support team.
5.Configuring Policy
-
Add Schedule under a defined domain (Full and incremental).

-
Add Retention under User-Defined Domain (Full and incremental)

-
Add Dataset > Specify the plug-in "Windows Exchange VSS" on the left panel.

Choose Full or Incremental backup from the dropdown.


-
Add or Edit Policy in order to assign the dataset, schedule, and retention.

Enter the name for the policy and enable it.

Select the checkbox to add the client as member to this policy.

From the dropdown, add the Dataset that was created earlier or use an existing one.

From the dropdown, add the Schedule that was created earlier or use an existing one.

From the dropdown, add the Retention that was created earlier or use an existing one.

Verify the configuration and select Finish to complete the configuration.

Additional Information
