ECS: Konfigurieren von ECS-SNMP-Traps.
Summary: SNMP-Traps werden von einem beliebigen Lifecycle-Node auf dem ECS erzeugt. Im folgenden Wissensdatenbank-Artikel wird gezeigt, wie Sie den aktiven Lebenszyklus-Node identifizieren und eine Testwarnmeldung erzeugen, um ein Trap-Ereignis zu erzeugen. ...
This article applies to
This article does not apply to
This article is not tied to any specific product.
Not all product versions are identified in this article.
Instructions
SNMP-Traps werden von einem beliebigen Lifecycle-Node auf dem ECS erzeugt. Im folgenden Wissensdatenbank-Artikel wird gezeigt, wie Sie den aktiven Lebenszyklus-Node identifizieren und eine Testwarnmeldung erzeugen, um ein Trap-Ereignis zu erzeugen.
So konfigurieren Sie SNMP-Trap-Sendungen und erstellen sie neu:
Hinweis: Jeder der Lifecycle-Server-Knoten kann einen Trap auslösen, da sie als Ensemble synchronisiert sind und alle Knoten über Fabric-Agenten verfügen, um den Status des Knotens und der Ressourcen zu aktualisieren.
ECS 3.1 – Administratorhandbuch Zusätzliche Informationen zu Traps:
ECS 3.7 – Administrationshandbuch (dell.com) (Seite 149–155)
MIB ist für die OID-Übersetzung in den meisten Monitoringlösungen erforderlich:
https://dl.dell.com/downloads/DL79351_ECS-MIB.mib
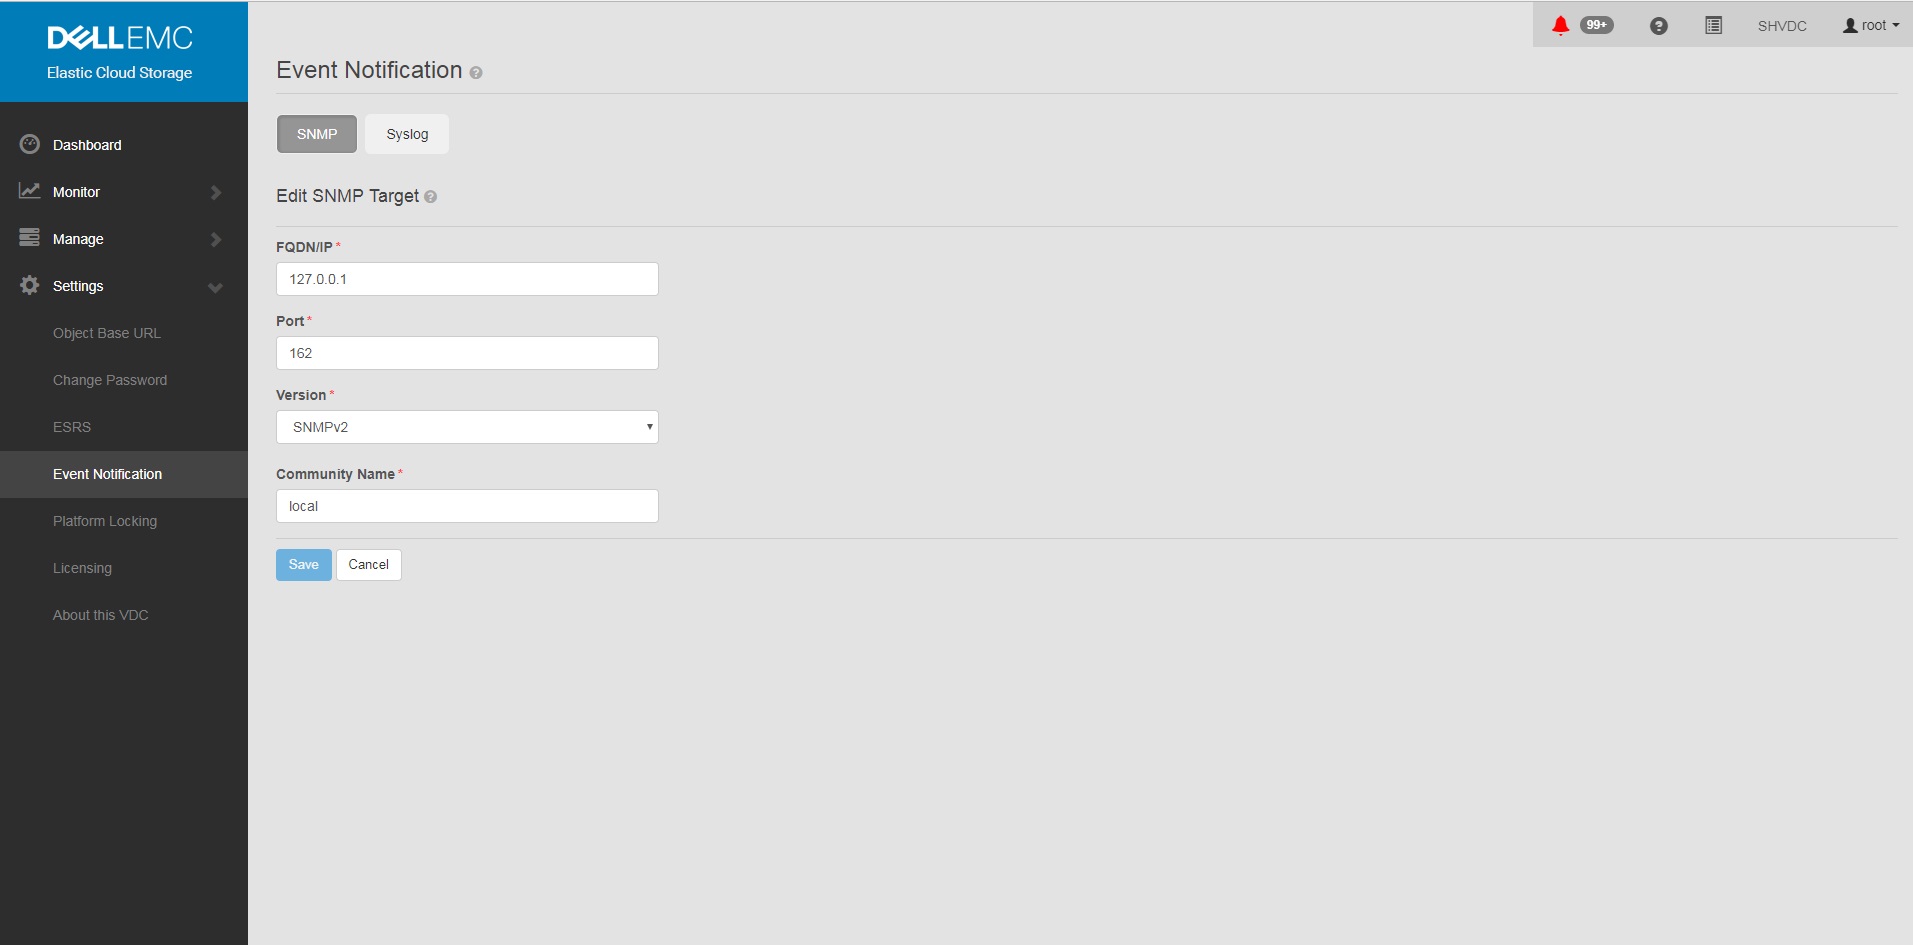
So konfigurieren Sie SNMP-Trap-Sendungen und erstellen sie neu:
- Einstellen von SNMP auf <Trap-Empfängeradresse> in der GUI
ein. Einstellungen in der GUI
b. Ereignisbenachrichtigung
c. Wählen Sie SNMP
d. Neuer Ziel-FQDN
/IP = <Trap-Empfängeradresse>
Port = 162
Version = SNMPv2
Community Name = <Communitystring>
Speichern
b. Ereignisbenachrichtigung
c. Wählen Sie SNMP
d. Neuer Ziel-FQDN
/IP = <Trap-Empfängeradresse>
Port = 162
Version = SNMPv2
Community Name = <Communitystring>
Speichern
Beispiel:
- Bestätigen Sie, dass die Konfiguration auf dem ECS festgelegt ist, nachdem Sie eine Trap-Konfiguration in der Benutzeroberfläche hinzugefügt haben.
Befehl:
Beispiel:
# sudo /opt/emc/caspian/fabric/cli/bin/fcli-internal lifecycle alert.snmpconfiguration
Beispiel:
Node 1:~ # sudo /opt/emc/caspian/fabric/cli/bin/fcli-internal lifecycle alert.snmpconfiguration
{
  "status": "OK",
  "etag": 73523,
  "snmp_configuration": {
    "engine_id": "80001370010A20A9799527B54B",
    "snmp_targets": [{
      "version": "v2",
      "port": 162,
      "hostname": "127.0.0.1",
      "community": "local",
      "username": "",
      "target_id": "816bd926-147e-4309-bf69-492eea94fc7a",
      "authentication_protocol": "",
      "privacy_protocol": ""
    }]
  }
}
- Führen Sie den Befehl test alert aus, um eine Warnmeldung und einen SNMP-Trap zu erzeugen.
Befehl (beachten Sie, dass Sie in den richtigen Nutzer und das richtige Kennwort wechseln müssen):
Beispiel:
# TOKEN=$(curl -iks https://localhost:4443/login -u '<User:Password>' | grep X-SDS-AUTH-TOKEN);echo $TOKEN;curl -ks -H "$TOKEN" -H "Content-Type: application/json" -d '{"user_str": "ECS Test Alert", "contact": "ecsadmin@company.com"}' https://localhost:4443/vdc/callhome/alert | xmllint --format -;curl -vk -H "$TOKEN" "https://localhost:4443/logout"
Beispiel:
admin@provo:~> TOKEN=$(curl -iks https://localhost:4443/login -u 'root:ChangeMe' | grep X-SDS-AUTH-TOKEN);echo $TOKEN;curl -ks -H "$TOKEN" -H "Content-Type: application/json" -d '{"user_str": "ECS Test Alert", "contact": "ecsadmin@company.com"}' https://localhost:4443/vdc/callhome/alert | xmllint --format -;curl -vk -H "$TOKEN" "https://localhost:4443/logout"
X-SDS-AUTH-TOKEN: BAAcSWx4M3IvY0p6VFBCTUtTaE9zdmFVSVFZNFdNPQMAjAQASHVybjpzdG9yYWdlb3M6VmlydHVhbERhdGFDZW50ZXJEYXRhOmZkYzJhMDg2LTQzMGEtNGU3ZC04ZmNiLTU2MDA3ZDFmOWU4NgIADTE1NTM1NDgzNjk5ODEDAC51cm46VG9rZW46YzQ3ZmUwYzYtZjg3Ni00OTE5LWJkMWYtZDgyMjYwN2I2MmIwAgAC0A8=
<?xml version="1.0" encoding="UTF-8" standalone="yes"?>
<alert>
  <acknowledged>false</acknowledged>
  <type>Notify</type>
  <description>ECS Test Alert: ecsadmin@company.com</description>
  <id>urn:storageos:Alert:bbb02b69-0169-1355-a40a-c1f3512e51cd</id>
  <namespace/>
  <severity>INFO</severity>
  <symptomCode>999</symptomCode>
  <timestamp>2019-03-26T20:27:58</timestamp>
</alert>
* SSL connection using TLSv1.2 / ECDHE-RSA-AES256-GCM-SHA384
* Server certificate:
*        subject: CN=localhost
*        start date: 2018-02-28 10:53:28 GMT
*        expire date: 2028-02-26 10:53:28 GMT
*        issuer: CN=localhost
*        SSL certificate verify result: self signed certificate (18), continuing anyway.
* SSLv2, Unknown (23):
> GET /logout HTTP/1.1
> User-Agent: curl/7.37.0
> Host: localhost:4443
> Accept: */*
> X-SDS-AUTH-TOKEN: BAAcSWx4M3IvY0p6VFBCTUtTaE9zdmFVSVFZNFdNPQMAjAQASHVybjpzdG9yYWdlb3M6VmlydHVhbERhdGFDZW50ZXJEYXRhOmZkYzJhMDg2LTQzMGEtNGU3ZC04ZmNiLTU2MDA3ZDFmOWU4NgIADTE1NTM1NDgzNjk5ODEDAC51cm46VG9rZW46YzQ3ZmUwYzYtZjg3Ni00OTE5LWJkMWYtZDgyMjYwN2I2MmIwAgAC0A8=
>
* SSLv2, Unknown (23):
< HTTP/1.1 200 OK
< Date: Tue, 26 Mar 2019 20:27:58 GMT
< Content-Type: application/xml
< Content-Length: 95
< Connection: keep-alive
<
* Connection #0 to host localhost left intact
<?xml version="1.0" encoding="UTF-8" standalone="yes"?><LoggedOut><user>root</user></LoggedOut>
- Führen Sie den folgenden Befehl aus, um festzustellen, ob der Trap von einem anderen Lebenszyklus-Node im Cluster ausgegangen ist, da der Protokolleintrag das neueste Datum hat.
Befehl:
Beispiel (Beachten Sie, dass Node 3 den Trap-Versand protokolliert hat):
# domulti 'grep -i snmp /opt/emc/caspian/fabric/agent/services/fabric/lifecycle/log/lifecycle.log'
Beispiel (Beachten Sie, dass Node 3 den Trap-Versand protokolliert hat):
admin@provo:~> domulti 'grep -i snmp /opt/emc/caspian/fabric/agent/services/fabric/lifecycle/log/lifecycle.log | grep 2017-12-11'
192.168.219.1
========================================

192.168.219.2
========================================

192.168.219.3
========================================
2017-12-11 18:10:48,849 1419726792 [qtp1183213894-166677] DEBUG com.emc.caspian.fabric.lifecycle.alert.snmp.TrapSenderV2::<init> (line: 51)  - 36827218-dcc3-4d44-b843-1fdcedc3899c Created trap sender SnmpV2CTarget[hostname=127.0.0.1, port=162, version=v2]
2017-12-11 18:10:48,856 1419726799 [qtp1183213894-166677] DEBUG com.emc.caspian.fabric.lifecycle.alert.snmp.TrapSenderV2::sendTrap (line: 85)  - 36827218-dcc3-4d44-b843-1fdcedc3899c Sent trap: pdu TRAP[requestID=143015719, errorStatus=Success(0), errorIndex=0, VBS[1.3.6.1.2.1.1.3.0 = 113 days, 3:54:55.25; 1.3.6.1.6.3.1.1.4.1.0 = 1.3.6.1.4.1.1139.102.1.1; 1.3.6.1.4.1.1139.102.0.1.1 = Mon Dec 11 18:10:48 UTC 2017; 1.3.6.1.4.1.1139.102.0.1.2 = Info; 1.3.6.1.4.1.1139.102.0.1.3 = 999; 1.3.6.1.4.1.1139.102.0.1.4 = ECS Test Alert: ecsadmin@company.com]], target: CommunityTarget[address=127.0.0.1/162,version=1,timeout=5000,retries=2,securityLevel=1,securityModel=1,securityName=local,preferredTransports=null], snmp: org.snmp4j.Snmp@6e6f15f3, transport: org.snmp4j.transport.DefaultUdpTransportMapping@122299ef
2017-12-11 18:10:48,857 1419726800 [qtp1183213894-166677] INFO com.emc.caspian.fabric.lifecycle.alert.snmp.SnmpAgent::sendAlert (line: 400)  - 36827218-dcc3-4d44-b843-1fdcedc3899c Sent alert Event[symptomCode=999, category=CONFIGURATION, severity=INFO, status=UNKNOWN, component=Object, componentId=, subComponent=Notify, subComponentId=, callHome=true, firstTime=1513015848814, lastTime=1513015848814, count=0, eventData=, description=ECS Test Alert: ecsadmin@company.com, channel=ALL] to SNMP target: SnmpV2CTarget[hostname=127.0.0.1, port=162, version=v2]

192.168.219.4
========================================
grep: /opt/emc/caspian/fabric/agent/services/fabric/lifecycle/log/lifecycle.log: No such file or directory
- Stellen Sie in einem zweiten PuTTY-Fenster per SSH eine Verbindung zu dem Node her, der die neuesten Protokolle angezeigt hat, und führen Sie den folgenden Befehl aus.
Befehl:
# tcpdump udp -i any port 162
- Führen Sie in Ihrem primären Fenster den folgenden Befehl aus, um einen Test-Trap zu erzeugen:
Befehl (beachten Sie, dass Sie in den richtigen Nutzer und das richtige Kennwort wechseln müssen):
Beispiel:
# TOKEN=$(curl -iks https://localhost:4443/login -u '<User:Password>' | grep X-SDS-AUTH-TOKEN);echo $TOKEN;curl -ks -H "$TOKEN" -H "Content-Type: application/json" -d '{"user_str": "ECS Test Alert", "contact": "ecsadmin@company.com"}' https://localhost:4443/vdc/callhome/alert | xmllint --format -;curl -vk -H "$TOKEN" "https://localhost:4443/logout"
Beispiel:
admin@provo:~> TOKEN=$(curl -iks https://localhost:4443/login -u 'root:ChangeMe' | grep X-SDS-AUTH-TOKEN);echo $TOKEN;curl -ks -H "$TOKEN" -H "Content-Type: application/json" -d '{"user_str": "ECS Test Alert", "contact": "ecsadmin@company.com"}' https://localhost:4443/vdc/callhome/alert | xmllint --format -;curl -vk -H "$TOKEN" "https://localhost:4443/logout"
X-SDS-AUTH-TOKEN: BAAcUWtmaTU0OEo0M21EYW1oSHVLa2dacFUyVTFjPQMAjAQASHVybjpzdG9yYWdlb3M6VmlydHVhbERhdGFDZW50ZXJEYXRhOjI1ZTU1NDY3LWNiMTMtNGM5NC05NGZjLWMzNjBjYjRhNjExYgIADTE1MTI4OTA0NjExODQDAC51cm46VG9rZW46MTYzNzA2ZTgtNTI1Zi00NjgwLWJkYmItZjYyYWM0MjQ1YzViAgAC0A8=
<?xml version="1.0" encoding="UTF-8" standalone="yes"?>
<alert>
  <acknowledged>false</acknowledged>
  <type>Notify</type>
  <description>ECS Test Alert: ecsadmin@company.com</description>
  <id>urn:storageos:Alert:46c9fdf1-0160-13fc-b8df-7c7be33092f3</id>
  <namespace/>
  <severity>INFO</severity>
  <symptomCode>999</symptomCode>
  <timestamp>2017-12-11T18:15:31</timestamp>
</alert>
- Im zweiten Fenster sollte der Trap aus dem Lifecycle-Node ausgelöst werden. Wenn der Trap nicht angezeigt wird, überprüfen Sie die Protokolle in Schritt 4 erneut, da sich der antwortende Zookeeper-Knoten möglicherweise geändert hat.
Beispiel (Beachten Sie, dass wir in diesem Fall Node 3 zum Zeitpunkt der Trap-Generierung als den Trap-sendenden Node identifiziert haben):
admin@murray:~> tcpdump udp -i any port 162
tcpdump: verbose output suppressed, use -v or -vv for full protocol decode
listening on any, link-type LINUX_SLL (Linux cooked), capture size 262144 bytes
18:15:37.050102 IP localhost.33530 > localhost.snmptrap:  C="local" V2Trap(198)  system.sysUpTime.0=977758344 S:1.1.4.1.0=E:1139.102.1.1 E:1139.102.0.1.1="Mon Dec 11 18:15:37 UTC 2017" E:1139.102.0.1.2="Info" E:1139.102.0.1.3="999" E:1139.102.0.1.4="ECS Test Alert: ecsadmin@company.com"
Hinweis: Jeder der Lifecycle-Server-Knoten kann einen Trap auslösen, da sie als Ensemble synchronisiert sind und alle Knoten über Fabric-Agenten verfügen, um den Status des Knotens und der Ressourcen zu aktualisieren.
ECS 3.1 – Administratorhandbuch Zusätzliche Informationen zu Traps:
ECS 3.7 – Administrationshandbuch (dell.com) (Seite 149–155)
MIB ist für die OID-Übersetzung in den meisten Monitoringlösungen erforderlich:
https://dl.dell.com/downloads/DL79351_ECS-MIB.mib
Affected Products
ECS ApplianceProducts
ECS Appliance Hardware Gen1 U-Series, ECS Appliance Software with Encryption, ECS Appliance Software without EncryptionArticle Properties
Article Number: 000019915
Article Type: How To
Last Modified: 18 Jan 2023
Version: 3
Find answers to your questions from other Dell users
Support Services
Check if your device is covered by Support Services.