EMC VMAX1、VMAX2 從精簡集區排空資料裝置 (TDAT)
Resumen: 本文概述如何從 VMAX1 和 VMAX 2 陣列瘦集區正確排出資料裝置 (TDAT)。
Este artículo se aplica a
Este artículo no se aplica a
Este artículo no está vinculado a ningún producto específico.
No se identifican todas las versiones del producto en este artículo.
Instrucciones
目標
如何使用 Unisphere for VMAX 或 Symmetrix 命令列介面 (SYMCLI) 從 VMAX1 或 VMAX2 瘦集區安全地排出資料裝置 (TDAT) 的指南。事實
- 從 VMAX 精簡集區排出資料裝置 (TDAT) 是一項不中斷的活動。
- 將 TDAT 從瘦集區中移除,不需要在 TDAT 上使用分配範圍來拆解任何 TDEV 的。
- TDAT 必須具有類似大小才能屬於瘦集區
- VMAX1 和 VMAX2
- Unisphere 1.6.x
- Unisphere 8.x.x
- Solution Enabler 7.x.x
- Solutions Enabler 8.x.x
- Enginuity 5875 及更高版本
參考資料:
- Unisphere for VMAX 線上說明
- Solution Enabler CLI 命令參考指南
symcfg -sid ### show -pool -thin -all
- 將 TDAT 重新分配給另一個有助於重複使用空間的集區,以提高效率。
- 將磁片磁碟機更換為較新的機型 (需要更高的容量),您必須移離現有磁片磁碟機上的任何生產資料,以利進行更換作業。
排空和卸載程式基本上是 3 階段作業:
- 停用 TDAT 會有效地啟動裝置的排空作業。當集區內的 TDAT 停用後,裝置上的「二手通路」會不中斷地移到集區中其餘已啟用的裝置。
- 在完成排空程式後,TDAT 裝置會進入停用狀態。
- 一旦處於停用狀態,即可從瘦集區移除 TDAT。
: Storage Tab -> Thin Pool -> Pool_Name> -> Data Volume
此範例示範如何移除裝置 ID 0904。
- 選擇資料磁片區 0904,然後按下 「Disable」 按鈕。
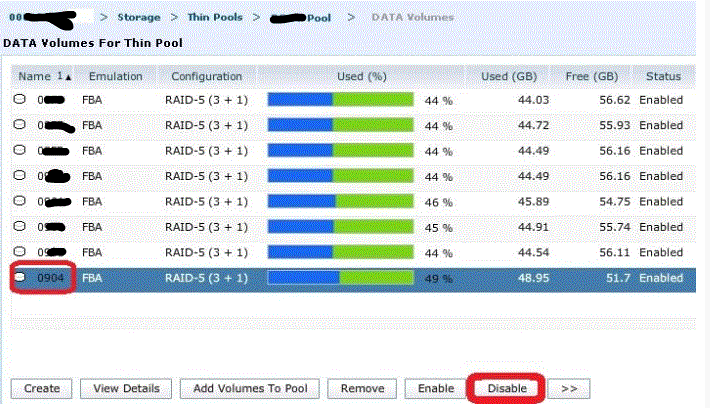
- 當磁片區 %使用中、GBused 和 GBfree 在轉換至其他 TDAT 時更新時,Unisphere 會顯示排空進度。

- 資料磁片區完成排空程式並顯示「非使用中」狀態後,即可安全地按下「移除」。

透過 Symcli 執行排空作業:
1.列出瘦集區上的 TDAT:
symcfg -sid ### show -pool -thin -all
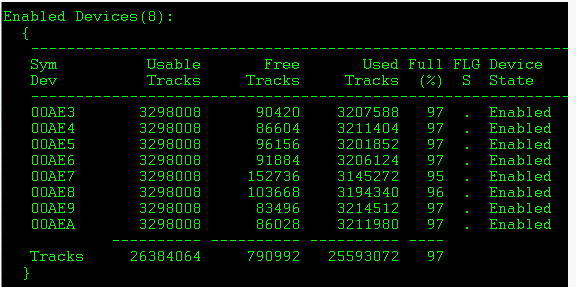
2.若要在瘦集區排空 TDAT:
symconfigure -sid ### -cmd “disable dev  in pool , type=thin;” preview
symconfigure -sid ### -cmd “disable dev  in pool , type=thin;” commit
3.使用 symconfigure 命令停用資料裝置:
symconfigure -sid ### -cmd “disable dev  in pool , type=thin;” preview
symconfigure -sid ### -cmd “disable dev  in pool , type=thin;” commit
4.使用 symcfg show-pool 命令檢視集區詳細資料,我們可以監控排空作業的進度:
symcfg -sid ### show -pool -thin -all
5.排空作業完成後,請卸下資料裝置:
symconfigure -sid ### -cmd “remove dev  from pool , type=thin;” preview
symconfigure -sid ### -cmd “remove dev  from pool , type=thin;” commit
Productos afectados
VMAXPropiedades del artículo
Número del artículo: 000205820
Tipo de artículo: How To
Última modificación: 14 abr 2026
Versión: 2
Encuentre respuestas a sus preguntas de otros usuarios de Dell
Servicios de soporte
Compruebe si el dispositivo está cubierto por los servicios de soporte.