NFS Uzak G/Ç hataları; FS etkin grup için grup sahibi değişikliği, uygulamaların ve/veya kullanıcıların NFS dosyalarına erişememesine neden olabilir
摘要: Önceki Kova Sahibine izin verilmiyor veya kısıtlanmadı ObjectControllerException: Önceki kova sahibi için updateObjectInternal yöntemine izin verilmiyor
本文适用于
本文不适用于
本文并非针对某种特定的产品。
本文并非包含所有产品版本。
症状
Kullanıcı arayüzünde kova sahibi sayfasında kullanıcı tarafından yapılan değişiklik:
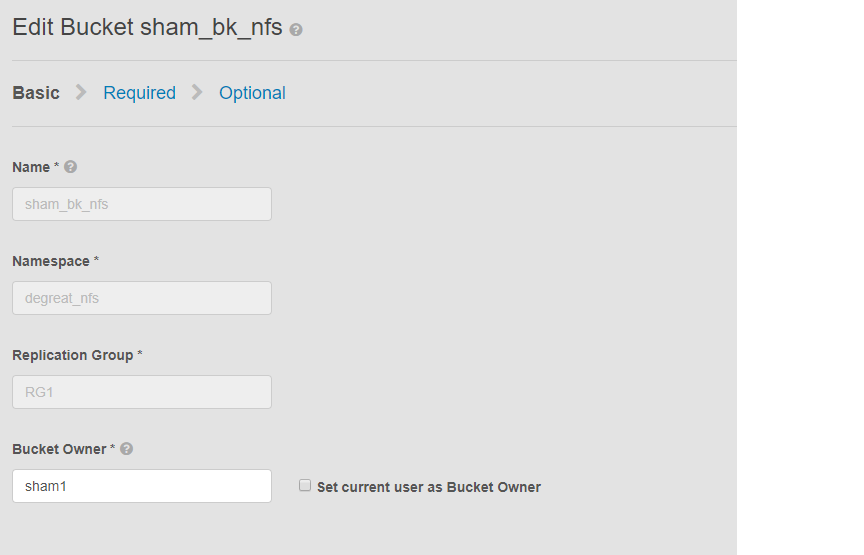
Bu sorun, NFS özellikli kovalar ve kullanıcı arayüzünün grup sahibi değişikliği için geçerlidir. Bu, 'na bağlı uygulamaların veya kullanıcıların Linux dosya sistemindeki kovaya erişimi kaybetmesine neden olabilir. Değişikliği tekrar orijinal sahibine geri döndürsek bile, erişim mümkün olmayacak ve DU'ya yol açacaktır.
Bu örnekte:
Grup sahibi, kullanıcı arayüzü kullanılarak "sham2" olarak değiştirilmiştir. ECS'deki bir sınırlama nedeniyle grup sahibi adını tekrar "sham1" olarak değiştirdikten sonra bile. ECS, kullanıcı arayüzünü kullanarak grup sahibini "sham1" olarak değiştirmez. Bu işlem şimdilik yalnızca CLI tarafından assignowner bayrağının true değerine sahip olduğu bir API kullanılarak yapılabilir.
Sorunu tanımlamanın yolları, Linux makinesinde kullanıcıdan bir dosyaya dokunmasını istemektir, örneğin:
Bu sorun, NFS özellikli kovalar ve kullanıcı arayüzünün grup sahibi değişikliği için geçerlidir. Bu, 'na bağlı uygulamaların veya kullanıcıların Linux dosya sistemindeki kovaya erişimi kaybetmesine neden olabilir. Değişikliği tekrar orijinal sahibine geri döndürsek bile, erişim mümkün olmayacak ve DU'ya yol açacaktır.
Bu örnekte:
Grup sahibi, kullanıcı arayüzü kullanılarak "sham2" olarak değiştirilmiştir. ECS'deki bir sınırlama nedeniyle grup sahibi adını tekrar "sham1" olarak değiştirdikten sonra bile. ECS, kullanıcı arayüzünü kullanarak grup sahibini "sham1" olarak değiştirmez. Bu işlem şimdilik yalnızca CLI tarafından assignowner bayrağının true değerine sahip olduğu bir API kullanılarak yapılabilir.
Sorunu tanımlamanın yolları, Linux makinesinde kullanıcıdan bir dosyaya dokunmasını istemektir, örneğin:
admin@node1~>touch file
touch: setting times of `file': Remote I/O error

se svc_log with the string  "method updateObjectInternal "

Command:
# svc_log -a -sr dataheadsvc | grep "method updateObjectInternal"
Example:
admin@node1~>svc_log -a -sr dataheadsvc | grep "method updateObjectInternal"
svc_log v1.0.22 (svc_tools v1.5.3)                 Started 2019-06-06 10:45:04

Running on nodes:              <All nodes>
Time range:                    2019-06-05 10:45:04 - 2019-06-06 10:45:04
Filter string(s):              <All messages>
Show nodename(s):              True
Search reclaim logs (if any):  False

com.emc.storageos.data.object.exception.ObjectControllerException: method updateObjectInternal not allowed for previous bucket owner sham1
Caused by: com.emc.storageos.data.object.exception.ObjectControllerException: method updateObjectInternal not allowed for previous bucket owner sham1
原因
Belirli bir kullanıcının sahibi olduğu bir grup oluşturma ve ardından grup sahipliğini değiştirme. Son olarak, ACL'ler sayfasını kullanarak orijinal sahibe tam kontrol verme işlemi ECS günlük özel durumuyla başarısız olur:
ObjectControllerException: method updateObjectInternal not allowed for previous bucket owner <ownerid>
This is a known issue currently being evaluated by Dell EMC at this time.
解决方案
Geçici çözüm, DLI aracılığıyla API'yi kullanarak grup sahibini yük ile resetowner bayrağını true olarak değiştirmektir.
1. Mevcut kova sahibini belirleyin.
2. vi düzenleyicisini kullanarak basit bir xml dosyası oluşturun. Aşağıdaki örnekte /tmp/bucket-owner.xml olarak adlandırılmıştır. Bu, çok adımlı bir işlemdir. Geçici olarak sham2'nin yeni sahibine ayarlamalıyız. Aşağıdaki örnekte olduğu gibi, orijinal sahip sham1 e geri dönmeden önce çıktıyı onaylayın:
. 7. Config değişikliği yapıldıktan sonra aynı hatayı bir daha görmemeliyiz
1. Mevcut kova sahibini belirleyin.
BELIRTECI oluşturmak için kullanıcı arayüzü kök parolasını gerektirin. Örneğin:
admin@ecsnode1:~> tok=$(curl -iks https://XX.XX.XX.XX:4443/login -u 'root:ChangeMe' | grep X-SDS-AUTH-TOKEN)
Mevcut kova sahibini doğrulayın (sizin durumunuza göre yedek kova ve ad alanı):
admin@node1:~> curl -s -k -X GET -H "$tok" https://XX.XX.XX.XX:4443/object/bucket/sham_bk_nfs/info?namespace=degreat_nfs | xmllint --format - | grep '<owner>'
  <owner>sham2</owner>
Bu, parametre reset_previous_owners true olarak ayarlanması gerektiğini doğrular. Geri döndürülen kova sahibi kullanıcı arayüzündedir ancak CLI aracılığıyla API, ECS'nin kova sahibini hâlâ "sham2" olarak gördüğünü doğrular.
2. vi düzenleyicisini kullanarak basit bir xml dosyası oluşturun. Aşağıdaki örnekte /tmp/bucket-owner.xml olarak adlandırılmıştır. Bu, çok adımlı bir işlemdir. Geçici olarak sham2'nin yeni sahibine ayarlamalıyız. Aşağıdaki örnekte olduğu gibi, orijinal sahip sham1 e geri dönmeden önce çıktıyı onaylayın:
admin@node1:~ # vi /tmp/bucket-owner.xml

admin@ecsnode1:~ # cat /tmp/bucket-owner.xml
<object_bucket_update_owner>
   <namespace>degreat_nfs</namespace>
   <new_owner>sham2</new_owner>
   <reset_previous_owners>true</reset_previous_owners>
</object_bucket_update_owner>

3. Change the bucket owner to the temporary owner.
Kova sahibini xml dosyası aracılığıyla "sham2" olarak değiştirmek için gereken API söz dizimi aşağıdaki gibidir:
admin@ecsnode1:~> curl -v -k -X "POST" "https://xx.xx.xx.xx:4443/object/bucket/sham_bk_nfs/owner" -H "$tok" -H "Content-Type: application/xml" -H "ACCEPT:application/xml" -d @/tmp/bucket-owner.xml -v
* Hostname was NOT found in DNS cache
*   Trying xx.xx.xx.xx...
* Connected to xx.xx.xx.xx (xx.xx.xx.xx) port 4443 (#0)
* successfully set certificate verify locations:
*   CAfile: none
  CApath: /etc/ssl/certs/
* SSLv3, TLS unknown, Certificate Status (22):
* SSLv3, TLS handshake, Client hello (1):
* SSLv3, TLS handshake, Server hello (2):
* SSLv3, TLS handshake, Certificate (11):
* SSLv3, TLS handshake, Server key exchange (12):
* SSLv3, TLS handshake, Server finished (14):
* SSLv3, TLS handshake, Client key exchange (16):
* SSLv3, TLS change cipher, Client hello (1):
* SSLv3, TLS handshake, Finished (20):
* SSLv3, TLS change cipher, Client hello (1):
* SSLv3, TLS handshake, Finished (20):
* SSL connection using TLSv1.2 / ECDHE-RSA-AES256-GCM-SHA384
* Server certificate:
*        subject: CN=localhost
*        start date: 2019-03-25 09:53:41 GMT
*        expire date: 2029-03-22 09:53:41 GMT
*        issuer: CN=localhost
*        SSL certificate verify result: self signed certificate (18), continuing anyway.
> POST /object/bucket/sham_bk_nfs/owner HTTP/1.1
> User-Agent: curl/7.37.0
> Host: xx.xx.xx.xx:4443
> X-SDS-AUTH-TOKEN: BAAcUy9KYlhxTlVYb2M0bnF3bTNscEsvSEdDeWhJPQMAjAQASHVybjpzdG9yYWdlb3M6VmlydHVhbERhdGFDZW50ZXJEYXRhOmJhOGQ3ZTkzLTMyMGYtNDNmNy05Y2FkLWM4YWQzMWFiMzY1MAIADTE1NTk3Mzk3OTA2MDgDAC51cm46VG9rZW46YjQ4NGNiZjEtNTkwNy00YWI3LTgzYTctM2Y3OGRhM2RiY2NiAgAC0A8=
> Content-Type: application/xml
> ACCEPT:application/xml
> Content-Length: 179
>
* upload completely sent off: 179 out of 179 bytes
< HTTP/1.1 200 OK
< Date: Thu, 06 Jun 2019 10:56:08 GMT
< Content-Length: 0
< Connection: keep-alive
<
* Connection #0 to host xx.xx.xx.xx left intact
4. Edit the simple.xml file previously created in step 2 and this time insert original owner of sham1
admin@node1:~ # vi /tmp/bucket-owner.xml

admin@ecsnode1:~ # cat /tmp/bucket-owner.xml
<object_bucket_update_owner>
   <namespace>degreat_nfs</namespace>
   <new_owner>sham1</new_owner>
   <reset_previous_owners>true</reset_previous_owners>
</object_bucket_update_owner>

5. Change the bucket owner back to the original owner
The API syntax required to change the bucket owner back to "sham1" through the xml file is as follows:
admin@ecsnode1:~> curl -v -k -X "POST" "https://xx.xx.xx.xx:4443/object/bucket/sham_bk_nfs/owner" -H "$tok" -H "Content-Type: application/xml" -H "ACCEPT:application/xml" -d @/tmp/bucket-owner.xml -v
* Hostname was NOT found in DNS cache
*   Trying xx.xx.xx.xx...
* Connected to xx.xx.xx.xx (xx.xx.xx.xx) port 4443 (#0)
* successfully set certificate verify locations:
*   CAfile: none
  CApath: /etc/ssl/certs/
* SSLv3, TLS unknown, Certificate Status (22):
* SSLv3, TLS handshake, Client hello (1):
* SSLv3, TLS handshake, Server hello (2):
* SSLv3, TLS handshake, Certificate (11):
* SSLv3, TLS handshake, Server key exchange (12):
* SSLv3, TLS handshake, Server finished (14):
* SSLv3, TLS handshake, Client key exchange (16):
* SSLv3, TLS change cipher, Client hello (1):
* SSLv3, TLS handshake, Finished (20):
* SSLv3, TLS change cipher, Client hello (1):
* SSLv3, TLS handshake, Finished (20):
* SSL connection using TLSv1.2 / ECDHE-RSA-AES256-GCM-SHA384
* Server certificate:
*        subject: CN=localhost
*        start date: 2019-03-25 09:53:41 GMT
*        expire date: 2029-03-22 09:53:41 GMT
*        issuer: CN=localhost
*        SSL certificate verify result: self signed certificate (18), continuing anyway.
> POST /object/bucket/sham_bk_nfs/owner HTTP/1.1
> User-Agent: curl/7.37.0
> Host: xx.xx.xx.xx:4443
> X-SDS-AUTH-TOKEN: BAAcUy9KYlhxTlVYb2M0bnF3bTNscEsvSEdDeWhJPQMAjAQASHVybjpzdG9yYWdlb3M6VmlydHVhbERhdGFDZW50ZXJEYXRhOmJhOGQ3ZTkzLTMyMGYtNDNmNy05Y2FkLWM4YWQzMWFiMzY1MAIADTE1NTk3Mzk3OTA2MDgDAC51cm46VG9rZW46YjQ4NGNiZjEtNTkwNy00YWI3LTgzYTctM2Y3OGRhM2RiY2NiAgAC0A8=
> Content-Type: application/xml
> ACCEPT:application/xml
> Content-Length: 179
>
* upload completely sent off: 179 out of 179 bytes
< HTTP/1.1 200 OK
< Date: Thu, 06 Jun 2019 10:56:08 GMT
< Content-Length: 0
< Connection: keep-alive
<
* Connection #0 to host xx.xx.xx.xx left intact


6.  Confirm the bucket owner change is reflected.
Grup sahibi değişikliğinin artık "sham1" olduğunu doğrulayın.
admin@ecsnode1:~> curl -s -k -X GET -H "$tok" https://XX.XX.XX.XX:4443/object/bucket/sham_bk_nfs/info?namespace=degreat_nfs | xmllint --format - | grep '<owner>'
<owner>sham1</owner>
Grup sahibi API'de geri döndürüldükten sonra ana bilgisayarın artık Linux dosya sistemindeki gruba erişebildiğini doğrulayın.
. 7. Config değişikliği yapıldıktan sonra aynı hatayı bir daha görmemeliyiz
svc_log -f "method updateObjectInternal not allowed" -start "20 hour ago" -sr all -sh -st hour
svc_log v1.0.22 (svc_tools v1.6.8)                 Started 2020-01-23 09:28:17

Running on nodes:              <All nodes>
Time range:                    2020-01-22 13:28:17 - 2020-01-23 09:28:17
Filter string(s):              'method updateObjectInternal not allowed'
Show nodename(s):              True
Search reclaim logs (if any):  False

Count of message occurrences per hour:

2020-01-22 13:xx - 5066
2020-01-22 14:xx - 9580
2020-01-22 15:xx - 9574
2020-01-22 16:xx - 9580
2020-01-22 17:xx - 9570
2020-01-22 18:xx - 9576
2020-01-22 19:xx - 9564
2020-01-22 20:xx - 9576
2020-01-22 21:xx - 9576
2020-01-22 22:xx - 9572
2020-01-22 23:xx - 9564
2020-01-23 00:xx - 9586
2020-01-23 01:xx - 9574
2020-01-23 02:xx - 9572
2020-01-23 03:xx - 4564
2020-01-23 04:xx - 0
2020-01-23 05:xx - 0
2020-01-23 06:xx - 0
2020-01-23 07:xx - 0
2020-01-23 08:xx - 0
2020-01-23 09:xx - 0


Dell EMC is aware of this issue and are working on a fix in a future release.
其他信息
NFS'yle ilgili KB:
- Temel bir NFS dışa aktarımı oluşturma ve bunu istemciye bağlama
- ECS: dataheadsvc günlük akışı hatası: NFSv3 prosedürü LINK isteği ReadLinkRequest te desteklenmiyor
- ECS, NFS bağlama işlemi "No such file or directory" (Böyle bir dosya veya dizin yok) ya da "ERROR_OBJECT_NOT_FOUND" (HATA NESNESİ BULUNAMADI) hatasıyla başarısız oluyor
- NFS Uzak G/Ç hataları; FS etkin grup için grup sahibi değişikliği, uygulamaların/kullanıcıların NFS dosyalarına erişememe durumlarında neden olabilir (İngilizce)
- NFS yazma işlemi, belirli bir miktarda verinin ardından G/Ç hatası veriyor (İngilizce)
- ECS'den NFS dosya paylaşımını VMware NFS veri deposuyla kullanma (İngilizce)
- ECS NFS dışa aktarımlarını bağlamak için en iyi uygulamalar (İngilizce)
- ECS, Windows istemcide NFS paylaşımını bağlama (İngilizce)
- Kullanıcı arayüzünde dosya dışa aktarma ayarları değiştirildikten sonra NFS bağlanamıyor (İngilizce)
- Oracle WebCenter İçeriği (WCC) ECS ile uyumlu mu? (İngilizce)
Ürün güncellemelerine abone olun.
Aşağıdaki Bilgi Yazısındaki talimatları izleyerek güncellemelere abone olabilirsiniz:
DELL EMC: Ürün Sayfalarına Abone Olma - Dell Desteği?
受影响的产品
Elastic Cloud Storage产品
ECS Appliance, ECS Appliance Software with Encryption, ECS Appliance Software without Encryption, Elastic Cloud Storage文章属性
文章编号: 000055535
文章类型: Solution
上次修改时间: 29 7月 2026
版本: 5
从其他戴尔用户那里查找问题的答案
支持服务
检查您的设备是否在支持服务涵盖的范围内。