ECS:OBS: xDoctor:RAP025:一或多個網路介面故障或遺失
摘要: xDoctor 回報警告錯誤,指出其中一個 ECS 介面已關閉至交換器。
本文章適用於
本文章不適用於
本文無關於任何特定產品。
本文未識別所有產品版本。
症狀
從 ECS xDoctor v4.8-109.0 和 ObjectScale xDoctor v5.1-109.0 開始,RAP025 (一或多個網路介面故障或遺失) 即會執行為自動修復程式。當交換器連線問題超過設定的錯誤或嚴重 性閾值時,xDoctor 會發出 RAP025 警示,並自動啟動整合式修復協調流程。如果已 啟用 xDoctor 自動修復程式,此工作流程將執行必要的補救動作。
注意:如果您的環境執行的 xDoctor 版本早於 ECS xDoctor v4.8-109.0 或 ObjectScale xDoctor v5.1-109.0,則無法使用 RAP025 自動修復功能。在這些版本中,必須使用下述 AutoPilot 程序執行補救,或依照「解決方法」一節中概述的手動補救步驟執行。
觸發 RAP025 自動修復的警示
當超過設定 的錯誤或嚴重 性閾值時,偵測到節點介面故障時,即會觸發 RAP025 自動修復工作流程。一旦超過此閾值,xDoctor 會產生 RAP025 警示,作為自動化修復程序的觸發器。
警示輸出範例
注意:在 ECS xDoctor v4.8-109.0 和 ObjectScale xDoctor v5.1-109.0 之前的 xDoctor 版本中,此狀況僅會導致警示。不執行自動補救。
----------------------------------------------
INFO - Auto Healer for interface_down disabled
----------------------------------------------
Extra     = Auto Healer for interface_down disabled
Timestamp = 2026-03-24_205634
PSNT      = CKM00190800120 @ 4.8-109.0

-------------------------------------------------------------------------------------
ERROR - (Cached) One or more network interfaces are down or missing
-------------------------------------------------------------------------------------
Node      = Nodes
Extra     = {"Nodes": {"169.254.1.4": ["pslave-1"]}}
RAP       = RAP025
Solution  = KB 503814
Timestamp = 2026-04-01_190513
PSNT      = CKMXXXXXXXXXXX @ 4.8-109.0
自動修復程式補救 (範例)
啟用自動修復程式後,xDoctor 會套用本知識庫中所列的常見修正措施,自動針對偵測到的節點介面故障啟動補救。
----------------------------------------
FIXED - Auto Healer fixed interface_down
----------------------------------------
Node      = Nodes
Extra     = {"Nodes": {"169.254.1.1": ["pslave-0"]}}
Timestamp = 2026-04-01_190513
PSNT      = CKMXXXXXXXXXXX @ 4.8-109.0
自動修復器要求
必須啟用 xDoctor 自動修復功能,才能進行此補救。自動修復程式可在安裝期間或安裝後依照下列步驟啟用:
KB:ECS:xDoctor:如何在工具安裝後啟用 xDoctor 自動修復程式
手動驗證:
- 檢查叢集上的介面連結狀態。在下面的範例中,節點 4 具有 NO-CARRIER,這意味著沒有連接到 secondary-0 介面。
命令:
# viprexec -i 'ip link show | egrep "slave-|public"'
範例:
admin@node1:~> viprexec -i 'ip link show | egrep "slave-|public"'

Output from host : 1xx.1xx.219.1
bash: public: command not found
3: slave-0: <BROADCAST,MULTICAST,SLAVE,UP,LOWER_UP> mtu 1500 qdisc mq master public state UP mode DEFAULT group default qlen 1000
5: slave-1: <BROADCAST,MULTICAST,SLAVE,UP,LOWER_UP> mtu 1500 qdisc mq master public state UP mode DEFAULT group default qlen 1000
10: public: <BROADCAST,MULTICAST,MASTER,UP,LOWER_UP> mtu 1500 qdisc noqueue state UP mode DEFAULT group default

Output from host : 1xx.1xx.219.2
bash: public: command not found
3: slave-0: <BROADCAST,MULTICAST,SLAVE,UP,LOWER_UP> mtu 1500 qdisc mq master public state UP mode DEFAULT group default qlen 1000
5: slave-1: <BROADCAST,MULTICAST,SLAVE,UP,LOWER_UP> mtu 1500 qdisc mq master public state UP mode DEFAULT group default qlen 1000
10: public: <BROADCAST,MULTICAST,MASTER,UP,LOWER_UP> mtu 1500 qdisc noqueue state UP mode DEFAULT group default

Output from host : 1xx.1xx8.219.3
bash: public: command not found
4: slave-0: <BROADCAST,MULTICAST,SLAVE,UP,LOWER_UP> mtu 1500 qdisc mq master public state UP mode DEFAULT group default qlen 1000
5: slave-1: <BROADCAST,MULTICAST,SLAVE,UP,LOWER_UP> mtu 1500 qdisc mq master public state UP mode DEFAULT group default qlen 1000
10: public: <BROADCAST,MULTICAST,MASTER,UP,LOWER_UP> mtu 1500 qdisc noqueue state UP mode DEFAULT group default

Output from host : 1xx.1xx.219.4
bash: public: command not found
2: slave-0: <NO-CARRIER,BROADCAST,MULTICAST,SLAVE,UP> mtu 1500 qdisc mq master public state DOWN mode DEFAULT group default qlen 1000
5: slave-1: <BROADCAST,MULTICAST,SLAVE,UP,LOWER_UP> mtu 1500 qdisc mq master public state UP mode DEFAULT group default qlen 1000
10: public: <BROADCAST,MULTICAST,MASTER,UP,LOWER_UP> mtu 1500 qdisc noqueue state UP mode DEFAULT group default
- 確認個別介面偵測到連結:
命令:
# viprexec -i "echo slave-0;sudo ethtool slave-0 | grep 'Link detected:';echo slave-1;sudo ethtool slave-1 | grep 'Link detected:'"
範例:
admin@node1:~> viprexec -i "echo slave-0;sudo ethtool slave-0 | grep 'Link detected:';echo slave-1;sudo ethtool slave-1 | grep 'Link detected:'" Output from host : 1xx.1xx.219.1 slave-0 Link detected: yes slave-1 Link detected: yes Output from host : 1xx.1xx.219.2 slave-0 Link detected: yes slave-1 Link detected: yes Output from host : 1xx.1xx.219.3 slave-0 Link detected: yes slave-1 Link detected: yes Output from host : 1xx.1xx.219.4 slave-0 Link detected: no slave-1 Link detected: yes
- 確認交換器在 Gen 1 或 Gen 2 環境中為 Arista,以及在 Gen 3 環境中為 Dell (或其他型號)。
注意:如果交換器不是 Arista 或 Dell 交換器,則它們是使用者管理的交換器。我們必須通知使用者他們有要補救的連線中斷問題。
命令:
# viprexec -i "sudo lldpcli show neigh | grep SysDescr"
範例:
Gen 1 或 Gen 2
Gen 1 或 Gen 2
admin@ecssh121:~> viprexec -i "sudo lldpcli show neigh | grep SysDescr"

Output from host : 1xx.1xx.219.1
    SysDescr:     Arista Networks EOS version 4.11.7.2 running on an Arista Networks DCS-7150S-24
    SysDescr:     Arista Networks EOS version 4.11.7.2 running on an Arista Networks DCS-7150S-24
    SysDescr:     Arista Networks EOS version 4.15.6M running on an Arista Networks DCS-7048T-A

Output from host : 1xx.1xx.219.2
    SysDescr:     Arista Networks EOS version 4.11.7.2 running on an Arista Networks DCS-7150S-24
    SysDescr:     Arista Networks EOS version 4.11.7.2 running on an Arista Networks DCS-7150S-24
    SysDescr:     Arista Networks EOS version 4.15.6M running on an Arista Networks DCS-7048T-A

Output from host : 1xx.1xx.219.3
    SysDescr:     Arista Networks EOS version 4.11.7.2 running on an Arista Networks DCS-7150S-24
    SysDescr:     Arista Networks EOS version 4.11.7.2 running on an Arista Networks DCS-7150S-24
    SysDescr:     Arista Networks EOS version 4.15.6M running on an Arista Networks DCS-7048T-A

Output from host : 1xx.1xx.219.4
    SysDescr:     Arista Networks EOS version 4.11.7.2 running on an Arista Networks DCS-7150S-24
    SysDescr:     Arista Networks EOS version 4.11.7.2 running on an Arista Networks DCS-7150S-24
    SysDescr:     Arista Networks EOS version 4.15.6M running on an Arista Networks DCS-7048T-A
範例:
Gen 3
Gen 3
admin@ecsnode1:~> viprexec -i "sudo lldpcli show neigh | grep SysDescr"

Output from host : 1xx.1xx.219.1
    SysDescr:     OS10
    SysDescr:     OS10
    SysDescr:     OS10
    SysDescr:     OS10

Output from host : 1xx.1xx.219.2
    SysDescr:     OS10
    SysDescr:     OS10
    SysDescr:     OS10
    SysDescr:     OS10

Output from host : 1xx.1xx.219.3
    SysDescr:     OS10
    SysDescr:     OS10
    SysDescr:     OS10
    SysDescr:     OS10

Output from host : 1xx.1xx.219.4
    SysDescr:     OS10
    SysDescr:     OS10
    SysDescr:     OS10
    SysDescr:     OS10

Output from host : 1xx.1xx.219.5
    SysDescr:     OS10
    SysDescr:     OS10
    SysDescr:     OS10
    SysDescr:     OS10

Output from host : 1xx.1xx.219.6
    SysDescr:     OS10
    SysDescr:     OS10
    SysDescr:     OS10
    SysDescr:     OS10

Output from host : 1xx.1xx.219.7
    SysDescr:     OS10
    SysDescr:     OS10
    SysDescr:     OS10
    SysDescr:     OS10

Output from host : 11xx.1xx.219.8
    SysDescr:     OS10
    SysDescr:     OS10
    SysDescr:     OS10
    SysDescr:     OS10
- 檢查節點上公用的搭接 secondary-0 和 secondary-1 公用介面組態,顯示步驟 2 中的未偵測到命令的任何連結:
命令:
# sudo cat /etc/sysconfig/network/ifcfg-public
範例:
admin@node4:~> sudo cat /etc/sysconfig/network/ifcfg-public
BONDING_MASTER=yes
BONDING_MODULE_OPTS="miimon=100 mode=4 xmit_hash_policy=layer3+4"
BONDING_SLAVE0=slave-0
BONDING_SLAVE1=slave-1
BOOTPROTO=static
IPADDR=xxx.xxx.xxx.xxx/xx
MTU=1500
STARTMODE=auto
- 確認已在節點上設定正確的連結彙總控制通訊協定 (LACP) 參數。(可預期為 IEEE 802.3ad 動態連結彙總是預設設定。)
命令:
# viprexec -i "grep Mode /proc/net/bonding/public"
範例:
admin@node1:~> viprexec -i "grep Mode /proc/net/bonding/public"

Output from host : 1xx.1xx.219.1
Bonding Mode: IEEE 802.3ad Dynamic link aggregation

Output from host : 1xx.1xx.219.2
Bonding Mode: IEEE 802.3ad Dynamic link aggregation

Output from host : 1xx.1xx.219.3
Bonding Mode: IEEE 802.3ad Dynamic link aggregation

Output from host : 1xx.1xx.219.4
Bonding Mode: IEEE 802.3ad Dynamic link aggregation
- 執行下列步驟,確認連接埠的連線一致,且介面已連接:
ECS Gen 1 或 Gen 2:
節點的 Gen 1 或 Gen 2 ECS 對應至相對應的交換器連接埠如下:
Ethernet9 = 節點 1
Ethernet10 = 節點 2
Ethernet11 = 節點 3
Ethernet12 = 節點 4
Ethernet13 = 節點 5
Ethernet14 = 節點 6
Ethernet15 = 節點 7
Ethernet16 = 節點 8
Ethernet10 = 節點 2
Ethernet11 = 節點 3
Ethernet12 = 節點 4
Ethernet13 = 節點 5
Ethernet14 = 節點 6
Ethernet15 = 節點 7
Ethernet16 = 節點 8
命令:
# viprexec -i "sudo lldpcli show neigh | egrep 'SysName|PortID'"
範例 (第一代或第二代 ECS 的範例):
admin@ecssh121:~> viprexec -i "sudo lldpcli show neigh | egrep 'SysName|PortID'"
Output from host : 1xx.1xx.219.1
    SysName:      rabbit
    PortID:       ifname Ethernet9
    SysName:      hare
    PortID:       ifname Ethernet9
    SysName:      turtle
    PortID:       ifname Ethernet1

Output from host : 1xx.1xx.219.2
    SysName:      rabbit
    PortID:       ifname Ethernet10
    SysName:      hare
    PortID:       ifname Ethernet10
    SysName:      turtle
    PortID:       ifname Ethernet2

Output from host : 1xx.1xx.219.3
    SysName:      hare
    PortID:       ifname Ethernet11
    SysName:      rabbit
    PortID:       ifname Ethernet11
    SysName:      turtle
    PortID:       ifname Ethernet3

Output from host : 1xx.1xx.219.4
    SysName:      hare
    PortID:       ifname Ethernet12
    SysName:      turtle
    PortID:       ifname Ethernet4
注意:在上述範例中,節點 4 遺失與 Ethernet12 rabbit 的連線。透過目前收集的所有資訊,我們現在知道連接埠 12 位於 rabbit 交換器上,連接到節點 4 的 secondary-0 介面。
ECS Gen 3:
節點的 Gen 3 ECS 對應至相對應的交換器連接埠如下:
節點的 Gen 3 ECS 對應至相對應的交換器連接埠如下:
ethernet1/1/1 = 節點 1
ethernet1/1/2 = 節點 2
ethernet1/1/3 = 節點 3
ethernet1/1/4 = 節點 4
ethernet1/1/5 = 節點 5
ethernet1/1/6 = 節點 6
ethernet1/1/7 = 節點 7
ethernet1/1/8 = 節點 8
ethernet1/1/2 = 節點 2
ethernet1/1/3 = 節點 3
ethernet1/1/4 = 節點 4
ethernet1/1/5 = 節點 5
ethernet1/1/6 = 節點 6
ethernet1/1/7 = 節點 7
ethernet1/1/8 = 節點 8
- 確認連線至四個 ECS Gen 3 交換器、前端、兔子和野兔後端狐狸和獵犬的 ECS 已連線。
命令:
# viprexec -i "sudo lldpcli show neigh | egrep 'SysName|PortID'"
範例:
admin@ecsnode1:~> viprexec -i "sudo lldpcli show neigh | egrep 'SysName|PortID'"

Output from host : 1xx.1xx.219.1
    SysName:      rabbit
    PortID:       ifname ethernet1/1/1
    SysName:      hare
    PortID:       ifname ethernet1/1/1
    SysName:      fox
    PortID:       ifname ethernet1/1/1
    SysName:      hound
    PortID:       ifname ethernet1/1/1

Output from host : 192.168.219.2
    SysName:      rabbit
    PortID:       ifname ethernet1/1/2
    SysName:      hare
    PortID:       ifname ethernet1/1/2
    SysName:      fox
    PortID:       ifname ethernet1/1/2
    SysName:      hound
    PortID:       ifname ethernet1/1/2

Output from host : 1xx.1xx.219.3
    SysName:      rabbit
    PortID:       ifname ethernet1/1/3
    SysName:      hare
    PortID:       ifname ethernet1/1/3
    SysName:      fox
    PortID:       ifname ethernet1/1/3
    SysName:      hound
    PortID:       ifname ethernet1/1/3

Output from host : 1xx.1xx.219.4
    SysName:      rabbit
    PortID:       ifname ethernet1/1/4
    SysName:      hare
    PortID:       ifname ethernet1/1/4
    SysName:      fox
    PortID:       ifname ethernet1/1/4
    SysName:      hound
    PortID:       ifname ethernet1/1/4

Output from host : 1xx.1xx.219.5
    SysName:      rabbit
    PortID:       ifname ethernet1/1/5
    SysName:      hare
    PortID:       ifname ethernet1/1/5
    SysName:      fox
    PortID:       ifname ethernet1/1/5
    SysName:      hound
    PortID:       ifname ethernet1/1/5

Output from host : 1xx.1xx.219.6
    SysName:      rabbit
    PortID:       ifname ethernet1/1/6
    SysName:      hare
    PortID:       ifname ethernet1/1/6
    SysName:      fox
    PortID:       ifname ethernet1/1/6
    SysName:      hound
    PortID:       ifname ethernet1/1/6

Output from host : 1xx.1xx.219.7
    SysName:      rabbit
    PortID:       ifname ethernet1/1/7
    SysName:      hare
    PortID:       ifname ethernet1/1/7
    SysName:      fox
    PortID:       ifname ethernet1/1/7
    SysName:      hound
    PortID:       ifname ethernet1/1/7

Output from host : 1xx.1xx.219.8
    SysName:      rabbit
    PortID:       ifname ethernet1/1/8
    SysName:      hare
    PortID:       ifname ethernet1/1/8
    SysName:      fox
    PortID:       ifname ethernet1/1/8
    SysName:      hound
    PortID:       ifname ethernet1/1/8
- 使用管理員登入資料連線至 rabbit,並檢查介面狀態。
命令:
ECS Gen 1 或 Gen 2
ECS Gen 1 或 Gen 2
# ssh <switch name>
# show interfaces show interfaces Ethernet<Interface Number>
範例:
ECS Gen 1 或 Gen 2
admin@ecs1:~> ssh rabbit
Password:
Last login: Tue Sep  5 11:13:30 2017 from 1xx.1xx.219.1
rabbit>show interfaces Ethernet12
Ethernet12 is down, line protocol is notpresent (notconnect)
  Hardware is Ethernet, address is 444c.a8de.8f83 (bia 444c.a8de.8f83)
  Description: MLAG group 4
  Member of Port-Channel4
  Ethernet MTU 9214 bytes , BW 10000000 kbit
  Full-duplex, 10Gb/s, auto negotiation: off, uni-link: n/a
  Loopback Mode : None
  0 link status changes since last clear
  Last clearing of "show interface" counters never
  5 minutes input rate 0 bps (0.0% with framing overhead), 0 packets/sec
  5 minutes output rate 0 bps (0.0% with framing overhead), 0 packets/sec
     0 packets input, 0 bytes
     Received 0 broadcasts, 0 multicast
     0 runts, 0 giants
     0 input errors, 0 CRC, 0 alignment, 0 symbol, 0 input discards
     0 PAUSE input
     0 packets output, 0 bytes
     Sent 0 broadcasts, 0 multicast
     0 output errors, 0 collisions
     0 late collision, 0 deferred, 0 output discards
     0 PAUSE output
命令:
ECS Gen 3
# ssh <switch name>
# show interfaces ethernet 1/1/<Interface Number>
範例:
ECS Gen 3
rabbit# show interface ethernet 1/1/4
Ethernet 1/1/9 is up, line protocol is down
Description: VLT Group 9
Port is part of Port-channel 9
Hardware is Dell EMC Eth, address is d8:9e:f3:c6:31:09
    Current address is d8:9e:f3:c6:31:09
Pluggable media not present

Interface index is 17305276
Internet address is not set
Mode of IPv4 Address Assignment: not set
Interface IPv6 oper status: Enabled
MTU 9216 bytes, IP MTU 9184 bytes
LineSpeed 0, Auto-Negotiation off
FEC is auto
Flowcontrol rx off tx off
ARP type: ARPA, ARP Timeout: 60
Last clearing of "show interface" counters: 6 days 17:39:09
Queuing strategy: fifo
Input statistics:
     0 packets, 0 octets
     0 64-byte pkts, 0 over 64-byte pkts, 0 over 127-byte pkts
     0 over 255-byte pkts, 0 over 511-byte pkts, 0 over 1023-byte pkts
     0 Multicasts, 0 Broadcasts, 0 Unicasts
     0 runts, 0 giants, 0 throttles
     0 CRC,  overrun, 0 discarded
Output statistics:
     0 packets, 0 octets
     0 64-byte pkts, 0 over 64-byte pkts, 0 over 127-byte pkts
     0 over 255-byte pkts, 0 over 511-byte pkts, 0 over 1023-byte pkts
     0 Multicasts, 0 Broadcasts, 0 Unicasts
     0 throttles, 0 discarded, 0 Collisions, 0 wreddrops
Rate Info(interval 299 seconds):
     Input 0 Mbits/sec, 0 packets/sec, 0% of line rate
     Output 0 Mbits/sec, 0 packets/sec, 0% of line rate
Time since last interface status change: 6 days 17:39:10
檢查可能的網路介面 (NIC) 卡問題:
另一個元件,用以檢查受影響節點上最近的 NIC 節點上的節點訊息緩衝區 (dmesg) 是否有最近的 NIC 問題。在以下範例中,NIC 會在處於運行和故障狀態之間迴圈。
如果 dmesg 中有 NIC 警示,則可能需要更換。
- 若是 ECS Gen 1 或 Gen 2 - 將輸出提供給 ECS 支援硬體工程師進行分析。
- 如果是 ECS Gen 3 - 將輸出提供給具備 EX 系列硬體專業知識的 Dell 硬體團隊。
命令:
# sudo dmesg -T
範例:
admin@node1:~> sudo dmesg -T
[Tue Jul  6 09:40:56 2021] public: link status definitely up for interface slave-1, 25000 Mbps full duplex
[Tue Jul  6 09:40:56 2021] bnxt_en 0000:04:00.1 slave-1: NIC Link is Down
[Tue Jul  6 09:40:56 2021] public: link status definitely down for interface slave-1, disabling it
[Tue Jul  6 09:40:57 2021] public: link status definitely down for interface slave-1, disabling it
[Tue Jul  6 09:41:09 2021] bnxt_en 0000:04:00.1 slave-1: NIC Link is Up, 25000 Mbps full duplex, Flow control: ON - receive & transmit
[Tue Jul  6 09:41:09 2021] bnxt_en 0000:04:00.1 slave-1: FEC autoneg off encodings: None
[Tue Jul  6 09:41:09 2021] public: link status definitely up for interface slave-1, 25000 Mbps full duplex
[Tue Jul  6 09:41:10 2021] bnxt_en 0000:04:00.1 slave-1: NIC Link is Down
[Tue Jul  6 09:41:10 2021] bnxt_en 0000:04:00.1 slave-1: speed changed to 0 for port slave-1
[Tue Jul  6 09:41:11 2021] public: link status definitely down for interface slave-1, disabling it
[Tue Jul  6 09:41:20 2021] bnxt_en 0000:04:00.1 slave-1: NIC Link is Up, 25000 Mbps full duplex, Flow control: ON - receive & transmit
[Tue Jul  6 09:41:20 2021] bnxt_en 0000:04:00.1 slave-1: FEC autoneg off encodings: None
[Tue Jul  6 09:41:20 2021] public: link status definitely up for interface slave-1, 25000 Mbps full duplex
[Tue Jul  6 09:41:22 2021] bnxt_en 0000:04:00.1 slave-1: NIC Link is Down
[Tue Jul  6 09:41:22 2021] bnxt_en 0000:04:00.1 slave-1: speed changed to 0 for port slave-1
[Tue Jul  6 09:41:22 2021] public: link status definitely down for interface slave-1, disabling it
[Tue Jul  6 09:41:31 2021] bnxt_en 0000:04:00.1 slave-1: NIC Link is Up, 25000 Mbps full duplex, Flow control: ON - receive & transmit
[Tue Jul  6 09:41:31 2021] bnxt_en 0000:04:00.1 slave-1: FEC autoneg off encodings: None
[Tue Jul  6 09:41:32 2021] public: link status definitely up for interface slave-1, 25000 Mbps full duplex
[Tue Jul  6 09:41:33 2021] bnxt_en 0000:04:00.1 slave-1: NIC Link is Down
原因
可能的原因
此問題可能是由於下列一或多種情況所導致:
-
SFP
安裝不當 小型可插拔 (SFP) 模組在安裝期間可能尚未完全裝妥。 -
使用者管理的交換器變更
在 Dell 控制之外的客戶管理交換器上所做的變更 (例如韌體升級、組態變更或維護活動) 可能會導致網路連結中斷,然後重新交涉,如「解決方法」一節中所述。 -
ECS 網路硬體故障,包括:
- 網路介面卡 (NIC)
- 網路纜線
- 小型可插拔 (SFP) 模組
- 網路交換器或交換器連接埠
解析度
xDoctor 自動修復器: ObjectScale xDoctor v5.1-109.0 / ECS xDoctor v4.8-109.0 或更新版本
- 若要手動觸發已啟用的自動修復程式,請在
master.rack節點。這將啟動機架分析器,一次一個地驗證和自動修復節點。
命令:
# sudo xdoctor --rap=RAP025
範例:
admin@ecsnode1:~> admin@ecsnode1:~> sudo xdoctor --rap=RAP025
2026-04-01 19:05:13,590: xDoctor_4.8-109.0 - INFO    : Initializing xDoctor v4.8-109.0 ...
2026-04-01 19:05:14,143: xDoctor_4.8-109.0 - INFO    : Removing orphaned session - session_1775070174.306
2026-04-01 19:05:14,146: xDoctor_4.8-109.0 - INFO    : Starting xDoctor session_1775070313.036 ... (SYSTEM)
2026-04-01 19:05:14,146: xDoctor_4.8-109.0 - INFO    : Primary Node Control Check ...
2026-04-01 19:05:14,336: xDoctor_4.8-109.0 - INFO    : xDoctor Composition - Analyzer(s):ac_interface_check
2026-04-01 19:05:14,352: xDoctor_4.8-109.0 - INFO    : Session limited to 0:40:00
2026-04-01 19:05:15,410: xDoctor_4.8-109.0 - INFO    : --------------------
2026-04-01 19:05:15,410: xDoctor_4.8-109.0 - INFO    : ECS Version: 3.8.1.4
2026-04-01 19:05:15,410: xDoctor_4.8-109.0 - INFO    : --------------------
2026-04-01 19:05:15,525: xDoctor_4.8-109.0 - INFO    : xDoctor Pre Features
2026-04-01 19:05:15,526: xDoctor_4.8-109.0 - INFO    : Cron Activation
2026-04-01 19:05:15,526: xDoctor_4.8-109.0 - INFO    : xDoctor already active ...
[... Truncated Output ...]
2026-04-01 19:05:21,987: xDoctor_4.8-109.0 - INFO    : ------------------------------
2026-04-01 19:05:21,992: xDoctor_4.8-109.0 - INFO    : Analyzing collected data ...
2026-04-01 19:05:21,992: xDoctor_4.8-109.0 - INFO    : Analysis Limit: 0:13:00
2026-04-01 19:05:21,993: xDoctor_4.8-109.0 - INFO    : ANALYZER [ac_interface_check]
2026-04-01 19:05:22,291: xDoctor_4.8-109.0 - INFO    : Autohealing interface_down on node 169.254.1.4 ...
2026-04-01 19:08:39,599: xDoctor_4.8-109.0 - INFO    : Autohealing interface_down on node 169.254.1.1 ...
2026-04-01 19:11:19,874: xDoctor_4.8-109.0 - INFO    : All data analyzed in 0:05:57
2026-04-01 19:11:20,709: xDoctor_4.8-109.0 - INFO    : --------------------
2026-04-01 19:11:20,709: xDoctor_4.8-109.0 - INFO    : Diagnosis Summary
2026-04-01 19:11:20,709: xDoctor_4.8-109.0 - INFO    : --------------------
2026-04-01 19:11:20,709: xDoctor_4.8-109.0 - INFO    : PSNT: CKM00190800120
2026-04-01 19:11:20,709: xDoctor_4.8-109.0 - INFO    : --------------------
2026-04-01 19:11:20,710: xDoctor_4.8-109.0 - INFO    : FIXED             =  1
2026-04-01 19:11:20,710: xDoctor_4.8-109.0 - INFO    : CRITICAL          =  0
2026-04-01 19:11:20,710: xDoctor_4.8-109.0 - INFO    : CRITICAL (CACHED) =  0
2026-04-01 19:11:20,710: xDoctor_4.8-109.0 - INFO    : ERROR             =  0
2026-04-01 19:11:20,710: xDoctor_4.8-109.0 - INFO    : ERROR (CACHED)    =  1
2026-04-01 19:11:20,710: xDoctor_4.8-109.0 - INFO    : WARNING           =  0
2026-04-01 19:11:20,710: xDoctor_4.8-109.0 - INFO    : INFO              =  0
2026-04-01 19:11:20,710: xDoctor_4.8-109.0 - INFO    : VERBOSE           =  0
2026-04-01 19:11:20,710: xDoctor_4.8-109.0 - INFO    : REPORT            =  0
2026-04-01 19:11:20,826: xDoctor_4.8-109.0 - INFO    : ---------------------
2026-04-01 19:11:20,826: xDoctor_4.8-109.0 - INFO    : xDoctor Post Features
2026-04-01 19:11:20,826: xDoctor_4.8-109.0 - INFO    : ----------------
2026-04-01 19:11:20,826: xDoctor_4.8-109.0 - INFO    : Data Combiner
2026-04-01 19:11:20,826: xDoctor_4.8-109.0 - INFO    : -------------
2026-04-01 19:11:20,827: xDoctor_4.8-109.0 - INFO    : Created a Data Collection Report (data.xml)
2026-04-01 19:11:20,827: xDoctor_4.8-109.0 - INFO    : ------
2026-04-01 19:11:20,827: xDoctor_4.8-109.0 - INFO    : SysLog
2026-04-01 19:11:20,827: xDoctor_4.8-109.0 - INFO    : ------
2026-04-01 19:11:20,828: xDoctor_4.8-109.0 - INFO    : Using Fabric as Syslog Server
2026-04-01 19:11:20,828: xDoctor_4.8-109.0 - INFO    : Syslog triggered on Warning
2026-04-01 19:11:20,828: xDoctor_4.8-109.0 - INFO    : Forwarded 1 event(s) to syslog
2026-04-01 19:11:20,828: xDoctor_4.8-109.0 - INFO    : ----
2026-04-01 19:11:20,828: xDoctor_4.8-109.0 - INFO    : SNMP
2026-04-01 19:11:20,828: xDoctor_4.8-109.0 - INFO    : ----
2026-04-01 19:11:20,829: xDoctor_4.8-109.0 - INFO    : Using 10.118.165.48:162 as SNMP server
2026-04-01 19:11:20,829: xDoctor_4.8-109.0 - INFO    : SNMP triggered on Warning
2026-04-01 19:11:26,905: xDoctor_4.8-109.0 - INFO    : Triggered 1 SNMPv2c event(s) and the SNMP server acknowledged 0 event(s)
2026-04-01 19:11:26,905: xDoctor_4.8-109.0 - INFO    : ------------
2026-04-01 19:11:26,905: xDoctor_4.8-109.0 - INFO    : ProcComplete
2026-04-01 19:11:26,905: xDoctor_4.8-109.0 - INFO    : ------------
2026-04-01 19:11:26,905: xDoctor_4.8-109.0 - WARNING : ProcComplete is disabled, please re-enable it (xdoctor --config)
2026-04-01 19:11:27,023: xDoctor_4.8-109.0 - INFO    : ----------------
2026-04-01 19:11:27,023: xDoctor_4.8-109.0 - INFO    : Session Archiver
2026-04-01 19:11:27,023: xDoctor_4.8-109.0 - INFO    : ----------------
2026-04-01 19:11:27,033: xDoctor_4.8-109.0 - INFO    : Session Stored in folder      - /usr/local/xdoctor/archive/other/2026-04-01_190513
2026-04-01 19:11:27,033: xDoctor_4.8-109.0 - INFO    : Session Archived as tar       - /usr/local/xdoctor/archive/other/xDoctor-CKMXXXXXXXXXXX-2026-04-01_190513.tgz
2026-04-01 19:11:27,034: xDoctor_4.8-109.0 - INFO    : --------------------------
2026-04-01 19:11:27,034: xDoctor_4.8-109.0 - INFO    : Session Report                - sudo xdoctor --report --archive=2026-04-01_190513
2026-04-01 19:11:27,034: xDoctor_4.8-109.0 - INFO    : ---------------
2026-04-01 19:11:27,034: xDoctor_4.8-109.0 - INFO    : Session Cleaner
2026-04-01 19:11:27,034: xDoctor_4.8-109.0 - INFO    : ---------------
2026-04-01 19:11:27,046: xDoctor_4.8-109.0 - INFO    : Removing folder  (count limit) - /usr/local/xdoctor/archive/other/2026-04-01_180540
2026-04-01 19:11:27,047: xDoctor_4.8-109.0 - INFO    : Removing archive (count limit) - /usr/local/xdoctor/archive/other/xDoctor-CKMXXXXXXXXXXX-2026-04-01_180540.tgz
2026-04-01 19:11:27,051: xDoctor_4.8-109.0 - INFO    : Cleaned 2 archived session(s)
2026-04-01 19:11:27,051: xDoctor_4.8-109.0 - INFO    : -------
2026-04-01 19:11:27,051: xDoctor_4.8-109.0 - INFO    : Emailer
2026-04-01 19:11:27,051: xDoctor_4.8-109.0 - INFO    : -------
2026-04-01 19:11:27,052: xDoctor_4.8-109.0 - INFO    : Using Dedicated Server (25:25) as SMTP Server ...
2026-04-01 19:11:27,052: xDoctor_4.8-109.0 - INFO    : Email Type = Individual Events
2026-04-01 19:11:27,052: xDoctor_4.8-109.0 - INFO    : ------------------------------
2026-04-01 19:11:27,053: xDoctor_4.8-109.0 - INFO    : xDoctor session_1775070313.036 finished in 0:06:14
2026-04-01 19:11:27,075: xDoctor_4.8-109.0 - INFO    : Successful Job:1775070313 Exit Code:200
- 運行會話報告以查看手動自動修復執行的結果。
命令:
注意:使用上述 xDoctor 範例中提供的「工作階段報告」命令,檢閱手動自動修復執行的結果。
# sudo xdoctor --report --archive=<session report>
範例:
admin@ecsnode1:~> sudo xdoctor --report --archive=2026-04-01_180344

xDoctor 4.8-109.0
CKMXXXXXXXXXXX - ECS 3.8.1.4

Displaying xDoctor Report (2026-04-01_180344) Filter:[] ...

----------------------------------------
FIXED - Auto Healer fixed interface_down
----------------------------------------
Node      = Nodes
Extra     = {"Nodes": {"169.254.1.1": ["pslave-0"]}}
Timestamp = 2026-04-01_190513
PSNT      = CKMXXXXXXXXXXX @ 4.8-109.0
- 如果發生故障,請開啟 SR 以進行調查。
失敗範例:------------------------------------------------------------------------------------- ERROR - (Cached) Auto fix failed - One or more network interfaces are down or missing ------------------------------------------------------------------------------------- Node = Nodes Extra = {"Nodes": {"169.254.1.4": ["pslave-1"]}} RAP = RAP025 Solution = KB 503814 Timestamp = 2026-04-01_190513 PSNT = CKMXXXXXXXXXXX @ 4.8-109.0
xDoctor Auto Pilot:
重要: xDoctor 4-8.104.0 及更新版本中已發佈一項新功能。此知識庫 (KB) 現已使用 xDoctor 自動化,可透過檢查節點和交換器詳細資料,快速嘗試還原節點介面。如果指令檔無法復原介面,則會提供其發現結果的詳細摘要。
若要使用 xDoctor 4-8.104.0 及更新版本設定自動化儲存庫,請遵循 ECS:ObjectScale:如何執行 KB 自動化指令檔 (Auto Pilot)
- 從具有 xDoctor 4-8.104.0 及更新版本的節點執行自動化命令。
注意:
--target-node支援此操作。此指令檔包含在 xDoctor 4-8.104.0 版本中,其中包含 Ansible 自動化指令檔 3.0 版。
命令:
# sudo xdoctor autopilot --kb 50341 --target-node <Node NAN IP>範例:
admin@ecsnode1:~> sudo xdoctor autopilot --kb 50341 --target-node 169.254.1.1
Checking for existing screen sessions...
Starting screen session 'autopilot_kb_50341_20250627_124206'...
Screen session 'autopilot_kb_50341_20250627_124206' started successfully.
Attaching to screen session 'autopilot_kb_50341_20250627_124206'...
- 檢閱自動化摘要:
範例:
>TASK [Print all summaries] ***************************************************************************************************************************************************************************
ok: [169.254.1.7] => {
    "msg": [
        "Host: 169.254.1.7",
        "*******************************************************************************",
        "Node interface summary:",
        "*******************************************************************************",
        "Interface status for switch rabbit and node interface(slave-0):",
        "                           Node Interface: UP",
        "                           Node physical link detected: yes",
        "                           Node SFP Vendor: DELL",
        "                           Node SFP PN: VXFJY",
        "                           Node SFP Type: GBIC/SFP defined by 2-wire interface ID",
        "                           Node connection detected: ethernet1/1/7",
        "                           Switch Interface: ethernet1/1/7",
        "                           Switch Speed: 25G",
        "                           Switch Status: up",
        "                           Switch SFP Model: 25GBASE-CR-3.0M",
        "                           Switch SFP Qualified: true",
        "Interface status for switch hare and node interface(slave-1):",
        "                           Node Interface: UP",
        "                           Node physical link detected: yes",
        "                           Node SFP Vendor: DELL",
        "                           Node SFP PN: VXFJY",
        "                           Node SFP Type: GBIC/SFP defined by 2-wire interface ID",
        "                           Node connection detected: ethernet1/1/7",
        "                           Switch Interface: ethernet1/1/7",
        "                           Switch Speed: 25G",
        "                           Switch Status: up",
        "                           Switch SFP Model: 25GBASE-CR-3.0M",
        "                           Switch SFP Qualified: true",
        "Interface status for switch fox and node interface(pslave-0):",
        "                           Node Interface: UP",
        "                           Node physical link detected: yes",
        "                           Node SFP Vendor: DELL",
        "                           Node SFP PN: VXFJY",
        "                           Node SFP Type: GBIC/SFP defined by 2-wire interface ID",
        "                           Node connection detected: ethernet1/1/7",
        "                           Switch Interface: ethernet1/1/7",
        "                           Switch Speed: 25G",
        "                           Switch Status: up",
        "                           Switch SFP Model: 25GBASE-CR-3.0M",
        "                           Switch SFP Qualified: true",
        "Interface status for switch hound and node interface(pslave-1): ",
        "                           Node Interface:UP",
        "                           Node physical link detected:yes",
        "                           Node SFP Vendor: DELL",
        "                           Node SFP PN: VXFJY",
        "                           Node SFP Type: GBIC/SFP defined by 2-wire interface ID",
        "                           Node connection detected: ethernet1/1/7",
        "                           Switch Interface: ethernet1/1/7",
        "                           Switch Speed: 25G",
        "                           Switch Status: up",
        "                           Switch SFP Model: 25GBASE-CR-3.0M",
        "                           Switch SFP Qualified: true",
        "*******************************************************************************",
        "Actions taken and Reccomendations:",
        "*******************************************************************************",
        "Validated node(s) to switch connection are correct: PASS: Node(s) are correctly connected on all reachable Dell managed switches",
        "Validated SFP on the node(s): PASS: SFP detected on all interfaces",
        "Validated interface status on the node(s): PASS: All interfaces are up",
        "Validated SFP on the switches are qualified: PASS: All SFPs are qualified.",
        "Validated Frontend switch(es): PASS: All frontend switches appear to be Dell managed switches.",
        "Validated Backend switch(es): PASS: All backend switch(es) are reachable",
        "*******************************************************************************"
    ]
}

TASK [Fail if validation fails] **********************************************************************************************************************************************************************
skipping: [169.254.1.7] => {"changed": false, "skip_reason": "Conditional result was False", "skipped": true}

PLAY RECAP *******************************************************************************************************************************************************************************************
169.254.1.7                : ok=70   changed=6    unreachable=0    failed=0
localhost                  : ok=8    changed=1    unreachable=0    failed=0

Playbook execution successful
20241112 22:28:58.932: | PASS (2 min 44 sec)
================================================================================
Status: PASS
Time Elapsed: 3 min 1 sec
Debug log: /opt/emc/caspian/service-console/log/20241112_222531_run_KB_Fix/dbg_robot.log
HTML log: /opt/emc/caspian/service-console/log/20241112_222531_run_KB_Fix/log.html
================================================================================

[screen is terminating]
注意:如果交換器不是 Arista 或 Dell 交換器,則它們是使用者管理的交換器。我們必須通知使用者他們有要補救的連線中斷問題。確認後,請遵循文章 ECS:如何篩選來自 xDoctor 的交換器警示 ,以停用使用者管理的交換器分析。
手動步驟如下:
在進行任何工作之前:在維護使用者管理的交換器(例如固件升級)的情況下,鏈路可能會中斷,並可能重新協商。以下範例適用於使用者在使用者管理的 FE 交換器上完成韌體升級後的 secondary-0 故障。以下命令用於重新協商介面:
ethtool -r <i/f name>

admin@ecs-n-1:~> sudo ethtool slave-0
Settings for slave-0:
        Supported ports: [ FIBRE ]
        Supported link modes:   1000baseX/Full
                                10000baseSR/Full
        Supported pause frame use: Symmetric
        Supports auto-negotiation: Yes
        Advertised link modes:  1000baseX/Full
                                10000baseSR/Full
        Advertised pause frame use: No
        Advertised auto-negotiation: Yes
        Speed: Unknown!
        Duplex: Unknown! (255)
        Port: FIBRE
        PHYAD: 0
        Transceiver: internal
        Auto-negotiation: off
        Supports Wake-on: g
        Wake-on: g
        Current message level: 0x0000000f (15)
                               drv probe link timer
        Link detected: no
admin@ecs-n-1:~>

admin@ecs-n-1:~> sudo ethtool -r slave-0
admin@ecs-n-1:~>

admin@ecs-n-1:~> sudo ethtool slave-0
Settings for slave-0:
        Supported ports: [ FIBRE ]
        Supported link modes:   1000baseX/Full
                                10000baseSR/Full
        Supported pause frame use: Symmetric
        Supports auto-negotiation: Yes
        Advertised link modes:  1000baseX/Full
                                10000baseSR/Full
        Advertised pause frame use: No
        Advertised auto-negotiation: Yes
        Speed: 10000Mb/s
        Duplex: Full
        Port: FIBRE
        PHYAD: 0
        Transceiver: internal
        Auto-negotiation: off
        Supports Wake-on: g
        Wake-on: g
        Current message level: 0x0000000f (15)
                               drv probe link timer
        Link detected: yes
注意:如果介面仍然故障且無法重新協商,則必須有 Dell 代表到場檢查並重新連接 SFP 和纜線。如果這樣做無法解決,建議更換從交換器到節點的 SFP 和纜線連接。
有不同的 SFP 機型使用銅線或光纖。此外,後端和前端交換器可能使用不同類型的 SFP 電線。更換前請先確認需要哪一個零件。
其他資訊
ECS 硬體指南第 1 代或第 2 代的擷取:
網路佈線
網路佈線圖適用於 Dell 或客戶提供機架中的 U 系列、D 系列或 C 系列 ECS 應用裝置。

網路佈線
網路佈線圖適用於 Dell 或客戶提供機架中的 U 系列、D 系列或 C 系列 ECS 應用裝置。
為了區分這三個交換器,每個交換器都有一個暱稱:
- Hare:10 GbE 公用交換器,位於 U 系列或 D 系列的機架頂端,或是 C 系列區段的頂端交換器。
- Rabbit:10 GbE 公用交換器,位於 U 系列或 D 系列機架頂端的 hare 下方,或 C 系列區段中 hare 交換器的下方。
- Turtle:1 GbE 私人交換器,位於 U 系列機架頂端的 rabbit 下方,或是 C 系列區段中的 hare 交換器下方。
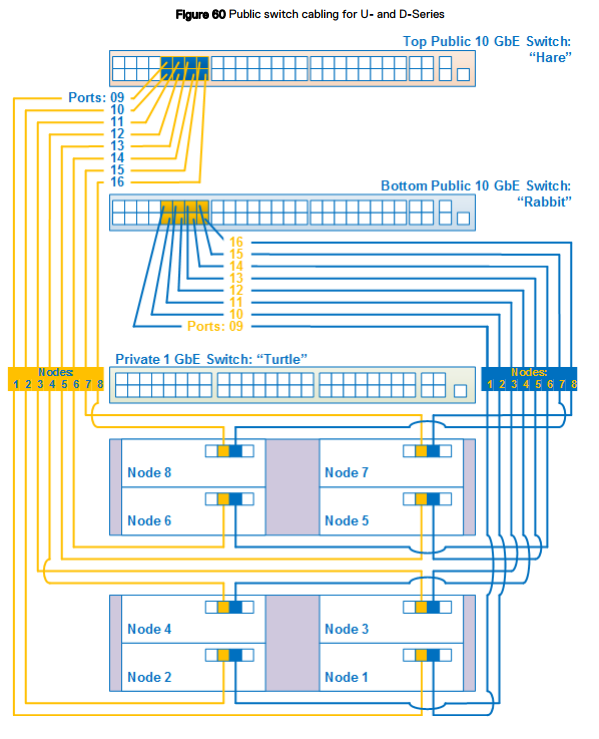
U 和 D 系列網路佈線
下圖顯示簡化的網路佈線圖,由 Dell 或客戶配置 U 或 D 系列 ECS 的八節點機架組態。在此圖以下,有其他詳細圖表和表格提供了連接埠、標籤和纜線顏色的資訊。
下圖顯示簡化的網路佈線圖,由 Dell 或客戶配置 U 或 D 系列 ECS 的八節點機架組態。在此圖以下,有其他詳細圖表和表格提供了連接埠、標籤和纜線顏色的資訊。
請參閱下表以瞭解交換器和連接埠的配對資訊,還有圖表顯示適當的交換器連接埠號碼。
交換器 1 = Rabbit = 底部交換器
交換器 2 = Hare = 頂部交換器
節點連接埠:
Secondary-0 = P01 = 右連接埠 - 連接至交換器 1 / Rabbit/底部交換器。
Secondary-1 = P02 = 左連接埠 - 連接至交換器 2 / Hare/頂部交換器。
交換器 1 = Rabbit = 底部交換器
交換器 2 = Hare = 頂部交換器
節點連接埠:
Secondary-0 = P01 = 右連接埠 - 連接至交換器 1 / Rabbit/底部交換器。
Secondary-1 = P02 = 左連接埠 - 連接至交換器 2 / Hare/頂部交換器。
受影響的產品
ECS Appliance產品
ECS Appliance, ECS Appliance Gen 1, ECS Appliance Gen 2, ECS Appliance Gen 3, ECS Appliance Hardware Gen1 U-Series, Elastic Cloud Storage文章屬性
文章編號: 000050341
文章類型: Solution
上次修改時間: 17 4月 2026
版本: 12
向其他 Dell 使用者尋求您問題的答案
支援服務
檢查您的裝置是否在支援服務的涵蓋範圍內。