NFS 원격 I/O 오류, FS 지원 버킷의 버킷 소유자 변경으로 인해 애플리케이션 및/또는 사용자가 NFS 파일에 액세스할 수 없음
摘要: 이전 버킷 소유자가 허용되지 않거나 제한됨 ObjectControllerException: updateObjectInternal 메서드는 이전 버킷 소유자에게 허용되지 않습니다.
本文章適用於
本文章不適用於
本文無關於任何特定產品。
本文未識別所有產品版本。
症狀
사용자가 사용자 인터페이스의 버킷 소유자 페이지에서 변경한 내용:
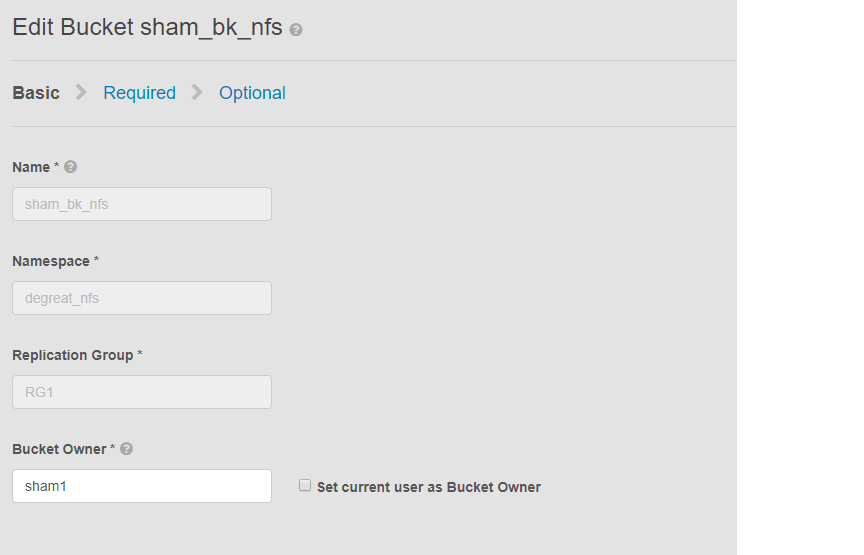
이 문제는 NFS가 활성화된 버킷과 사용자 인터페이스에 의한 버킷 소유자 변경에 적용됩니다. 이로 인해 연결된 애플리케이션 또는 사용자가 Linux 파일 시스템의 버킷에 액세스하지 못할 수 있습니다. 변경 사항을 원래 소유자로 되돌리더라도 액세스가 불가능하여 DU가 발생합니다.
이 예에서는
사용자 인터페이스를 사용하여 버킷 소유자를 "sham2"로 변경했습니다. ECS의 제한 사항으로 인해 버킷 소유자 이름을 다시 "sham1"로 변경한 후에도 ECS는 사용자 인터페이스를 사용하여 버킷 소유자를 다시 "sham1"로 변경하지 않습니다. 이 작업은 현재 CLI를 통해서만 payload to resetowner 플래그가 true인 API를 사용하여 수행할 수 있습니다.
문제를 식별하는 방법은 Linux 시스템에서 사용자에게 예를 들어 파일을 터치하도록 요청합니다.
이 문제는 NFS가 활성화된 버킷과 사용자 인터페이스에 의한 버킷 소유자 변경에 적용됩니다. 이로 인해 연결된 애플리케이션 또는 사용자가 Linux 파일 시스템의 버킷에 액세스하지 못할 수 있습니다. 변경 사항을 원래 소유자로 되돌리더라도 액세스가 불가능하여 DU가 발생합니다.
이 예에서는
사용자 인터페이스를 사용하여 버킷 소유자를 "sham2"로 변경했습니다. ECS의 제한 사항으로 인해 버킷 소유자 이름을 다시 "sham1"로 변경한 후에도 ECS는 사용자 인터페이스를 사용하여 버킷 소유자를 다시 "sham1"로 변경하지 않습니다. 이 작업은 현재 CLI를 통해서만 payload to resetowner 플래그가 true인 API를 사용하여 수행할 수 있습니다.
문제를 식별하는 방법은 Linux 시스템에서 사용자에게 예를 들어 파일을 터치하도록 요청합니다.
admin@node1~>touch file
touch: setting times of `file': Remote I/O error

se svc_log with the string  "method updateObjectInternal "

Command:
# svc_log -a -sr dataheadsvc | grep "method updateObjectInternal"
Example:
admin@node1~>svc_log -a -sr dataheadsvc | grep "method updateObjectInternal"
svc_log v1.0.22 (svc_tools v1.5.3)                 Started 2019-06-06 10:45:04

Running on nodes:              <All nodes>
Time range:                    2019-06-05 10:45:04 - 2019-06-06 10:45:04
Filter string(s):              <All messages>
Show nodename(s):              True
Search reclaim logs (if any):  False

com.emc.storageos.data.object.exception.ObjectControllerException: method updateObjectInternal not allowed for previous bucket owner sham1
Caused by: com.emc.storageos.data.object.exception.ObjectControllerException: method updateObjectInternal not allowed for previous bucket owner sham1
原因
특정 사용자를 소유자로 하여 버킷을 생성한 후 버킷의 소유권을 변경합니다. 마지막으로, ACLs 페이지를 사용하여 원래 소유자에게 모든 권한을 부여하면 ECS 로그 예외가 발생하여 실패합니다.
ObjectControllerException: method updateObjectInternal not allowed for previous bucket owner <ownerid>
This is a known issue currently being evaluated by Dell EMC at this time.
解析度
해결 방법은 페이로드를 resetowner 플래그가 true로 설정한 CLI를 통해 API를 사용하여 버킷 소유자를 변경하는 것입니다.
1. 현재 버킷 소유자를 확인합니다.
2. vi 편집기를 사용하여 간단한 xml 파일을 작성하십시오. 아래 예에서는 /tmp/bucket-owner.xml라고 합니다. 이 프로세스에는 여러 단계가 필요합니다. 일시적으로 sham2의 새 소유자로 설정해야합니다. 아래 예에서와 같이 원래 소유자 sham1로 다시 설정하기 전에 출력을 확인합니다.
. 7. 구성 변경이 완료되면 더 이상 동일한 오류가 표시되지 않습니다
1. 현재 버킷 소유자를 확인합니다.
TOKEN을 생성하려면 사용자 인터페이스 루트 암호가 필요합니다. 예:
admin@ecsnode1:~> tok=$(curl -iks https://XX.XX.XX.XX:4443/login -u 'root:ChangeMe' | grep X-SDS-AUTH-TOKEN)
현재 버킷 소유자를 확인합니다(상황에 따라 버킷과 네임스페이스로 대체).
admin@node1:~> curl -s -k -X GET -H "$tok" https://XX.XX.XX.XX:4443/object/bucket/sham_bk_nfs/info?namespace=degreat_nfs | xmllint --format - | grep '<owner>'
  <owner>sham2</owner>
이는 매개변수 reset_previous_owners true로 설정해야 함을 확인합니다. 되돌린 버킷 소유자는 사용자 인터페이스에 있지만 CLI를 통한 API는 ECS가 여전히 버킷 소유자를 "sham2"로 보고 있는지 확인합니다.
2. vi 편집기를 사용하여 간단한 xml 파일을 작성하십시오. 아래 예에서는 /tmp/bucket-owner.xml라고 합니다. 이 프로세스에는 여러 단계가 필요합니다. 일시적으로 sham2의 새 소유자로 설정해야합니다. 아래 예에서와 같이 원래 소유자 sham1로 다시 설정하기 전에 출력을 확인합니다.
admin@node1:~ # vi /tmp/bucket-owner.xml

admin@ecsnode1:~ # cat /tmp/bucket-owner.xml
<object_bucket_update_owner>
   <namespace>degreat_nfs</namespace>
   <new_owner>sham2</new_owner>
   <reset_previous_owners>true</reset_previous_owners>
</object_bucket_update_owner>

3. Change the bucket owner to the temporary owner.
xml 파일을 통해 버킷 소유자를 "sham2"로 변경하는 데 필요한 API 구문은 다음과 같습니다.
admin@ecsnode1:~> curl -v -k -X "POST" "https://xx.xx.xx.xx:4443/object/bucket/sham_bk_nfs/owner" -H "$tok" -H "Content-Type: application/xml" -H "ACCEPT:application/xml" -d @/tmp/bucket-owner.xml -v
* Hostname was NOT found in DNS cache
*   Trying xx.xx.xx.xx...
* Connected to xx.xx.xx.xx (xx.xx.xx.xx) port 4443 (#0)
* successfully set certificate verify locations:
*   CAfile: none
  CApath: /etc/ssl/certs/
* SSLv3, TLS unknown, Certificate Status (22):
* SSLv3, TLS handshake, Client hello (1):
* SSLv3, TLS handshake, Server hello (2):
* SSLv3, TLS handshake, Certificate (11):
* SSLv3, TLS handshake, Server key exchange (12):
* SSLv3, TLS handshake, Server finished (14):
* SSLv3, TLS handshake, Client key exchange (16):
* SSLv3, TLS change cipher, Client hello (1):
* SSLv3, TLS handshake, Finished (20):
* SSLv3, TLS change cipher, Client hello (1):
* SSLv3, TLS handshake, Finished (20):
* SSL connection using TLSv1.2 / ECDHE-RSA-AES256-GCM-SHA384
* Server certificate:
*        subject: CN=localhost
*        start date: 2019-03-25 09:53:41 GMT
*        expire date: 2029-03-22 09:53:41 GMT
*        issuer: CN=localhost
*        SSL certificate verify result: self signed certificate (18), continuing anyway.
> POST /object/bucket/sham_bk_nfs/owner HTTP/1.1
> User-Agent: curl/7.37.0
> Host: xx.xx.xx.xx:4443
> X-SDS-AUTH-TOKEN: BAAcUy9KYlhxTlVYb2M0bnF3bTNscEsvSEdDeWhJPQMAjAQASHVybjpzdG9yYWdlb3M6VmlydHVhbERhdGFDZW50ZXJEYXRhOmJhOGQ3ZTkzLTMyMGYtNDNmNy05Y2FkLWM4YWQzMWFiMzY1MAIADTE1NTk3Mzk3OTA2MDgDAC51cm46VG9rZW46YjQ4NGNiZjEtNTkwNy00YWI3LTgzYTctM2Y3OGRhM2RiY2NiAgAC0A8=
> Content-Type: application/xml
> ACCEPT:application/xml
> Content-Length: 179
>
* upload completely sent off: 179 out of 179 bytes
< HTTP/1.1 200 OK
< Date: Thu, 06 Jun 2019 10:56:08 GMT
< Content-Length: 0
< Connection: keep-alive
<
* Connection #0 to host xx.xx.xx.xx left intact
4. Edit the simple.xml file previously created in step 2 and this time insert original owner of sham1
admin@node1:~ # vi /tmp/bucket-owner.xml

admin@ecsnode1:~ # cat /tmp/bucket-owner.xml
<object_bucket_update_owner>
   <namespace>degreat_nfs</namespace>
   <new_owner>sham1</new_owner>
   <reset_previous_owners>true</reset_previous_owners>
</object_bucket_update_owner>

5. Change the bucket owner back to the original owner
The API syntax required to change the bucket owner back to "sham1" through the xml file is as follows:
admin@ecsnode1:~> curl -v -k -X "POST" "https://xx.xx.xx.xx:4443/object/bucket/sham_bk_nfs/owner" -H "$tok" -H "Content-Type: application/xml" -H "ACCEPT:application/xml" -d @/tmp/bucket-owner.xml -v
* Hostname was NOT found in DNS cache
*   Trying xx.xx.xx.xx...
* Connected to xx.xx.xx.xx (xx.xx.xx.xx) port 4443 (#0)
* successfully set certificate verify locations:
*   CAfile: none
  CApath: /etc/ssl/certs/
* SSLv3, TLS unknown, Certificate Status (22):
* SSLv3, TLS handshake, Client hello (1):
* SSLv3, TLS handshake, Server hello (2):
* SSLv3, TLS handshake, Certificate (11):
* SSLv3, TLS handshake, Server key exchange (12):
* SSLv3, TLS handshake, Server finished (14):
* SSLv3, TLS handshake, Client key exchange (16):
* SSLv3, TLS change cipher, Client hello (1):
* SSLv3, TLS handshake, Finished (20):
* SSLv3, TLS change cipher, Client hello (1):
* SSLv3, TLS handshake, Finished (20):
* SSL connection using TLSv1.2 / ECDHE-RSA-AES256-GCM-SHA384
* Server certificate:
*        subject: CN=localhost
*        start date: 2019-03-25 09:53:41 GMT
*        expire date: 2029-03-22 09:53:41 GMT
*        issuer: CN=localhost
*        SSL certificate verify result: self signed certificate (18), continuing anyway.
> POST /object/bucket/sham_bk_nfs/owner HTTP/1.1
> User-Agent: curl/7.37.0
> Host: xx.xx.xx.xx:4443
> X-SDS-AUTH-TOKEN: BAAcUy9KYlhxTlVYb2M0bnF3bTNscEsvSEdDeWhJPQMAjAQASHVybjpzdG9yYWdlb3M6VmlydHVhbERhdGFDZW50ZXJEYXRhOmJhOGQ3ZTkzLTMyMGYtNDNmNy05Y2FkLWM4YWQzMWFiMzY1MAIADTE1NTk3Mzk3OTA2MDgDAC51cm46VG9rZW46YjQ4NGNiZjEtNTkwNy00YWI3LTgzYTctM2Y3OGRhM2RiY2NiAgAC0A8=
> Content-Type: application/xml
> ACCEPT:application/xml
> Content-Length: 179
>
* upload completely sent off: 179 out of 179 bytes
< HTTP/1.1 200 OK
< Date: Thu, 06 Jun 2019 10:56:08 GMT
< Content-Length: 0
< Connection: keep-alive
<
* Connection #0 to host xx.xx.xx.xx left intact


6.  Confirm the bucket owner change is reflected.
버킷 소유자의 변경 사항이 이제 "sham1"인지 확인합니다.
admin@ecsnode1:~> curl -s -k -X GET -H "$tok" https://XX.XX.XX.XX:4443/object/bucket/sham_bk_nfs/info?namespace=degreat_nfs | xmllint --format - | grep '<owner>'
<owner>sham1</owner>
API에서 버킷 소유자를 되돌린 후 호스트가 이제 Linux 파일 시스템의 버킷에 액세스할 수 있는지 확인합니다.
. 7. 구성 변경이 완료되면 더 이상 동일한 오류가 표시되지 않습니다
svc_log -f "method updateObjectInternal not allowed" -start "20 hour ago" -sr all -sh -st hour
svc_log v1.0.22 (svc_tools v1.6.8)                 Started 2020-01-23 09:28:17

Running on nodes:              <All nodes>
Time range:                    2020-01-22 13:28:17 - 2020-01-23 09:28:17
Filter string(s):              'method updateObjectInternal not allowed'
Show nodename(s):              True
Search reclaim logs (if any):  False

Count of message occurrences per hour:

2020-01-22 13:xx - 5066
2020-01-22 14:xx - 9580
2020-01-22 15:xx - 9574
2020-01-22 16:xx - 9580
2020-01-22 17:xx - 9570
2020-01-22 18:xx - 9576
2020-01-22 19:xx - 9564
2020-01-22 20:xx - 9576
2020-01-22 21:xx - 9576
2020-01-22 22:xx - 9572
2020-01-22 23:xx - 9564
2020-01-23 00:xx - 9586
2020-01-23 01:xx - 9574
2020-01-23 02:xx - 9572
2020-01-23 03:xx - 4564
2020-01-23 04:xx - 0
2020-01-23 05:xx - 0
2020-01-23 06:xx - 0
2020-01-23 07:xx - 0
2020-01-23 08:xx - 0
2020-01-23 09:xx - 0


Dell EMC is aware of this issue and are working on a fix in a future release.
其他資訊
관련 NFS KB:
- 기본 NFS 내보내기를 생성하고 클라이언트에 마운트하는 방법
- ECS: dataheadsvc 로그 스트리밍 오류: NFSv3 프로시저 LINK가 요청 ReadLinkRequest에서 지원되지 않음
- No such file or directory 또는 ERROR_OBJECT_NOT_FOUND가 표시되며 ECS, NFS 마운트가 실패함
- NFS 원격 I/O 오류: FS 지원 버킷의 버킷 소유자 변경으로 인해 애플리케이션/사용자가 NFS 파일에 액세스할 수 없음
- 특정 양의 데이터 후에 NFS 쓰기에 I/O 오류가 발생함
- ECS의 NFS 파일 공유를 VMware NFS 데이터스토어에 사용
- ECS NFS 내보내기를 마운트하는 모범 사례
- Windows 클라이언트에서 NFS 공유를 마운트하는 방법, ECS, How to mount NFS share on Windows client
- UI에서 파일 내보내기 설정을 변경한 후 NFS가 마운트되지 않음
- Oracle WCC(WebCenter Content)는 ECS와 호환됩니까?
제품 업데이트를 구독합니다.
아래 기술 자료 문서의 지침에 따라 업데이트를 구독할 수 있습니다.
DELL EMC: 제품 페이지를 구독하는 방법 - Dell 지원?
受影響的產品
Elastic Cloud Storage產品
ECS Appliance, ECS Appliance Software with Encryption, ECS Appliance Software without Encryption, Elastic Cloud Storage文章屬性
文章編號: 000055535
文章類型: Solution
上次修改時間: 29 7月 2026
版本: 5
向其他 Dell 使用者尋求您問題的答案
支援服務
檢查您的裝置是否在支援服務的涵蓋範圍內。