ME4:使用 FTP 收集診斷記錄
摘要: 本文說明透過檔案傳輸通訊協定 (FTP) 收集 PowerVault ME 系列儲存產品支援套裝的步驟。
本文章適用於
本文章不適用於
本文無關於任何特定產品。
本文未識別所有產品版本。
說明
本文說明透過 FTP 收集支援套裝的步驟。
PSFTP 等安全 FTP 公用程式無法收集支援套裝。必須在儲存裝置上啟用 FTP。
您可以使用 FTP 通訊協定從任一控制器收集記錄。
先決條件
-
執行
show protocols命令,或使用 PowerVault Manager (PVM) 啟用 FTP 從 首頁 主題中,選取:動作 →「系統 設定 」→ 「服務 」,然後選取 「檔案傳輸通訊協定」的核取方塊。
- 具有監控權限的使用者認證
- 使用
show users命令以查看誰已啟用 FTP 訪問許可權。
- 使用
程序概要
- 開啟 FTP 工作階段:
ftp <controller IP address>
- 以具有 FTP 和顯示器存取權限的使用者身分登入:
manage或ftp
- 輸入密碼用於
manage或ftp使用者:******
- 將檔案從 ME4 陣列儲存至本機系統:
get logs <filename.zip>
<filename.zip> 的密碼 manage 或 ftp user 是從 ME4 陣列傳輸後的套裝檔案名稱。
- 結束 FTP 工作階段:
bye
- 將檔案傳送給您的 Dell 支援代表。
在陣列上啟用 FTP (預設為未啟用 FTP)。
使用 PVM UI
- 從 「主頁 」主題中,選擇:動作 →「系統 設定 」→ 「服務 」,然後選取 「檔案傳輸通訊協定」的核取方塊。
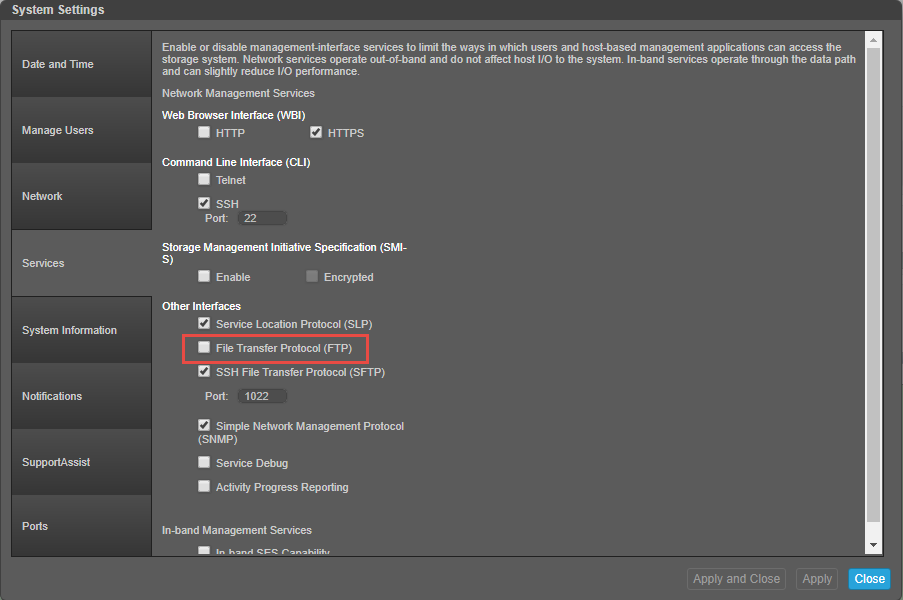
- 選取 FTP 核取方塊後,按一下 套用
- 隨即會出現顯示以確認變更,選取 確定
使用 ME4 CLI
使用 FTP 的使用者帳戶可能無法存取 PVM UI,請在該例項中使用 CLI。
最大化終端模擬器視窗,以在螢幕上獲得最佳輸出格式。
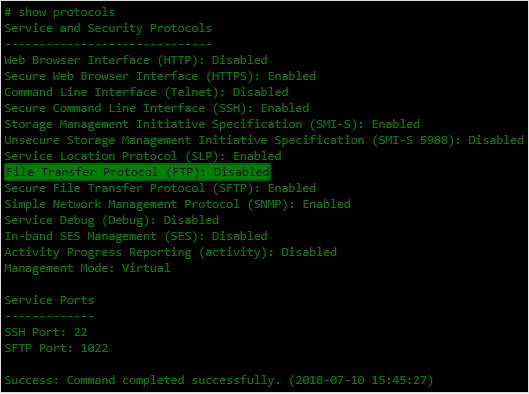
- 若要檢視 ME4 陣列上是否已啟用 FTP 通訊協定,請執行下列命令
show protocols
- 若要在 ME4 上啟用 FTP 通訊協定支援,請執行以下命令
set protocols ftp enabled。若要在收集完記錄後予以停用,請執行下列命令:set protocols ftp disabled。

- (選擇性)建立使用者以收集儲存裝置記錄,然後執行命令
create user <UserName> interfaces ftp。使用者名稱和密碼需要區分大小寫。

注意:FTP 使用埠號 20 和 21 進行命令控制和數據傳輸。如果這些埠未打開,會話可能會打開,但無法傳輸任何檔。
- 對於 Windows 使用者,在視窗防火牆中創建新的入站規則,保持選中 TCP,然後輸入埠號 20 和 21(“20、21”)。
- 選取選項。允許連接接受這些埠上的傳入流量。
- 從主機用戶端開啟 FTP 工作階段至其中一個 ME4 控制器上的管理介面
ftp <management interface IP address> - 以具有 FTP 和顯示器存取權限的使用者身分登入:
manage或ftp - 輸入密碼用於
manage或ftp使用者:****** - 將檔案從 ME4 陣列儲存至本機系統:
get logs <filename.zip>
<filename.zip> 的密碼 manage 或 ftp user 是從 ME4 陣列傳輸套裝檔案後的名稱。
- 結束 FTP 工作階段:
bye - 將檔案傳送給您的 Dell 支援代表。(檔案位於您目前的工作目錄中)
Windows 主機用戶端的 FTP 工作階段範例輸出:
C:\dell\logs>ftp 172.28.120.XX
Connected to 172.28.120.XX.
220-Welcome to Pure-FTPd.
220-You are user number 1 of 5 allowed.
220-Local time is now 15:58. Server port: 21.
220-This is a private system - No anonymous login
220-IPv6 connections are also welcome on this server.
220 You will be disconnected after 15 minutes of inactivity.
User (172.28.120.30:(none)): ftp                                  <------- Login as a user with FTP permissions
331 User ftp OK. Password required
Password:
230-OK. Current restricted directory is /
230-Instructions for getting the cumulative I/O density data:
230-    1. Log in with user name and password
230-    2. Type 'get logs:heatmap <filename.csv> is a file to capture the cumulative
230-        I/O density data
230-    3. Example: 'get logs:heatmap IO_density.csv'
230-
230-Instructions for updating firmware in controller modules:
230-    1. Type 'put <filename> flash' where <filename> is the new firmware image to load.
230-    2. For a single controller load, it will take approximately 10 minutes for
230-        the new firmware to load and for the automatic restart to complete. For
230-        a system load (dual controller, PFU enabled), allow an additional 15
230-        minutes for the partner controller to be updated.
230-        If using FTP, progress messages will be displayed in the FTP client
230-        interface during that time.
230-        If using SFTP, progress messages will *not* be displayed in the SFTP
230-        client.   Instead, progress may be monitored via the Management Port
230-        (e.g., :8081) or by issuing a "get progress" command with a separate
230-        FTP/SFTP connection.
230-        Wait for the progress messages to indicate that the code load has
230-        completed.
230-    3. If PFU is not enabled and a system load was not performed, log into the
230-        other controller and repeat steps 1-2.
230-    4. WARNING! Do not power cycle or restart during the firmware update
230-        as this can result in loss of capabilities for this unit.
230-    5. If you attempt to load an incompatible firmware version (such as code
230-        that is intended only for an iSCSI system on an FC system) the message
230-        "*** Code Load Fail. Bad format image. ***" will be displayed and the FTP
230-        prompt will come back in just a few seconds. The code will not be loaded.
230-
230-Instructions for updating firmware in expansion modules:
230-    1. Obtain the address of each enclosure management processor (EMP) in the form
230-        <EMP-channel-ID>:<EMP-target-ID> (for example, 0:63 and 1:63)
230-        and obtain the firmware revision of each EMP.
230-        Determine which EMPs need to be updated based on the revision.
230-        Note: In the WBI, the EMP addresses are displayed by clicking on each
230-        enclosure in the Configuration View. The needed data is displayed
230-        in the fields labeled 'EMP A Bus ID', 'EMP B Bus ID', 'EMP A Target ID',
230-        'EMP B Target ID', 'EMP A Revision', and 'EMP B Revision'. (The terms
230-        'bus' and 'channel' are equivalent.)
230-        Note: In the CLI, enter 'show enclosures'. The needed data is displayed
230-        in the columns labeled 'EMP A CH:ID Rev' and 'EMP B CH:ID Rev'.
230-    2. Log in via FTP/SFTP with user name and password.
230-    3. Type 'put <filename> encl:<EMP-channel-ID>:<EMP-target-ID>'
230-        where <filename> is the new firmware image to load.
230-    4. It typically takes several minutes for the new firmware to load.
230-        If using FTP, progress messages will be displayed in the FTP client
230-        interface during that time.
230-        If using SFTP, progress messages will *not* be displayed in the SFTP
230-        client.   Instead, progress may be monitored via the Management Port
230-        (e.g., :8081) or by issuing a "get progress" command with a separate
230-        FTP/SFTP connection.
230-        Wait for the progress messages to indicate that the code load has
230-        completed.
230-        WARNING! Do not power cycle or restart during the firmware update
230-        as this can result in loss of capabilities for this unit.
230-    5. Repeat steps 3-4 for each EMP to update in each enclosure.
230-
230-Instructions for updating disk firmware:
230-    1. Obtain the address of each disk to be loaded in the form
230-        <enclosure-ID>.<slot-number> (for example, 0.1 and 1.9)
230-        and obtain the firmware revision of each of these disks.
230-        Determine which disks need to be updated based on the revision.
230-        Note: In the WBI, the disk addresses are displayed by clicking on each
230-        enclosure in the Configuration View and then selecting the desired
230-        disk. The needed data is displayed in the fields labeled 'Enclosure ID',
230-        'Slot', and 'Revision'.
230-        Note: In the CLI, enter 'show disks'. The needed data is displayed
230-        in the columns labeled 'Location' and 'Revision'.
230-    2. Log in via FTP/SFTP with user name and password.
230-    3. Type 'put <filename> disk:<disk-list>'
230-        where <filename> is the new firmware image to load,
230-        and <disk-list> is a list of the form currently supported in the CLI.
230-        You can specify:
230-        - A disk (Example: 0.4)
230-        - A hyphenated range of disks (Example: 0.4-7)
230-        - A comma-separated list of individual disks, ranges, or both with no spaces.
230-          (Example: 0.4,0.6-9)
230-        If "disk" with no disk-list is entered, all disks compatible with the
230-        specified firmware will be updated.
230-    4. It typically takes several minutes for the new firmware to load.
230-        If using FTP, progress messages will be displayed in the FTP client
230-        interface during that time.
230-        If using SFTP, progress messages will *not* be displayed in the SFTP
230-        client.   Instead, progress may be monitored via the Management Port
230-        (e.g., :8081) or by issuing a "get progress" command with a separate
230-        FTP/SFTP connection.
230-        Wait for the progress messages to indicate that the code load has
230-        completed.
230-        WARNING! Do not power cycle or restart during the firmware update
230-        as this can result in loss of capabilities for this unit.
230-    5. Repeat steps 3-4 for each disk to update in each enclosure.
230-
230-Instructions for getting debug logs:      <---- This is what you are going to do
230-    1. Log in with a user name and password.
230-    2. Type 'get logs <filename.zip>'
230-        where <filename.zip> is the file to capture the system debug logs.
230-        Note the debug logs are in a compressed archive format and will need to be
230-        uncompressed before viewing.
230-
230-Instructions for getting disk debug dump (Seagate Drives Only):
230-    1. Log in with a user name and password.
230-    2. Type 'get logs:disk:<enclosure-ID>.<slot-number>[:trigger] <filename.zip>'
230-        where <filename.zip> is the file to capture the disk debug logs.
230-        Note the drive dump are in a compressed archive format and will need to
230-        be uncompressed before processing.
230-        - The disk to collect the debug dump from is specified by
230-          <enclosure-ID>.<slot-number> (for example, 0.1).
230-        - A disk debug dump can be manually triggered with the ":trigger" keyword.
230-          This could overwrite old debug data with the newly triggered data, so
230-          it should only be done when instructed.
230-    Prerequisites: Drive must be a spinning/ready Native-SAS Seagate drive that
230-                   is NOT part of an active VDisk (acceptable states are:
230-                   Available/Spare/Leftover/Failed).
230-
230-Instructions for getting historical disk-performance statistics:
230-    1. Log in as a user that has permission to use the FTP/SFTP interface.
230-    2. Type 'get perf[:<date/time-range>] <filename>.csv'
230-        where <filename>.csv is the file to capture the historical
230-        disk-performance statistics and <date/time-range> is optional
230-        and specifies the time range of data to transfer, in the format:
230-        start.<yyyy>-<mm>-<dd>.<hh>:<mm>.[AM|PM].end.<yyyy>-<mm>-<dd>.<hh>:<mm>.[AM|PM]
230-        The <date/time-range> string must contain no spaces.
230-    3. Example: 'get perf:start.2015-01-03.04:00.AM.end.2015-01-05.10:00.PM. statistics
230-
230-Instructions for loading a license file:
230-    1. Log in via FTP/SFTP with user name and password.
230-    2. Type 'put <certificate.txt> license'
230-        where <certificate.txt> is the name of the license file generated
230-        for your specific system.
230-
230-Instructions for loading security certificate files:
230-    1. The security certificate files will consist of a pair of files.
230-       You will have a certificate file and a key file.
230-    2. Log in with a user name and password.
230-    3. Type 'put <certificate-file-name> cert-file'
230-        where <certificate-file-name> is the name of the certificate file
230-        for your specific system.
230-    4. Type 'put <key-file-name> cert-key-file'
230-       where <key-file-name> is the name of the security key file for
230-        your specific system.
230-    5.  Restart both Management Controllers to have the new security
230-        certificate take effect.
230-
230
ftp> get logs me4012_08072018.zip                             <--- get logs <yourfilename.zip>
200 PORT command successful
150-Starting operation:
STATUS: Getting Storage Controller logs ...
Please wait...
Please wait...
Please wait...
Please wait...
Please wait...
Please wait...
Please wait...
Please wait...
Please wait...
Please wait...
Please wait...
Please wait...
Please wait...
Please wait...
Please wait...
Please wait...
STATUS: Finished getting Storage Controller logs
STATUS: Getting logs from Partner Management Controller B
Please wait...
STATUS: Finished getting the Partner Management Controller B logs
STATUS: Getting local Management Controller logs from A
Please wait...
STATUS: Finished getting logs from local Management Controller.
STATUS: get logs operation is complete
Size: 11278053 bytes

Operation Complete
150-Connecting to port 55639
150 (11278053 bytes) to download
226-File successfully transferred
226 2.737 seconds (measured here), 3.93 Mbytes per second
ftp: 11278053 bytes received in 2.72Seconds 4147.87Kbytes/sec.
ftp> bye                                                               <--- exit the FTP session
221-Goodbye. You uploaded 0 and downloaded 11014 kbytes.
221 Logout
受影響的產品
OEMR ME40XX and ME4XX, Dell EMC PowerVault ME4012, Dell EMC PowerVault ME4024, Dell EMC PowerVault ME4084, Dell EMC PowerVault ME412 Expansion, Dell EMC PowerVault ME424 Expansion, Dell EMC PowerVault ME484文章屬性
文章編號: 000117696
文章類型: How To
上次修改時間: 03 9月 2025
版本: 4
向其他 Dell 使用者尋求您問題的答案
支援服務
檢查您的裝置是否在支援服務的涵蓋範圍內。