Willkommen
Dell Standorte
Dell Standorte
Willkommen bei Dell
Mein Konto
- Bestellungen schnell und einfach aufgeben
- Bestellungen anzeigen und den Versandstatus verfolgen
- Profitieren Sie von exklusiven Prämien und Rabatten für Mitglieder
- Erstellen Sie eine Liste Ihrer Produkte, auf die Sie jederzeit zugreifen können.
- Verwalten Sie mit der Unternehmensverwaltung Ihre Dell EMC Seiten, Produkte und produktspezifischen Kontakte.
Artikelnummer: 000142509
Using the Keyboard on the Venue 10 (7040)
Artikelinhalt
Symptome
Table of Contents:
- Attaching the Keyboard.
- Pairing the Keyboard.
- Shortcut Keys
- Adjusting the Cursor Speed
- Detaching the Keyboard.
- Locking and Unlocking the Tablet Using the Keyboard
- Optional Positions
1. Attaching the Keyboard
With the keyboard on a flat stable surface, align the groves in the tablet's sound bar with the rails in the curved part of the keyboard. They should pull towards each other and snap into place.
2. Pairing the Keyboard.
Initial Paring
- When attaching the keyboard to the tablet for the first time, you will be shown a number on the tablet screen.
- Enter the number shown on the tablet screen into the keyboard.
- Press the <Enter> key, the keyboard and tablet are paired.
Note: As long as you do not tell the tablet to forget about the pairing to the keyboard, every time you re-attach the keyboard, the keyboard should automatically be paired.
Troubleshooting Pairing Issues
There may be times when the pairing between the keyboard and tablet is corrupted.
- You may be asked to enter a new number shown on the tablet screen into the keyboard, to create a new pairing.
- You may see a message that the keyboard and tablet did not pair.
- Touch Scan, you will be given another number to enter into the keyboard, and then press the <Enter> key, the keyboard and tablet are paired.
- You can force the keyboard and tablet to create a new pairing by performing the following steps.
- From the home page, touch the Apps icon in the center of the bottom row to access all your apps (Figure 1).

Figure 1: Apps Icon
- From the home page, touch the Apps icon in the center of the bottom row to access all your apps (Figure 1).
- Touch the Settings icon (Figure 2, you may have to swipe to the second page of Apps).

Figure 2: Settings Icon
- Touch Bluetooth to open the menu.
- When the Dell Keyboard is listed in the Paired devices, perform the following steps.
- Touch the settings icon listed to the right of the Dell Keyboard listing.
- Touch FORGET.
- Touch the option icon
 in the upper right-hand corner.
 - Touch Refresh.
- Touch Dell Keyboard under Available devices.
- Enter the number shown on the tablet screen into the keyboard.
- Press the <Enter> key, the keyboard and tablet are paired.
- When the Dell Keyboard is listed in the Available devices, perform the following steps.
- Touch Dell Keyboard under Available devices.
- Enter the number shown on the tablet screen into the keyboard.
- Press the <Enter> key, the keyboard and tablet are paired.
3. Shortcut Keys
| Button | Action |
|---|---|
 |
Back Key. |
 |
Mute Key. |
 |
Lower Sound Key. |
 |
Increase Sound Key. |
 |
Previous Key. |
 |
Pause / Play Key. |
 |
Application Key. |
 |
Action Menu Key. |
 |
Search Key. |
 |
Keyboard Backlight Key |
 |
Decrease Brightness Key. |
 |
Increase Brightness Key. |
 |
Lock Key. |
Table 1: Shortcut Key
4. Adjusting the Cursor Speed.
- From the home page, touch the Apps icon in the center of the bottom row to access all your apps (Figure 1).

Figure 1: Apps Icon - Touch the Settings icon (Figure 2, you may have to swipe to the second page of Apps).

Figure 2: Settings Icon - Touch the Languages & input.
- Swipe up until Pointer speed appears.
- Touch Pointer speed.
- Using the slider adjust the Pointer speed to the desired speed.
- Touch OK.
5. Detaching the Keyboard.
Using both hands.
- Place the tablet and keyboard on a flat stable surface.
- Place one hand on the palmrest (either side of the touchpad).
- With the other hand straddle the tablet itself with your thumb on the screen and the rest of your hand on the back of the tablet.
- Gently swing open the tablet away from the keyboard until the sound bar releases from the keyboard.
- Lift the tablet away from the keyboard.
6. Locking and Unlocking the Tablet Using the Keyboard
- To lock the screen press the
 key.
key. - To unlock the screen press the space bar twice.
Note: Depending on the level of security you set up, you may need to enter a Pattern, PIN or Password as well.
7. Optional Positions
Not only can the keyboard be used as a keyboard, it can also be used to stand the tablet up. All you have to do is reverse the keyboard and attach the tablet to the keyboard to create a triangle (Figure 3).
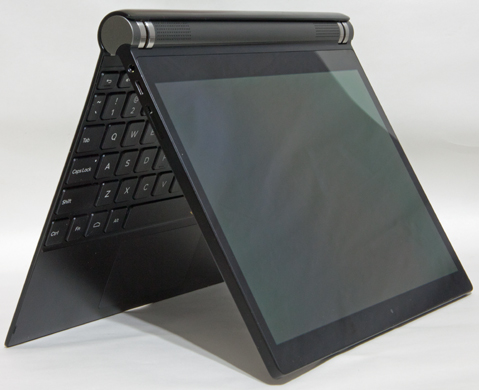
Figure 3: Optional Position
Artikeleigenschaften
Betroffenes Produkt
Venue 7040
Letztes Veröffentlichungsdatum
21 Feb. 2021
Version
3
Artikeltyp
Solution