Artikelnummer: 000103639
How to Troubleshoot and Resolve Common Issues with Trusted Platform Module (TPM) and BitLocker
Samenvatting: Learn more about how to identify and resolve common issues with Trusted Platform Module (TPM) or BitLocker on a Dell computer.
Article content
Instructies
Table of Contents
- What is a Trusted Platform Module (TPM)
- What is Intel Platform Trust Technology (PTT)
- Which Dell computers have a TPM or Intel PTT
- How to determine if the TPM is a discrete TPM or Intel PTT
- How to reset the TPM without losing data
- How to flash the TPM firmware and change TPM modes
- What is BitLocker
- Common TPM and BitLocker issues and resolution
- TPM points of failure and troubleshooting
- BitLocker points of failure and troubleshooting
- Additional Info
What is a Trusted Platform Module (TPM)
A Trusted Platform Module (TPM) is a chip that resides inside a computer and is soldered to the system board on Dell computers. A TPM’s primary function is to securely generate cryptographic keys, but it has other functions as well. Each TPM chip has a unique and secret RSA key that is embedded into it on production.
If a TPM is used for security features such as BitLocker or Dell Data Security (DDS), that security must be suspended before clearing the TPM or replacing the system board.
TPMs have two modes, 1.2 and 2.0. TPM 2.0 is a new standard that includes additional functionality such as additional algorithms, support for multiple trusted keys, and broader support for applications. TPM 2.0 requires you to set the BIOS to UEFI mode instead of legacy. It also requires a 64-bit version of Windows. As of March 2017, all Dell Skylake platforms support TPM 2.0 and TPM 1.2 mode in Windows 7, 8, and 10. Windows 7 requires the Windows Update KB2920188 in order to support TPM 2.0 Mode. In order to swap the modes on a TPM, you must flash the firmware of the TPM. Download links can be found under the supported computers driver page at the Dell Drivers & Downloads website.
The Trusted computing group manages the specifications on TPM. For more details and documentation, reference https://trustedcomputinggroup.org/work-groups/trusted-platform-module/.

Figure 1: TPM 2.0 Security Setting in BIOS
What is Intel Platform Trust Technology (PTT)
Some Dell laptops are equipped with the Intel Platform Trust Technology (PTT). This technology is part of the Intel System on Chip (SoC). It is a firmware-based TPM version 2.0 that can function in the same capacity as the discrete TPM 1.2 chip. Windows TPM.msc can manage Intel PTT in the same capacity as the discrete TPM.
For computers equipped with the Intel PTT, the TPM menu option is not available in the BIOS. Instead, an option for PTT Security appears under the Security settings menu in the BIOS (Figure 2). This can cause confusion when trying to enable BitLocker on a computer where Intel PTT is disabled.

Figure 2: PTT Security setting in BIOS
Which Dell computers have a TPM or Intel PTT
Per Intel, all computers with an 8th generation processor or later have Intel PTT. (For more information about Intel PTT, reference How Do I Know If My PC Already Has TPM 2.0 from Trusted Platform Module (TPM) Overview. To find out if the TPM in use is a discrete TPM or Intel PTT, use either TPM.msc or
get-tpm to check the TPM manufacturer. For more information, reference How to determine if the TPM is a discrete TPM or Intel PTT.
How to determine if the TPM is a discrete TPM or Intel PTT
You may want to know the physical location of the TPM on the computer for security reasons. The TPM can either be discrete where it is a physical chip on the motherboard, or it can be firmware and is part of the processor. As Intel 8th generation processors and beyond contain Intel Platform Trusted Technology (Intel PTT) which is an integrated TPM residing in the firmware. For more information, reference How Do I Know If My PC Already Has TPM 2.0 from Trusted Platform Module (TPM) Overview.
In instances of the computer having both a discrete TPM and firmware TPM, the computer only uses the discrete TPM.
There are two methods to know which TPM the computer is using. Regardless of which method is used, the TPM Manufacturer is displayed.
- If the TPM Manufacturer field shows STM or NTC, the computer uses a discrete TPM from STMicro and Nuvoton.
- If the TPM Manufacturer field shows INTC, the computer uses a firmware TPM.
Method 1 - tpm.msc
- Open the Start menu.
- Search for and then open
tpm.msc. - From the TPM Management and Local Computer window that opens, locate the TPM Manufacturer name.

Figure 3: Manufacturer Name in TPM Management on Local Computer
Method 2 - Elevated PowerShell Prompt
- Search for
PowerShell, right-click it, and then choose Run as administrator. - Type
get-tpmand then press Enter. - The
ManufacturerIdTxtshows the TPM manufacturer.

Figure 4: ManufacturerIdTxt field from get-tpm command
How to Reset your TPM without Losing Data
A common solution to a TPM not showing correctly in the BIOS or the operating system is to reset the TPM.
Resetting the TPM is not the same as clearing the TPM. During a TPM reset, the computer attempts to redetect the TPM and preserve the data that is held within. Here are the steps to perform a TPM reset on your Dell computer:
For laptops
- Remove the AC adapter, turn off the computer, and disconnect any USB devices.
- Turn on the computer and press F2 key to enter BIOS or System Setup.
- Is the TPM available under Security? If yes, no further steps are required.
- If the TPM is not available under Security, follow the following steps.
- If the TPM is not present, turn off the computer, and disconnect the battery (if the battery is removable).
- Discharge static power by pressing and holding the power button for over 60 seconds.
- Connect the battery (if the battery is removable), AC adapter, and turn on the computer.
For desktops and all-in-ones
- Turn off the computer and unplug the power cable from the back of the computer.
- Discharge static power by pressing and holding the power button for over 60 seconds.
- Connect the power cable to the back of the computer and turn on the computer.
How to Flash TPM Firmware and Change TPM Modes
TPM 1.2 and 2.0 modes can be changed only by using firmware that is downloaded from the Dell Drivers & Downloads website. Select Dell computers support this feature. You can use the methods outlined in How to determine if the TPM is a discrete TPM or Intel PTT to determine if a computer supports this feature. You can also check the Dell Drivers & Downloads website to verify if the firmware is available for switching between the two modes. If the firmware is not listed, then a computer does not support this feature. In addition, the TPM must be On and Enabled in order to flash the firmware.
Note: Never flash the computer’s TPM with the firmware from a different computer. This may result in damage to the TPM.
Follow these steps to flash the TPM with version 1.2 or 2.0 firmware:
- In Windows:
- Suspend BitLocker or any encryption or security program relying on the TPM.
- Disable Windows Auto Provisioning if needed (Windows 8 or 10).
- PowerShell command:
Disable-TpmAutoProvisioning
- PowerShell command:
- Reboot the computer and go into the BIOS.
- In the BIOS screen:
- Go to Security and then the TPM/Intel PTT page.
- Check the Clear TPM box and then select the Apply button at the bottom.
- Select the Exit button to reboot into Windows.
- In Windows:
- Run the TPM firmware update.
- The computer automatically reboots and begins the firmware flash.
- Do NOT turn the computer off during this update.
- Reboot the computer into Windows and enable Windows Auto Provisioning, if applicable.
- PowerShell command:
Enable-TpmAutoProvisioning - If running Windows 7, use
TPM.mscto take ownership of the TPM. - Reboot the computer again and enable any encryption that uses the TPM.
- Run the TPM firmware update.
Note: To automate this process, see the Dell knowledge base article Using scripting or automation for TPM firmware updates from Dell.
The TPM firmware version can be checked using TPM.msc or the get-tpm command in Windows PowerShell (supported in Windows 8 and 10 only). Using get-tpm on Windows 10 1607 and earlier only shows the first three characters of the firmware (listed as ManufacturerVersion) (Figure 5). Windows 10 1703 and later shows 20 characters (listed as ManufacturerVersionFull20) (Figure 6).

Figure 5: get-tpm command in Windows 10 version 1607 and earlier
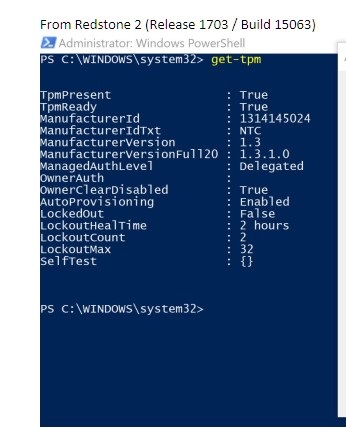
Figure 6: get-tpm command in Windows 10 version 1703 and later
What is BitLocker
BitLocker is a full disk encryption feature available in most versions of Windows 7, 8, 10, and 11 (see the list below for editions that support BitLocker).
- Windows 7 Enterprise
- Windows 7 Ultimate
- Windows 8 Pro
- Windows 8 Enterprise
- Windows 10 Pro
- Windows 10 Enterprise
- Windows 10 Education
- Windows 11 Pro
- Windows 11 Enterprise
- Windows 11 Education
For steps to enable BitLocker or Device Encryption, see the Microsoft Support article Device encryption in Windows.
Note: Windows 10 Home has a feature that is called "Device Encryption" instead of BitLocker. This feature functions the same as BitLocker, with limited features and it uses a separate Windows user interface.
Common TPM and BitLocker issues and resolutions
Note: It is recommended that you review these common TPM and BitLocker issues before following the advanced troubleshooting steps in the sections below.
TPM Missing
A "TPM missing" issue has several causes. Review the information below and verify which type of issue you have. Also, a missing TPM can be caused by a general TPM failure and requires a system board replacement. These types of failures are rare, and system board replacement should be a last resort in troubleshooting a missing TPM.
- Original TPM missing issue found on Nuvoton 650 chip
- Resolved in Firmware 1.3.2.8 for 2.0 Mode and 5.81.2.1 for 1.2 Mode
- Further reference: TPM Option Is Missing in the System BIOS Setup Latitude, Precision, or XPS.
- Nuvoton 650 chip missing after firmware 1.3.2.8 updated
- Only seen on Precision 5510, Precision 5520, XPS 9550, and XPS 9560
- Resolved with August 2019 BIOS updates for both XPS and Precision computers
- If you need further assistance with this issue, contact Dell Technical Support.
- Nuvoton 750 chip missing in BIOS
- Resolved with Firmware update 7.2.0.2
- If you need further assistance with this issue, contact Dell Technical Support.
- System not configured with TPM
- Systems may ship without a TPM and instead ship with Intel PTT firmware-based TPMs.
- If you need further assistance with this issue, contact Dell Technical Support.
TPM Setup
- Using scripting or automation for TPM firmware updates from Dell
- YouTube video - Dell Client Configuration Toolkit (CCTK) - Activating the TPM
- How to Successfully Update the TPM Firmware on your Dell Computer
BIOS Issues
- BitLocker Error When Using TPM in 1.2 Mode After Updating the BIOS - BitLocker fails to engage and displays the message "The Trusted Platform Module (TPM) on this computer does not work with the current BIOS. Contact the computer manufacturer for BIOS upgrade instructions" in TPM 1.2 mode after updating the BIOS.
- Updating the BIOS on Dell Systems With BitLocker Enabled
Recovery Key Issues
- Automatic Windows Device Encryption or BitLocker on Dell Computers
- BitLocker is Prompting for a Recovery Key, and You Cannot Locate the Key
- BitLocker Asks for a Recovery Key Every Boot on USB-C or Thunderbolt Computers When Docked or Undocked
- How to Unlock BitLocker When It Stops Accepting Recovery Keys
Windows Issues
TPM points of failure and troubleshooting
TPM is visible in Device Manager and TPM Management Console
The Trusted Platform Module should show under Security devices in Device Manager. You can also check the TPM Management Console by following the steps below:
- Press the Windows + R keys on the keyboard to open Command Prompt.
- Type
tpm.mscand press Enter on the keyboard. - Verify that the status for the TPM in the management console shows as Ready.
If the TPM is not visible in Device Manager, or if it is showing as Ready in the TPM Management Console, follow the steps below to troubleshoot the issue:
- Verify that TPM is enabled and activated in the BIOS using the steps below and the example image of the BIOS settings in Figure 7:
- Reboot the computer and press the F2 key at the Dell logo screen to enter BIOS or System Setup.
- Click Security in the Settings menu.
- Click the TPM 1.2 Security or TPM 2.0 Security option in the Security menu.
- Ensure TPM On and Activate are checked.
- You may also need to ensure that Attestation Enable and Key Storage Enable are also checked for proper TPM functionality.
Note: If the TPM section is missing in the BIOS, check your order to ensure that the computer was not ordered with TPM disabled.

Figure 7: Example of TPM BIOS settings
Note: Listed settings may vary based on computer model, BIOS version, and TPM Mode.
If TPM still does not show in Device Manager, or if it shows a Ready status in the TPM Management Console, clear the TPM and update to the latest TPM firmware, if possible. You may need to first disable TPM Auto-Provisioning and then clear TPM using the steps below:
- Press the Windows key on the keyboard and type
powershellin the search box. - Right-click PowerShell (x86) and select Run as administrator.
- Type the following PowerShell command:
Disable-TpmAutoProvisioningand press Enter. - Confirm the result AutoProvisioning: Disabled (Figure 8).

Figure 8: AutoProvisioning: Disabled PowerShell setting - Open the TPM Management Console by pressing the Windows + R keys on the keyboard to open a command prompt. Type
tpm.mscand press Enter. - In the Actions pane on the right, select Clear TPM.
- Reboot the computer and press F12 on the keyboard, when prompted, to proceed with clearing the TPM.
Next, install the latest TPM firmware update by following the steps below:
- Browse to the Dell Drivers & Downloads website.
- Enter the Service Tag or search for your computer model to enter the correct support page.
- Click the Drivers & Downloads tab and choose the correct operating system (click the Operating system dropdown to view the available operating systems for your computer).
- Select the Security category from the available driver menu.
- Find the Dell TPM 2.0 Firmware Update Utility or Dell TPM 1.2 Update Utility in the menu. Click the View Details link to view further information about the file and Installation instructions for downloading and installing the update.
If the TPM is still not visible in Device Manager or is showing as Ready in the TPM Management Console, contact Dell Technical Support. It may be necessary to reinstall the operating system to resolve the issue.
Receiving the following message: "The TPM is on and ownership has not been taken".
- For Windows 7: Initialize the TPM
.
- For Windows 10: Enable-TpmAutoProvisioning
"TPM is ready for use, with reduced functionality" message in TPM.msc.
- The issue occurs if a computer has been reimaged without clearing the TPM.
- Attempt to resolve the issue by clearing the TPM and installing the latest TPM firmware (following the steps in the section above).
- Check the BIOS to ensure that the TPM settings are correct.
- If the issue persists, clear the TPM and reload Windows.
Verify TPM.msc shows that TPM is on and ready for use.
- The TPM is working.
Note: Dell does not support the programming of a TPM or changing of registers for custom configurations.
BitLocker points of failure and troubleshooting for each
Verify that your operating system supports BitLocker.
Reference the list of operating systems which support BitLocker from the What is BitLocker section above.
Verify that TPM is enabled and ready for use in the TPM Management Console (tpm.msc).
- If TPM is not ready for use review TPM troubleshooting, review the above TPM troubleshooting section.
BitLocker is triggering on startup.
If BitLocker is triggering on startup, follow the suggested troubleshooting guidance below:
- Triggers for BitLocker when starting the computer often mean BitLocker is working as designed. The issue may be isolated to one of the following causes:
- Changes to Windows core files
- Changes to BIOS
- Changes to the TPM
- Changes to encrypted volume or boot record
- Failure to use correct credentials
- Changes in hardware configuration
It is recommended that you suspend BitLocker before making any of the above changes to your computer. Follow the steps below to suspend BitLocker:
- Click Start, type
manage bitlockerin the search box, and press Enter to open the Manage BitLocker Console. - Click Suspend protection for the encrypted hard drive (Figure 9):

Figure 9: Suspend BitLocker from the management console - Click Yes on the message prompt that appears to suspend BitLocker (Figure 10):

Figure 10: Message prompt to suspend BitLocker - After the changes have been made to your computer, then return to the Manage BitLocker Console, and select Resume protection to enable BitLocker (Figure 11):

Figure 11: Resume BitLocker from the management console
To prevent BitLocker from triggering at startup after making changes to your computer, you may need to fully disable BitLocker encryption before enabling it again. You can disable and enable BitLocker encryption from the management console following the steps below:
- Click Start and type
manage bitlockerin the search box, then press Enter to open the Manage BitLocker Console. - Click Turn off BitLocker (Figure 12).

Figure 12: Turn off BitLocker from the console - Click Turn off BitLocker when prompted to confirm (Figure 13).

Figure 13: Turn off BitLocker confirmation prompt - Allow the computer to fully decrypt the hard drive (Figure 14).

Figure 14: Status screen for BitLocker encryption - After the decryption is complete, you can choose to Turn on BitLocker from the Manage BitLocker Console to encrypt the hard drive again.
BitLocker cannot resume or engage.
If BitLocker cannot resume or engage, follow the troubleshooting tips below:
- Verify that you have not recently made any changes from the list above to the computer. If you have made changes, roll the computer back to a state before the change occurred, and see if BitLocker engages or resumes.
- If the recent change is the issue, suspend BitLocker from the Manage BitLocker Console and make the change again.
- If the issue persists, verify that the BIOS and TPM firmware are the latest versions. Check for the latest versions at the Dell Drivers & Downloads website.
- If BitLocker still does not resume or engage, reinstall the operating system.
Lost BitLocker recovery key
The BitLocker recovery key is necessary to ensure that only an authorized person can unlock your personal computer and restore access to your encrypted data. If the recovery key is lost or misplaced, Dell cannot recover or replace it. It is recommended that you store the recovery key in a secure and recoverable location. Examples of places to store the recovery key includes:
- A USB flash drive
- An external hard drive
- A network location (mapped drives, an Active Directory controller or domain controller, so on)
- Saved to your Microsoft Account
If you never encrypted your computer, it is possible the encryption was performed through the automated Windows process. This is explained in the Dell knowledge base article Automatic Windows Device Encryption or BitLocker on Dell Computers.
BitLocker working as designed
If BitLocker engages and encrypts the hard drive, and does not enable when starting up the computer, then it is working as designed.
Extra informatie
Recommended Articles
Here are some recommended articles for you.
- TPM Option Is Missing in the System BIOS Setup Latitude, Precision, or XPS
- Dell Computers That Can Upgrade from TPM Version 1.2 to 2.0
- How to Enable the TPM (Trusted Platform Module)
- Activating the Trusted Platform Module Security Feature
- Trusted Platform Module (TPM) Frequently Asked Questions for Windows 11
Encrypt Your Drive With BitLocker
Duration: 02:57
Closed captions: English only
BitLocker Key Troubleshooting
Duration: 00:30:21
Closed captions: English only
Artikeleigenschappen
Getroffen product
Alienware 17 R3, Venue 7140 Pro, Inspiron 13 5378 2-in-1, Inspiron 15 3567, Inspiron 17 7779 2-in-1, Latitude 5280/5288, Latitude 5289 2-in-1, Latitude 13 3380, Latitude 5480/5488, Latitude 7480, Dell Latitude 3580/3588, Latitude 5580, Latitude 3470
, Latitude 7275, Latitude E5250/5250, Latitude E5440, Latitude E5450/5450, Latitude E5470, Latitude E5550/5550, Latitude E5570, Latitude E6530, Latitude E7240 Ultrabook, Latitude E7250/7250, Latitude E7270, Latitude E7440, Latitude E7450, Latitude E7470, OptiPlex 3040 Micro, OptiPlex 3040 Small Form Factor, OptiPlex 3040 Tower, OptiPlex 5040 Tower, OptiPlex 5040 Small Form Factor, OptiPlex 7040 Tower, OptiPlex 7040 Micro, OptiPlex 7040 Small Form Factor, OptiPlex 7450 All-In-One, Precision 5520, Precision M4800, Precision 5510, Precision M6800, Precision 7510, Precision 7710, Vostro 14 5468, XPS 12 9250, XPS 13 9350, XPS 13 9360, XPS 13 9365 2-in-1, XPS 15 9550, XPS 15 9560
...
Datum laatst gepubliceerd
14 mrt. 2024
Versie
18
Artikeltype
How To