文章編號: 000135413
How to Resolve Lines on Scans or Copies on a Dell MFP Laser Printers
摘要: Troubleshooting lines that may appear on scans or copies made on Dell MFP Laser Printers.
文章內容
症狀
Lines on documents that are put through the ADF or copies or scans are done on the flatbed.
原因
The ADF or flatbed to make copies can get dirty, causing marks.
解析度
You may experience a print quality issue when scanning or copying from the ADF (Automated Document Feeder) or Scanner Flatbed when using a Dell MFP (Multi Function Printer), Figure 1.
The most likely cause of lines on scans or copies is a mark or scratch on the ADF glass. The paper is fed past the ADF glass when scanning or copying and any small defect can be displayed as a vertical line on the page.

Figure 1: ADF and Scanner Flatbed Location
To verify the cause of this issue, please perform the following steps:
- Print a settings report from the printer operating panel and verify that there is no line present on document.
- Make a copy from the Scanner Flatbed and then the ADF.
- When there is a line on the copies from both the Scanner Flatbed and the ADF, then the issue is not with the Scanner/Copier, you will need to troubleshoot a print quality issue on your specific printer model.
Note: Print quality issues troubleshooting steps are found in the manual for your printer. Refer the Dell User Guides / Manuals on how to obtain the manual for your printer.
- When the line is only present on one source (ADF or Scanner Flatbed) then issue is due to marks, scratches, toner or cracks on the Scanner Flatbed or ADF.
- When the issue is present from copies made from the Scanner Flatbed only:
- Using a lint-free cloth and a glass cleaner the cloth should be damp but not dripping or soaking wet.
- Clean the Scanner Flatbed and check for any foreign objects or cracks.
- When the issue is present from copies made from the ADF only:
- Gather the following items: Lint free cloth or paper towels, a small flashlight or keychain light and a firm plastic card such as an old credit card.
- First dampen the paper towels or cloth. They need to be damp but not dripping or soaking wet. Lift the lid of the scanner and locate the narrow glass strip to the left of the large piece of glass.
- You need to fold the paper towels or cloth in a lengthwise manner so that they cover the narrow strip. Once in place, close the lid gently and let them sit for no less than 4 minutes.
- After 4 minutes or more, lift the lid, remove the damp cloth or paper towel. Now "vigorously" clean the narrow glass strip. Not so hard you damage the printer. Also clean the plastic strip on the lid adjacent to the narrow strip that covers it when the lid is in the close position.
- Once this is done, make sure the strip is dry and moisture free.
- Now run a test scan. If image is changed or improved but lines are still present, then repeat the previous steps. You may be able to use the small flashlight to find the defect or contaminant and remove it.
- You can also remove residue by using a firm plastic, such as an old credit card to scrape the glass of the ADF, Figure 2.
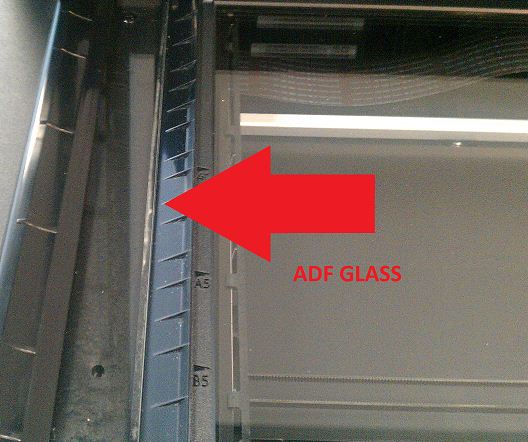
Figure 2: ADF Glass Location
- When the issue is present from copies made from the Scanner Flatbed only:
Note: It is recommended that only Dell Branded toner, drums, transfer rollers or other consumables are used in our laser printers. Dell cannot guarantee compatibility or the print quality of any 3rd party consumables.
文章屬性
受影響的產品
Dell E525w Color Multifunction Printer
上次發佈日期
13 4月 2021
版本
5
文章類型
Solution