Dell Precision and XPS Ubuntu Touchpad Fix: Solutions for Touchpad and Mouse Issues on Ubuntu
Summary: Explore effective solutions for Ubuntu touchpad and mouse issues on Dell Precision and XPS computers. Follow step-by-step instructions to enhance your touchpad experience running Ubuntu. Resolve cursor problems with this comprehensive guide. ...
This article applies to
This article does not apply to
This article is not tied to any specific product.
Not all product versions are identified in this article.
Symptoms
The following fix is a best practice for troubleshooting the touchpad or mouse configuration in Ubuntu. This is a modification to your Ubuntu Operating System (OS) that has had great success in resolving issues such as erratic or a jumping cursor. This should improve your overall experience of the feel of the touchpad or mouse.
Cause
No cause information is available.
Resolution
To resolve touchpad or mouse issues, follow these steps:
- Start by verifying that the computer is fully updated:
- Open a Terminal window (Press the CTRL + ALT + T keys together).
- Run the following commands followed by pressing the Enter key after each one:
sudo apt-get updatesudo apt-get upgrade -yNOTE: Sudo is a command in Ubuntu that gives the administrator rights to the command that follows it. You must have administrator-level access to the computer for these commands to work. If you intend to make several Terminal commands, you may want to use the sudo su command to give the whole terminal session administrator level rights.
- Reboot the computer for the changes to take effect.
- Enable the HWE kernel:
- Open a Terminal window.
- Run the following command followed by pressing the Enter key:
sudo apt-get install --install-recommends linux-generic-hwe-16.04 xserver-xorg-hwe-16.04
NOTE: For more info on what this kernel does, you can go to the following article: https://wiki.ubuntu.com/Kernel/LTSEnablementStack - Reboot the computer for the changes to take effect.
- Verify if your computer has the dual mouse drivers (Not all models have this issue. If your computer does not have the double mouse driver, go to the next step):
- Open a Terminal window.
- Run the following command, then press the Enter key to verify if Ubuntu detects two touchpads:
xinput list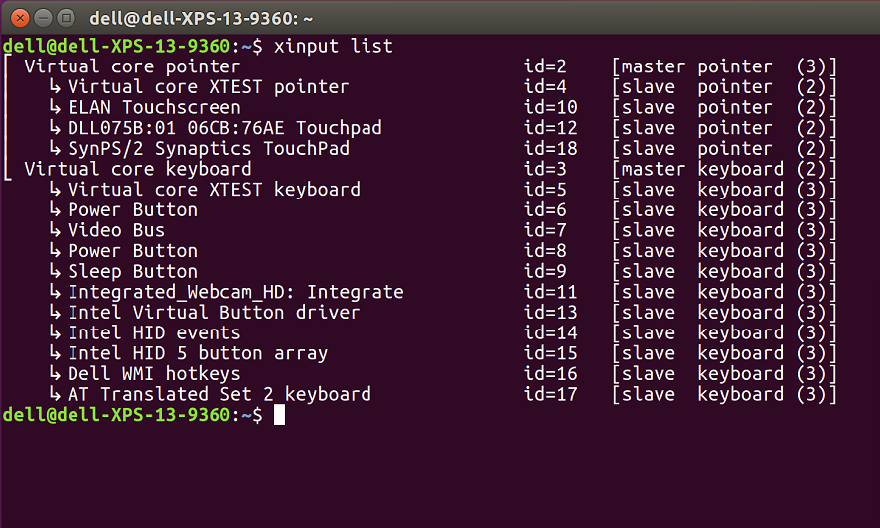
NOTE: Your Id number is different as each computer pulls and assigns the ids differently. - Edit the 51-synaptics-quirks.conf file by running the following command and pressing Enter:
sudo gedit /usr/share/x11/xorg.conf.d/*synaptics-quirks.conf
Add the following text to the bottom of the file:# Disable generic Synaptics device, as we're using
# DLL0704:01 06CB:76AE Touchpad
# Having multiple touchpad devices running confuses syndaemon
Section InputClass
Identifier SynPS/2 Synaptics TouchPad
MatchProduct SynPS/2 Synaptics TouchPad
MatchIsTouchpad on
MatchOS Linux
MatchDevicePath /dev/input/event*
Option Ignore on
EndSection
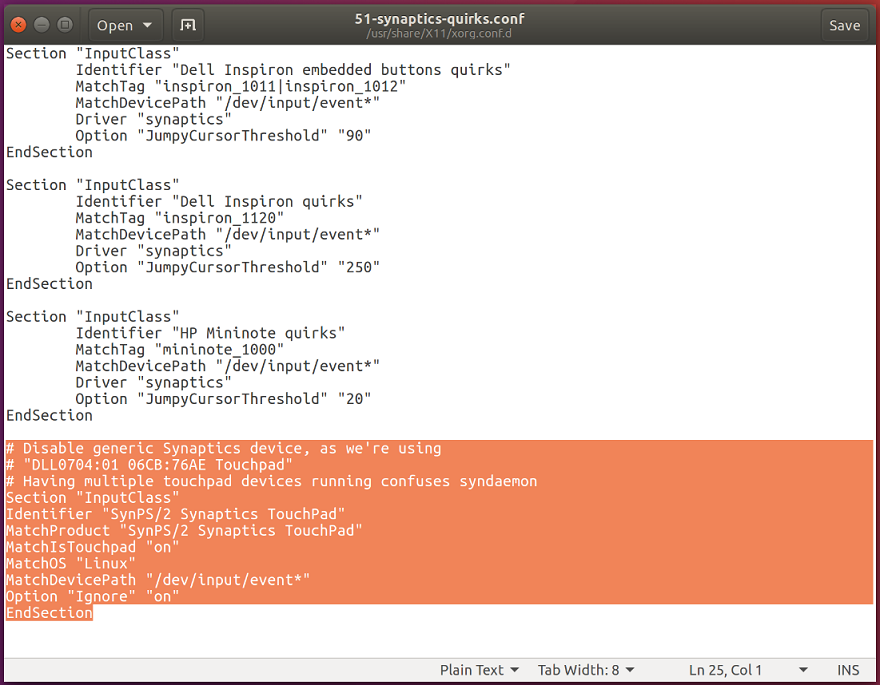
Once completed, click the Save Button on the upper right and then Exit out the window and Reboot your computer. - Open a Terminal window.
- Verify that the second mouse is disabled using the following command followed by pressing the Enter key:
xinput -list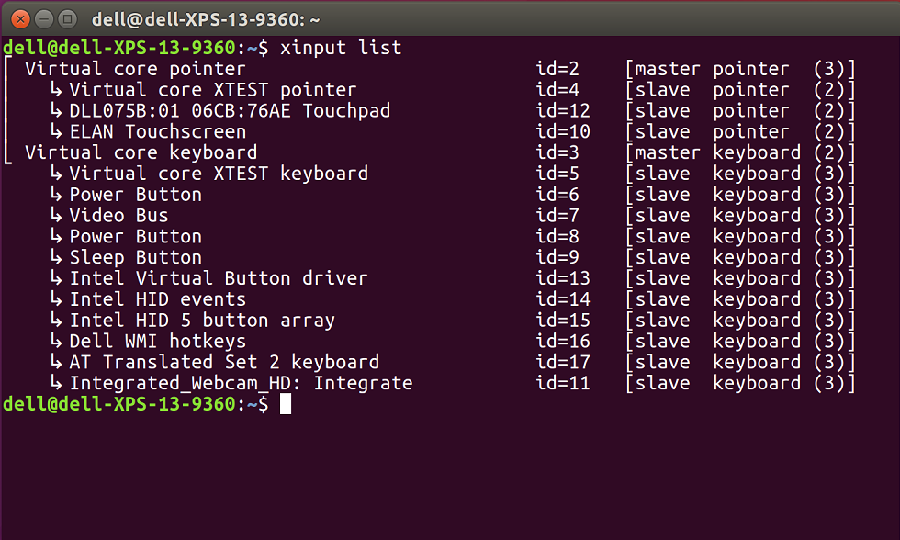
The Synaptics touchpad should not appear, if you still have the extra touchpad, retry the last series of steps before proceeding.
- Install the new libinput driver:
- Open a Terminal window.
- Run the following command followed by pressing the Enter key:
sudo apt-get install xserver-xorg-input-libinput-hwe-16.04 libinput-tools xorg-input-abi-24 - Reboot your computer.
- Block the Synaptics driver:
- Edit the synatptics.conf file to block the old driver. Depending on your model, the number at the front may be different.
- Open a Terminal window.
- Run the following command followed by pressing the Enter key:
sudo gedit /usr/share/X11/xorg.conf.d/*synaptics.conf - Comment out the Touchpad catchall section, by adding the pound sign (#) at the beginning of every line in the section.

- Once completed, click the Save Button on the upper right corner and Exit out of the window.
- Add in options to the libinput configuration file:
- The last step is to add in the extra options to the libinput configuration file. This enables some extra features and improves the overall feel of the touchpad.
- Open a Terminal window.
- Run the following command to edit the file followed by pressing the Enter key:
sudo gedit /usr/share/X11/xorg.conf.d/*libinput.conf - Now find the section that has the wording - Identifier libinput touchpad catchall and type in the following changes between the lines MatchDevicePath /dev/input/event* and Driver libinput:
- Option Tapping True
Option TappingDrag True
Option DisableWhileTyping True
Option AccelProfile adaptive
Option AccelSpeed 0.4
Option SendEventsMode disabled-on-external-mouse
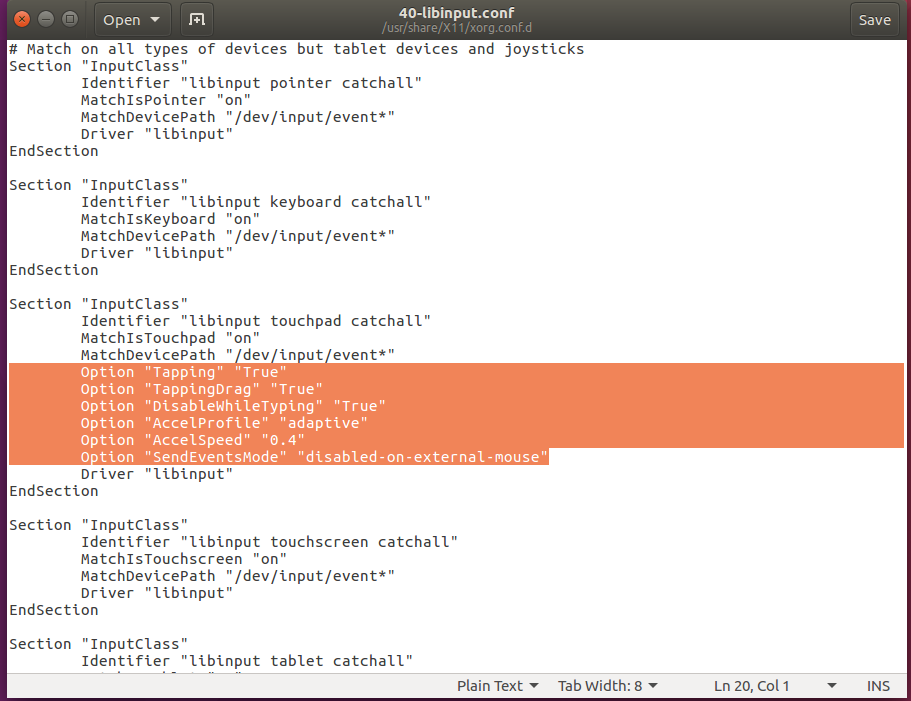
Once completed, click the Save Button on the upper right and then Exit out the window. - Option Tapping True
- Reboot the computer and test that the issues have been resolved.
Additional Information
Useful Linux Terminal Commands to Know
- xinput -list-devices - This gives you the hardware id of the touchpad. Each computer displays a different number. For example, my computer is ID 11 but yours might be different.
- xinput list-props 11 - Shows you all the options that are enabled and disabled. This will also verify that libinput is working. The 11 at the end is the hardware ID that was obtained from the previous command.
- sudo libinput-list-devices - This shows you all the devices recognized by libinput and show you the state of the options.
For all the libinput options, go to https://www.mankier.com/4/libinput
Here are the following options that are most common (These options are added to /usr/share/X11/xorg.conf.d/*libinput.conf):
- Option "SendEventsMode" "disabled-on-external-mouse" - When a USB mouse is detected it disables the touchpad.
- Option "Tapping" "True" - This allows you to use your finger and tap the mouse to click. If you leave this option out it causes you to have to physically click the touchpad to activate a mouse click or use the lower buttons. Once enabled, it allows two fingers tap to activate a right click.
- Option "DisableWhileTyping" "True" - Enabled by default but if you like here is the setting.
- Option "AccelProfile" "adaptive" - Enables the mouse acceleration profile. This helps make the speed of your mouse finger to be a bit more natural and less sluggish feeling. Adaptive is recommended as it changes vs your input. You may also try the "flat" option.
- Option "AccelSpeed" "0.3" - Changes the acceleration speed of the pointer. Use values -1 to 1. The higher the number the faster the pointer goes. Most people like 0.2 for a slower response and 0.5 for a faster response.
- Option "TappingDrag" "True" - When enabled, a tap followed by a finger held down causes a single button down only, all motions of that finger thus translate into dragging motion.
- Option "HorizontalScrolling" "True" - If you want to be able to scroll side to side. Personally I do not like this one. If you have a touch screen, you can use the option on the touch screen. It feels more natural on the touch screen vs the touchpad.
- Option "ScrollMethod" "edge" - By default the touchpad scrolls using two fingers. If you like the older mouse style that had the scroll area to the right of the touchpad you may use this option to enable it.
Affected Products
XPS, Mobile WorkstationsArticle Properties
Article Number: 000150104
Article Type: Solution
Last Modified: 30 Sept 2025
Version: 9
Find answers to your questions from other Dell users
Support Services
Check if your device is covered by Support Services.