Computer Cannot Boot into Windows
What is Booting?
Booting is the process your computer goes through to start up and get ready for you to use. It checks to make sure everything is working properly and then loads the operating system so you can start using it.
Steps in the Boot Process
During the boot process, your computer goes through each step one by one to get ready for use.
- Power On: When you press the power button, your computer gets electricity and starts to wake up. Cannot turn on your computer? Check our common fixes to resolve power issues.
- BIOS/UEFI: The Basic Input/Output System (BIOS) or Unified Extensible Firmware Interface (UEFI) helps initialize the hardware components and start up your computer. It checks to make sure all the parts of your computer are working properly.
- POST (Power-On Self-Test): This is a quick check-up. The computer tests its memory, keyboard, and other parts to make sure everything is okay. Is your computer failing to startup? If your computer doesn't start up or finish its power-on self-test (POST), follow our troubleshooting guide for help.
- Find the Boot Device: The BIOS/UEFI looks for a device to load the operating system from. This is usually your hard drive or SSD (Solid State Drive).
- Load the Bootloader: The bootloader is a small program that helps load the operating system. It’s like the first page of a book that tells you what the story is about.
- Load the Operating System: The bootloader loads the operating system (like Windows) into the computer’s memory.
- Initialize System Files: The operating system starts loading important files and drivers that help your computer’s hardware and software work together.
- User Login: Finally, you see the login screen where you enter your username and password. Once you log in, your computer is ready for you to use!
Common Boot Error Messages
When a computer can’t start Windows, you might see error messages like:
- No Boot Device Found
- Operating System Not Found
- Boot Configuration Data (BCD) Missing or Corrupted
- Bootmgr is Missing
- Windows Failed to Start
- Automatic Repair Couldn’t Repair Your PC
- Blue Screen (BSOD) or STOP Error
- Blank screen with a blinking cursor (no error message)
Check FAQ #1 below to learn what these errors mean. This guide provides common troubleshooting steps for any of these error messages.
Fixing a Dell Computer That Doesn't Boot into Windows

If your computer can't boot into Windows, follow these detailed step-by-step instructions to troubleshoot and resolve the problem. You may also watch this video to help fix your computer if it won't boot.
Step 1: Disconnecting External Devices
Sometimes, external devices can interfere with the boot process.
- Unplug External Devices: Remove USB drives, printers, and other peripherals.
- Restart the Computer: Press the power button to see if it boots up.
If your computer boots into Windows, try these steps. If it doesn't boot up, proceed to the next step.
Step 2: Performing a Hard Reset
Discharging residual electricity can often fix startup problem when your computer does not boot into Windows.
- Turn Off the Computer: Hold the power button until the computer shuts down.
- Disconnect the power source: Unplug the power cable or remove the battery if it’s a laptop (removable batteries only).
- Hold the Power Button: Press and hold it for 15-20 seconds to drain any residual power.
- Reconnect the Power Source: Plug in the power cable or reinsert the battery.
- Turn On the Computer: Press the power button to see if it boots up.
If your computer boots into Windows, try these steps. Still can't boot into Windows? Go to the next step.
Step 3: Verifying BIOS Settings
Make sure your computer can see the hard drive and that it's listed in the boot order in the BIOS or UEFI settings. This helps the computer know where to start up from.
- Restart the computer: Press the power button.
- Enter BIOS or UEFI: Press F2 repeatedly as the computer starts.
- Check If the Hard Drive is Detected: Look under the Storage or General > System Information section. If hard drive is not detected, refer to FAQ #9 below.
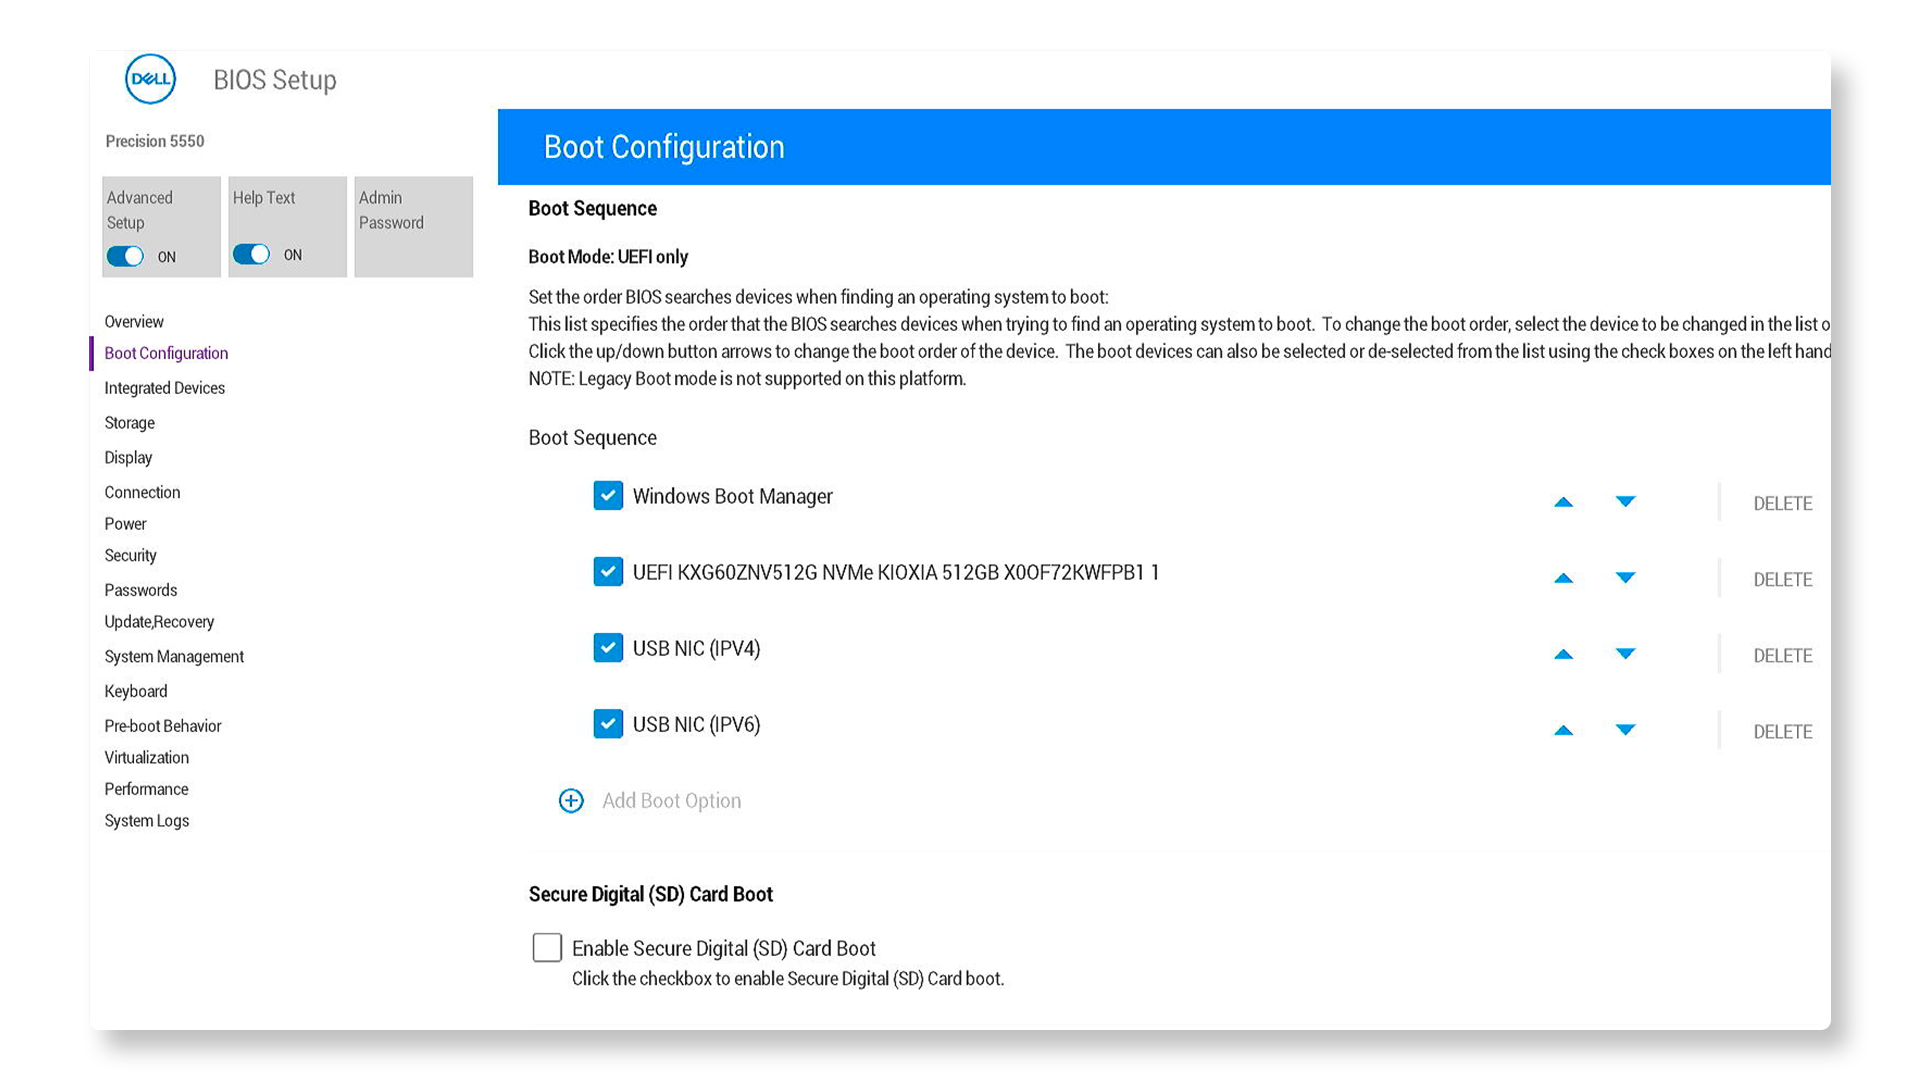
- Check Boot Order: If the hard drive is detected, ensure the hard drive is listed as the first boot device. Look under General > Boot Sequence or Boot Configuration > Boot Sequence.
- Reset BIOS to Defaults: Look for an option to reset to default settings, usually Load Defaults or Restore Settings button.
Can't find the same options in BIOS? Check your computer's user manual for BIOS or UEFI navigation.
If your computer boots into Windows, try these steps. If it doesn't boot, proceed to the next step.
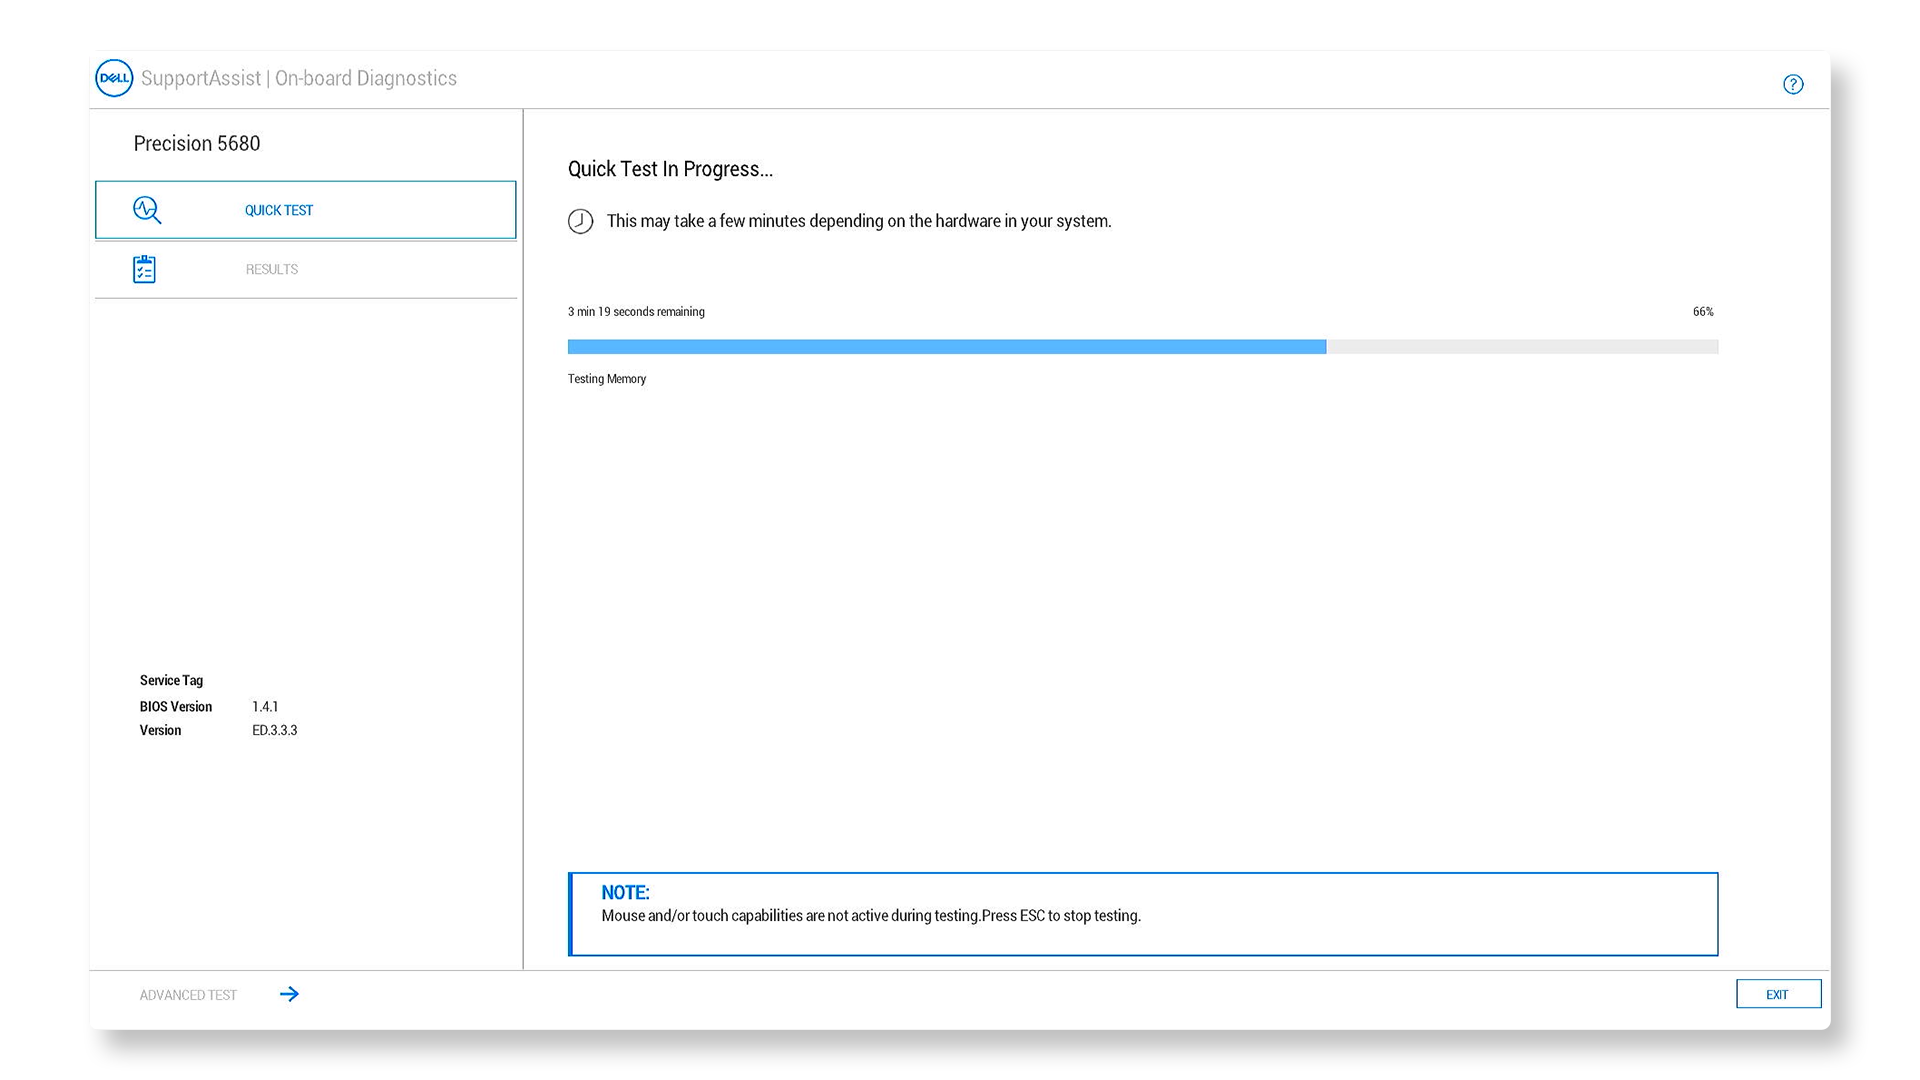
Step 4: Running Dell Diagnostics
SupportAssist on-board diagnostics helps find problems with your computer's hard drive or other parts that might be stopping it from booting up properly.
- Restart the computer: Press the power button.
- Enter Boot Menu: Press F12 repeatedly as the computer starts.
- Select Diagnostics: Select Diagnostics from the menu and press Enter.
- Follow On-Screen Instructions: SupportAssist Pre Boot System Assessment (ePSA on older devices) checks for hardware issues. If the test passes, your hard drive is working properly, proceed to the next step. If the diagnostic test fails, make a note of the error code, validation code, Service Tag, and then look up the error code.
If your computer boots into Windows, try these steps. Still can't boot into Windows? Go to the next step.
Step 5: Repairing Windows Startup Files
Startup Repair helps you fix common problems that stop Windows from starting. Use Windows Startup Repair to see if it can solve the boot issue.
- Turn off the computer: Hold the power button until it shuts down.
- Turn on and interrupt boot: Turn on the computer. When you see the Windows logo, press and hold the power button to turn it off. Repeat this again. On the third try, let it fully restart.
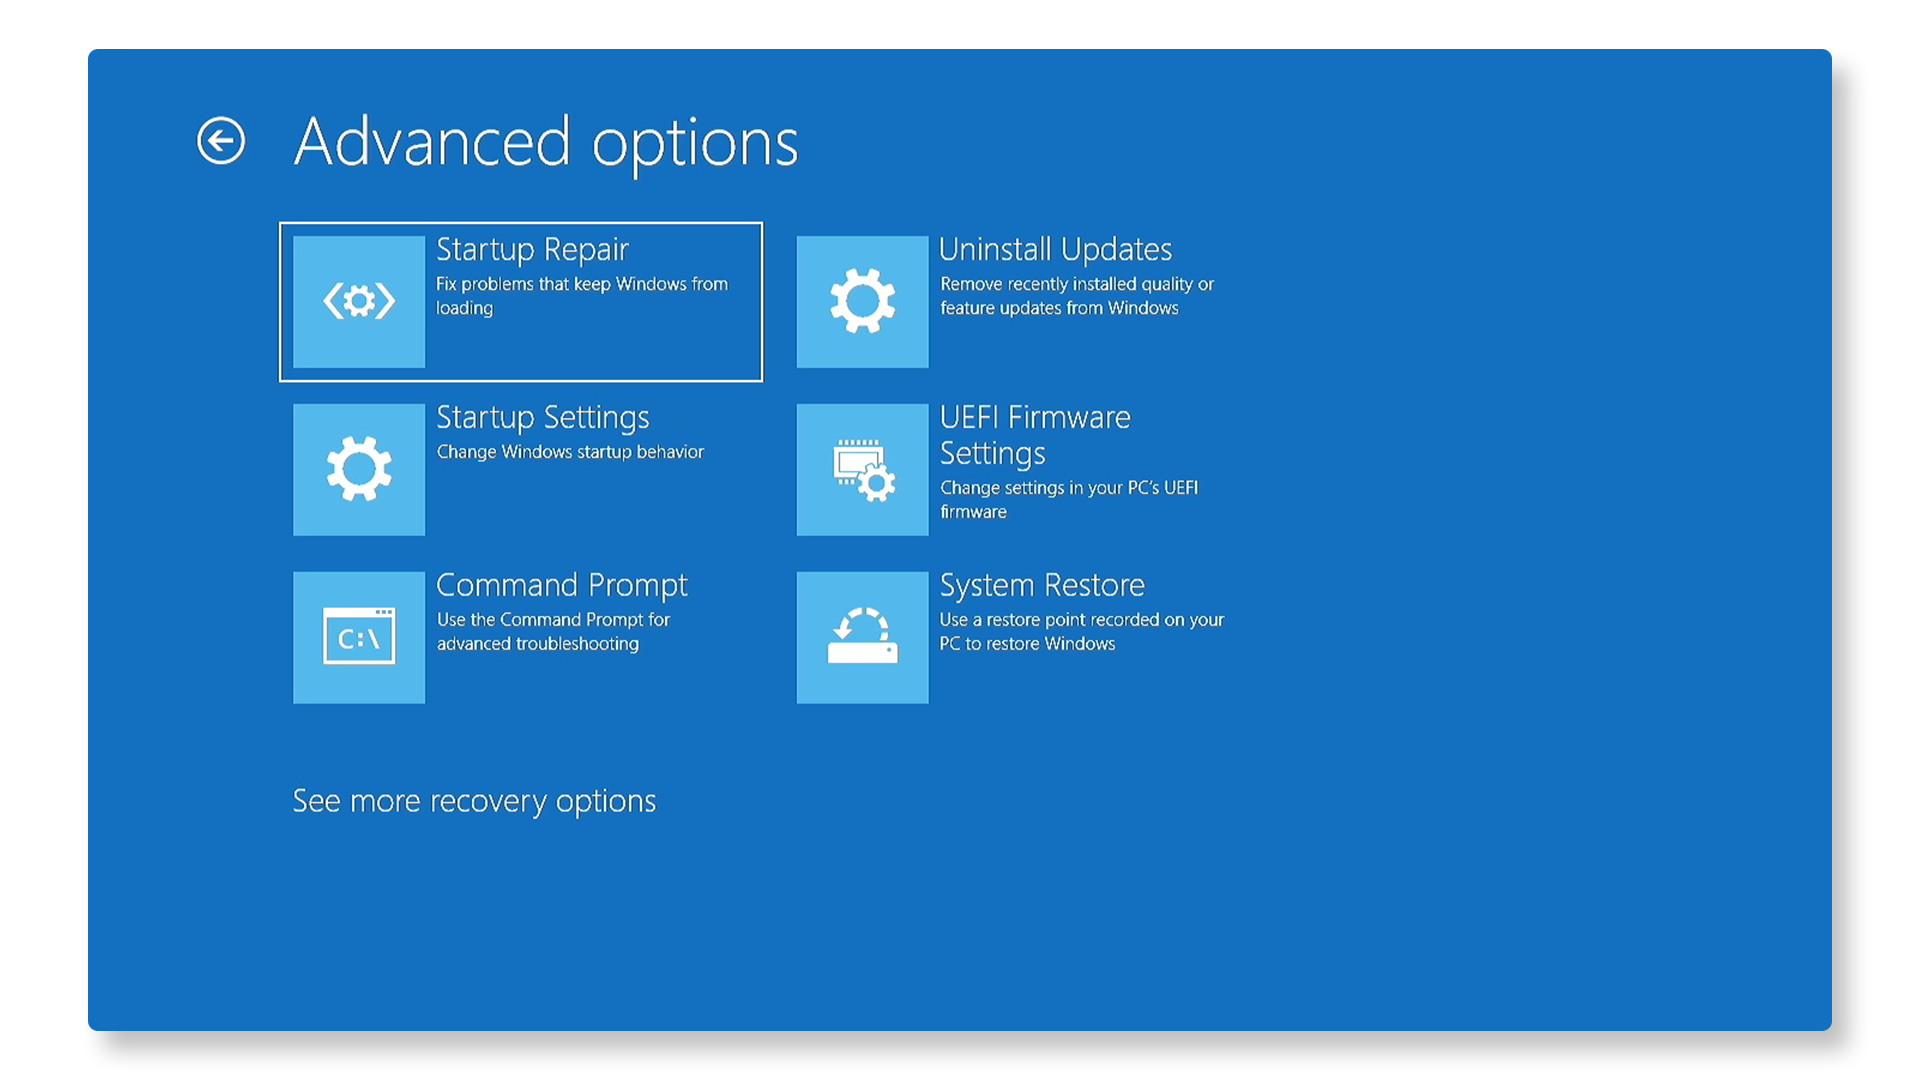
- Access Advanced Startup Options: In the Automatic Repair screen, select Advanced Options. Your computer will enter the Windows Recovery Environment (WinRE).
- Choose Startup Repair: Select Troubleshoot > Advanced Options > Startup Repair. Follow the on-screen instructions to repair Windows startup.
- Enter BitLocker Key: If your computer is encrypted with BitLocker, enter the recovery key when asked. You can find the key by logging into your account at account.microsoft.com and checking the Devices section.
If Startup Repair fixes the boot issue, update drivers and Windows. If the Startup Repair fails, proceed to the next step.
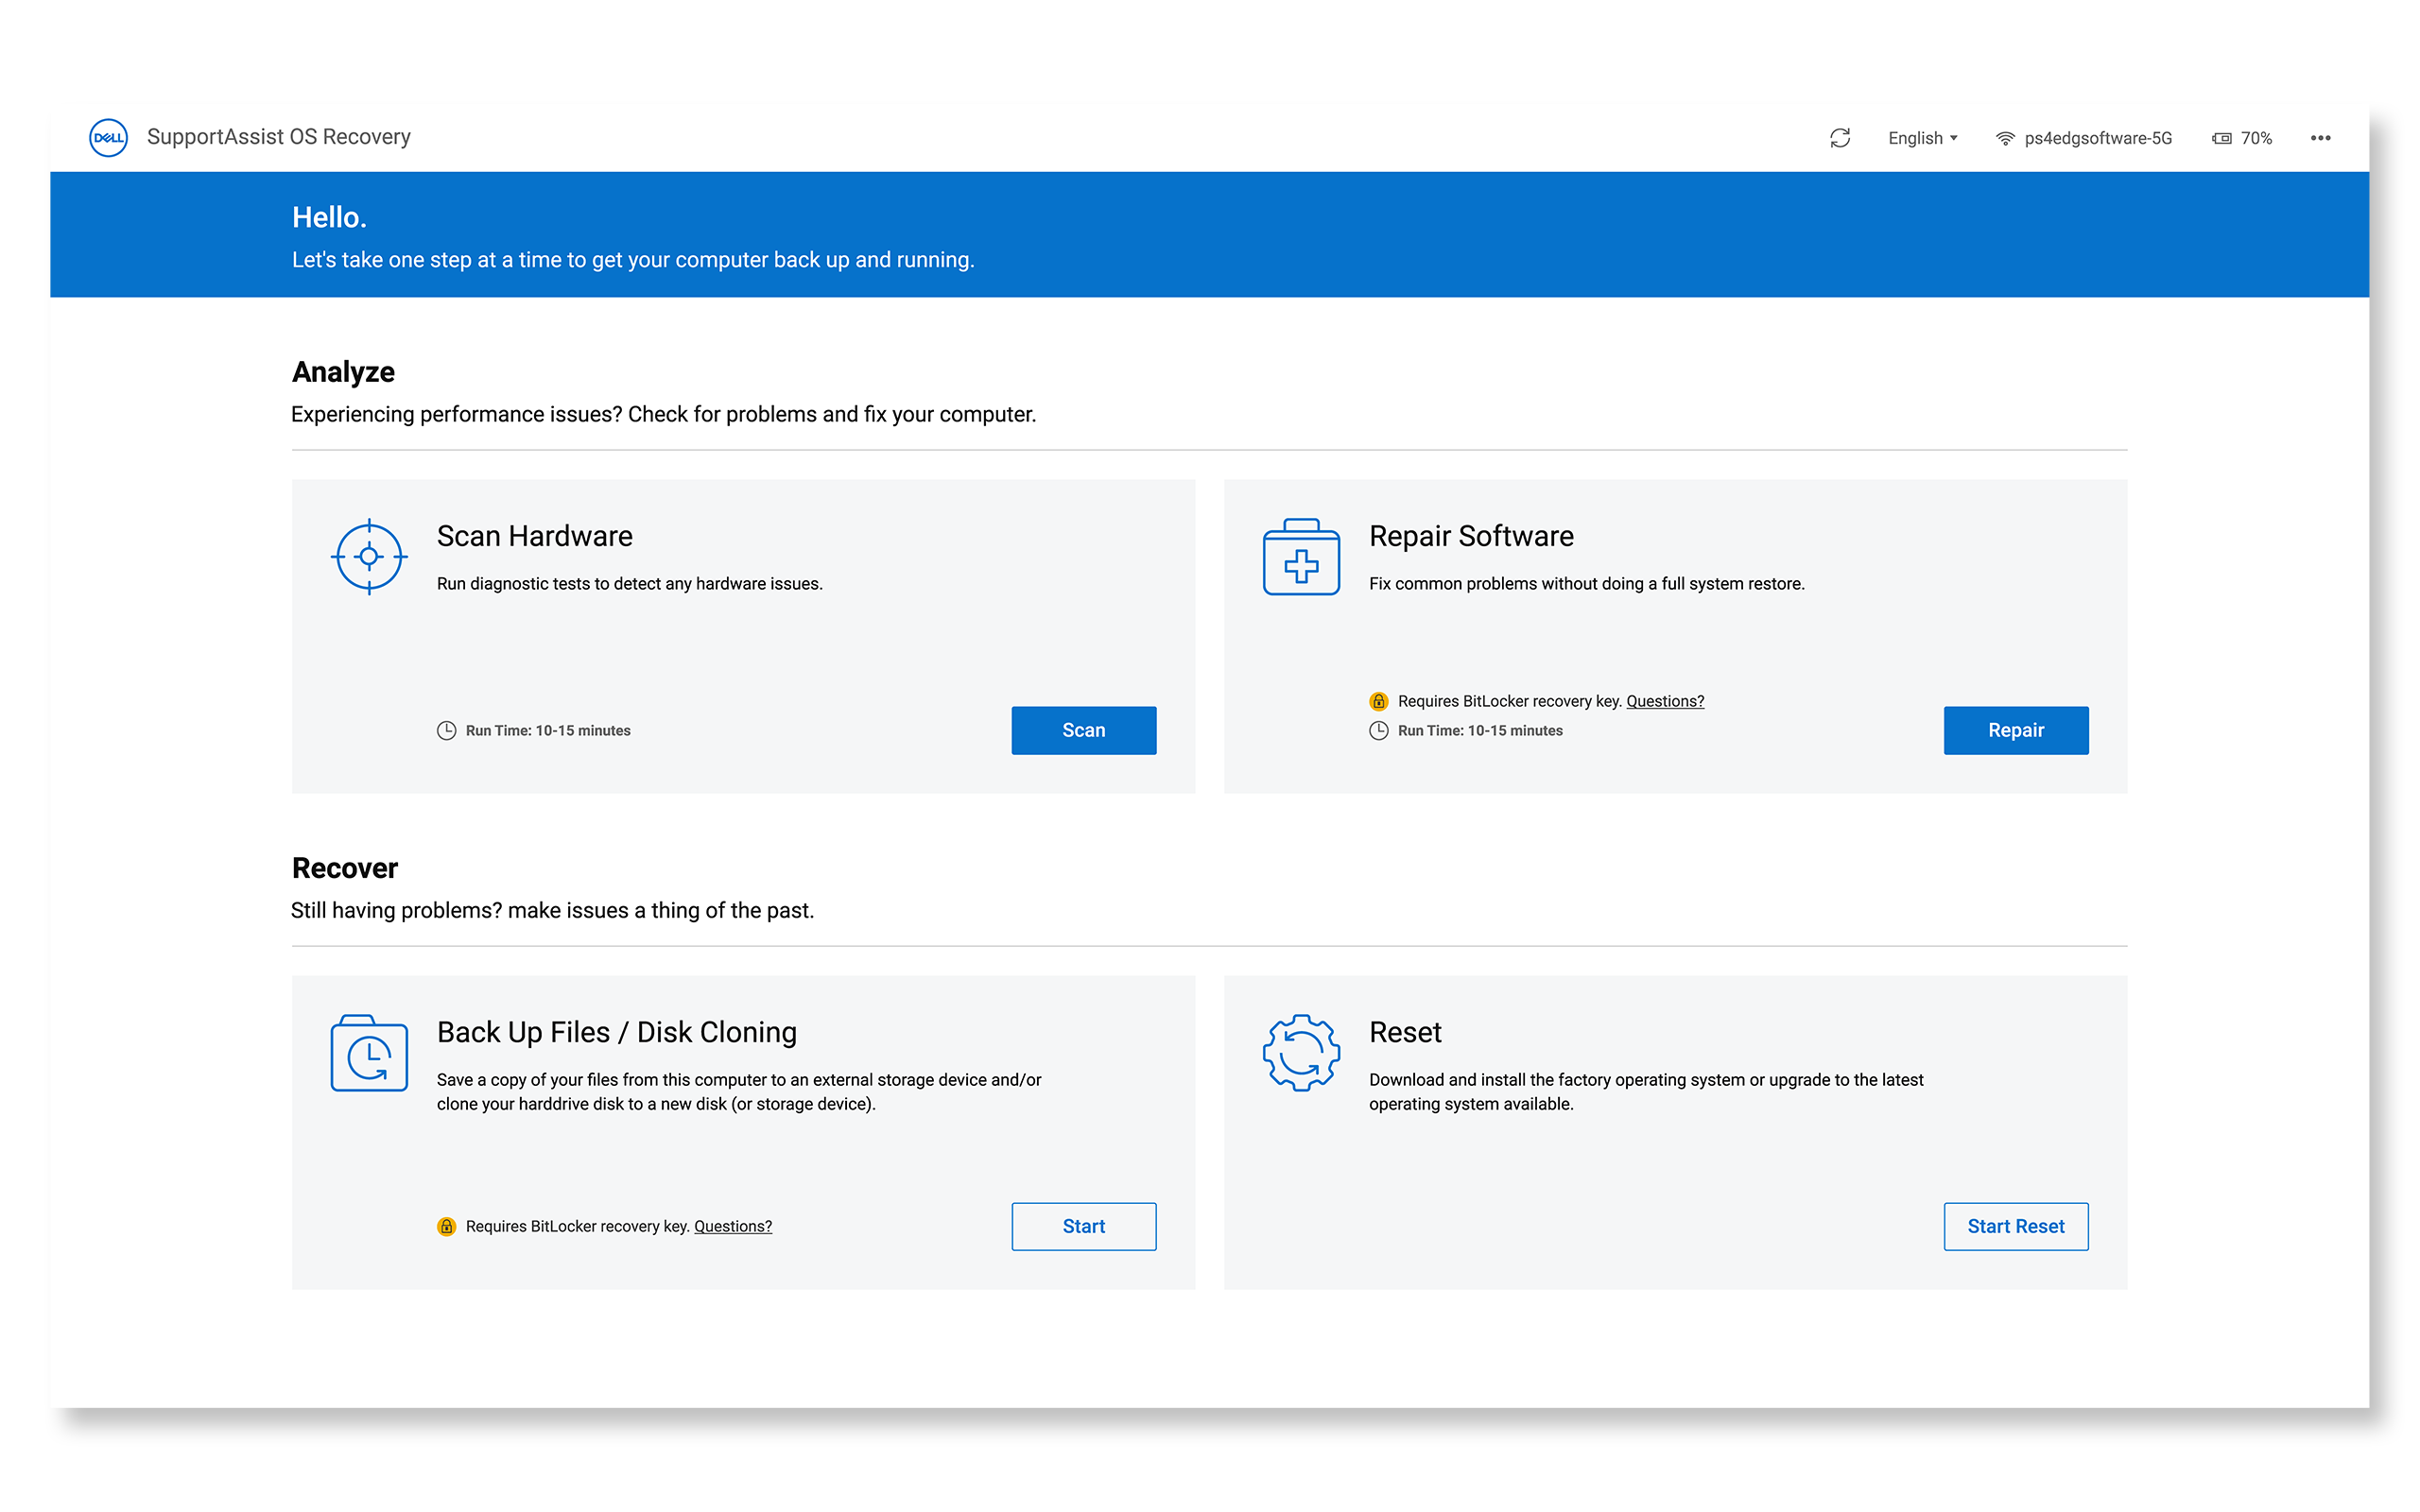
Step 6: Repairing Windows Using SupportAssist OS Recovery
Sometimes missing or corrupted files can prevent your operating system from working properly. Software repair automatically runs a conditional two-step process to find and fix boot issues. If SupportAssist is not available, try some additional steps to recover your computer from boot problems.
- Restart the Computer: Press the power button.
- Enter Boot Menu: Press F12 repeatedly as the computer restarts.
- Select SupportAssist OS Recovery: Use the arrow keys to highlight SupportAssist OS Recovery and press Enter.
- Select Repair: On the Repair Software tile, select Repair.
- Unlock your Computer: If your computer is encrypted with BitLocker, enter the recovery key when asked. You can find the key by logging into your account at account.microsoft.com and checking the Devices section.
- Start Repair: Select Start Repair and the progress is of repair is displayed.
If your computer still won't start Windows after using the repair option in SupportAssist OS Recovery, try these additional steps to fix common boot problems.
What to Do If the Computer Boots into Windows
If your computer boots into Windows at any point, follow these steps to prevent future boot issues:
Updating BIOS and Drivers
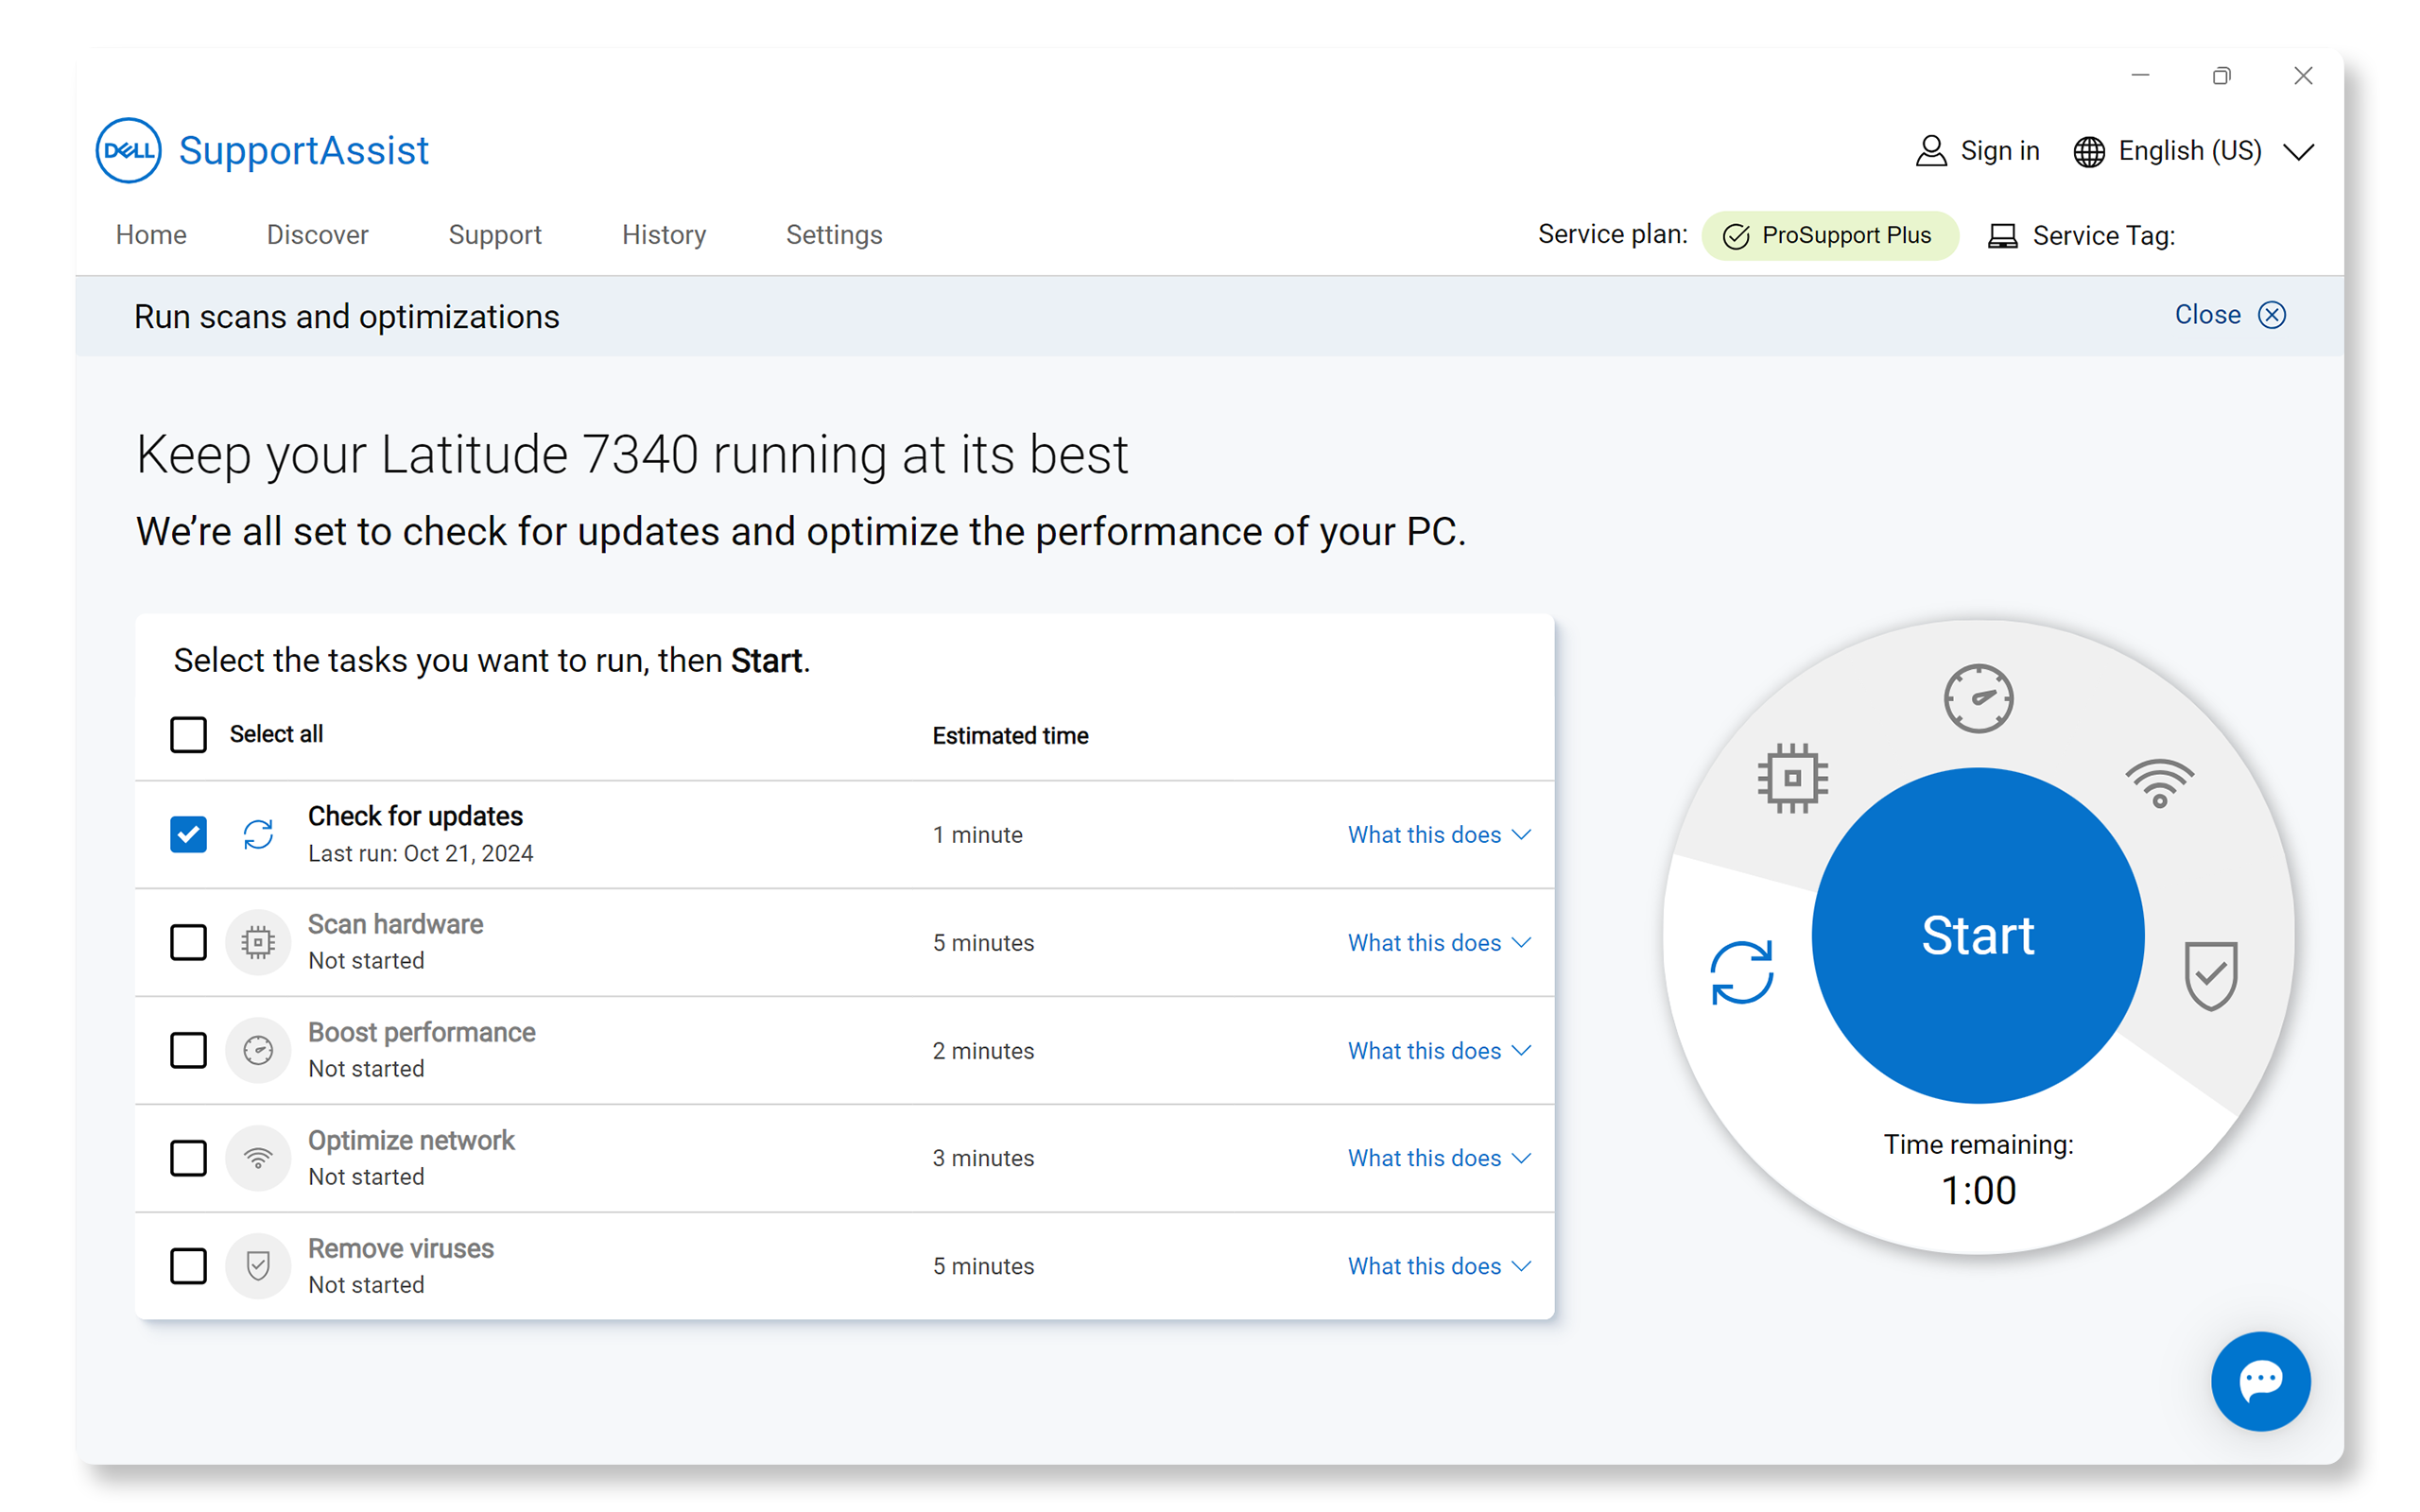
Outdated drivers or BIOS can cause boot problems. Updating drivers and BIOS ensure compatibility with the latest operating system updates and fixes known issues. SupportAssist is Dell's automated tool that scans your Windows computer for driver and firmware updates, downloads, and installs them.
- Search for SupportAssist in the Start menu and open the app.
- On the Home tab, select Update software.
- Select Start to check for driver and BIOS updates.
- Follow the on-screen instructions to complete the installation and restart your computer if prompted.
If you don't have SupportAssist, refer to our driver update guide for alternative methods to download and install Dell drivers.
Checking for Software Updates
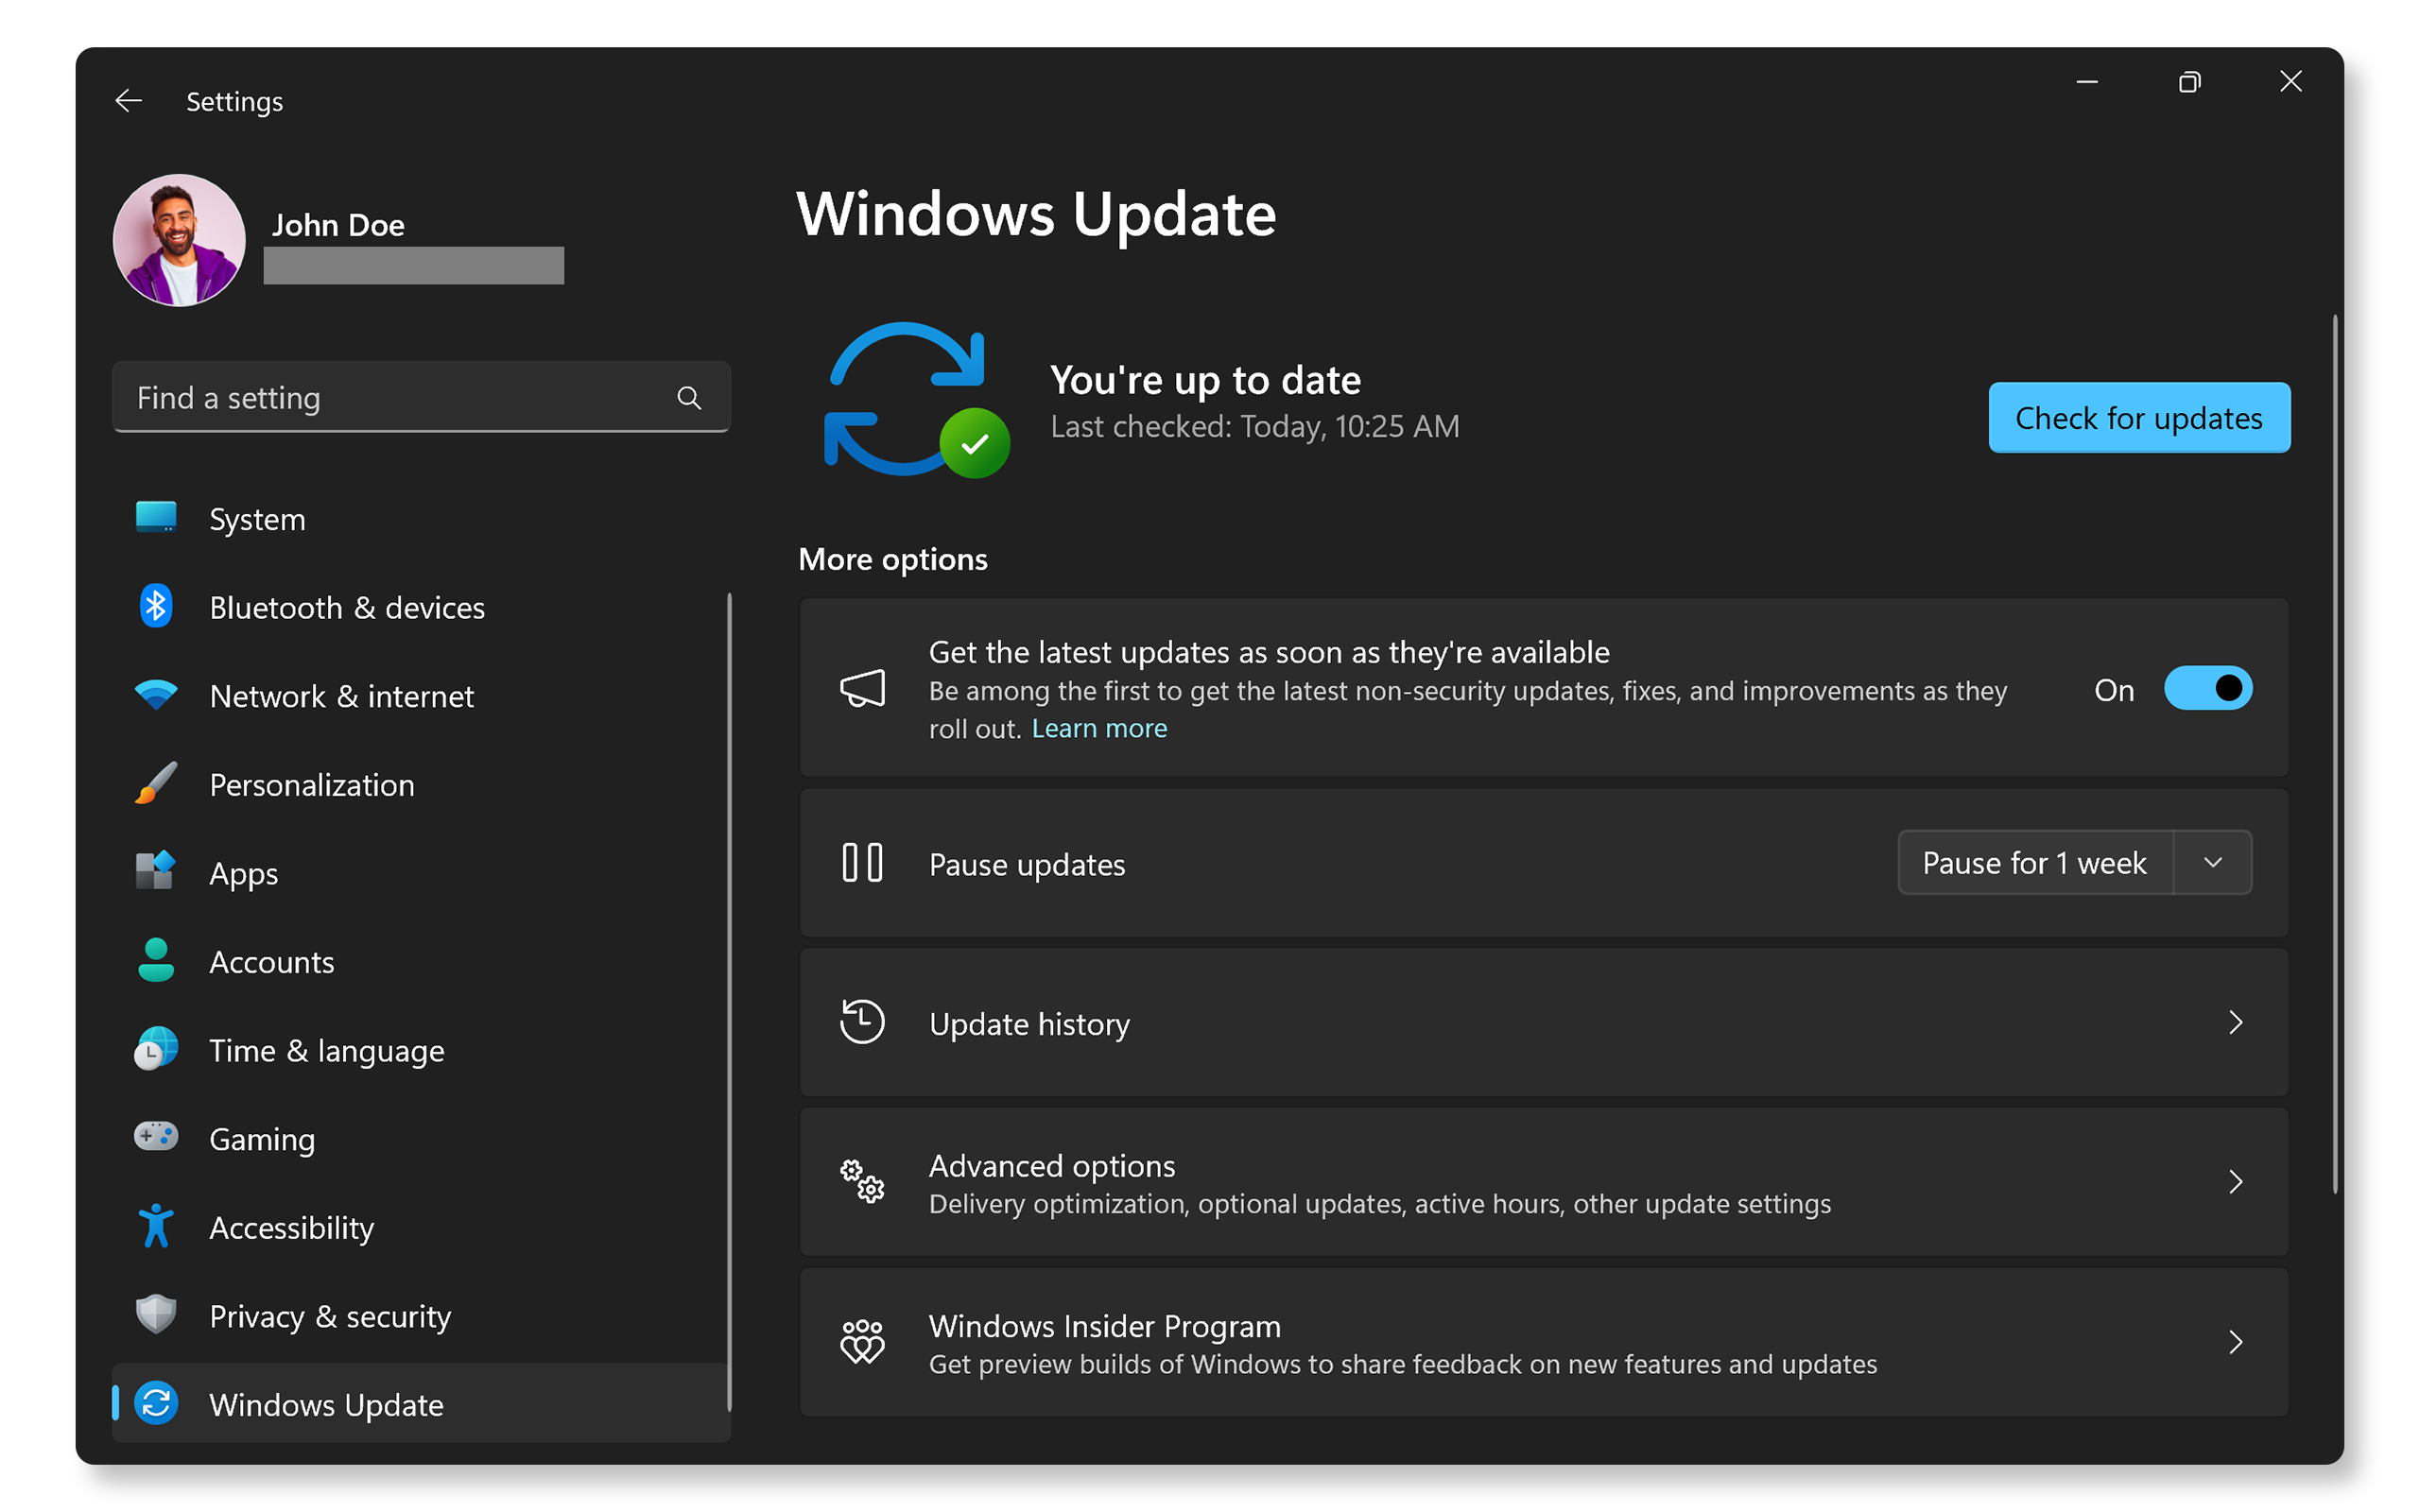
Keep your operating system and applications up to date to benefit from bug fixes and performance enhancements. To update Windows:
- Go to Start > Settings > Windows Update and then click Check for updates and install any available updates. Open Windows Update settings.
Checking Windows System Files
The Deployment Image Servicing and Management (DISM) tool checks and repairs Windows system files. Let's run the restore health command to repair any corrupt system files.
- Press Windows key + X to open the Power User menu.
- Click Windows PowerShell (Admin) or Command Prompt (Admin).
- If prompted by User Account Control, click Yes to allow administrative access.
- In the command window, type the following command and press Enter:
DISM /Online /Cleanup-Image /RestoreHealth - Wait for the scan to complete (this may take 10-30 minutes depending on your system).
- When complete, you'll see a message indicating whether any issues were found and repaired.
- Restart the computer.
Note: Make sure you have an active internet connection during this process, as DISM may need to download files from Microsoft's servers.

Frequently Asked Questions (FAQs)
Here are some common questions users have when their computer won’t start Windows. We’ll help you understand why this happens and what you can do to fix it.
1. What are the most common error messages and their meanings?
- No Boot Device Found: The computer cannot find a device to boot from, usually indicating a problem with the hard drive or its connection.
- Boot Device Not Found: Similar to No Boot Device Found, this error indicates that the computer cannot locate a bootable device.
- Operating System Not Found: The computer cannot find the operating system on the hard drive.
- Boot Configuration Data (BCD) Missing or Corrupted: The Boot Configuration Data file is missing or corrupted, preventing Windows from starting.
- Bootmgr is Missing: The Boot Manager (Bootmgr) is missing or corrupted.
- Inaccessible Boot Device: Windows cannot access the boot device, often due to driver issues or corrupted files.
- Blue Screen (BSOD) or STOP Error with Error Codes: A critical error has occurred, preventing Windows from starting. Common error codes include 0x0000007B (Inaccessible Boot Device) and 0x00000024 (NTFS File System).
- Your PC Ran into a Problem and Needs to Restart: Windows encountered a problem and needs to restart. This is often accompanied by a stop code.
- Automatic Repair Couldn’t Repair Your PC: Windows attempted to repair itself but failed.
- Windows Failed to Start: Windows encountered an error during startup.
2. How can I run Dell Diagnostics to check for hardware issues?
- Restart the computer: Press the power button.
- Enter Boot Menu: Press F12 repeatedly as the computer starts.
- Select Diagnostics: Select Diagnostics from the menu and press Enter.
- Follow On-Screen Instructions: SupportAssist Pre Boot System Assessment (ePSA on older devices) will check for hardware issues. If the diagnostic test fails, make a note of the error code, validation code, Service Tag, and then look up the error code.
3. How to access the Windows Recovery Environment (WinRE)?
- Turn Off Your Computer: Press and hold the power button for about 10 seconds to turn off your computer.
- Turn On and Interrupt Boot: Turn on the computer. When you see the Windows logo, press and hold the power button to turn it off. Repeat this again. On the third try, let it fully restart.
- Access WinRE: Your computer will automatically enter the Windows Recovery Environment.
4. How to boot into safe mode if my computer cannot boot into Windows?
- This method forces your computer to enter the recovery environment, allowing you to access Safe Mode even when Windows won’t boot normally.
- Turn Off Your Computer: Press and hold the power button for about 10 seconds to turn off your computer.
- Turn On and Interrupt Boot: Turn on the computer. When you see the Windows logo, press and hold the power button to turn it off. Repeat this again. On the third try, let it fully restart.
- Access Advanced Startup Options: Your computer will enter the Windows Recovery Environment (WinRE). Select Troubleshoot > Advanced Options > Startup Settings and then choose Restart.
- Enter BitLocker Key: If your computer is encrypted with BitLocker, enter the recovery key when asked. You can find the key by logging into your account at account.microsoft.com and checking the Devices section.
- Select Safe Mode: After your computer restarts, you'll see a list of options. Press the number for Safe Mode.
5. How can I fix a black screen on startup?
- Check the monitor connection: Ensure the monitor is properly connected to the computer.
- Turn off the computer: Hold the power button until it shuts down.
- Turn on and interrupt boot: Turn on the computer. When you see the Windows logo, press and hold the power button to turn it off. Repeat this again. On the third try, let it fully restart. If the screen stays black, follow our display troubleshooting guide.
- Access Advanced Startup Options: In the Automatic Repair screen, select Advanced Options. Your computer will enter the Windows Recovery Environment (WinRE).
- Choose Startup Repair: Select Troubleshoot > Advanced Options > Startup Repair. Follow the on-screen instructions to repair Windows startup.
- Enter BitLocker Key: If your computer is encrypted with BitLocker, enter the recovery key when asked. You can find the key by logging into your account at account.microsoft.com and checking the Devices section.
6. How can I fix a blue screen error on startup?
- Access WinRE: Follow the steps to boot into Windows recovery environment (see FAQ #3).
- Run Startup Repair: In Windows recovery environment, go to Troubleshoot > Advanced options > Startup Repair.
- Enter BitLocker Key: If your computer is encrypted with BitLocker, enter the recovery key when asked. You can find the key by logging into your account at account.microsoft.com and checking the Devices section.
- Blue Screen Troubleshooting: If the issue persists, follow our troubleshooting guide to fix blue screen (BSOD) errors.
7. What if my computer freezes during startup?
- Access WinRE: Follow the steps to boot into Windows recovery environment (see FAQ #3).
- Run System Restore: In Windows recovery environment, go to Troubleshoot > Advanced options > System Restore.
- Enter BitLocker Key: If your computer is encrypted with BitLocker, enter the recovery key when asked. You can find the key by logging into your account at account.microsoft.com and checking the Devices section.
8. What should I do if my Dell computer is stuck on the Dell logo screen?
- Turn Off the Computer: Hold the power button until the computer shuts down.
- Disconnect External Devices: Remove all external devices and restart the computer.
- Turn On the Computer: Press the power button to see if the issue is resolved.
- Run Pre-Boot Diagnostics: If the computer turns on, access the diagnostics menu (see FAQ #2) and run a system check.
9. What if my computer is stuck in a boot loop?
- Access WinRE: Follow the steps to boot into Windows recovery environment (see FAQ #3).
- Run System Restore: In Windows recovery environment, go to Troubleshoot > Advanced options > System Restore.
10. How do I fix a "No Boot Device Found" error?
- Restart your computer and Press F2 repeatedly as soon as you see the Dell logo until the BIOS/UEFI screen appears.
- Look for "Boot Sequence" or "Boot Order" and make sure your hard drive appears first in the list.
- Find these settings and make sure they match:
- Boot Mode: Set to UEFI (not Legacy)
- SATA Operation: Set to AHCI
- Apply and save the changes and exit BIOS/UEFI.
- If you need help navigating BIOS, check your computer's user manual.
11. What should I do if my computer doesn’t recognize the hard drive?
- Check physical connections: Ensure the data and power cables are securely connected to the hard drive and motherboard. For laptops, ensure the hard drive is seated securely.
- Enter BIOS/UEFI: Press F2 repeatedly as the computer starts. Navigate the BIOS/UEFI interface and check if the hard drive is detected. If the hard drive is not detected, refer to your computer’s user manual and reseat the hard drive. If the hard drive is not detected after reseating, contact Dell Technical Support for repair options based on your device’s warranty status.
12. How do I resolve "INACCESSIBLE_BOOT_DEVICE" error?
- This error occurs when your computer's storage settings don't match what Windows expects. Here's how to fix it:
- Restart your computer and press F2 repeatedly to enter BIOS.
- Locate "SATA Operation" in the settings and change it to the opposite setting:
- If it shows "RAID On", change it to "AHCI".
- If it shows "AHCI", change it to "RAID On".
- Save the changes and exit BIOS/UEFI.
- If this doesn't work, restore BIOS defaults and then reinstall Windows.
13. What should I do if my computer starts but I can't log in to my account?
- Restart the computer: Sometimes, a simple restart can resolve login issues.
- Try logging in again: After the restart, attempt to log in to your user account.
- Check your Password: Ensure you are entering the correct password. Make sure the Caps Lock key is not on, as passwords are case-sensitive.
- Reset your Password: Click on the Reset password link, if available on the login screen. Use your security questions or a recovery email to reset your password. Reset your Microsoft account password.
- Use Another Account: If you have another user account with administrative privileges, log in with that account.
- Check for Corrupted User Profile: Open File Explorer and navigate to C:\Users. Check for a .bak profile: If you see a profile with a .bak extension, it might be corrupted. Remove the .bak extension and restart the computer.
14. Where can I find my BitLocker recovery key?
- Microsoft Account: If you linked BitLocker to your Microsoft account, you can find the recovery key by logging into your account at account.microsoft.com and navigating to the Devices section.
- Printout: You may have printed the recovery key when BitLocker was activated. Check where you keep important documents related to your computer.
- USB Flash Drive: If you saved the recovery key to a USB flash drive, insert the drive into your locked PC and follow the instructions.
- Active Directory or Azure Active Directory: If your device is managed by an organization, the recovery key might be stored in Active Directory or Azure Active Directory. Contact your IT department for assistance.
15. Can Dell provide my BitLocker recovery key?
- No, Dell does not store or have access to BitLocker recovery keys.
- If you cannot locate your recovery key, you may need to reset your device, which could result in data loss. It’s crucial to back up your recovery key in a safe place to avoid such situations.
16. What if none of the troubleshooting steps work?
- Additional Troubleshooting: Follow these additional steps to fix cannot boot into Windows.
- Use Dell Community Forums: Join the Dell Community Forums to get help from other users.
- Contact Dell Support: If the issue persists, contact Dell Technical Support for repair options based on your device’s warranty status.


