Mouse Setup Guide: Connect USB, Wireless, and Bluetooth Mouse
Getting Started with Mice
First, let's identify the type of mouse you have to start the setup process:
- USB Wired Mouse: Connects to your computer via a USB port and does not require additional drivers.
- Bluetooth Mouse: Requires pairing through Bluetooth and requires Bluetooth drivers.
- Wireless Mouse with USB Receiver: Comes with a USB dongle that connects the mouse wirelessly.
Each type of mouse has a unique setup process, and following the right steps ensures a seamless connection and optimal performance.
Connecting a Dell or Alienware USB Mouse
Dell and Alienware USB mice are plug-and-play devices, making them easy to install and do not require any additional drivers.
How to Set Up a USB Mouse
- Locate a USB Port: Find an available USB port on your computer. It's best to use a USB 2.0 or USB 3.0 port for optimal compatibility and speed. For laptops with limited USB ports, use a docking station or USB hub.
- Connect the Mouse: Plug the mouse to the USB port.
- Wait for Automatic Installation: Your computer automatically recognizes the mouse and installs the necessary drivers. This may take a few moments.

Setting Up Your Bluetooth Mouse
Bluetooth mice offer wireless functionality without a USB receiver, making them ideal for laptops or devices with limited ports. Dell mice like MS5320W and MS700 support both Bluetooth and wireless (via a universal USB dongle) connection.

Pairing via Bluetooth
Ready to complete Bluetooth pairing between your mouse and keyboard? Follow these simple steps:
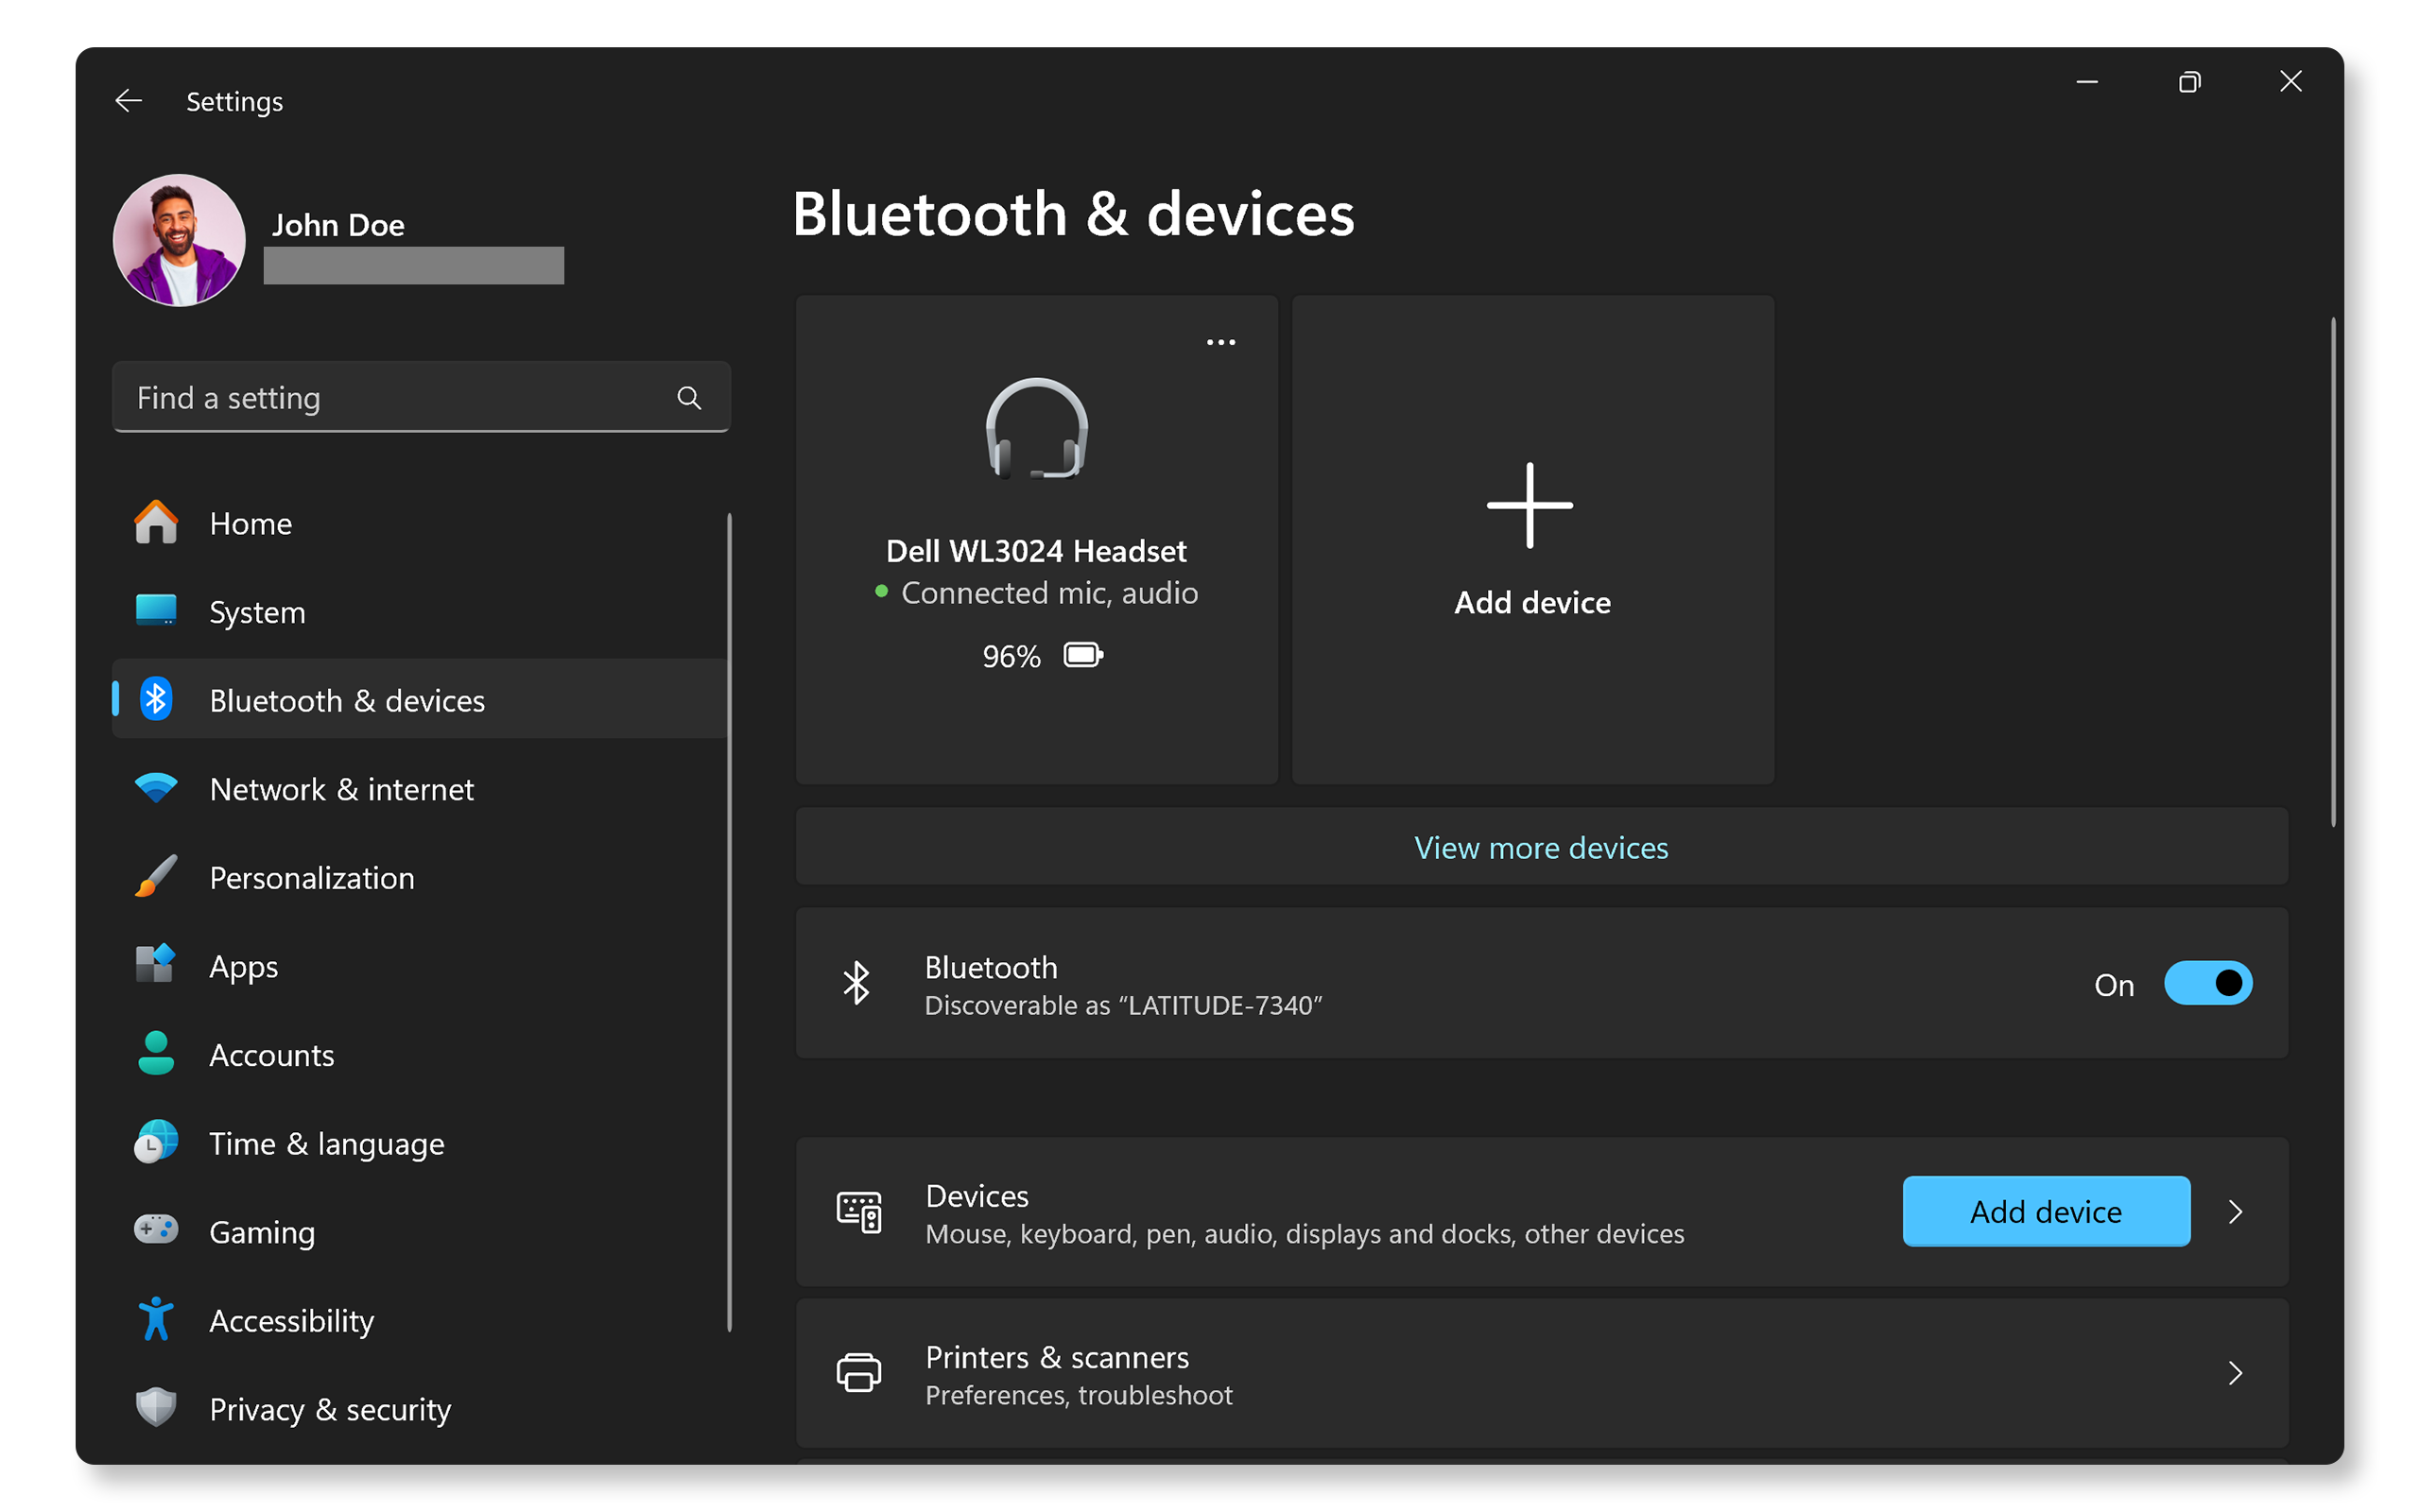
- Turn On Bluetooth: Go to Start > Settings > Bluetooth & devices, and turn on Bluetooth. Open Windows Bluetooth settings.
- Install or Charge Battery: Insert the battery (typically AA or AAA) with the correct polarity (+ and -) as indicated inside the compartment. For mice with built-in rechargeable battery, use the provided USB cable for charging.
- Power On the Mouse: Switch on the mouse. Most models have an on/off switch located on the bottom.
- Enable Pairing Mode on the Mouse: For most mice, there should be a pairing button (location may vary, check your mouse's user guide). Press and hold the pairing button until the Bluetooth LED starts flashing, indicating that the mouse is in pairing mode.
- Add the Mouse: In Bluetooth settings, click Add device, select Bluetooth from the list of options, and wait for your computer to locate the mouse. Once the mouse appears in the list, select it to complete pairing and follow the on-screen instructions.
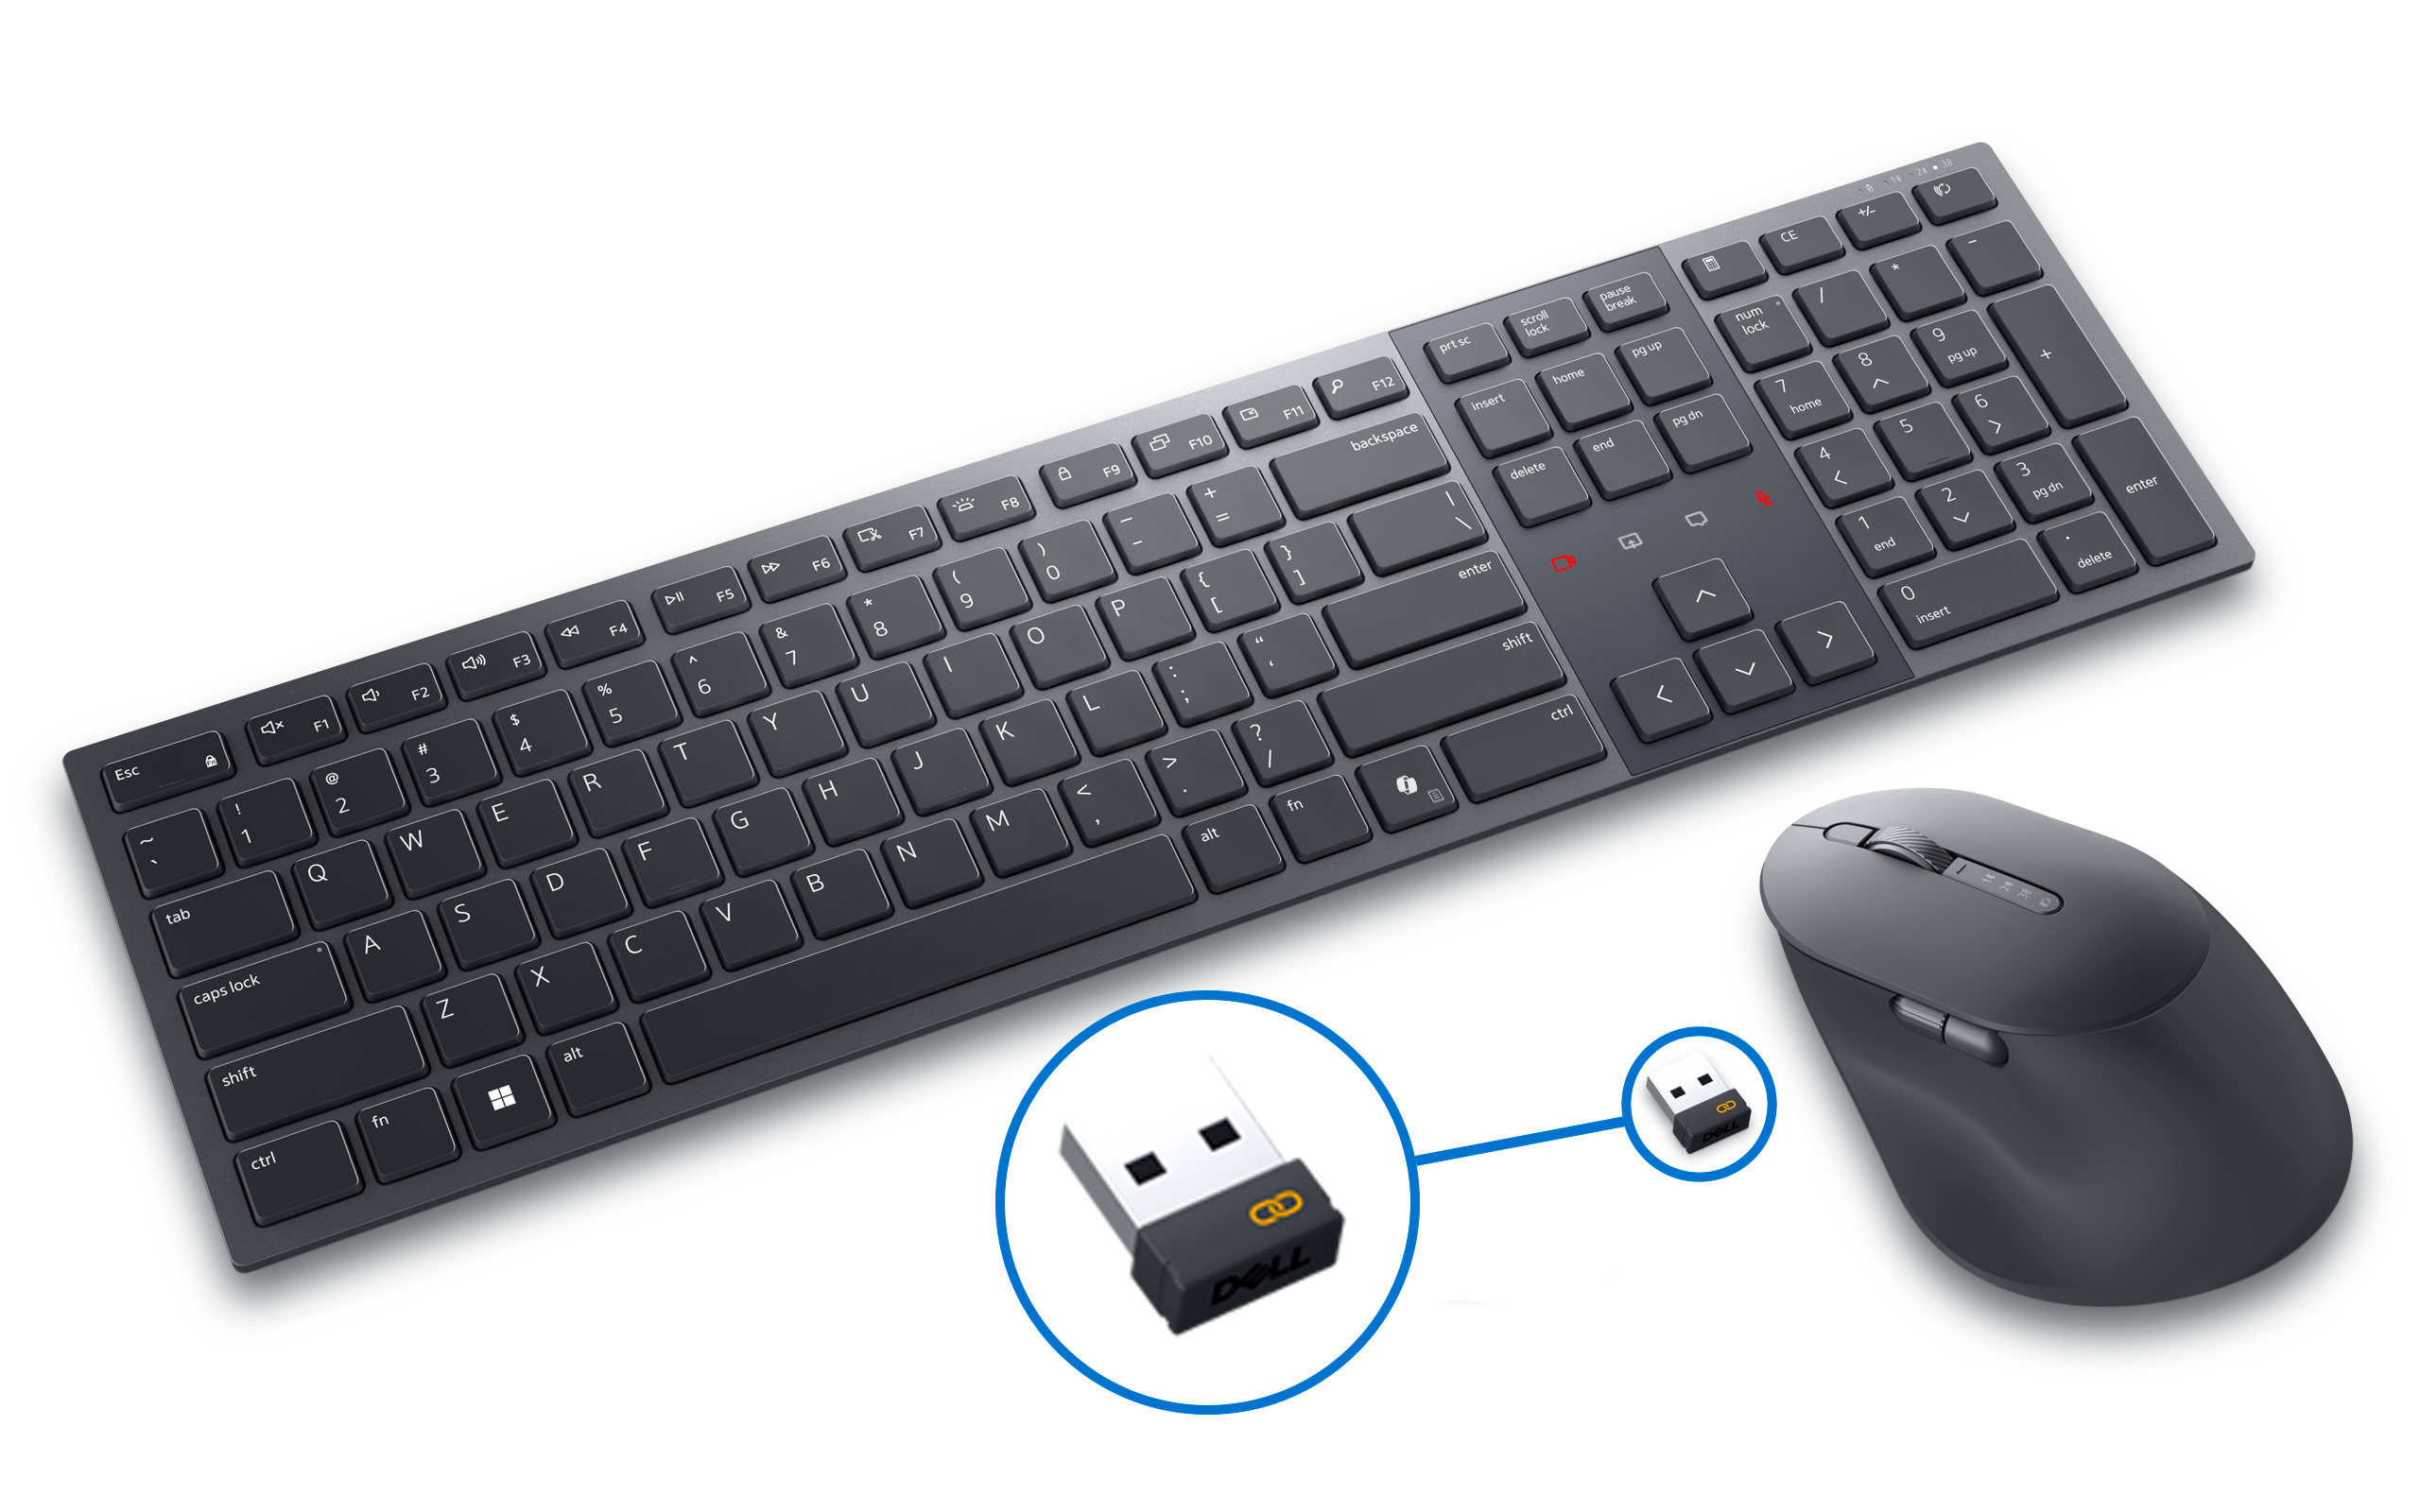
Setting Up a Wireless Mouse with USB Dongle
Dell and Alienware mice with a USB receiver provide a simple, secure connection without the need for Bluetooth.
Connecting Using a USB Receiver
Dell and Alienware wireless mice with a universal USB receiver provide a simple, secure connection without the need for Bluetooth.
- Locate the USB Receiver: Wireless mice include a small receiver, often stored in the battery compartment for safekeeping.
- Connect the USB Receiver: Plug the USB pairing dongle into an available USB port on your computer.
- Install or Charge Battery: Insert the battery (typically AA or AAA) with the correct polarity (+ and -) as indicated inside the compartment. For mice with built-in rechargeable battery, use the provided USB cable for charging.
- Power On the Mouse: Switch on the mouse. Most models have an on/off switch located on the bottom.
- Wait for the Connection: Your computer automatically recognizes the mouse within a few seconds. If prompted, follow on-screen instructions to complete the setup.
Firmware and Software Updates for Dell/Alienware Mice
Regular updates ensure your mouse performs optimally and prevents issues. Dell Display and Peripheral Manager and Alienware Command Center software notifies you when a firmware update is available for supported mice and keyboard.
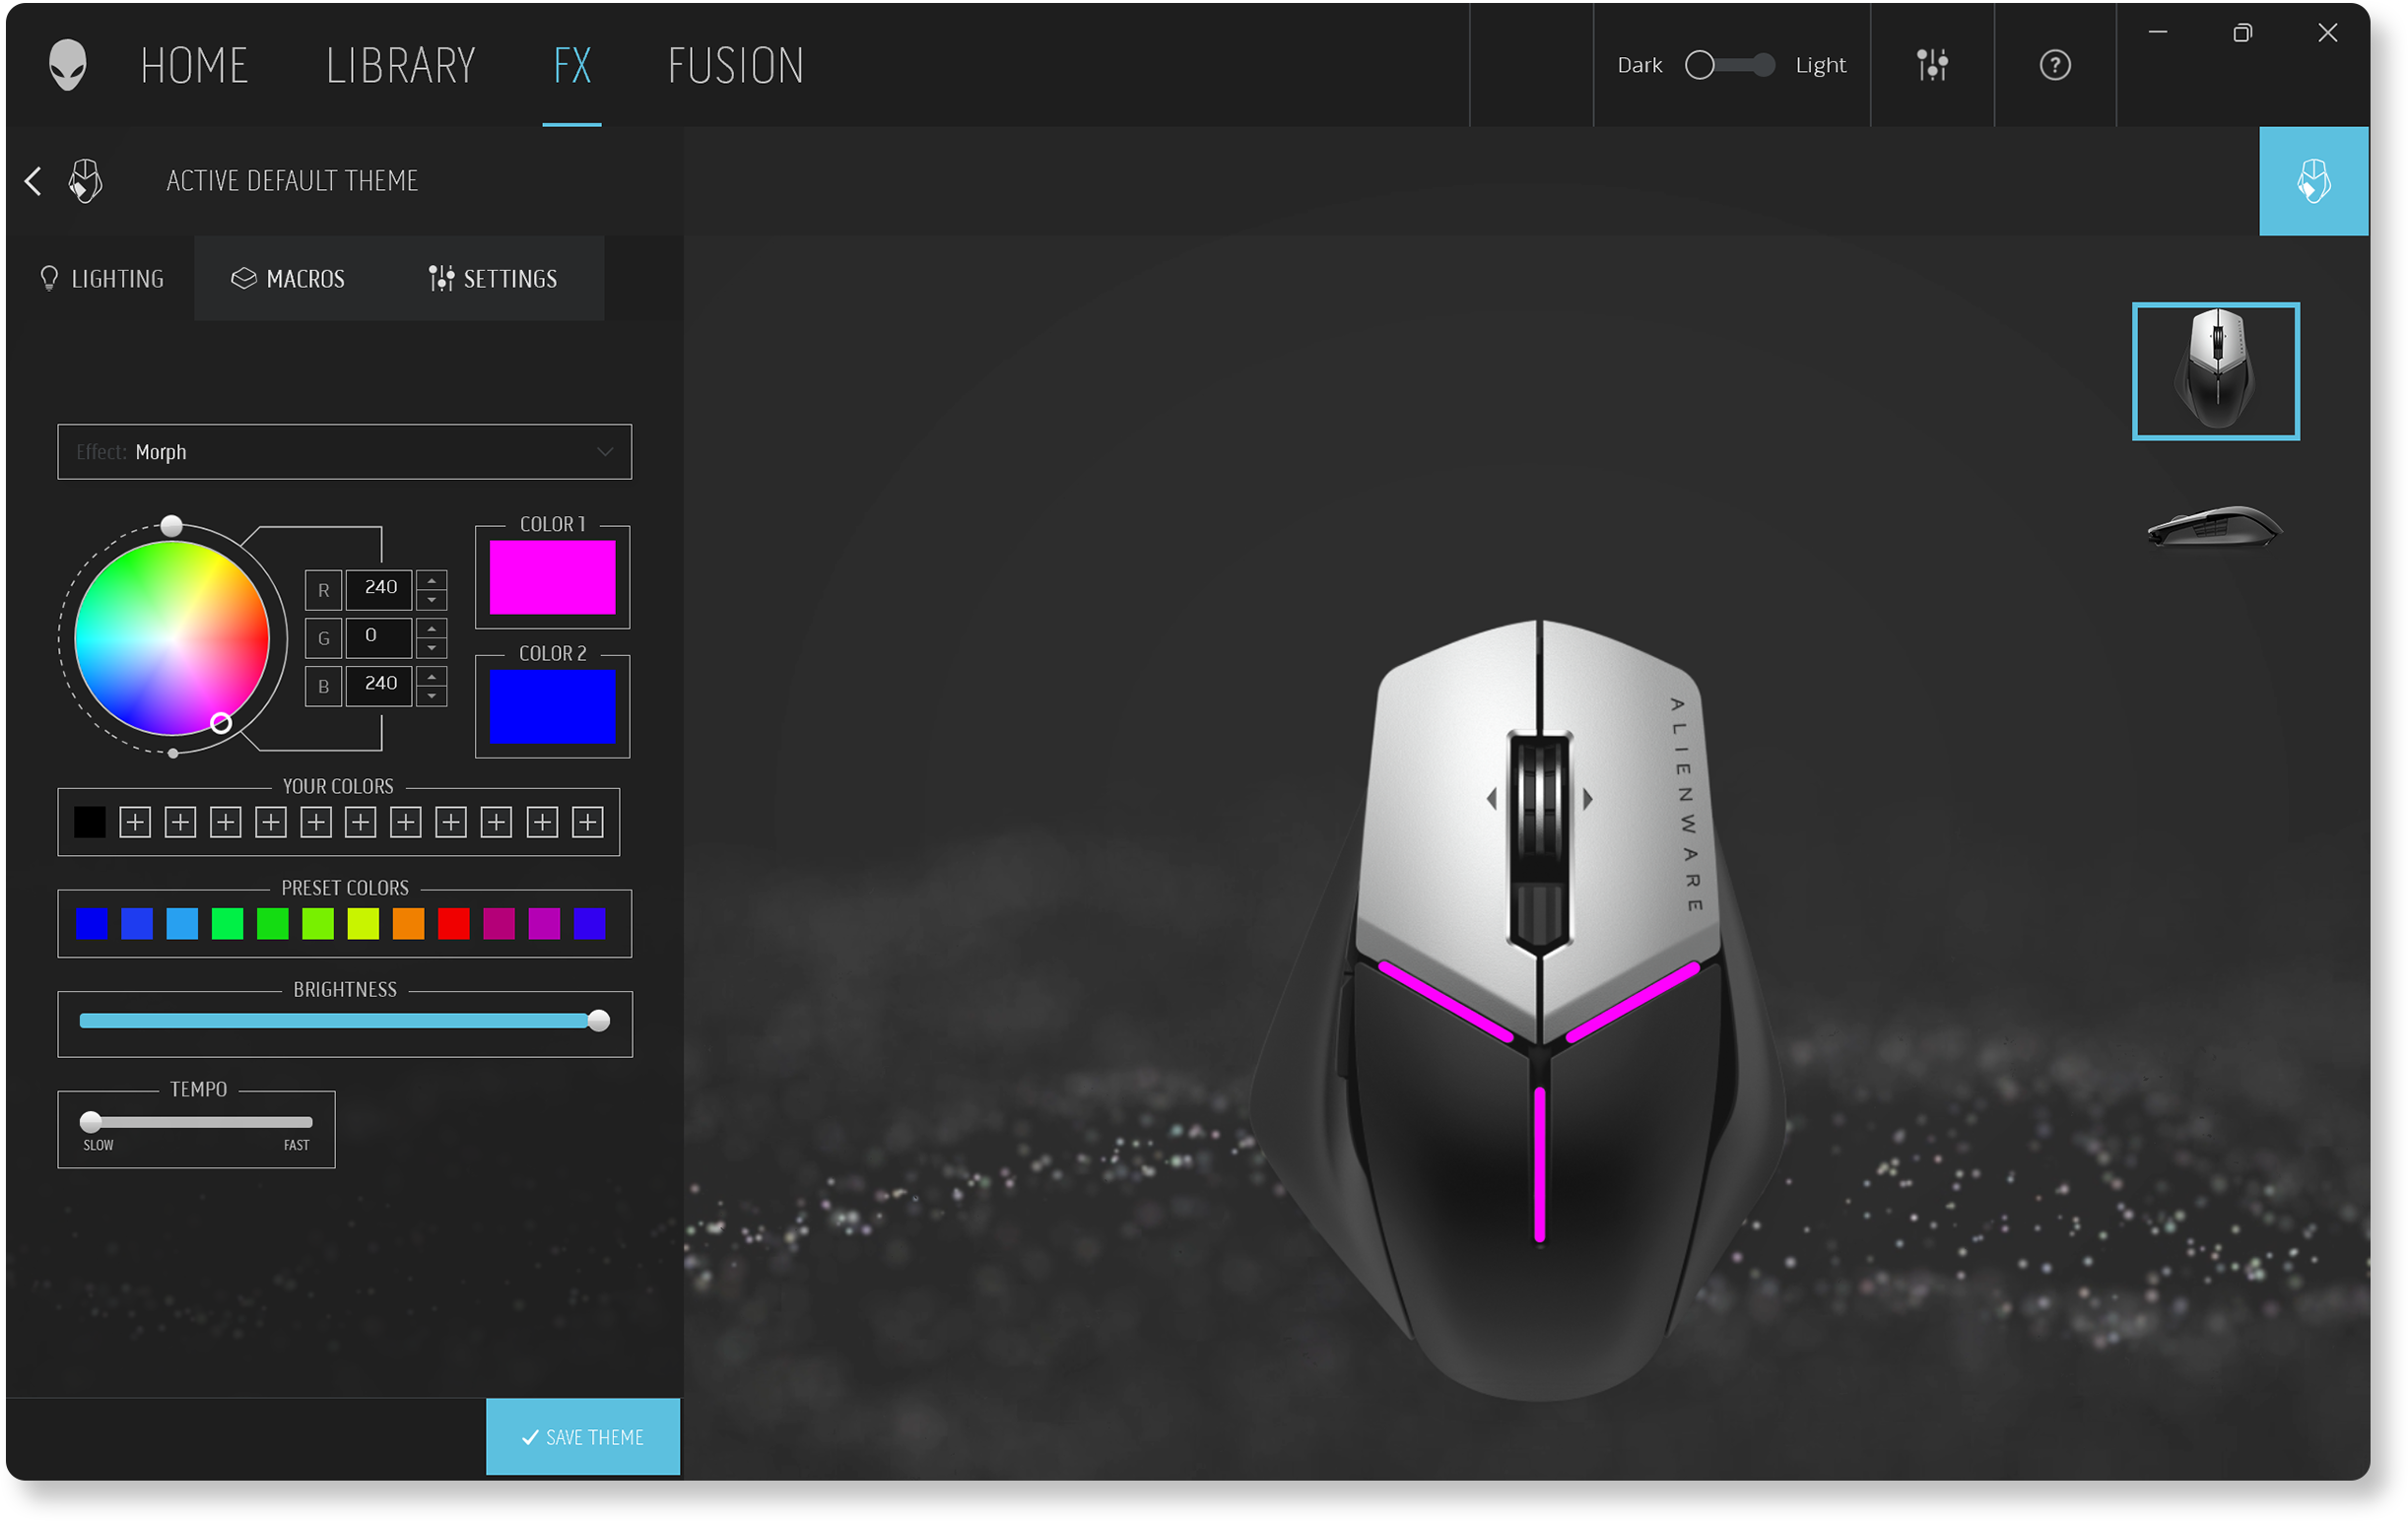
Optimizing an Alienware Mouse for Gaming
Gamers prefer Alienware peripherals for their precision and top-notch performance. With Alienware Command Center, you can personalize lighting, DPI settings, update firmware, and more. Easily manage your Alienware mice and other Alienware peripherals all in one place. With Alienware Command Center, you can:
- Configure lighting effects for immersive gaming.
- Adjust DPI settings for faster responses.
- Create custom macros to perform complex in-game actions with a single press.
- Upgrade the mouse firmware.
To learn more, check out the Alienware Command Center user guide.
Using Dell Display and Peripheral Manager for Dell Mice
Dell Display and Peripheral Manager helps manage and customize supported Dell mice. With it, you can:
- Pair or unpair supported mice using Bluetooth or USB receiver.
- Assign shortcuts to customizable action buttons.
- View device information, such as firmware version and battery status.
- Upgrade the mouse firmware.
To learn more, check out the Dell Display and Peripheral Manager's user guide.

Maintenance and Care
For optimal performance and increase your mouse's lifespan:
- Keep the Mouse Clean: Dust and debris can accumulate on the mouse sensor and between the buttons. Regular cleaning with compressed air or a soft brush helps. Avoid exposing to extreme temperatures.
- Update Firmware: Check and update the firmware when available, especially for wireless and Bluetooth models.
- Update Bluetooth Driver: For Bluetooth mice, make sure to update the Bluetooth drivers when available.
- Manage Battery Life: For wireless and Bluetooth mice, conserving battery life can improve performance. Turn off the mouse when not in use, and use rechargeable batteries to reduce costs.
Troubleshooting Mouse Issues
Mouse not working, erratic cursor movement, or having other issues with your mouse? Don’t worry! We’ve got some easy tips to help you fix mouse issues.
Frequently Asked Questions (FAQ)
Here are some answers to common questions that users ask when setting up their Dell or Alienware mice.
1. How do I know if my mouse needs drivers?
- Dell and Alienware mice are plug-and-play devices, the operating system automatically installs the necessary drivers.
- If Bluetooth connection isn't working, you might need to update Bluetooth drivers on your computer.
2. Why is my mouse lagging or freezing?
- Mouse lag or freezing can be caused by several factors:
- Low battery (for wireless models).
- Interference with other wireless devices.
- Corrupt drivers or outdated firmware.
3. Can I use the mouse with a non-Dell computer?
- Yes, Dell and Alienware mice are compatible with most systems, including non-Dell computers that support USB or Bluetooth connections. Functionality may be limited on macOS and Linux operating systems.
4. How do I change the DPI settings of my mouse?
- DPI settings allow you to control the speed and precision of the mouse pointer movement.
- You can change the DPI settings using Dell Display and Peripheral Manager or Alienware Command Center for supported mice.
5. Can I connect the mouse to multiple computers?
- Yes, some Dell mice like MS5320W and MS900 support pairing with multiple devices. Check your mouse's specifications in the user guide to learn about multi-device support.
6. What is Dell Pair?
- Dell Pair helps detect supported mice when they are within the detection range to pair via Bluetooth.
- Dell Pair app comes preinstalled on supported Dell computers with Windows 11 and Windows 10.
7. Why isn't my touchpad working when a mouse is connected?
- The touchpad may be disabled when a mouse is connected.
- To turn on the touchpad when using a mouse:
- Go to Start > Settings > Bluetooth & devices > Touchpad. Under Touchpad, check Leave touchpad on when a mouse is connected. Open Windows touchpad settings.
8. How do I switch the left and right mouse button?
- To switch the primary mouse button, go to Start > Settings > Bluetooth & devices > Mouse. Change the Primary mouse button to Right. Open Windows mouse settings.
9. How do I change the mouse pointer speed?
- To adjust the speed of the mouse movement, go to Start > Settings > Bluetooth & devices > Mouse. Slide the Mouse pointer speed to increase or decrease and check. Open Windows mouse settings.
10. How do I change the scrolling direction on Windows?
- To adjust the scrolling direction on Windows, go to Start > Settings > Bluetooth & devices > Mouse. Change the Scrolling direction according to your preference and check. Open Windows mouse settings.
11. Why does the scrolling direction feel different on Windows and macOS?
- The difference is due to scrolling direction settings:
- Natural scrolling: Content moves in the same direction as scrolling. Scrolling down moves the content down.
- Reverse scrolling: Content moves in the opposite direction of scrolling the mouse wheel. Scrolling down moves the content up.
- Adjust the scrolling direction in Windows Settings and macOS System Preferences.
12. How do I set up RGB lighting on my Alienware mouse?
- To set up and configure RGB lighting on your Alienware mouse, use Alienware Command Center.
- With AlienFX, adjust colors and effects to customize the mouse lights according to your preferences.
- Some mice allow you to save different profiles for various tasks or games.