Blue Screen (BSOD) Errors and Stop Code Issues in Windows
What is Blue Screen of Death (BSOD)?
Blue Screen of Death (BSOD) error happens when Windows encounters a critical error it can’t recover from and forces your computer to restart abruptly. This can be caused by hardware failures, driver conflicts, corrupt system files, or software problems. In Windows 10 and Windows 11, you’ll see a message that says “Your PC ran into a problem and needs to restart” with a STOP code.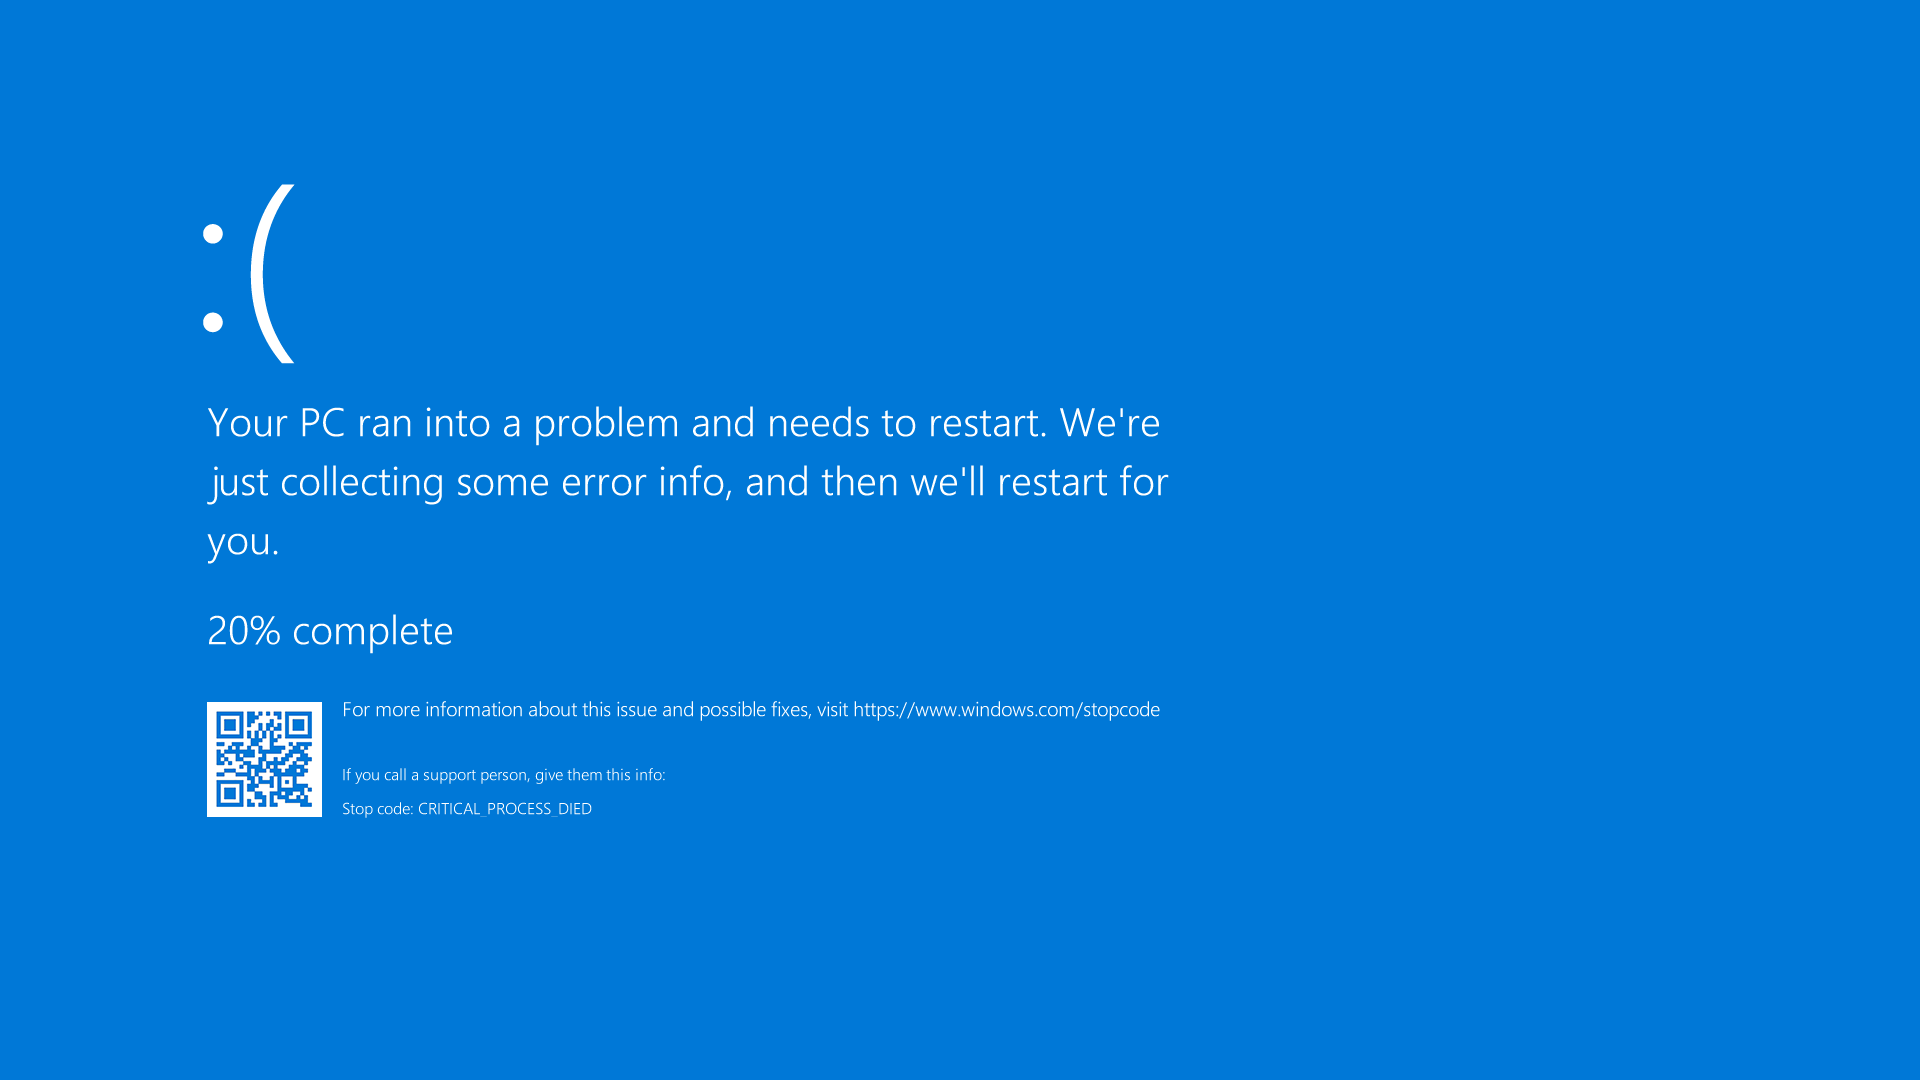
What is a STOP Code?
A STOP code is a hexadecimal code displayed on the BSOD screen that helps identify the specific error causing the crash. Examples include 0x0000007E or 0x00000050, and so on.
What causes a BSOD?
Blue Screens (BSODs) often happen from faulty hardware, outdated or corrupt drivers, software that doesn’t get along, viruses, or corrupt system files. Common reasons include faulty memory (RAM), damaged parts of the hard drive, old drivers, and overheating.
Common BSOD Errors in Windows 11 and Windows 10
When Windows experiences a Blue Screen error, you might see error messages like:
- PAGE_FAULT_IN_NONPAGED_AREA. STOP Code: 0x00000050.
- IRQL_NOT_LESS_OR_EQUAL. STOP Code: 0x0000000A.
- SYSTEM_SERVICE_EXCEPTION. STOP Code: 0x0000003B.
- KMODE_EXCEPTION_NOT_HANDLED. STOP Code: 0x0000001E.
- CRITICAL_PROCESS_DIED. STOP Code: 0x000000EF.
- MEMORY_MANAGEMENT. STOP Code: 0x0000001A.
- DRIVER_IRQL_NOT_LESS_OR_EQUAL. STOP Code: 0x000000D1.
- VIDEO_TDR_FAILURE. STOP Code: 0x00000116.
- INACCESSIBLE_BOOT_DEVICE. STOP Code: 0x0000007B.
- BAD_POOL_HEADER. STOP Code: 0x00000019.
- SYSTEM_THREAD_EXCEPTION_NOT_HANDLED. STOP Code: 0x0000007E.
- BAD_SYSTEM_CONFIG_INFO. STOP Code: 0x00000074.
- WHEA_UNCORRECTABLE_ERROR. STOP Code: 0x00000124.
- UNMOUNTABLE_BOOT_VOLUME. STOP Code: 0x000000ED.
- MACHINE_CHECK_EXCEPTION. STOP Code: 0x0000009C.
- DPC_WATCHDOG_VIOLATION. STOP Code: 0x00000133.
Check FAQ #1 below to learn what these errors mean. This guide provides common troubleshooting steps for any BSOD or STOP error messages.
Fixing Blue Screen (BSOD) Errors in Windows
If your computer encountered a Blue Screen error, follow these detailed step-by-step instructions to troubleshoot and resolve the problem. You may also watch this video to help fix your computer if it won't boot.
Step 1: Disconnecting External Devices
Sometimes, faulty external devices can cause Blue Screen errors.
- Disconnect all external peripherals except your keyboard and mouse (USB drives, printers, external storage, webcams)
- Restart your computer to test if it boots normally
- If successful, reconnect devices one at a time to identify any problematic hardware
Step 2: Performing a Hard Reset
Discharging residual electricity can often fix startup problems when your computer won't boot into Windows due to a Blue Screen error.
- Power off your computer by holding the power button until shutdown
- Disconnect the power source - unplug the power cable or remove the battery (laptops with removable batteries only)
- Press and hold the power button for 15-20 seconds to discharge residual power
- Reconnect power and turn on your computer
- Check if the system boots properly
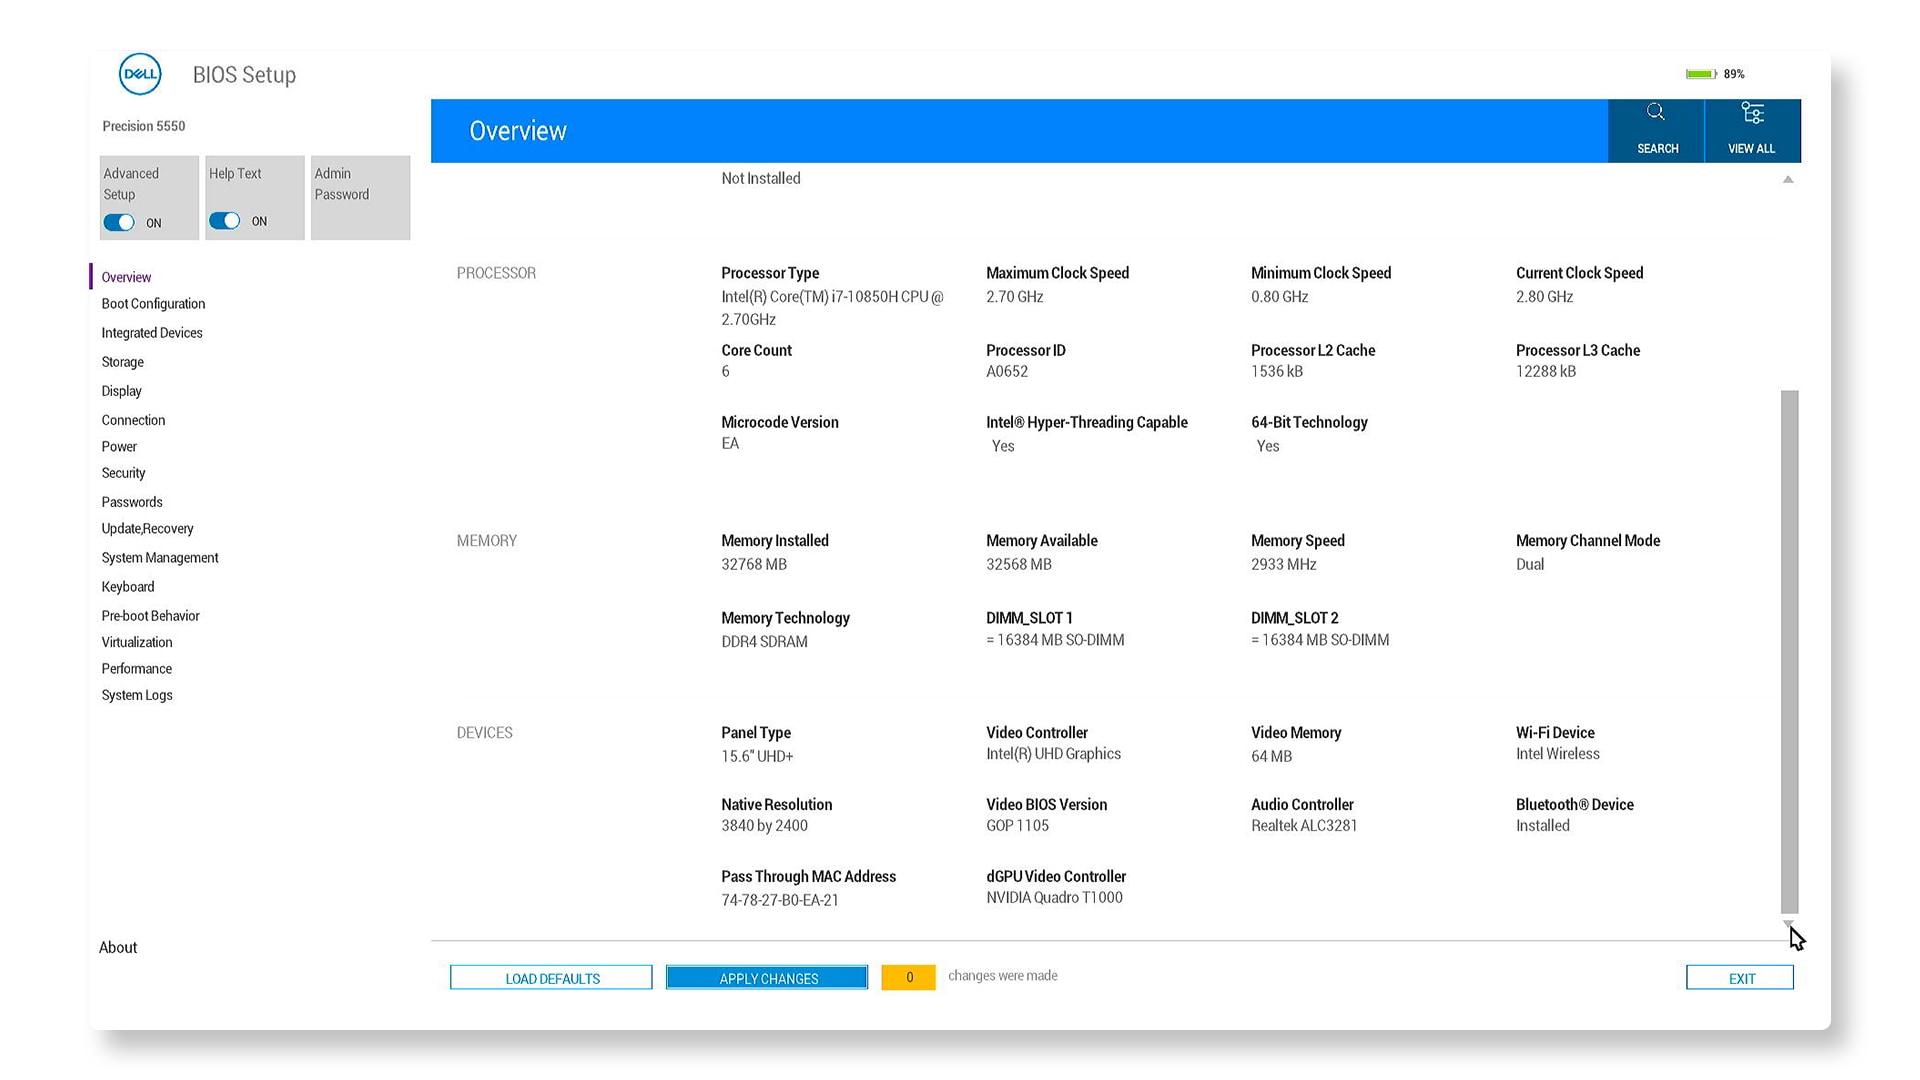
Step 3: Resetting BIOS or UEFI to Default Settings
If your computer has Blue Screen errors, it might be because of wrong BIOS settings. You can try fixing this by resetting the BIOS or UEFI settings to their original defaults.
- Restart your computer and press F2 repeatedly during startup
- Locate the reset option - typically labeled "Load Defaults," "Restore Settings," or "Reset to Default"
- Apply the reset and save changes
- Exit BIOS and allow the system to restart
Can't find the same options in BIOS? Check your computer's user manual for BIOS or UEFI navigation.
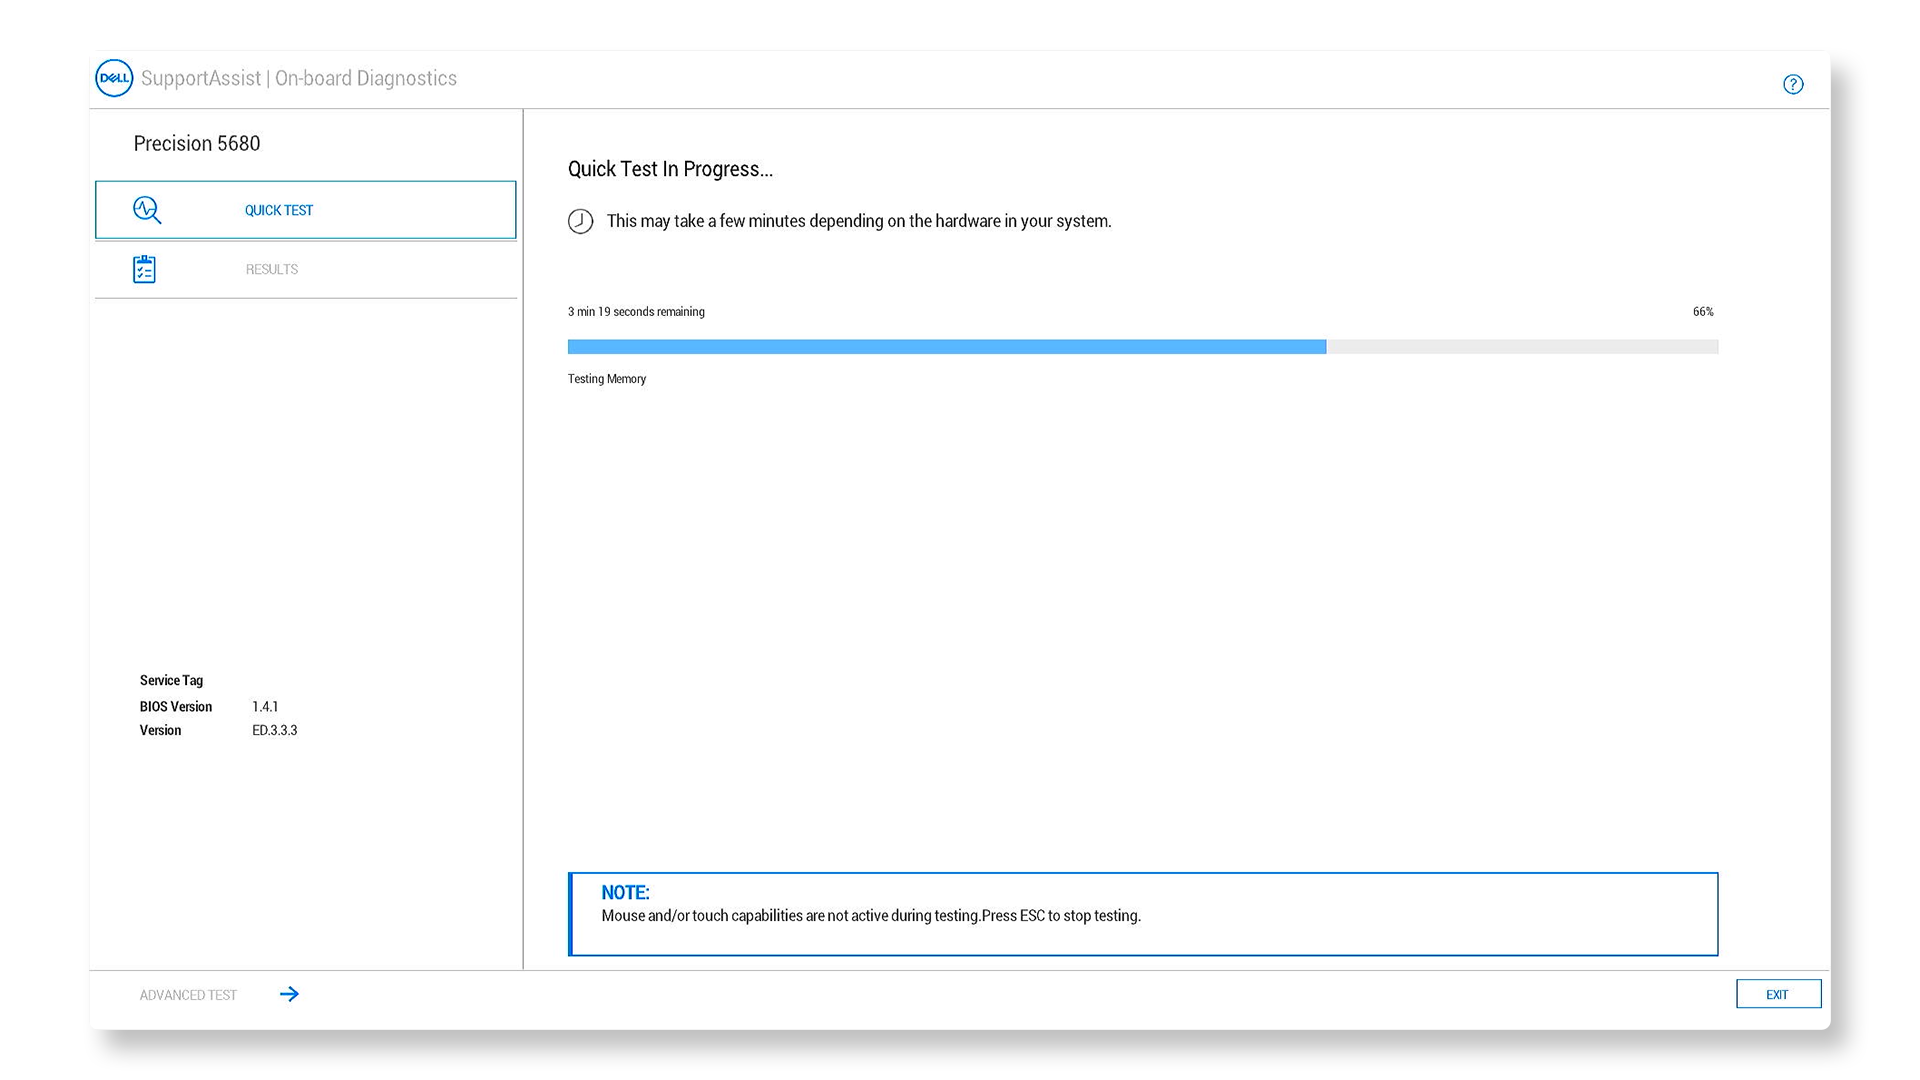
Step 4: Running Dell Diagnostics
SupportAssist can check your computer’s hard drive and other parts to find out what’s causing Blue Screen errors.
- Restart your computer and press F12 repeatedly during startup
- Select "Diagnostics" from the boot menu
- Run SupportAssist Pre Boot System Assessment - this comprehensive test checks your hardware components
- Record any error codes if the diagnostic fails (you'll need these for technical support) make a note of the error code, validation code, Service Tag, and then look up the error code
- If diagnostics pass, proceed to the next troubleshooting step
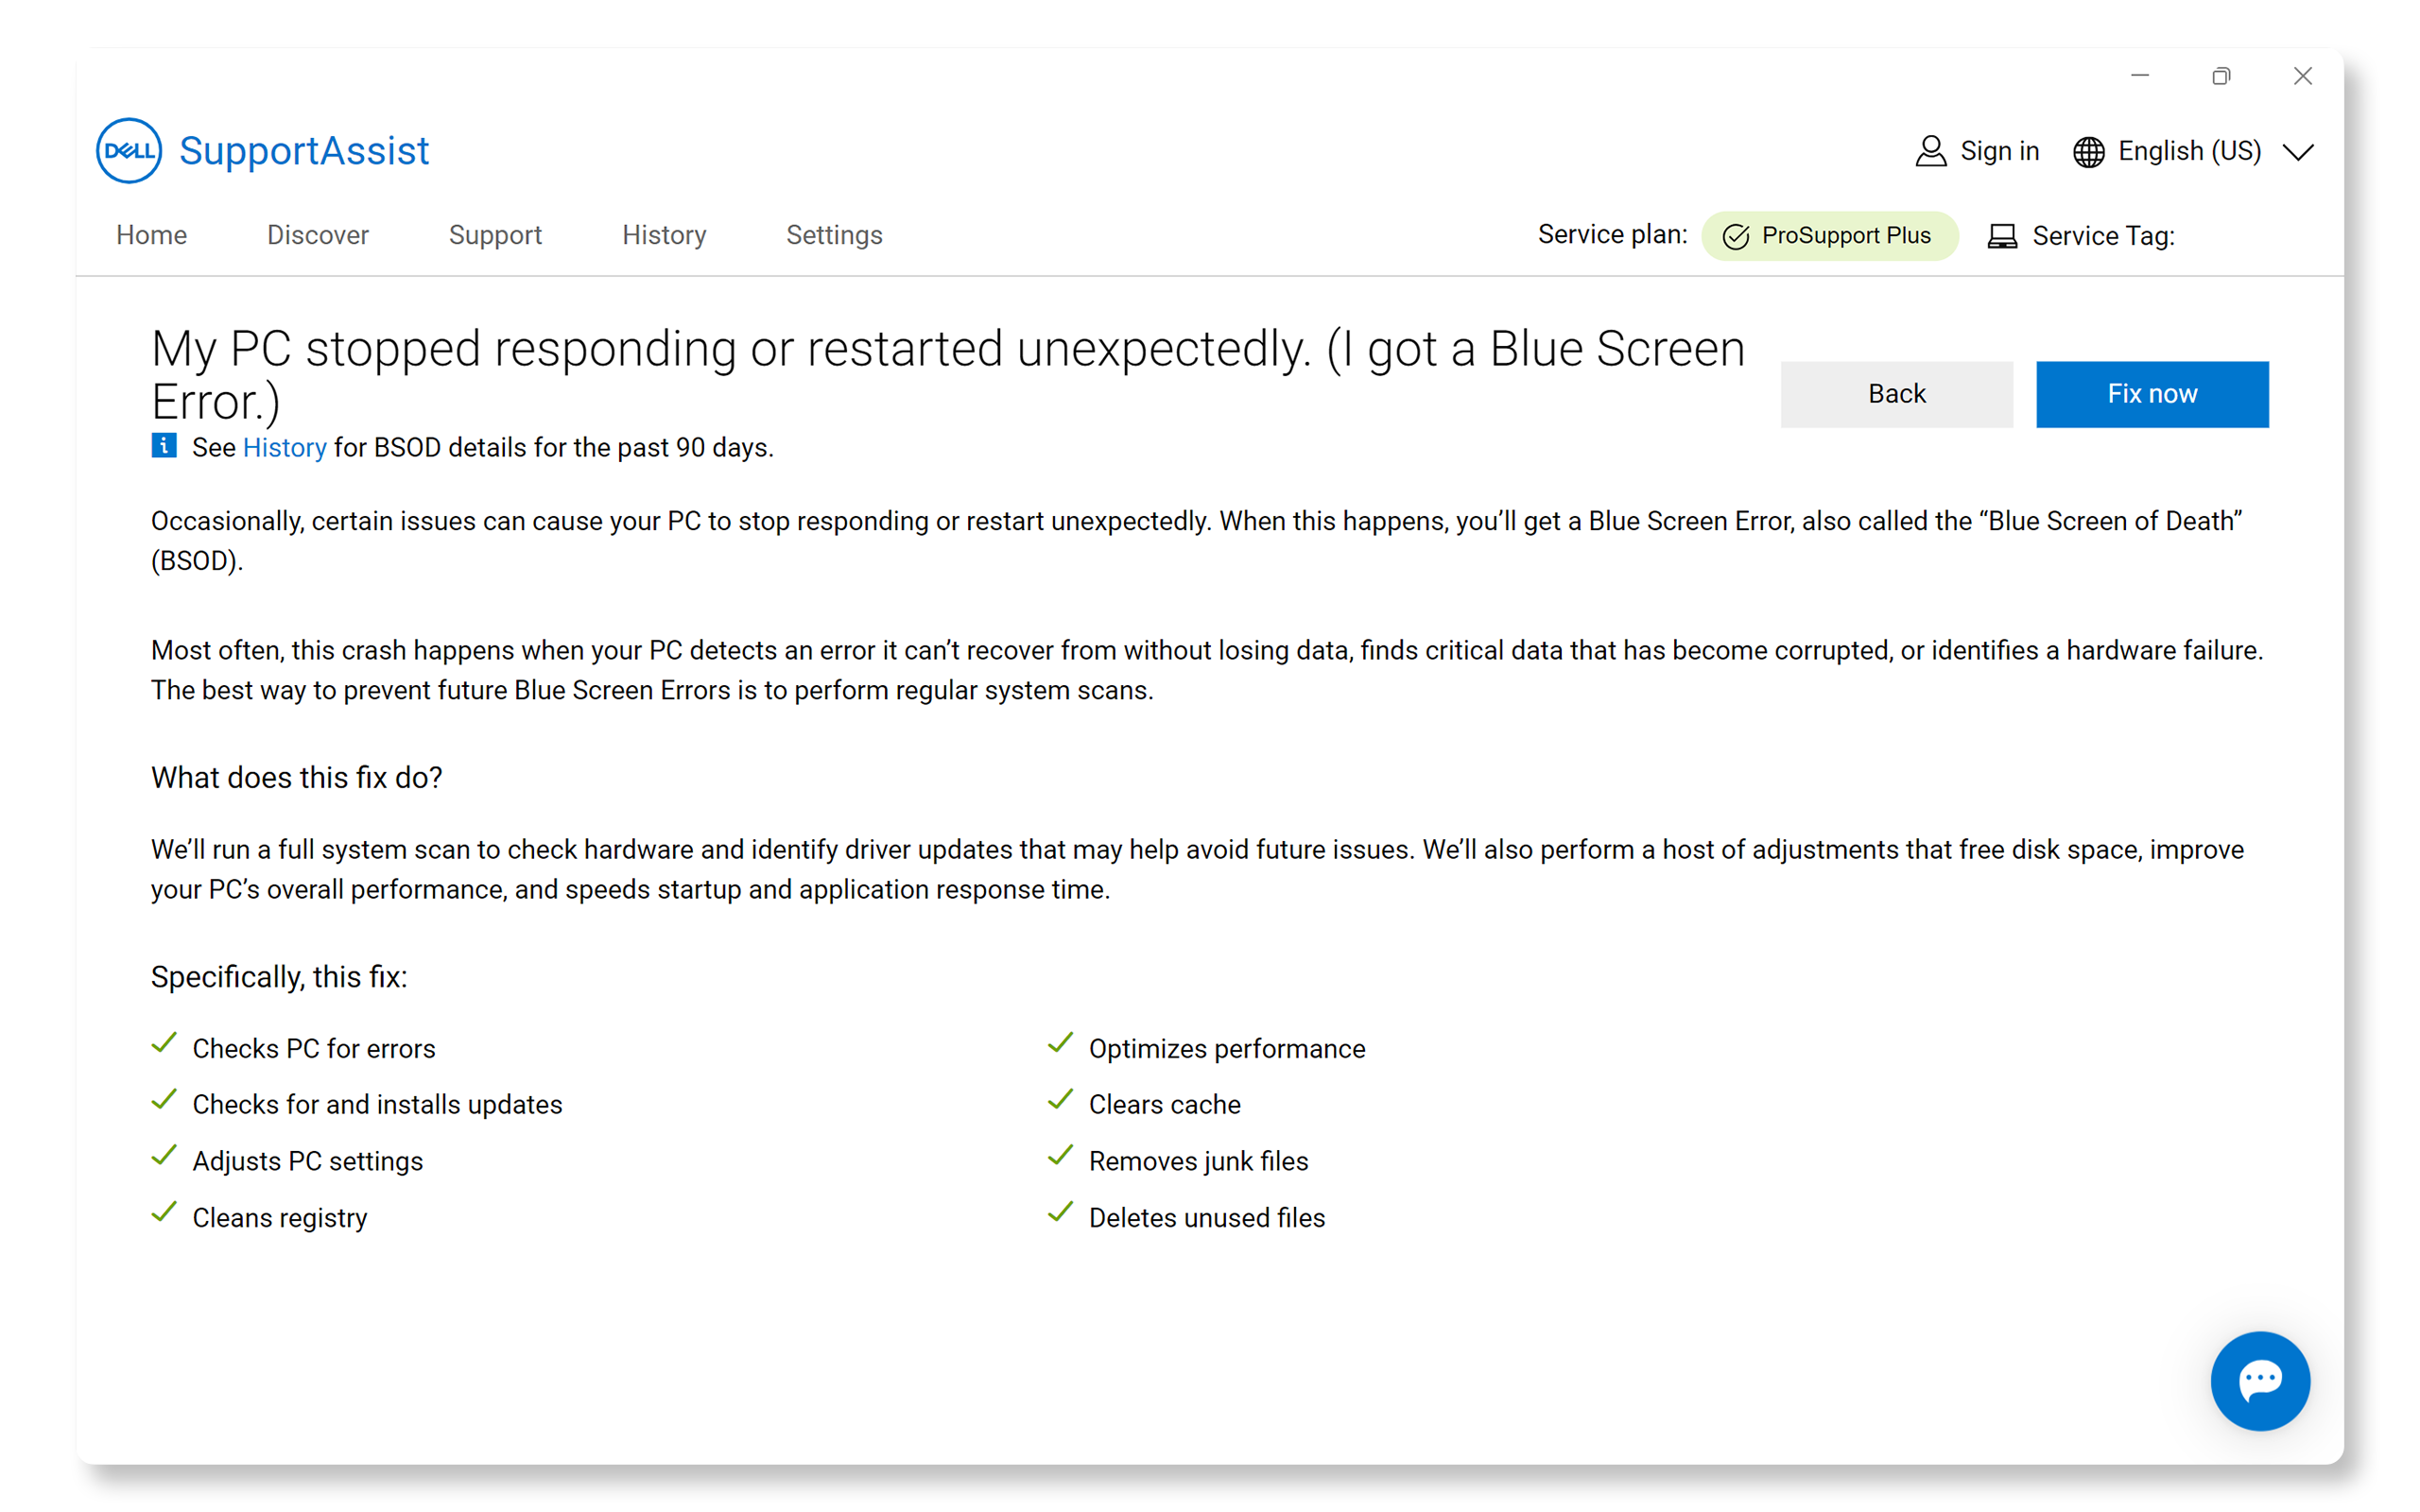
Step 5: Running SupportAssist Blue Screen Troubleshooter
Use SupportAssist to run an automated repair. It will scan your computer to check for hardware problems and find driver updates that can help prevent future issues. If your computer cannot boot into Windows, go to the next step.
- Search for and open SupportAssist, then go to the Support tab.
- Under View Common Issues, select Get Started.
- Under My PC stopped responding or restarted unexpectedly, choose Fix my PC.
- Click the Fix now button to let SupportAssist scan your computer and run an automated repair.
Step 6: Repairing Windows Startup Files
If your computer shows a Blue Screen (BSOD) and won't start Windows, try using Windows Startup Repair. It might fix the problem and help your computer start up again.
- Force shutdown by holding the power button
- Create a boot interruption sequence: Turn on your computer, and when the Windows logo appears, hold the power button to force shutdown. Repeat this process twice more.
- Access Windows Recovery Environment: On the third startup attempt, allow the system to boot fully into the Automatic Repair screen
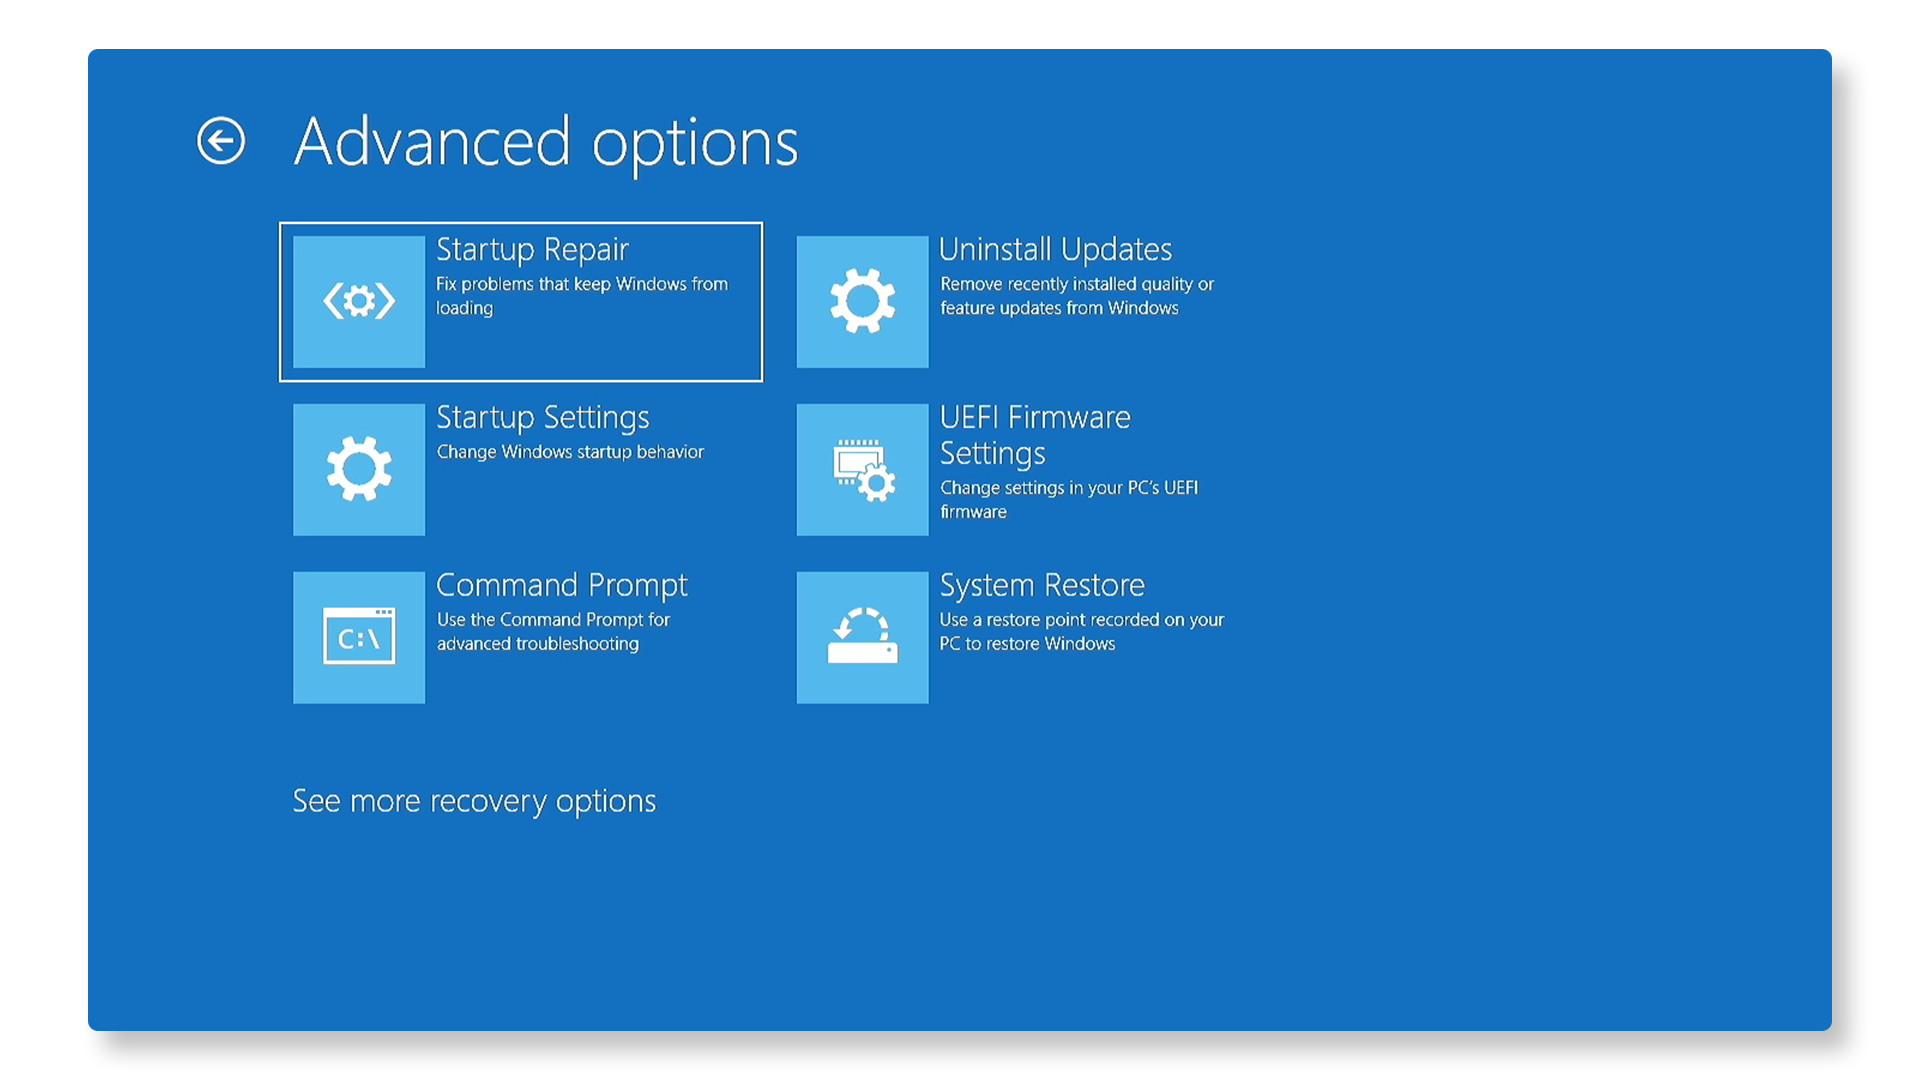
- Select "Advanced Options"
- Navigate to Troubleshoot > Advanced Options > Startup Repair
- Complete the repair process following on-screen instructions
If BitLocker encryption is enabled, you'll need your recovery key, available at account.microsoft.com under Devices.
Step 7: Repairing Windows Using SupportAssist OS Recovery
Sometimes corrupted system files can cause Blue Screen (BSOD) errors. Software repair automatically runs a conditional two-step process to find and fix boot issues. If SupportAssist is not available, try some additional steps to fix common Blue Screen errors.
- Restart your computer and press F12 during startup
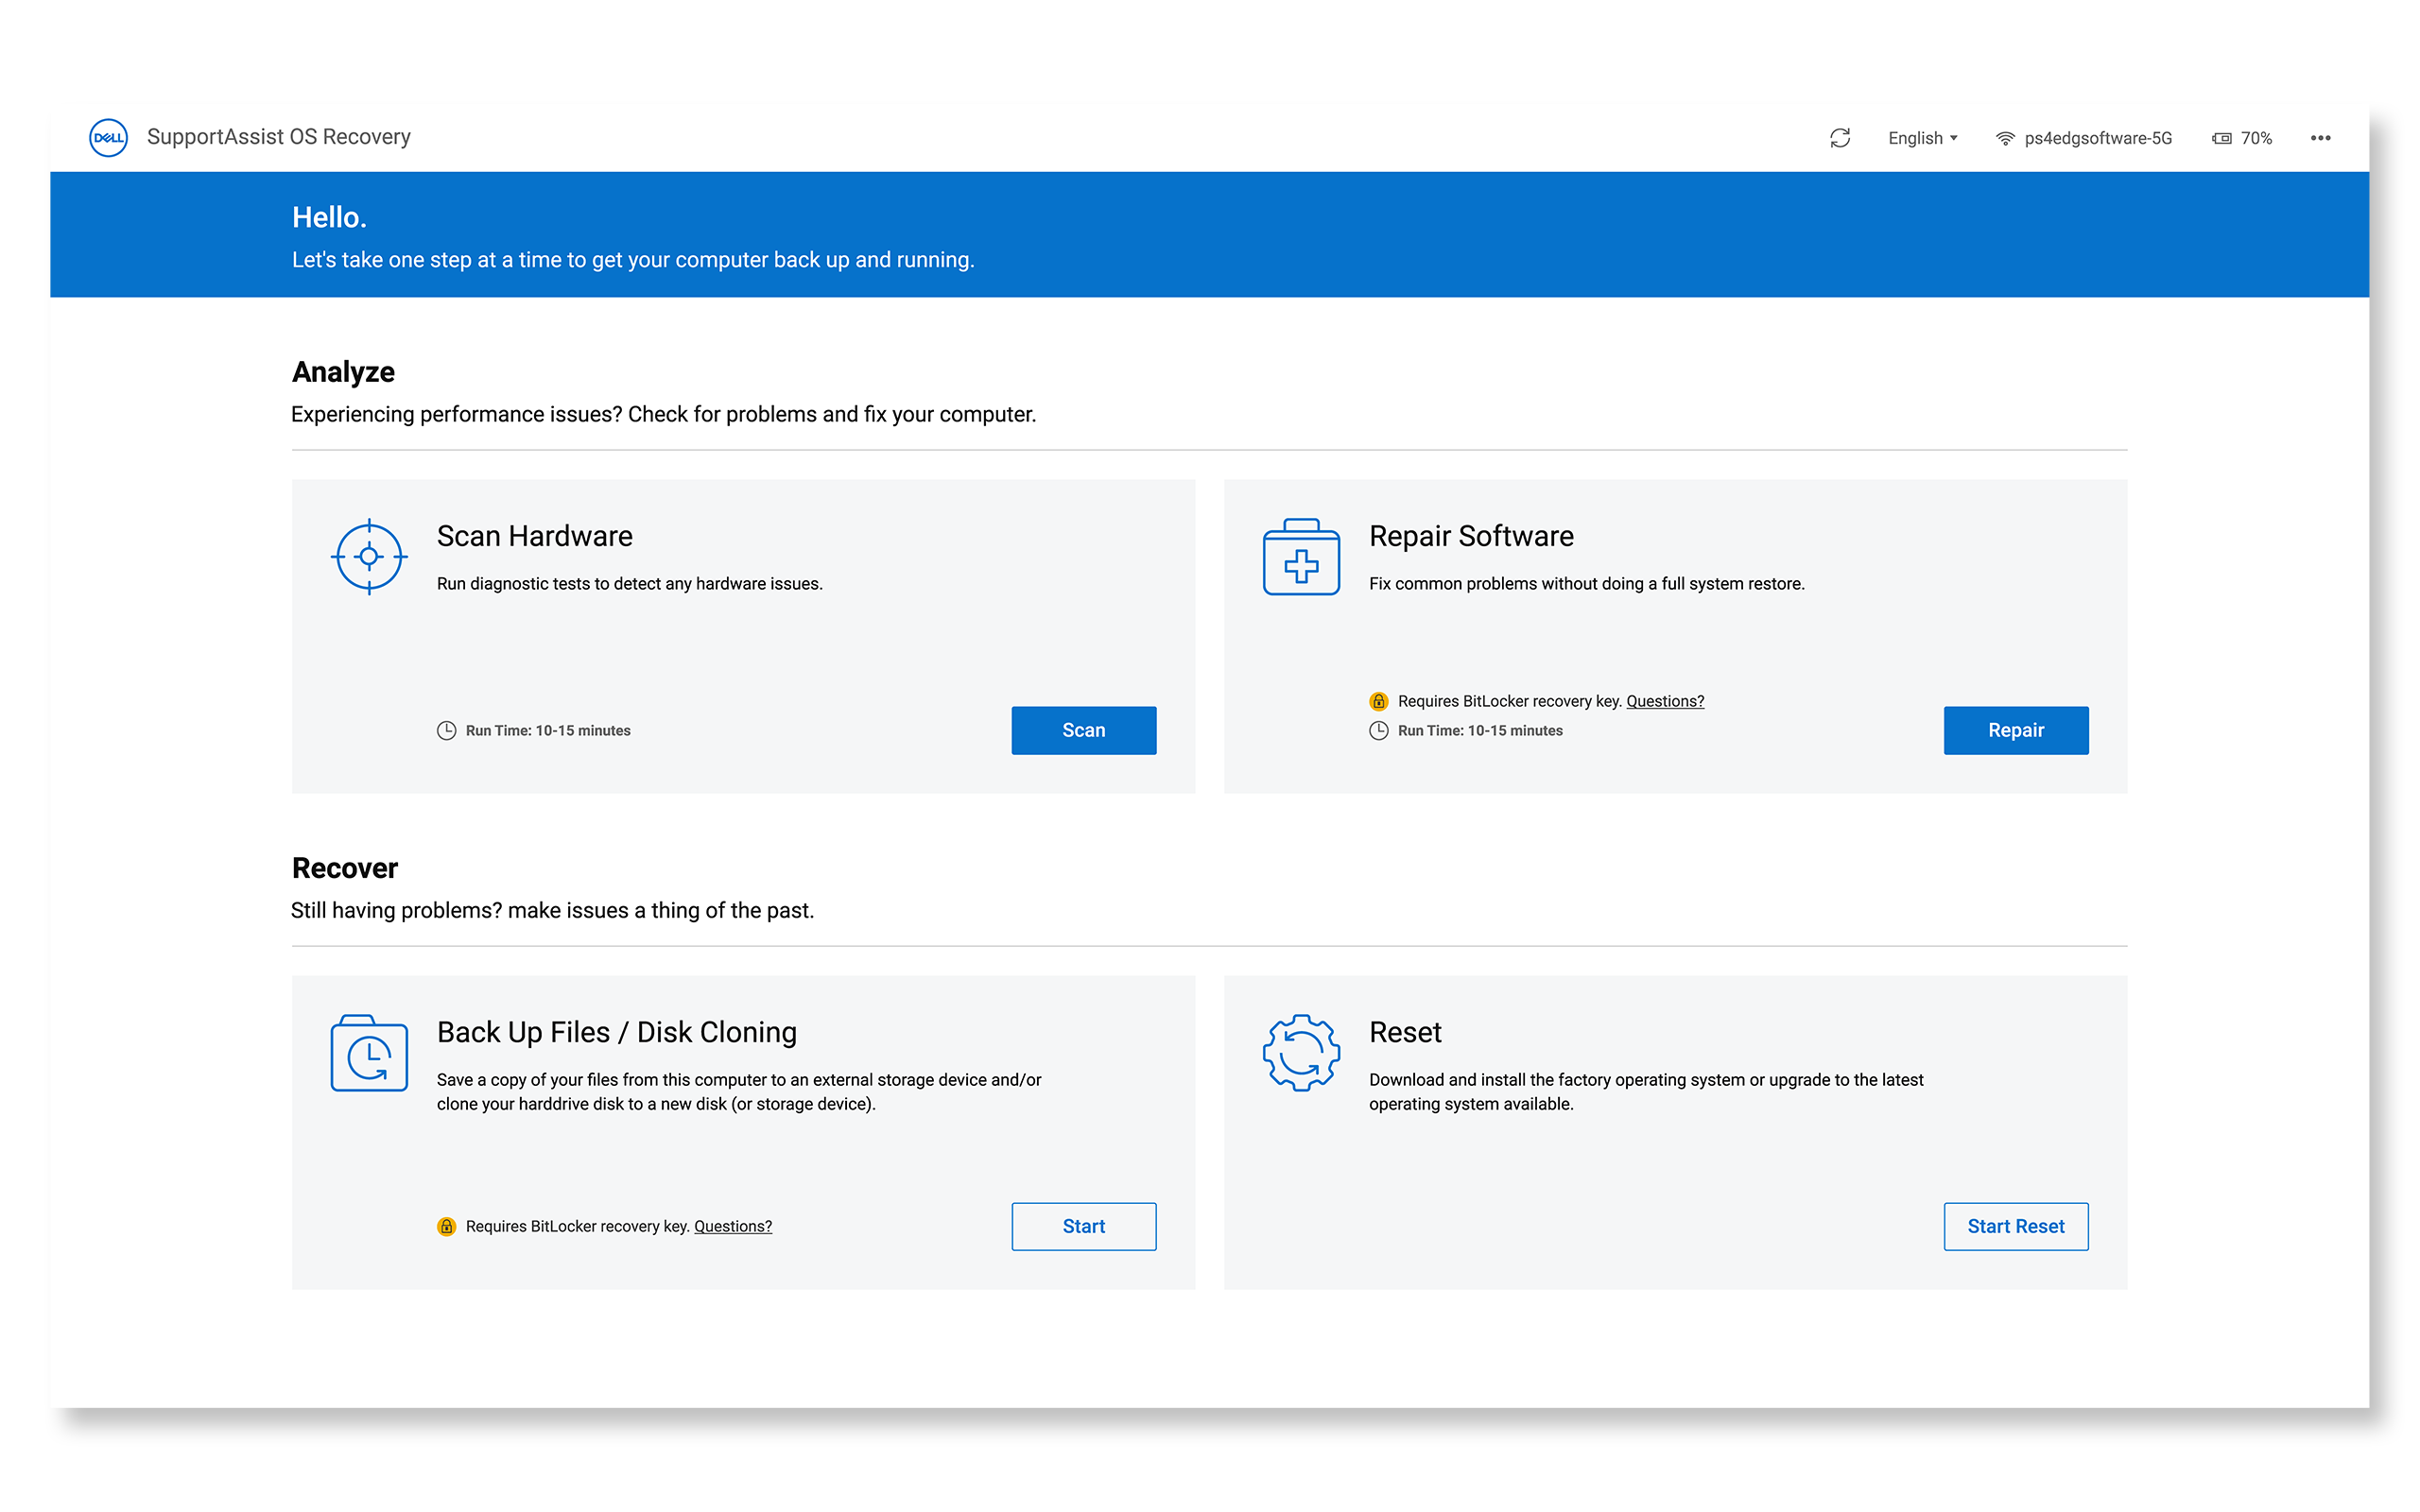
- Select "SupportAssist OS Recovery" from the boot menu
- Choose "Repair" from the software repair options
- Enter BitLocker recovery key if prompted
- Select "Start Repair" and monitor the progress
- Restart after completion
If your computer still won't start Windows after using the repair option in SupportAssist OS Recovery, try these additional steps to fix common Blue Screen errors.
Preventive Measures (When Windows Boots Successfully)
If your computer boots into Windows at any point, follow these steps to prevent blue screen (BSOD) errors:
Updating BIOS and Drivers
Outdated drivers or BIOS can cause boot problems. Updating drivers and BIOS ensure compatibility with the latest operating system updates and fixes known issues. SupportAssist is Dell's automated tool that scans your Windows computer for driver and firmware updates, downloads, and installs them.
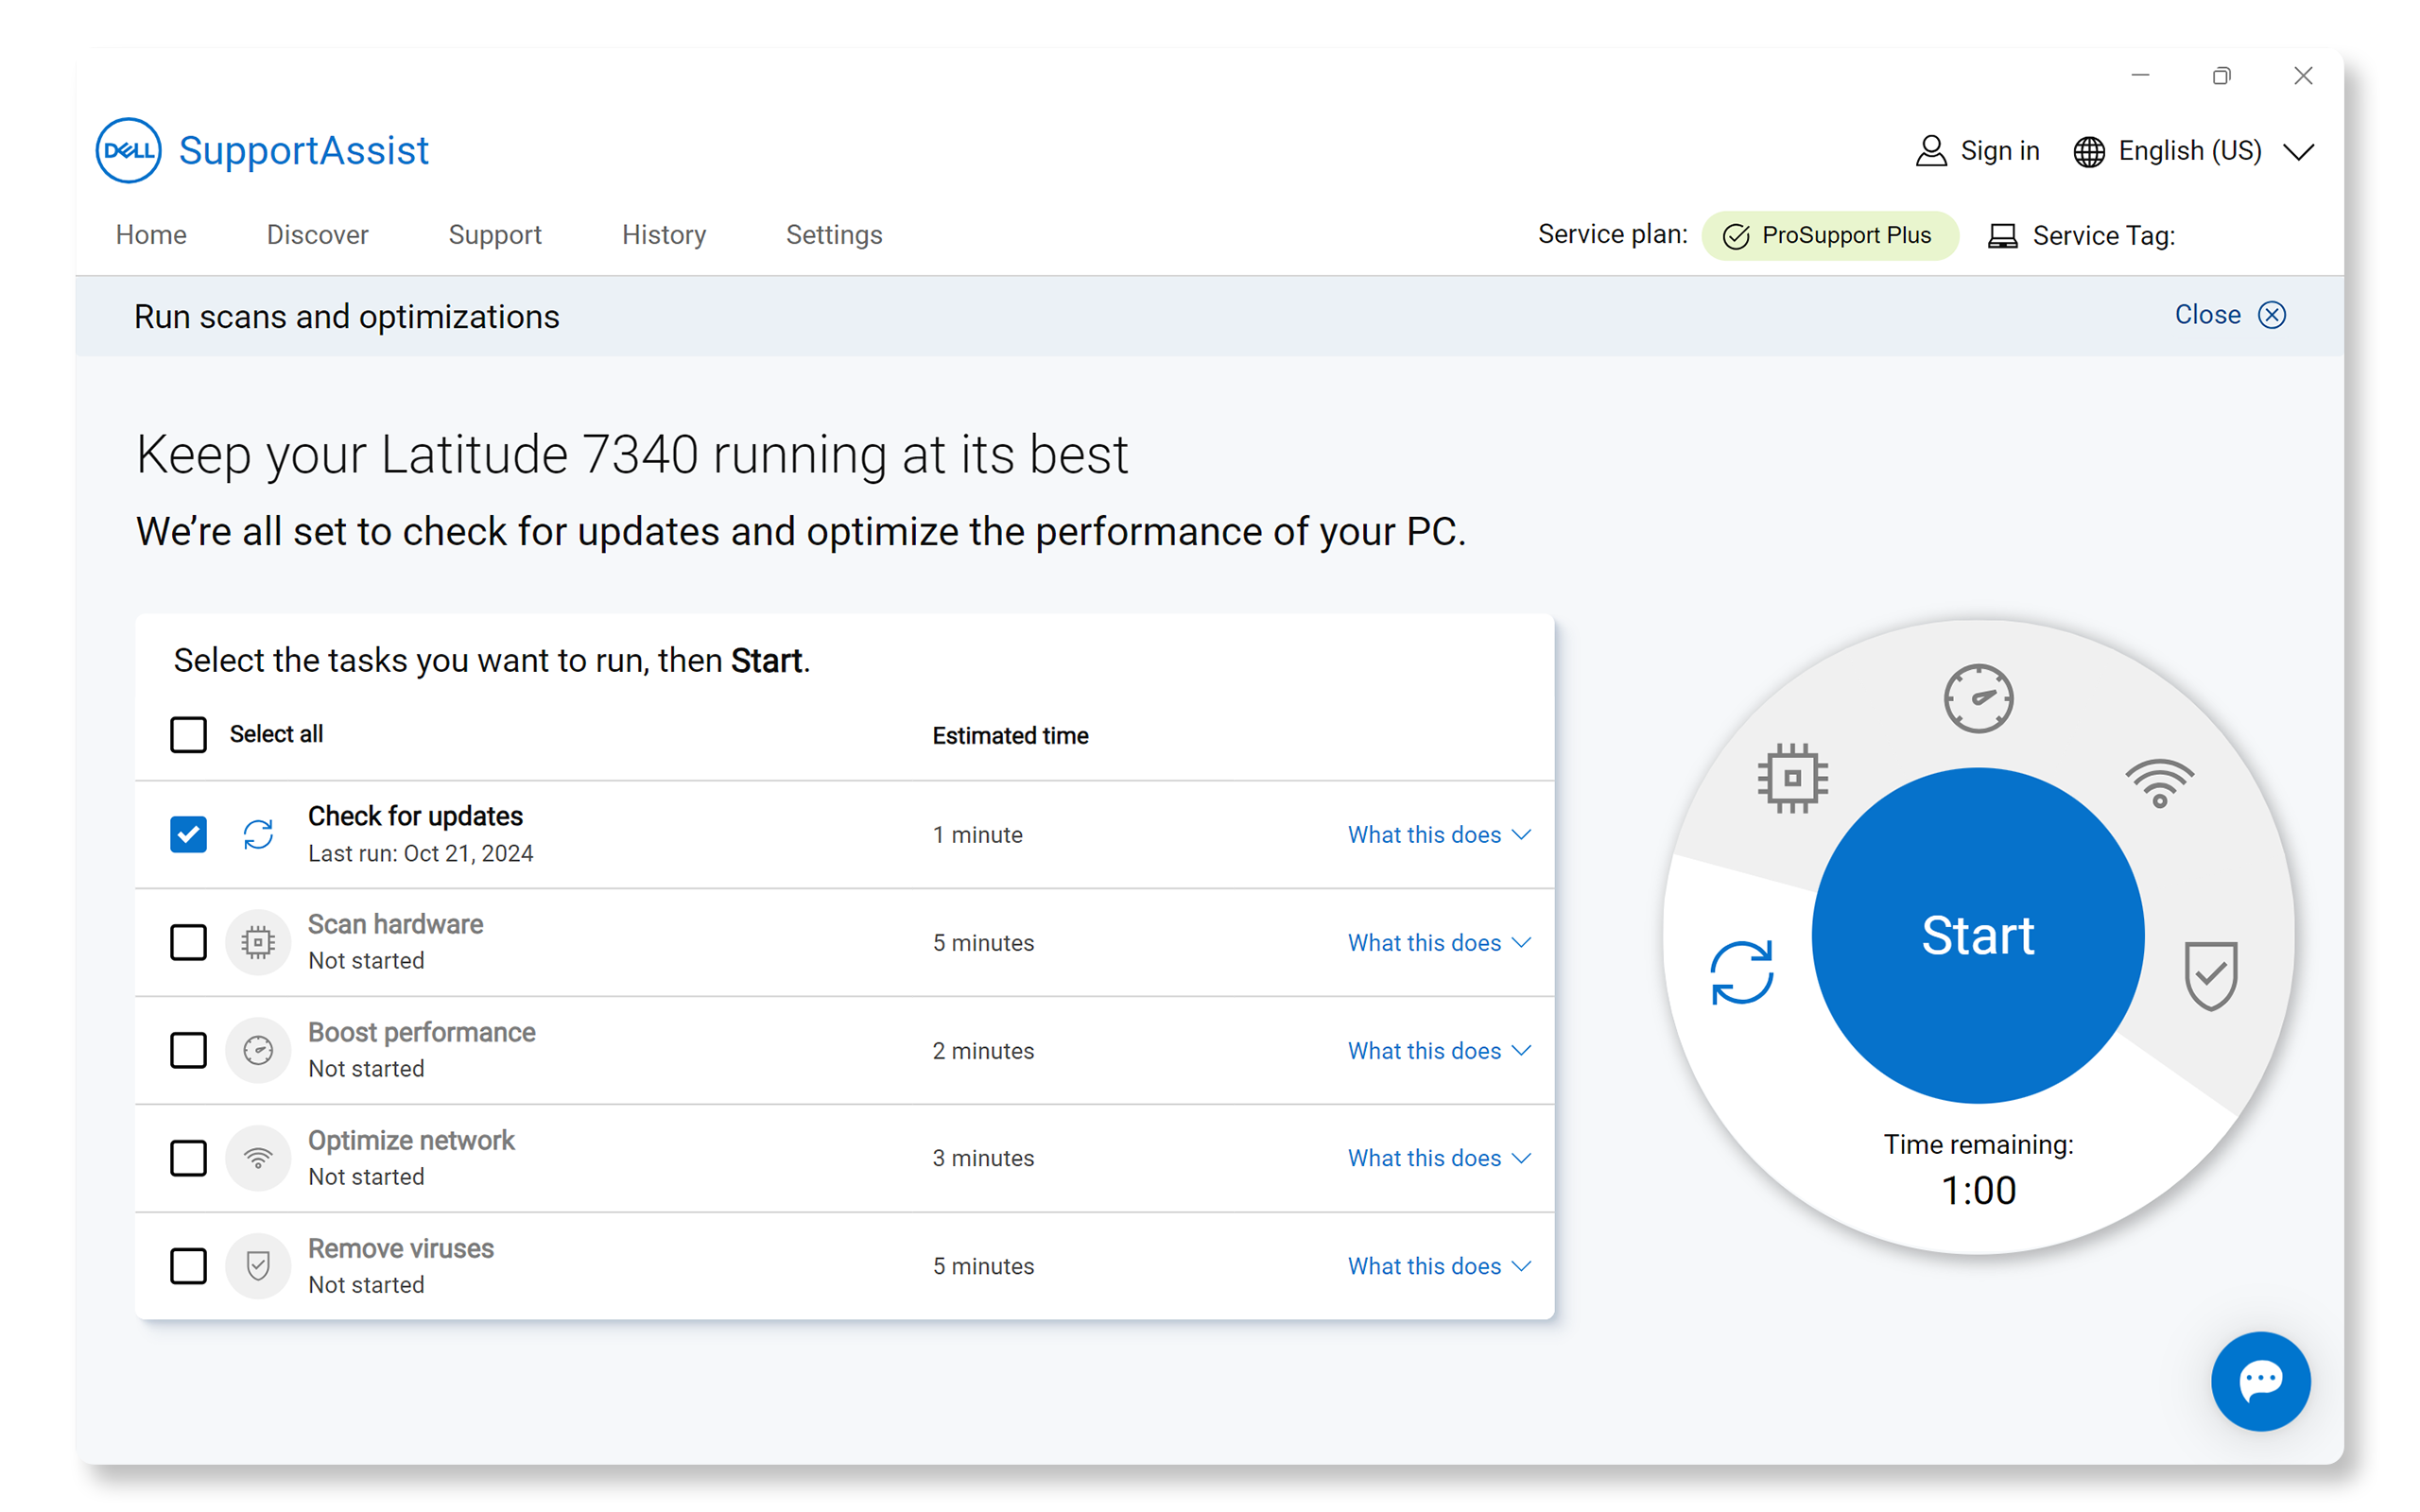
- Search for SupportAssist in the Start menu and open the app.
- On the Home tab, select Update software.
- Select Start to check for driver and BIOS updates.
- Follow the on-screen instructions to complete the installation and restart your computer if prompted.
If you don't have SupportAssist, refer to our driver update guide for alternative methods to download and install Dell drivers.
Checking for Software Updates
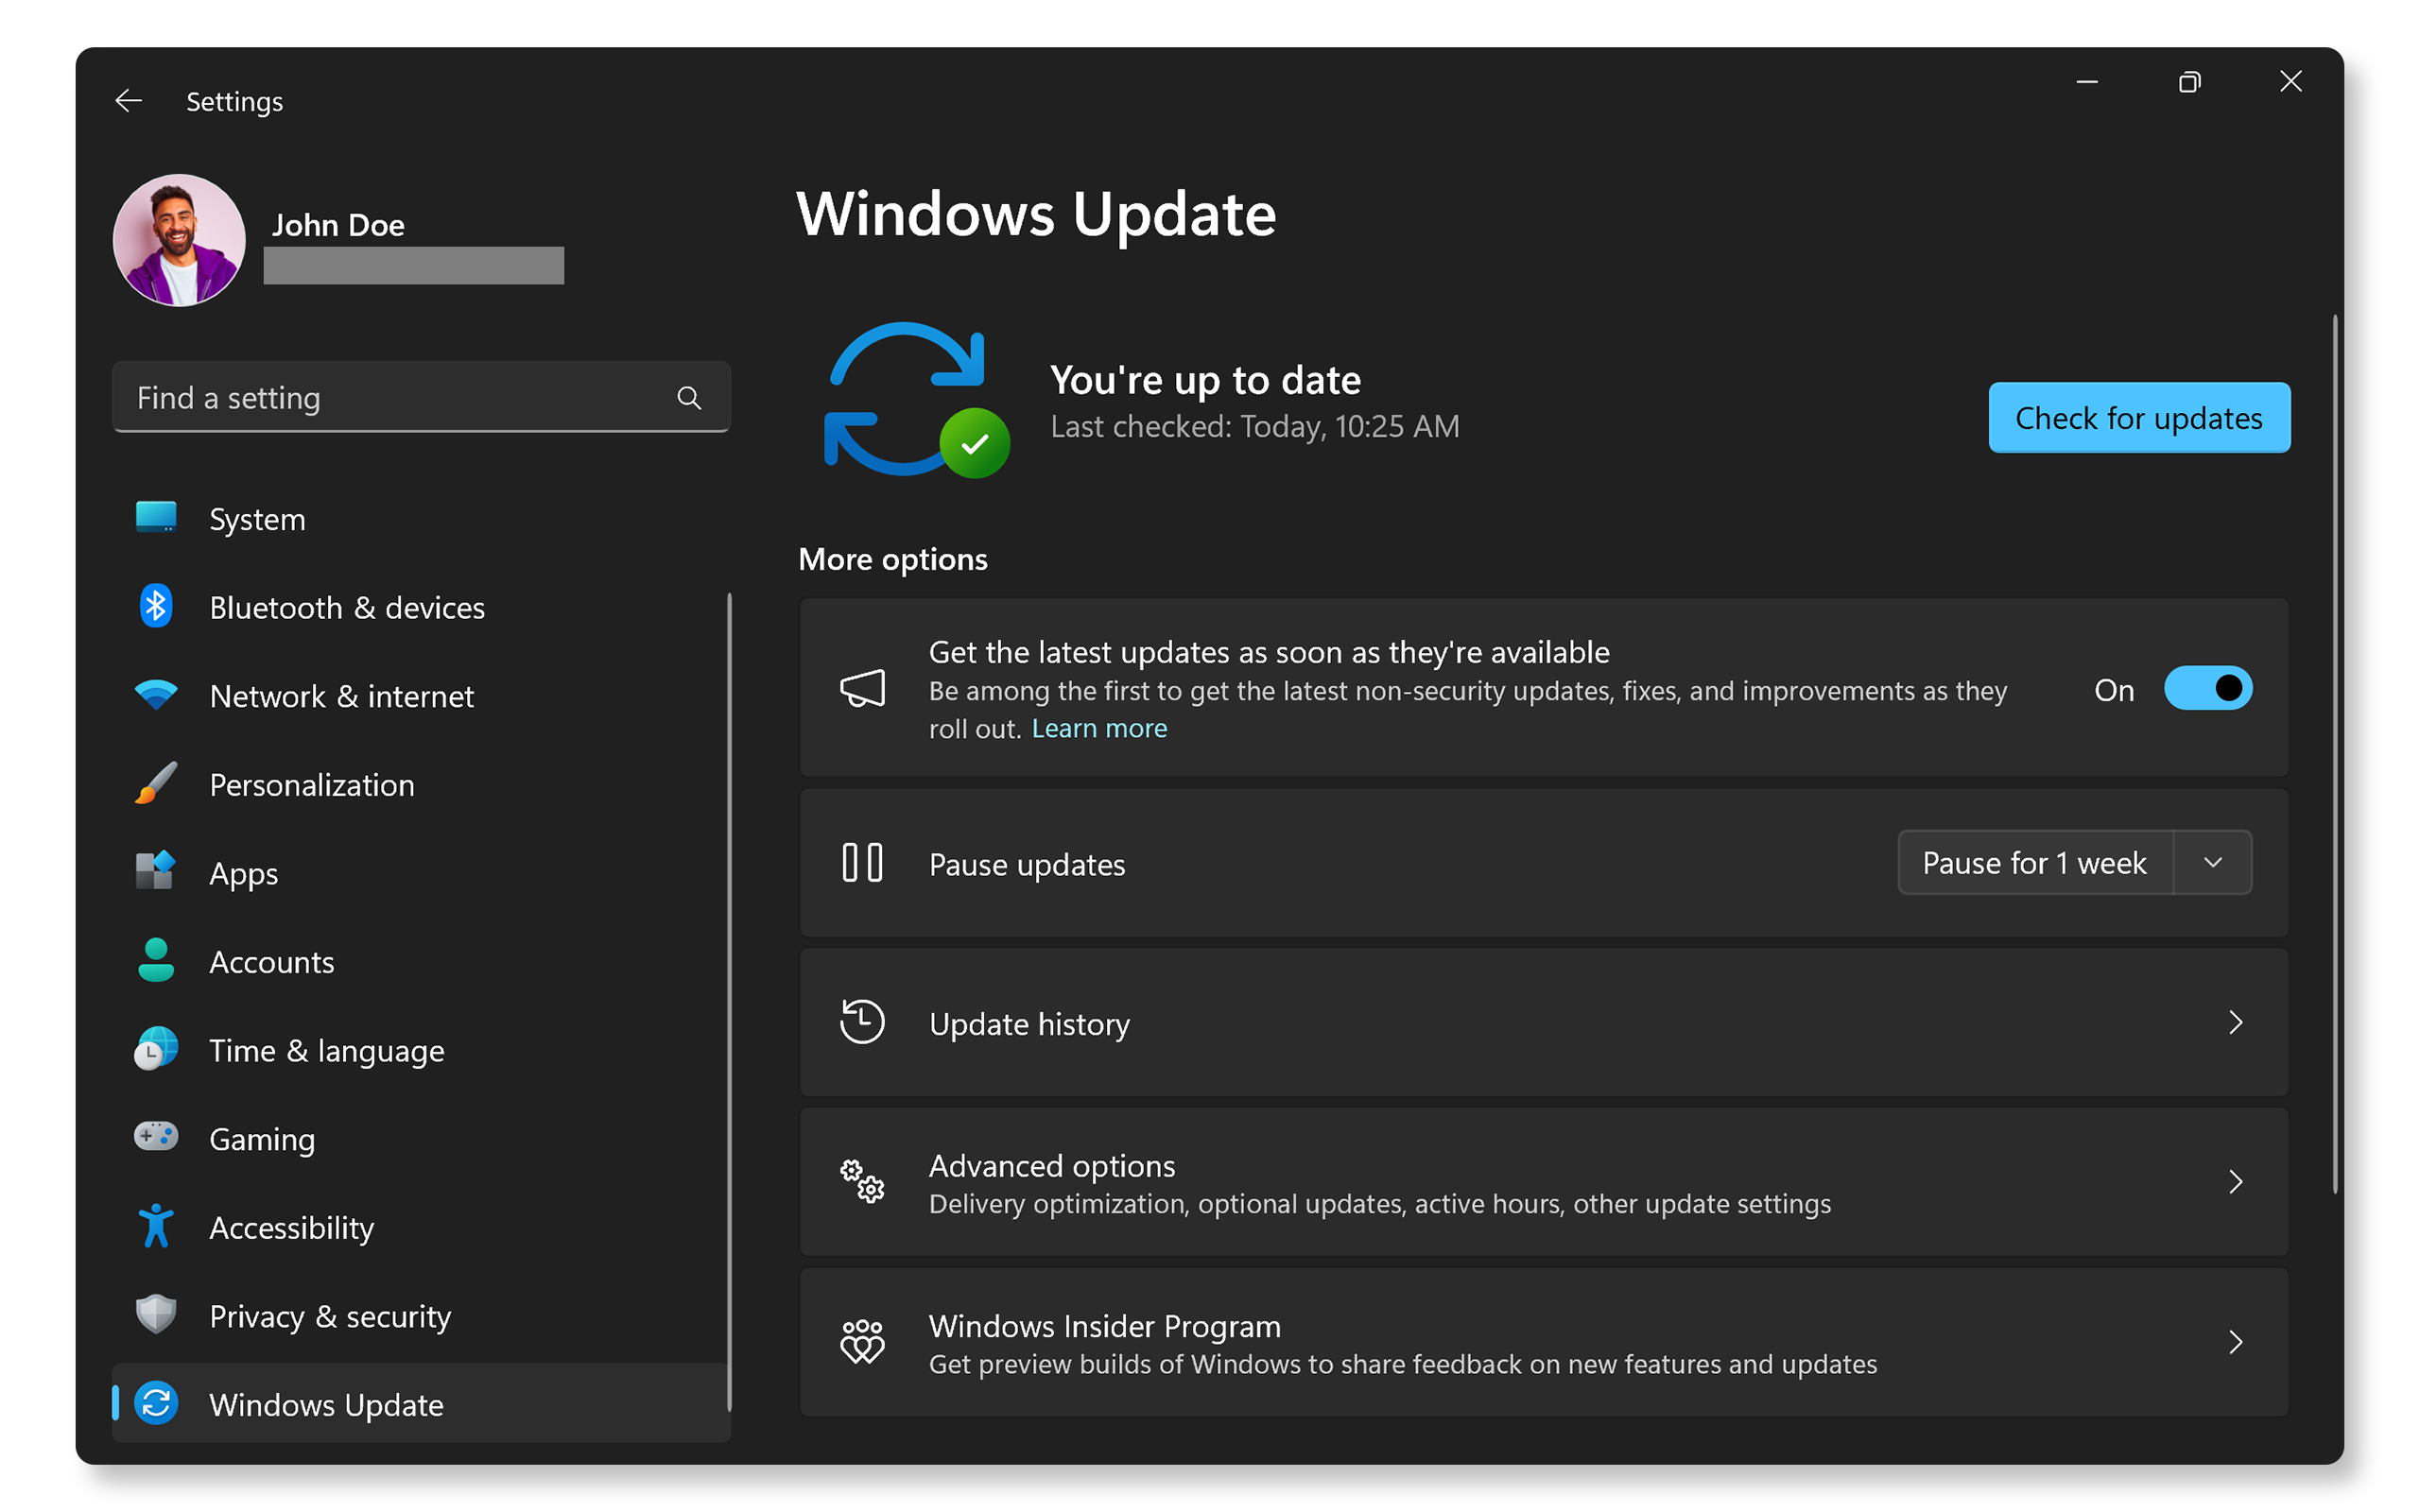
Keep your operating system and applications up to date to benefit from bug fixes and performance enhancements. To update Windows:
- Go to Start > Settings > Windows Update and then click Check for updates and install any available updates. Open Windows Update settings.
Repairing Windows System Files
The Deployment Image Servicing and Management (DISM) tool checks and repairs Windows system files. Let's run the restore health command to repair any corrupt system files.
- Press Windows key + X to open the Power User menu.
- Click Windows PowerShell (Admin) or Command Prompt (Admin).
- If prompted by User Account Control, click Yes to allow administrative access.
- In the command window, type the following command and press Enter:
DISM /Online /Cleanup-Image /RestoreHealth - Wait for the scan to complete (this may take 10-30 minutes depending on your system).
- When complete, you'll see a message indicating whether any issues were found and repaired.
- Restart the computer.
Note: Make sure you have an active internet connection during this process, as DISM may need to download files from Microsoft's servers.

Frequently Asked Questions (FAQs)
Here are some frequently asked questions about Blue Screen or BSOD errors on Windows computers.
1. What are some common Blue Screen (BSOD) errors?
- Here are a few common BSOD or Blue Screen errors that you might encounter in Windows:
- PAGE_FAULT_IN_NONPAGED_AREA. STOP Code: 0x00000050. This error occurs when Windows tries to access a page of memory that is not present. It can be caused by faulty hardware, such as RAM, or by a corrupted NTFS volume.
- IRQL_NOT_LESS_OR_EQUAL. STOP Code: 0x0000000A. This error indicates that a kernel-mode driver tried to access pageable memory at a process IRQL that was too high. It is often caused by faulty drivers or hardware issues.
- SYSTEM_SERVICE_EXCEPTION. STOP Code: 0x0000003B. This error occurs when a system service, such as a driver or a system process, causes an exception. It can be due to incompatible or outdated drivers, or software conflicts.
- DRIVER_IRQL_NOT_LESS_OR_EQUAL. STOP Code: 0x000000D1. This error is caused by a driver trying to access an invalid memory address while running at a high IRQL. It is often due to faulty or incompatible drivers.
- INACCESSIBLE_BOOT_DEVICE. STOP Code: 0x0000007B. This error indicates that Windows cannot access the system partition during startup. It can be caused by corrupted boot files, faulty hardware, or incorrect BIOS settings.
- BAD_POOL_HEADER. STOP Code: 0x00000019. This error occurs when the pool header is corrupted. It can be due to faulty drivers, hardware issues, or software conflicts.
- SYSTEM_THREAD_EXCEPTION_NOT_HANDLED. STOP Code: 0x0000007E. This error occurs primarily due to outdated, incompatible, or faulty drivers.
- WHEA_UNCORRECTABLE_ERROR. STOP Code: 0x00000124. This error is mostly due to corrupt hardware and heat or voltage issues. It can also be triggered by driver issues or faulty system files.
- UNMOUNTABLE_BOOT_VOLUME. STOP Code: 0x000000ED. This error occurs when Windows cannot load correctly from the boot drive. It is often encountered during system startup.
2. How do I find out what caused the BSOD?
- You can use the Event Viewer in Windows or Windows Debugger to analyze crash dump files. These tools provide details about the error, which can help identify the cause.
3. How do I use Event Viewer to troubleshoot a BSOD?
- To use Event Viewer:
- Type “Event Viewer” in the search bar and open it.
- Navigate to Windows Logs > System.
- Look for critical errors that occurred around the time of the BSOD.
4. What is a minidump file?
- A minidump file is a small file created by Windows when a BSOD occurs. It contains information about the crash, which can be used for troubleshooting. You can view these files using tools like Windows Debugger.
5. How do I update my drivers to prevent BSODs?
- Update drivers in Windows using Dell apps like SupportAssist, Dell Update, Alienware Update, or Dell Command Update. One of these apps should already be on your Dell computer.
6. How do I disable automatic restart on a BSOD?
- To disable automatic restart:
- Go to Control Panel > System and Security > System.
- Click on Advanced system settings.
- Under Startup and Recovery, click Settings.
- Uncheck Automatically restart and click OK.
7. What should I do if my computer keeps getting BSODs?
- If your computer frequently encounters BSODs, try the following steps:
- Update drivers and Windows.
- Check for hardware issues.
- Run a full virus scan.
- Consider resetting or reinstalling Windows if the Blue Screen error persists.
8. Can a BSOD damage my computer?
- A BSOD itself doesn’t damage your computer, but the underlying issue causing the BSOD can potentially harm your system's hardware if not addressed. For example, overheating can damage components over time.
9. Can overheating cause a BSOD?
- Yes, overheating can cause hardware components to fail, leading to a BSOD. Ensure your computer is well-ventilated and clean of dust to prevent overheating.
10. Can a BSOD be caused by a software update?
- Yes, sometimes software updates can introduce bugs or conflicts that cause BSODs. If you suspect this, you can uninstall the update or use System Restore to revert to a previous state.
11. How do I resolve "INACCESSIBLE_BOOT_DEVICE" error?
- This error occurs when your computer's storage settings don't match what Windows expects. Here's how to fix it:
- Restart your computer and press F2 repeatedly to enter BIOS.
- Locate "SATA Operation" in the settings and change it to the opposite setting:
- If it shows "RAID On", change it to "AHCI"
- If it shows "AHCI", change it to "RAID On"
- Save the changes and exit BIOS/UEFI.
- If this doesn't work, restore BIOS defaults and then reinstall Windows.
12. What is the difference between a BSOD and a system freeze?
- A BSOD is a critical error that forces Windows to stop and display a Blue Screen, while a system freeze is when the computer becomes unresponsive but doesn’t display a BSOD. Freezes can be caused by similar issues but may not generate a STOP code.
13. How do I perform a clean boot to troubleshoot a BSOD?
- To perform a clean boot:
- Type “msconfig” in the search bar and open System Configuration.
- Go to the Services tab, check Hide all Microsoft services, and click Disable all.
- Go to the Startup tab and click Open Task Manager. Disable all startup items.
14. Should I reinstall Windows if BSODs persist?
- Reinstalling Windows can fix persistent BSOD issues caused by corrupted system files. However, this should be a last resort after trying other troubleshooting steps.
15. What if none of the troubleshooting steps work?
- Additional Troubleshooting: Follow these additional steps on Blue Screen troubleshooting.
- Use Dell Community Forums: Join the Dell Community Forums to get help from other users.
- Contact Dell Support: If the issue persists, contact Dell Technical Support for repair options based on your device’s warranty status.

