BIOS Settings to Allow PXE Boot on Certain Dell Latitude Laptops
Summary: This article serves as a guide to configure the BIOS settings to allow for PXE boot on certain Dell Latitude laptops.
This article applies to
This article does not apply to
This article is not tied to any specific product.
Not all product versions are identified in this article.
Symptoms
How to Access the BIOS or UEFI (also known as System Setup)?
To access the BIOS or UEFI on a Dell computer, press the F2 key several times at the Dell logo screen during startup.
Alternatively, you may press the F12 key several times at the Dell logo screen during startup and select BIOS Setup or System Setup from the menu.
Once you are in BIOS screen, the following BIOS settings should be in place for PXE boot on Latitude laptops. There are different BIOS User Interfaces found on Latitude laptop depending on the model you use.
- Enable PXE boot in BIOS for Latitude 7x00 and 7x10
- Enable PXE boot in BIOS for Latitude 7x20 and 7x30
NOTE: Ensure that you have downloaded and installed the latest BIOS update available for your Latitude laptop from Dell Support | Drivers & Downloads website under the BIOS category.
Cause
Cause information is not available.
Resolution
Enable PXE boot in BIOS for Latitude 7x10 and 7x00
- Go to General > Boot Sequence, then select to enable Windows Boot Manager.

- Go to General > Advanced Boot Options, then select Enable UEFI Network Stack under:

- Since these newer Latitude laptop models do not have a NIC connection, check to enable Enable USB Boot Support under System Configuration >USB Configuration (Figure 3):

- Check to enable Thunderbolt, Enable Thunderbolt Boot Support, and Enable TBT (and PCIE behind TBT) Pre-boot Modules under System Configuration->Thunderbolt Adapter Configuration, even if you are not connecting to a Thunderbolt dock:

- Depending on how your PXE server is configured, it may be necessary to disable Secure Boot Enable under General->Secure Boot->Secure Boot Enable temporarily until after image deployment is complete (Figure 5):

- Under Post Behavior, Fastboot must be set to Thorough:

NOTE: Dell Docks that use Display-Link drivers (for example, the D6000 series and D3100) will not allow PXE boot. Drivers for these docks do not load in a pre-Windows environment. While Dell does not recommend you PXE boot through a dock connection, you can accomplish this using a USB Type-C to Ethernet dongle (such as Dell SKU# 470-ABND) to complete PXE boot.
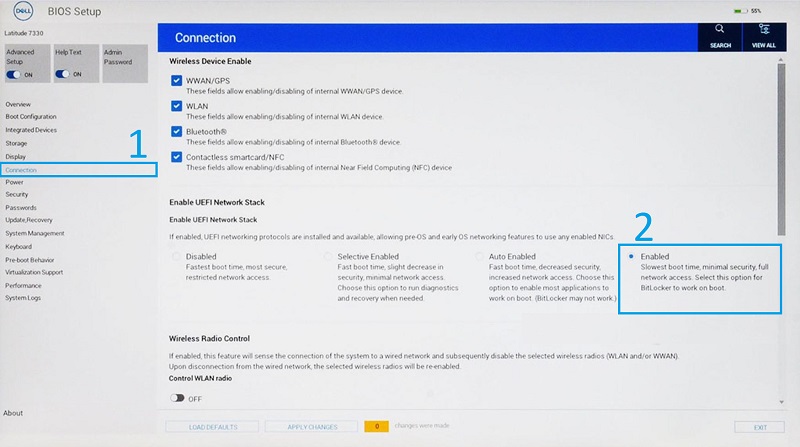
Enable PXE boot in BIOS for Latitude 7x20 and 7x30
- Select Connection, then ensure that Enable UEFI Network Stack is set to Enabled.
- Select Integrated Devices.
- Scroll-down to see USB/Thunderbolt Configuration, then select Enable USB Boot Support.

- Ensure that Enable Thunderbolt Boot Support is set to ON.
- Click Apply Changes to save changes.
Affected Products
Latitude 7200 2-in-1, Latitude 7210 2-in-1, Latitude 7300, Latitude 7310, Latitude 7320, Latitude 7320 Detachable, Latitude 7330, Latitude 7400 2-in-1, Latitude 7400, Latitude 7410, Latitude 7420, Latitude 7430, Latitude 7520, Latitude 7530Article Properties
Article Number: 000131551
Article Type: Solution
Last Modified: 22 May 2025
Version: 7
Find answers to your questions from other Dell users
Support Services
Check if your device is covered by Support Services.