Dell Networking Spectrum-X Cumulus Linux: Installing a New Image with ONIE
Summary: A Cumulus Linux image can be installed using ONIE, an open source project that enables the installation of network operating systems(NOS) on bare metal switches.
Instructions
Index
Install Using a DHCP/Web Server with Dynamic Host Configuration Protocol(DHCP) Options
Install Using a DHCP/Web Server without DHCP Options
Install Using FTP Without a Web Server
Introduction
A new Cumulus Linux image can be installed using Open Network Install Environment(ONIE), an open source project that enables the installation of different network operating systems (NOS) on bare metal switches.
Prior to installing Cumulus Linux, the switch can be in two different states:
- Switch is only running ONIE, Cumulus Linux not installed
- Cumulus Linux is on the switch, but would like to use ONIE to reinstall the same Cumulus Linux version or upgrade Cumulus Linux to a newer version.
NOTE: Installing a Cumulus Linux Image using ONIE does not retain the configuration files. The configuration files must be saved to a different location prior to the upgrade process.
The Cumulus Linux image can be downloaded from the Dell Networking support portal.
Install Using a DHCP/Web Server with Dynamic Host Configuration Protocol(DHCP) Options
With the DHCP 114 option configured on the DHCP/Web Server, the switch assigns an IP address, but has the details(option 114) to know the location and which Cumulus Linux image to retrieve. ONIE discovery attempts local file locations and then attempts to use the details provided in option 114.
NOTE: The most common way is to send DHCP option 114 with the entire URL to the web server (this can be the same server).
http://172.0.24.14/<filename>
However, there are other ways DHCP can be used even if the user does not have full control over DHCP. See the ONIE user guide for information about partial installer URLs and advanced DHCP options; both articles list more supported DHCP options.
Follow the steps below, while logged into the switch with a serial console (ONIE).
1. Power cycle or reboot the switch.
cumulus@Cumulus-U23:mgmt:~$ sudo reboot
cumulus@Cumulus-U23:mgmt:~$ sudo reboot

[sudo] password for cumulus:

Broadcast message from root@Cumulus-U23 on pts/1 (Fri 2025-10-03 14:24:20 UT                             C):

The system will reboot now!
2. Interrupt the boot process using <ESC>.

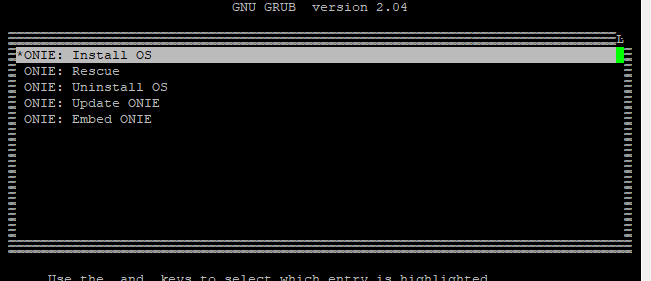
3. Use the arrow keys to select the ONIE option.
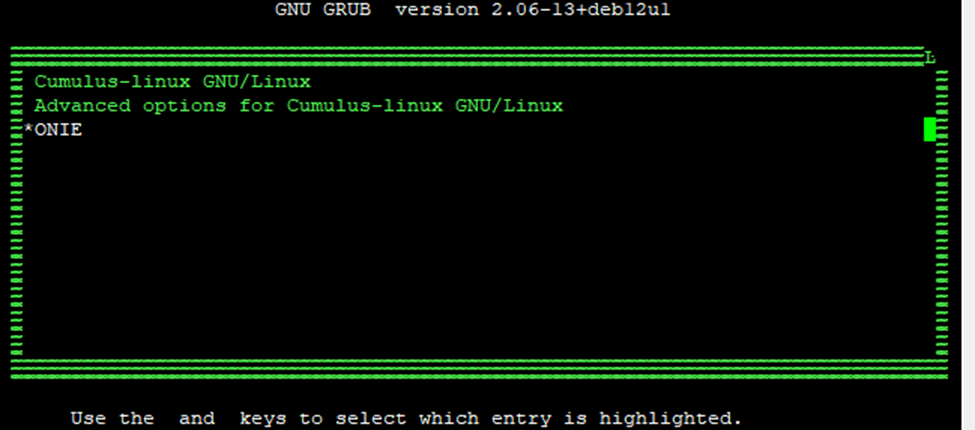
4. Use the arrow keys to select the ONIE: Install OS option.
5. The switch enters ONIE: Install mode and into ONIE discovery mode(default:enabled). ONIE discovery attempts local file locations and then attempts to use the details provided in option 114.
ONIE: OS Install Mode ...
Platform  : x86_64-mlnx_x86-r0
Version   : 2022.08-5.3.0010-115200
Build Date: 2023-02-08T13:51+02:00
[    2.255370] tpm tpm0: [Firmware Bug]: TPM interrupt not working, polling instead

<output truncated>

Please press Enter to activate this console. Info: eth0:  Checking link... up.
Info: Trying DHCPv4 on interface: eth0
ONIE: Using DHCPv4 addr: eth0: 100.72.29.204 / 255.255.255.0
ONIE: Starting ONIE Service Discovery
Info: Attempting file://dev/sda7/onie-installer-x86_64-nvidia_sn5600-r0 ...
Info: Attempting file://dev/sda7/onie-installer-x86_64-nvidia_sn5600-r0.bin ...

<output truncated>

Info: Attempting file://dev/sda3/onie-installer-x86_64 ...
Info: Attempting file://dev/sda3/onie-installer-x86_64.bin ...
Info: Attempting file://dev/sda3/onie-installer ...
Info: Attempting file://dev/sda3/onie-installer.bin ...
Info: Attempting http://100.72.24.36/cumulus/onie-installer.bin ...
ONIE: Executing installer: http://100.72.24.36/cumulus/onie-installer.bin
CMS Verified OK
Verifying image checksum ...OK.
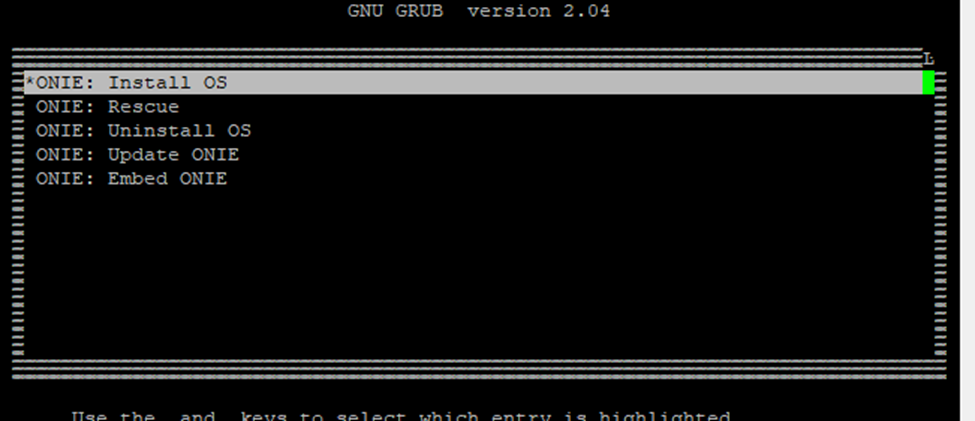
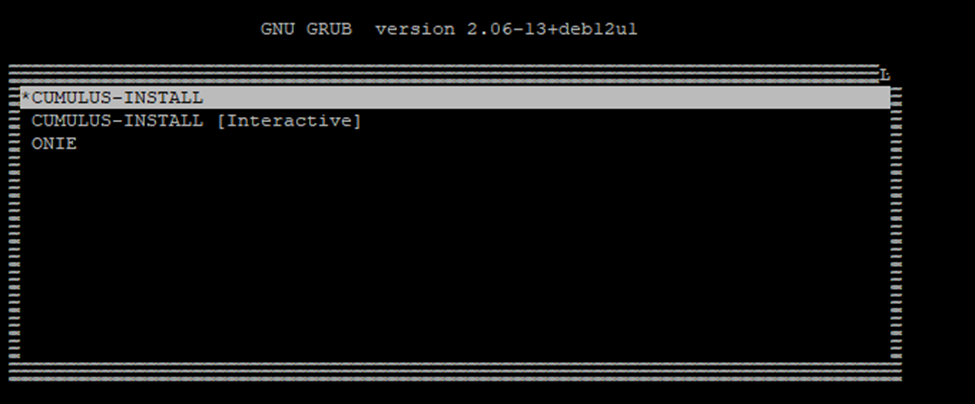
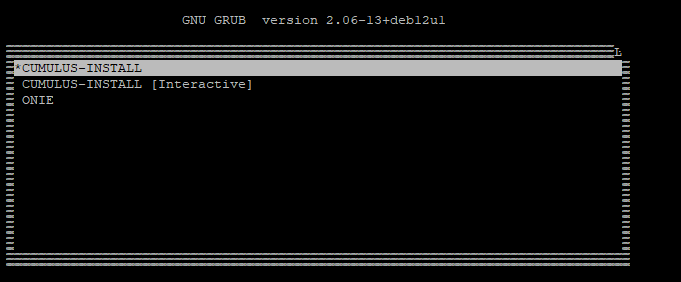
6. Switch reboots and enters GRUB>CUMULUS-INSTALL to complete the install.
7. The switch completes boot and prompts for the default username/pass. The switch requires that the default password be changed.
In Cumulus Linux 4.2 and later:
- Username:
cumulus - Password:
cumulus
In Cumulus Linux 4.1.x and earlier:
- Username:
cumulus - Password:
CumulusLinux!
8. Use nv show system image and nv show system version to view the Cumulus Linux version.
cumulus@cumulus:mgmt:~$ nv show system image
cumulus@cumulus:mgmt:~$ nv show system image

               operational
-------------  --------------------
current        1
next           1
partition1
  build-id     5.14.0.0068
  description  Cumulus Linux 5.14.0
  disk         /dev/sda5
  release      5.14.0
partition2
  build-id     5.14.0.0068
  description  Cumulus Linux 5.14.0
  disk         /dev/sda6
  release      5.14.0
cumulus@cumulus:mgmt:~$ nv show system version
cumulus@cumulus:mgmt:~$ nv show system version

                 operational
---------------  ----------------------------
onie             2022.08-5.3.0010-115200
kernel           6.1.0-cl-1-amd64
base-os          Debian GNU/Linux 12.11
product-release  5.14.0
image
  build-id       5.14.0.0068
  build-date     Wed Aug 06 12:24:00 UTC 2025
Install Using a DHCP/Web Server without DHCP Options
Without DHCP options, the switch assigns an IP address, but does not have the details(option 114) to know the location to retrieve the Cumulus Linux image. ONIE discovery attempts to reach out to different locations to locate the Cumulus Linux image.
Follow the steps below, with either option:
- Logging into the switch using a serial console (ONIE)
- Log in to the console or with ssh (Install from Cumulus Linux)
To install using serial console(ONIE), use the following procedure:
1. Power cycle or reboot the switch.
cumulus@Cumulus-U23:mgmt:~$ sudo reboot
cumulus@Cumulus-U23:mgmt:~$ sudo reboot

[sudo] password for cumulus:

Broadcast message from root@Cumulus-U23 on pts/1 (Fri 2025-10-03 14:24:20 UT                             C):

The system will reboot now!
2. Interrupt the boot process using <ESC>.

3. Use the arrow keys to select the ONIE option.

4. Use the arrow keys to select the ONIE: Install OS option.
5. The switch defaults into ONIE discovery mode. If secure boot is configured, the ONIE login prompt presents itself: username/pass=root/root.
To check the install status inspect /var/log/onie.log.

Try this:  tail -f /var/log/onie.log

** Installer Mode Enabled **
onie login:
onie login: root
Password: root
6. Without DHCP options, the switch assigns an IP address, but does not have the details(option 114) to know the location to retrieve the Cumulus Linux image. ONIE discovery attempts to reach out to different locations to locate the Cumulus Linux image. ONIE discovery can be disabled with the following command:
ONIE:~ # onie-discovery-stop
ONIE:~ # onie-discovery-stop
NOTICE: The 'onie-discovery-stop' command is deprecated and will be removed in 2019.02.
NOTICE: use 'onie-stop' instead.
discover: installer mode detected.
Stopping: discover... done.
ONIE:~ # Info: Trying DHCPv4 on interface: eth0
ONIE: Using DHCPv4 addr: eth0: 100.72.30.100 / 255.255.255.0
7. View the configured eth0 IP address or default gateway.
ONIE:~ # ifconfig
ONIE:~ # ifconfig

eth0      Link encap:Ethernet  HWaddr 22:25:73:F4:62:AE
          inet addr:100.72.30.100  Bcast:100.72.30.255  Mask:255.255.255.0
          inet6 addr: fe80::5e25:ffff:fef4:62ae/64 Scope:Link
          UP BROADCAST RUNNING MULTICAST  MTU:1500  Metric:1
          RX packets:5318 errors:0 dropped:0 overruns:0 frame:0
          TX packets:5608 errors:0 dropped:0 overruns:0 carrier:0
          collisions:0 txqueuelen:1000
          RX bytes:720853 (703.9 KiB)  TX bytes:593356 (579.4 KiB)
          Interrupt:16 Memory:a4600000-a4620000

lo        Link encap:Local Loopback
          inet addr:127.0.0.1  Mask:255.0.0.0
          inet6 addr: ::1/128 Scope:Host
          UP LOOPBACK RUNNING  MTU:65536  Metric:1
          RX packets:21 errors:0 dropped:0 overruns:0 frame:0
          TX packets:21 errors:0 dropped:0 overruns:0 carrier:0
          collisions:0 txqueuelen:1000
          RX bytes:2184 (2.1 KiB)  TX bytes:2184 (2.1 KiB)
ONIE:~ # iproute
ONIE:~ # iproute

default via 100.72.30.1 dev eth0
100.72.30.0/24 dev eth0  src 100.72.30.100
8. Use the onie-nos-install command to direct the switch to the location and file to load. The switch fetches and installs the Cumulus Linux image.
ONIE:~ # onie-nos-install
Usage: /bin/onie-nos-install <URL> [<INSTALLER_ARGS>]
URL types: http, ftp, tftp
ONIE:~ # onie-nos-install http://100.72.11.36/cumulus/cumulus-linux-5.14.0-mlx-amd64.bin
discover: installer mode detected.
Stopping: discover... done.
Info: Attempting http://100.72.11.36/cumulus/cumulus-linux-5.14.0-mlx-amd64.bin ...
Connecting to 100.72.11.36 (100.72.11.36:80)
installer 100% |*******************************| 786M 0:00:00 ETA
ONIE: Executing installer: http://100.72.11.36/cumulus/cumulus-linux-5.14.0-mlx-amd64.bin
CMS Verified OK
Verifying image checksum ...OK.
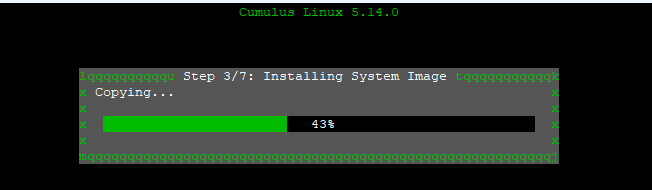
Preparing image archive ... OK.
Verifying image compatibility ...OK.
Verifying system ram ...OK.
9. The switch completes boot and prompts for the default username/pass. The switch requires that the default password be changed.
In Cumulus Linux 4.2 and later:
- Username:
cumulus - Password:
cumulus
In Cumulus Linux 4.1.x and earlier:
- Username:
cumulus - Password:
CumulusLinux!
10. Use nv show system image and nv show system version to view Cumulus Linux version.
cumulus@cumulus:mgmt:~$ nv show system image
cumulus@cumulus:mgmt:~$ nv show system image

               operational
-------------  --------------------
current        1
next           1
partition1
  build-id     5.14.0.0068
  description  Cumulus Linux 5.14.0
  disk         /dev/sda5
  release      5.14.0
partition2
  build-id     5.14.0.0068
  description  Cumulus Linux 5.14.0
  disk         /dev/sda6
  release      5.14.0
cumulus@cumulus:mgmt:~$ nv show system version
cumulus@cumulus:mgmt:~$ nv show system version

                 operational
---------------  ----------------------------
onie             2022.08-5.3.0010-115200
kernel           6.1.0-cl-1-amd64
base-os          Debian GNU/Linux 12.11
product-release  5.14.0
image
  build-id       5.14.0.0068
  build-date     Wed Aug 06 12:24:00 UTC 2025
To install using the console or with ssh (Install from Cumulus Linux), use the following procedure:
1. Use onie-install to initiate the Cumulus Linux image install using Cumulus Linux.
root@cumulus:mgmt:~# sudo onie-install -a -I http://x.x.x.x/<image name>
root@cumulus:mgmt:~#    sudo onie-install -a -i http://100.72.11.36/cumulus/cumulus-linux-5.13.1-mlx-amd64.bin

Fetching installer: http://100.72.11.36/cumulus/cumulus-linux-5.13.1-mlx-amd64.bin
Downloading URL: http://100.72.11.36/cumulus/cumulus-linux-5.13.1-mlx-amd64.bin
######################################################################### 100.0%

Success: HTTP download complete.
SecureBoot is enabled.
Image is signed.
Checking signer "Switch Secure ONIE".
Checking signer "Switch Secure Cumulus Linux".
Signature matches signer "Switch Secure Cumulus Linux".
Staging installer image...done.

WARNING:
WARNING: Activating staged installer requested.
WARNING: This action will wipe out all system data.
WARNING: Make sure to back up your data.
WARNING:

Are you sure (y/N)? y
2. Use the sudo reboot command to initiate a reboot of the switch.
cumulus@Cumulus-U23:mgmt:~$ sudo reboot
cumulus@Cumulus-U23:mgmt:~$ sudo reboot

[sudo] password for cumulus:

Broadcast message from root@Cumulus-U23 on pts/1 (Fri 2025-10-03 14:24:20 UT                             C):

The system will reboot now!
3. The switch reboots and starts the installer script. The switch enters GRUB>ONIE: Install OS and initiates the installer.
ONIE: Executing installer: file://dev/sda5/onie-installer

CMS Verified OK
Verifying image checksum ...OK.
Preparing image archive ... OK.
Verifying image compatibility ...OK.
Verifying system ram ...OK.
Setting up installer ...[  103.320178] ext4 filesystem being mounted at /tmp/tmp.xwF1hU supports timestamps until 2038 (0x7fffffff)
removed directory: '/tmp/ei_grub.d.XXcjtxAF'
Info: The full install log is located at /tmp/ei_runlog.XXDpYFGi
 OK.

Please reboot to start installing OS.
ONIE: NOS install successful: file://dev/sda5/onie-installer
ONIE: Rebooting...
Switch reboots and enters GRUB>CUMULUS-INSTALL to complete the install.
4. The switch completes boot and prompts for default username/pass. The system requires the default password to be changed.
In Cumulus Linux 4.2 and later:
- Username:
cumulus - Password:
cumulus
In Cumulus Linux 4.1.x and earlier:
- Username:
cumulus - Password:
CumulusLinux!
5. Use nv show system image and nv show system version to view Cumulus Linux version.
cumulus@cumulus:mgmt:~$ nv show system image
cumulus@cumulus:mgmt:~$ nv show system image

               operational
-------------  --------------------
current        1
next           1
partition1
  build-id     5.14.0.0068
  description  Cumulus Linux 5.14.0
  disk         /dev/sda5
  release      5.14.0
partition2
  build-id     5.14.0.0068
  description  Cumulus Linux 5.14.0
  disk         /dev/sda6
  release      5.14.0
cumulus@cumulus:mgmt:~$ nv show system version
cumulus@cumulus:mgmt:~$ nv show system version

                 operational
---------------  ----------------------------
onie             2022.08-5.3.0010-115200
kernel           6.1.0-cl-1-amd64
base-os          Debian GNU/Linux 12.11
product-release  5.14.0
image
  build-id       5.14.0.0068
  build-date     Wed Aug 06 12:24:00 UTC 2025
Install using FTP Without a DHCP/Web Server
Without a DHCP/Web Server, the user assigns the switch eth0 IP address. ONIE discovery attempts to reach out to different locations to locate the Cumulus Linux image.
NOTE: The Cumulus Linux image must be placed onto the target TFTP/FTP server.
Follow the steps below, with either option:
- Logging into the switch using a serial console (ONIE)
- Log in to the console or with ssh (Install from Cumulus Linux)
To install using serial console(ONIE), use the following procedure:
1. Power cycle or reboot the switch.
cumulus@Cumulus-U23:mgmt:~$ sudo reboot
cumulus@Cumulus-U23:mgmt:~$ sudo reboot

[sudo] password for cumulus:

Broadcast message from root@Cumulus-U23 on pts/1 (Fri 2025-10-03 14:24:20 UT                             C):

The system will reboot now!
2. Interrupt the boot process using <ESC>.

3. Use the arrow keys to select the ONIE option.
4. Use the arrow keys to select the ONIE: Install OS option.

5. Switch defaults into ONIE discovery mode. If secure boot is configured, the ONIE login prompt presents itself: user/pass=root/root.
To check the install status inspect /var/log/onie.log.

Try this:  tail -f /var/log/onie.log

** Installer Mode Enabled **
onie login:
onie login: root
Password: root
6. ONIE discovery attempts to reach out to different locations to locate the Cumulus Linux image. ONIE discovery can be disabled with the following command:
ONIE:~ # onie-discovery-stop
ONIE:~ # onie-discovery-stop
NOTICE: The 'onie-discovery-stop' command is deprecated and will be removed in 2019.02.
NOTICE: Use 'onie-stop' instead.
discover: installer mode detected.
Stopping: discover... done.
ONIE:~ # Info: Trying DHCPv4 on interface: eth0
7. Use the ip addr add command to configure the eth0 IP address and, if needed, use the route add default gw command to configure the default gateway.
ONIE:~ # ip addr add <ip addr/subnet> dev eth0
ONIE:~ # ip addr add 100.72.30.100/24 dev eth0
ONIE:~ # route add default gw <ip addr>
ONIE:~ # route add default gw 100.72.30.1
8. View the configured eth0 IP address or default gateway.
ONIE:~ # ifconfig
ONIE:~ # ifconfig

eth0      Link encap:Ethernet  HWaddr 22:25:73:F4:62:AE
          inet addr:100.72.30.100  Bcast:100.72.30.255  Mask:255.255.255.0
          inet6 addr: fe80::5e25:ffff:feff:62ae/64 Scope:Link
          UP BROADCAST RUNNING MULTICAST  MTU:1500  Metric:1
          RX packets:5318 errors:0 dropped:0 overruns:0 frame:0
          TX packets:5608 errors:0 dropped:0 overruns:0 carrier:0
          collisions:0 txqueuelen:1000
          RX bytes:720853 (703.9 KiB)  TX bytes:593356 (579.4 KiB)
          Interrupt:16 Memory:a4600000-a4620000

lo        Link encap:Local Loopback
          inet addr:127.0.0.1  Mask:255.0.0.0
          inet6 addr: ::1/128 Scope:Host
          UP LOOPBACK RUNNING  MTU:65536  Metric:1
          RX packets:21 errors:0 dropped:0 overruns:0 frame:0
          TX packets:21 errors:0 dropped:0 overruns:0 carrier:0
          collisions:0 txqueuelen:1000
          RX bytes:2184 (2.1 KiB)  TX bytes:2184 (2.1 KiB)
ONIE:~ # iproute
ONIE:~ # iproute

default via 100.72.30.1 dev eth0
100.72.30.0/24 dev eth0  src 100.72.30.100
9. Use onie-nos-install command to direct the switch to the location and file to load. The switch fetches and installs the Cumulus Linux image.
ONIE:~ # onie-nos-install ftp://<user>:<password>@x.x.x.x/<image name>
Error: Installer URL not specified.
Usage: /bin/onie-nos-install <URL> [<INSTALLER_ARGS>]
URL types: http, ftp, tftp
ONIE:~ # onie-nos-install ftp://test:P@$$w0rd@100.72.11.168/cumulus-linux-5.14.0-mlx-amd64.bin

discover: installer mode detected.
Stopping: discover... done.
Info: Attempting ftp://test:P@$$w0rd@100.72.11.168/cumulus-linux-5.14.0-mlx-amd64.bin ...
Connecting to 100.72.11.168 (100.72.11.168:21)
installer            100% |*******************************|   757M  0:00:00 ETA
ONIE: Executing installer: ftp://test:P@$$w0rd@100.72.11.168/cumulus-linux-5.14.0-mlx-amd64.bin
CMS Verified OK
Verifying image checksum ...OK.
Preparing image archive ... OK.
Verifying image compatibility ...OK.
Verifying system ram ...OK.
Setting up installer ...[  229.731964] ext4 filesystem being mounted at /tmp/tmp.wfTahY supports timestamps until 2038 (0x7fffffff)
removed directory: '/tmp/ei_grub.d.XX0Xif9a'
Info: The full install log is located at /tmp/ei_runlog.XXQEg9HP
 OK.
Please reboot to start installing OS.
ONIE: NOS install successful: ftp://test:P@$$w0rd@100.72.11.168/cumulus-linux-5.14.0-mlx-amd64.bin
ONIE: Rebooting...
ONIE:~ # discover: installer mode detected.
Stopping: discover...start-stop-daemon: warning: killing process 554: No such process
 done.
Enabling VPD WP... done.
Stopping: dropbear ssh daemon... done.
Stopping: telnetd... done.
Stopping: klogd... done.
Stopping: syslogd... done.
Info: Unmounting kernel filesystems
umount: devtmpfs busy - remounted read-only
umount: can't unmount /: Invalid argument

The system is going down NOW!
Sent SIGTERM to all processes
Sent SIGKILL to all processes
Requesting system reboot
[  231.947919] reboot: Restarting system

9. The switch boots and prompts for default username/pass. The switch requires that the default password be changed.
In Cumulus Linux 4.2 and later:
- Username:
cumulus - Password:
cumulus
In Cumulus Linux 4.1.x and earlier:
- Username:
cumulus - Password:
CumulusLinux!
10. Use nv show system image and nv show system version to view Cumulus Linux version.
cumulus@cumulus:mgmt:~$ nv show system image
cumulus@cumulus:mgmt:~$ nv show system image

               operational
-------------  --------------------
current        1
next           1
partition1
  build-id     5.14.0.0068
  description  Cumulus Linux 5.14.0
  disk         /dev/sda5
  release      5.14.0

partition2
  build-id     5.14.0.0068
  description  Cumulus Linux 5.14.0
  disk         /dev/sda6
  release      5.14.0
cumulus@cumulus:mgmt:~$ nv show system version
cumulus@cumulus:mgmt:~$ nv show system version

                 operational
---------------  ----------------------------
onie             2022.08-5.3.0010-115200
kernel           6.1.0-cl-1-amd64
base-os          Debian GNU/Linux 12.11
product-release  5.14.0
image
  build-id       5.14.0.0068
  build-date     Wed Aug 06 12:24:00 UTC 2025
To install using the console or with ssh (Install from Cumulus Linux), use the following procedure:
1. Use onie-install to initiate the Cumulus Linux image install using Cumulus Linux.
root@cumulus:mgmt:~#sudo onie-install -a -i ftp://user:password@x.x.x.x/<image name>
root@cumulus:mgmt:~# sudo onie-install -a -i ftp://user:P@$$w0rd@100.72.11.36/cumulus/cumulus-linux-5.13.1-mlx-amd64.bin

Fetching installer: ftp://user:P@$$w0rd@100.72.11.36/cumulus/cumulus-linux-5.13.1-mlx-amd64.bin
Downloading URL: ftp://user:P@$$w0rd@100.72.11.36/cumulus/cumulus-linux-5.13.1-mlx-amd64.bin
######################################################################### 100.0%

Success: FTP download complete.
SecureBoot is enabled.
Image is signed.
Checking signer "Switch Secure ONIE".
Checking signer "Switch Secure Cumulus Linux".
Signature matches signer "Switch Secure Cumulus Linux".
Staging installer image...done.
WARNING:
WARNING: Activating staged installer requested.
WARNING: This action will wipe out all system data.
WARNING: Make sure to back up your data.
WARNING:
Are you sure (y/N)? y
2. Use the sudo reboot command to initiate a reboot of the switch.
cumulus@Cumulus-U23:mgmt:~$ sudo reboot
cumulus@Cumulus-U23:mgmt:~$ sudo reboot

[sudo] password for cumulus:

Broadcast message from root@Cumulus-U23 on pts/1 (Fri 2025-10-03 14:24:20 UT                             C):

The system will reboot now!
3. The switch reboots and starts the installer script. The switch enters GRUB>ONIE: Install OS and initiates the installer.
ONIE: Executing installer: file://dev/sda5/onie-installer
CMS Verified OK
Verifying image checksum ...OK.
Preparing image archive ... OK.
Verifying image compatibility ...OK.
Verifying system ram ...OK.

Setting up installer ...[  103.320178] ext4 filesystem being mounted at /tmp/tmp.xwF1hU supports timestamps until 2038 (0x7fffffff)
removed directory: '/tmp/ei_grub.d.XXcjtxAF'
Info: The full install log is located at /tmp/ei_runlog.XXDpYFGi
 OK.
Please reboot to start installing OS.
ONIE: NOS install successful: file://dev/sda5/onie-installer
ONIE: Rebooting...
Switch reboots and enters GRUB>CUMULUS-INSTALL to complete the install.

4. The switch completes boot and prompts for default username/pass. The switch requires that the default password be changed.
In Cumulus Linux 4.2 and later:
- Username:
cumulus - Password:
cumulus
In Cumulus Linux 4.1.x and earlier:
- Username:
cumulus - Password:
CumulusLinux!
5. Use nv show system image and nv show system version to view Cumulus Linux version.
cumulus@cumulus:mgmt:~$ nv show system image
cumulus@cumulus:mgmt:~$ nv show system image

               operational
-------------  --------------------
current        1
next           1
partition1
  build-id     5.14.0.0068
  description  Cumulus Linux 5.14.0
  disk         /dev/sda5
  release      5.14.0
partition2
  build-id     5.14.0.0068
  description  Cumulus Linux 5.14.0
  disk         /dev/sda6
  release      5.14.0
cumulus@cumulus:mgmt:~$ nv show system version
cumulus@cumulus:mgmt:~$ nv show system version

                 operational

---------------  ----------------------------
onie             2022.08-5.3.0010-115200
kernel           6.1.0-cl-1-amd64
base-os          Debian GNU/Linux 12.11
product-release  5.14.0
image
  build-id       5.14.0.0068
  build-date     Wed Aug 06 12:24:00 UTC 2025
Install using a USB drive
Follow the steps below to install the Cumulus Linux image using a USB drive.
NOTE: Installing Cumulus Linux using a USB drive is not scalable. DHCP can scale to hundreds of switch installs with zero manual input unlike USB installs.
To prepare the USB for use, it can be completed with either option(OPTIONAL):
If USB is ready for use:
To prepare the USB using personal computer:
From the computer, prepare the USB drive by formatting it using one of these supported formats: FAT32, vFAT or EXT2.
To prepare the USB using Cumulus Linux:
1. Insert your USB drive into the USB port on the switch running Cumulus Linux and log in to the switch. Examine the output from cat /proc/partitions and sudo fdisk -l [device] to determine the location of your USB drive. For example, sudo fdisk -l /dev/sdb.
These instructions assume that your USB drive is the /dev/sdb device, which is typical if the USB drive is inserted after the machine is already booted. However, if the USB drive is inserted during the boot process, it is possible that the USB drive is the /dev/sda device. Please modify the commands below to use the proper device for the USB drive.
2. Create a new partition table on the USB drive. If the parted utility is not on the switch, install it with sudo -E apt-get install parted.
sudo parted /dev/sdb mklabel msdos
3. Create a new partition on the USB drive:
sudo parted /dev/sdb -a optimal mkpart primary 0% 100%
4. Format the partition to your file system of choice using one of the examples below:
NOTE: To use mkfs.msdos or mkfs.vfat, you must install the dosfstools package from the Debian software repositories, as they are not included by default.
sudo mkfs.ext2 /dev/sdb1

sudo mkfs.msdos -F 32 /dev/sdb1

sudo mkfs.vfat /dev/sdb1
5. To continue installing Cumulus Linux, mount the USB drive to move files:
sudo mkdir /mnt/usb

sudo mount /dev/sdb1 /mnt/usb
Procedure for loading image onto USB and using ONIE to boot from USB image
1. Copy the Cumulus Linux image to the USB drive, then rename the image file to onie-installer-x86_64.
Any of the ONIE naming schemes mentioned here can be used.
When using a MAC or Windows computer to rename the installation file, the file extension can still be present. Confirm that the file extension is removed so ONIE can detect the file.
2. Insert the USB drive into the switch, then prepare the switch for installation:
-
- If the switch is offline, connect to the console and power on the switch.
- If the switch is already online in ONIE, use the reboot command.
SSH sessions to the switch get dropped after this step. To complete the remaining instructions, connect to the console of the switch. Cumulus Linux switches display their boot process to the console; you must monitor the console to complete the next step.
3. Boot into ONIE install mode. Use the arrow keys to select the ONIE: Install OS option.

4. Switch defaults into ONIE discovery mode. The switch recognizes the USB drive and mounts it automatically. Cumulus Linux installation begins.
Platform  : x86_64-mlnx_x86-r0
Version   : 2022.08-5.3.0010-115200
Build Date: 2023-02-08T13:51+02:00

[    2.255371] tpm tpm0: [Firmware Bug]: TPM interrupt not working, polling instead
Info: Mounting kernel filesystems... done.
Info: Mounting ONIE-BOOT on /mnt/onie-boot ...
[   11.694142] ext4 filesystem being mounted at /mnt/onie-boot supports timestamps until 2038 (0x7fffffff)
Info: Mounting EFI System on /boot/efi ...
Info: Secure Boot: Active.
Info: BIOS mode:   UEFI
Eabling VPD WP... done.
Info: Using eth0 MAC address: 5c:25:73:f4:62:ae
Info: eth0:  Checking link... up.
Ino: Trying DHCPv4 on interface: eth0
ONIE: Using DHCPv4 addr: eth0: 100.72.29.204 / 255.255.255.0
Starting: klogd... done.
Starting: dropbear ssh daemon... done.
Starting: telnetd... done.
discover: installer mode detected.  Running installer.
Starting: discover... done.

Please press Enter to activate this console. Info: eth0:  Checking link... up.
Info: Trying DHCPv4 on interface: eth0
ONIE: Using DHCPv4 addr: eth0: 100.72.29.204 / 255.255.255.0

{output truncated}

Info: Attempting file://dev/sda3/onie-installer.bin ...
ONIE: Executing installer: file://dev/sda7/onie-installer-x86_64
CMS Verified OK
Verifying image checksum ...OK.
Preparing image archive ... OK.
Verifying image compatibility ...OK.
Verifying system ram ...OK.
Setting up installer ...[   73.222144] ext4 filesystem being mounted at /tmp/tmp.5G8pCy supports timestamps until 2038 (0x7fffffff)
removed directory: '/tmp/ei_grub.d.XX1OwdHQ'
Info: The full install log is located at /tmp/ei_runlog.XXuGwr3T
 OK.
Please reboot to start installing OS.
ONIE: NOS install successful: file://dev/sda7/onie-installer-x86_64
ONIE: Rebooting...
discover: installer mode detected.
5. The switch completes boot and prompts for default username/pass. The switch requires that the default password be changed.
In Cumulus Linux 4.2 and later:
- Username:
cumulus - Password:
cumulus
In Cumulus Linux 4.1.x and earlier:
- Username:
cumulus - Password:
CumulusLinux!
6. Use nv show system image and nv show system version to view Cumulus Linux version.
cumulus@cumulus:mgmt:~$ nv show system image
cumulus@cumulus:mgmt:~$ nv show system image

               operational
-------------  --------------------
current        1
next           1
partition1
  build-id     5.14.0.0068
  description  Cumulus Linux 5.14.0
  disk         /dev/sda5
  release      5.14.0
partition2
  build-id     5.14.0.0068
  description  Cumulus Linux 5.14.0
  disk         /dev/sda6
  release      5.14.0
cumulus@cumulus:mgmt:~$ nv show system version
cumulus@cumulus:mgmt:~$ nv show system version

                 operational
---------------  ----------------------------
onie             2022.08-5.3.0010-115200
kernel           6.1.0-cl-1-amd64
base-os          Debian GNU/Linux 12.11
product-release  5.14.0
image
  build-id       5.14.0.0068
  build-date     Wed Aug 06 12:24:00 UTC 2025