Configuring Scan to Gmail on 3333dn / 3335dn / B3465dn / B3465dnf / 5535dn Dell Laser Printers
Summary: How to configure for scanning Gmail on 3333dn / 3335dn / B3465dn / B3465dnf / 5535dn Dell Laser Printers.
Symptoms
Table of Contents:
- Before You Begin
- Why Do We Need Certificates?
- Configure the MFP to Communicate with the E-mail Server
This article provides information on "Configuring Scan to Gmail on 3333dn / 3335dn / B3465dn / B3465dnf / 5535dn Dell Laser Printers"
1. Before You Begin
Please understand that Dell does not control future changes Google makes to their SMTP configuration. If unable to connect, the following considerations should be evaluated:
- The SMTP address may have changed.
- Outdated certificates may require you to confirm your settings with Google.
- Appropriate port selection. Currently this port is 465
- Messages similar to "SSL Connect Fail" may require you to acquire or obtain an additional certificate for the issuer of the certificate. At present time, Equifax is the issuer for Gmail certificates.
- Make sure your reply address is the Gmail address and the SMTP address is smtp.gmail.com
- Once the Equifax certificate is installed you should be able to do scan to email through Gmail's SMTP servers.
Back to Top
2. Why Do We Need Certificates?
In order to prevent the Gmail service from being used by spammers, Gmail requires security certificates for any device sending email via SMTP (such as our printers). The first thing we need to do is download the two certificates needed and install them on the printer.
- Download the Thawte Server Root Certificate
 zip file and extract it somewhere, such as the desktop.
 - Download the Equifax Certificate
 .
.
note: The Thawte Server Root Certificate must be installed first.
Now we need to install the certificates on the printer.
- Open the EWS in your browser (http://the.ip.address.for.printer)
- Click on Settings
- Click on Security
- Click on Certificate Management
- Click on Certificate Authority Management
- Click New
- Click Browse and navigate to wherever we extracted the Thawte Server root certificate zip file.
- In the folders from that zip file, navigate to Thawte Root Certificates\thawte Premium Server CA.
- Select Thawte Premium Server CA.pem and click "Submit".
- Repeat steps 6-9 for the Equifax Certificate file.
Now that we have the security certificates we need, lets setup the Scan to Email server settings.
- In the left hand menu, click on Settings.
- Click Network/Ports
- Click SMTP Setup
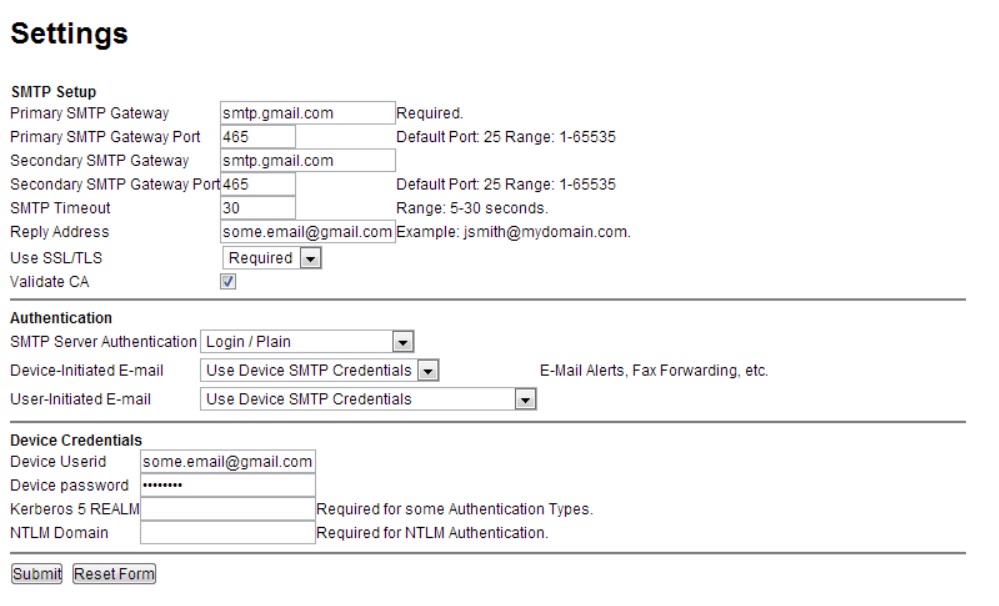
- Use the settings below, except make sure to use a valid Gmail address in both the "Reply Address" and "Device User ID" boxes (and the password for that account in the device password box).
- Verify the Gmail account in question is not setup to use to Google's 2-step authentication. If the account is using 2-step authentication, then we'll need to generate a device/application specific password and use that in the "Device Password" box. This Google article
 explains how.
Back to Top
3. Configure the MFP to Communicate with the E-mail Server
Example Illustration in English only.Settings

After clicking submit, turn off the printer, turn it back and you may now Scan to Gmail.
When unable to get scan to Gmail working try enabling less secure apps here  . (Google article)
 NOTE: Turn off "Validate CA" if a connection error occurs when performing a scan to Gmail as occasional communication issues with the certificate authority can cause errors when scanning.
For more information about less secure apps click here  . (Google article)
Back to Top

More information can be found in the User Guide for your model printer, or visit our Printer Support site for additional information, troubleshooting articles and videos.
Purchase Toner and other Dell Laser Printer Supplies
Dell Recycling
 It is recommended that only Dell Branded toner, drums, transfer rollers or other consumables are used in our laser printers. Dell cannot guarantee compatibility or the print quality of any 3rd party consumables.