How to Install Dell Security Management Server Virtual
Summary: Dell Security Management Server Virtual and Dell Data Protection Virtual Edition can be installed by following these instructions.
This article applies to
This article does not apply to
This article is not tied to any specific product.
Not all product versions are identified in this article.
Instructions
This article covers how to perform the basic installation process for Dell Security Management Server Virtual (formerly Dell Data Protection Virtual Edition).
Affected Products:
- Dell Security Management Server Virtual
- Dell Data Protection Virtual Edition
Affected Versions:
-
8.2.0 and Later
Affected Operating Systems:
- Linux
Note: This article only covers the basic deployment of Dell Security Management Server Virtual. Client services are required for more complex or custom deployments of Dell Security Management Server Virtual. Client service engagements can be purchased through your sales representative.
The installation of Dell Security Management Server Virtual varies based on version. Click the appropriate version for specific steps.
For versioning information, reference How to Identify the Dell Data Security Server Version.
Warning: Before installation, ensure that the environment meets Dell Security Management Server Virtual System Requirements.
9.11.0 and Later
- Select the language to display by pressing the spacebar on the appropriate option.
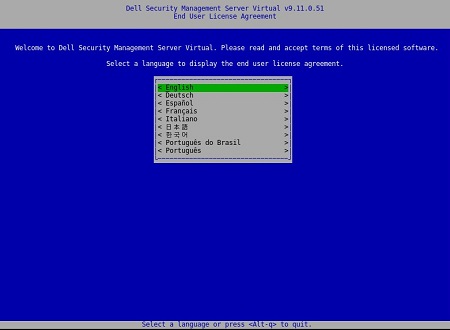 Note: Language settings may be changed later from the administration console after installation is completed.
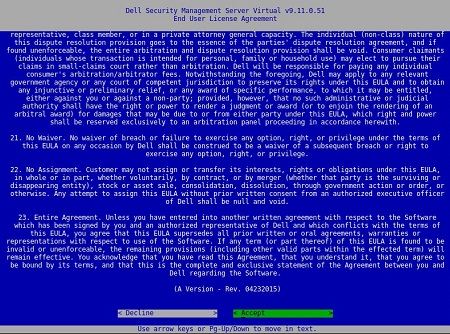
 - Review the End User License Agreement (EULA) by using the arrow keys or page down to scroll down. At the end of the EULA menu, select Accept, and then press Enter.
- Select Connected Mode and then press Enter.
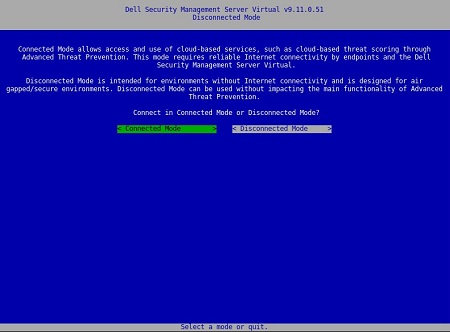 Note: This article only covers how to install in Connected Mode. Due to the complexity, Dell Technologies recommends a client services engagement for Disconnected Mode (air-gap mode). Client service engagements can be purchased through your sales representative.
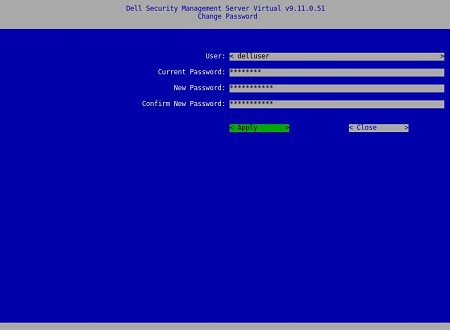
 - To change the default user‘s passwords, go to Step 4a; otherwise go to Step 5.
- Select a User from the drop-down menu using the spacebar.
- Type the Current Password, New Password, and then Confirm New Password.
- Select Apply and then press Enter.
- To modify an additional user's passwords, repeat steps 4a, 4b & 4c.
- Once the user’s passwords have been changed, select Close and then press Enter.
 Note:
Note:- The password for
delluser,dellconsole, anddellsupportmay be changed later from the administration console after installation is completed. - The default credentials for Dell Security Management Server Virtual are:
- Username:
delluser - Password:
delluser - Username:
dellconsole - Password:
dellconsole - Username:
dellsupport - Password:
dellsupport
- Username:
- Populate a fully qualified domain name (FQDN) for the Hostname, select OK, and then press Enter.
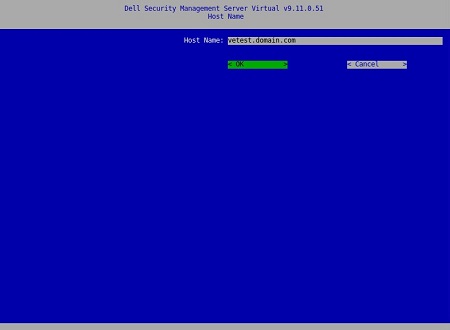
- In the Network menu, if using IPv4, go to Step 7. If using IPv6, continue to Step 8.
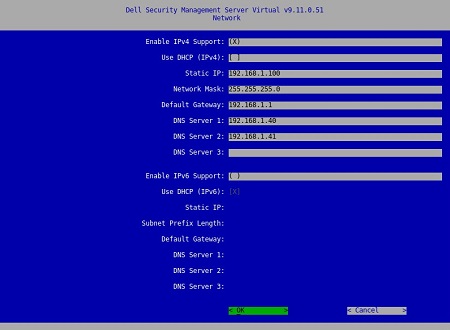
- In the Network menu:
- To use IPv4 DHCP, leave the default settings checked, select OK, press Enter, and then go to Step 9. To not use DHCP, go to Step 7b.
- To disable DHCP, press the spacebar to the right of Use DHCP (IPv4).
- Populate Static IP, Network Mask, Default Gateway, and DNS Server 1.
- Optionally populate DNS Server 2 and DNS Server 3.
- Once network settings have been populated, select OK, press Enter, and then go to Step 9.
 Note:
Note:- Network settings may be changed later from the administration console after installation is completed.
- The network settings in the screenshot example may differ in your environment.
- The DNS server is intended for a DNS server internal to your environment, as opposed to a public DNS.
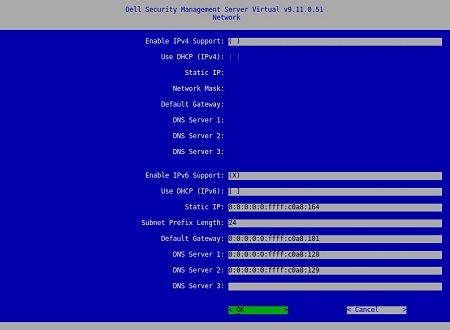
- In the Network menu:
- To use IPv6, check Enable IPv6 Support with the spacebar.
- To use DHCP, check Use DHCP (IPv6) with the spacebar, and then go to Step 9. To not use DHCP, go to Step 8C.
- Populate Static IP, Subnet Prefix Length, Default Gateway, and DNS Server 1.
- Optionally populate DNS Server 2 and DNS Server 3.
- Once network settings have been populated, select OK, press Enter, and then go to Step 9.
 Note:
Note:- Network settings may be changed later from the administration console after installation is completed.
- The network settings in the screenshot example may differ in your environment.
- The DNS server is intended for a DNS server internal to your environment, as opposed to a public DNS.
- Select the time zone where the server resides and then press Enter.
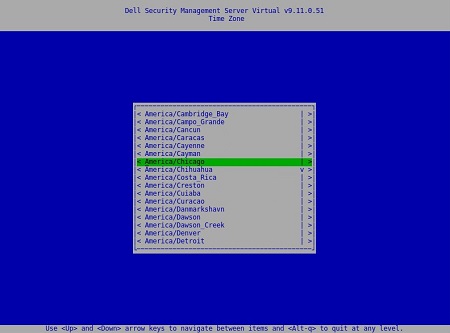 Note: The time zone may be changed later from the administration console after installation is completed.
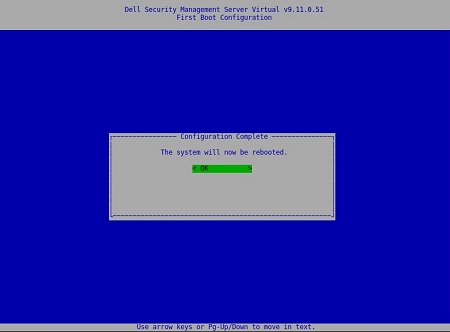
 - Press Enter on OK to reboot.
9.8.2 to 9.10.1
- Select the language to display by pressing the spacebar on the appropriate option. Once the language is chosen, scroll down to Display EULA and then press Enter.
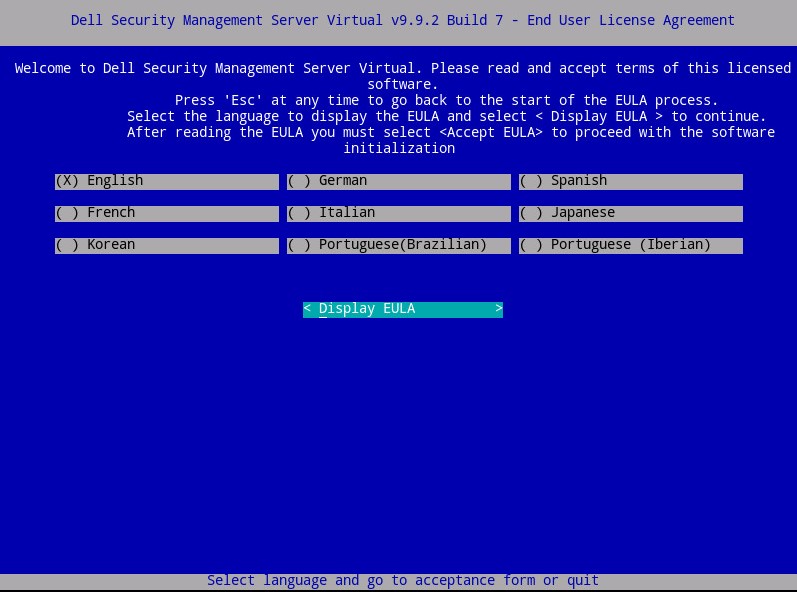 Note: Language settings may be changed later from the administration console after installation is completed.
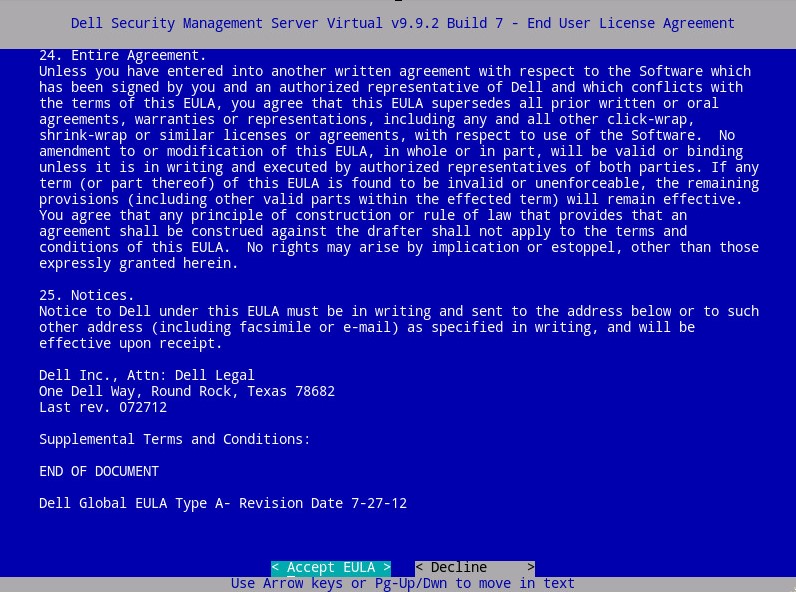
 - Review the End User License Agreement (EULA) by using the arrow keys or page down to scroll down. At the end of the EULA menu, select Accept EULA, and then press Enter.
- Select Connected Mode and then press Enter.
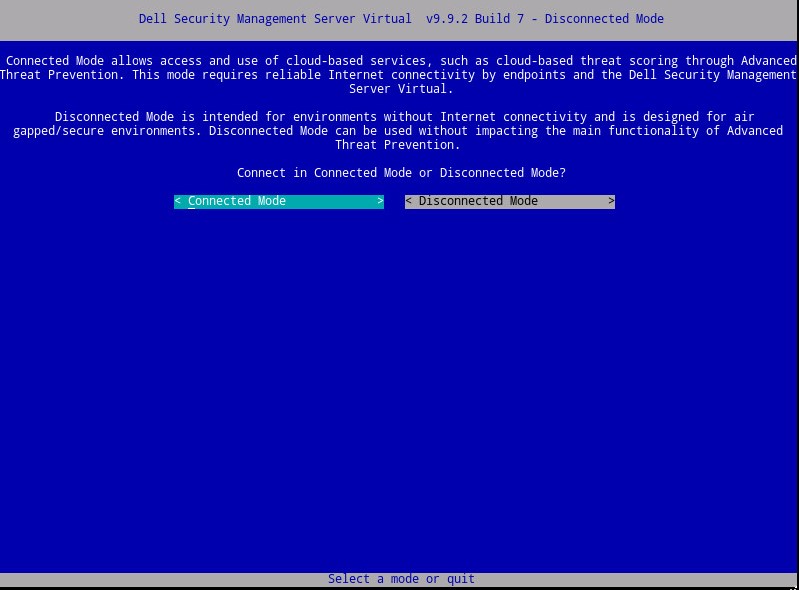 Note: This article only covers how to install in Connected Mode. Due to the complexity, Dell Technologies recommends a client services engagement for Disconnected Mode (air-gap mode). Client service engagements can be purchased through your sales representative.
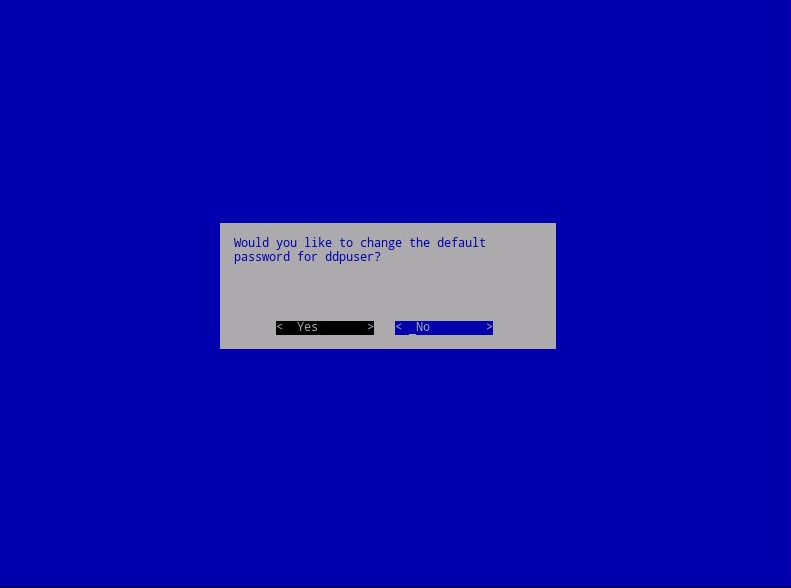
 - Optionally select Yes and then press Enter to change the default password for
ddpuser. If Yes was selected, go to Step 4a. To leave the default password forddpuser, select No, press Enter, and then go to Step 5.
 Note:
Note:- This password, along with the passwords for
ddpconsoleandddpsupport, may be changed later from the administration console after installation is completed. - The default credentials for Dell Security Management Server Virtual are:
- Username:
ddpuser - Password:
ddpuser
- Username:
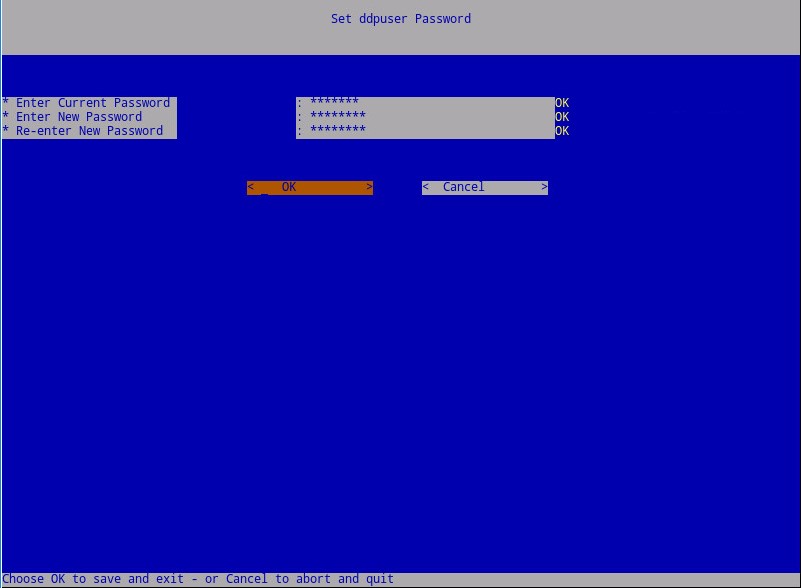
- In the Set
ddpuserPassword menu, populate the Current Password forddpuser. - Populate New Password and Re-enter New Password.
- Select OK and then press Enter.
- This password, along with the passwords for
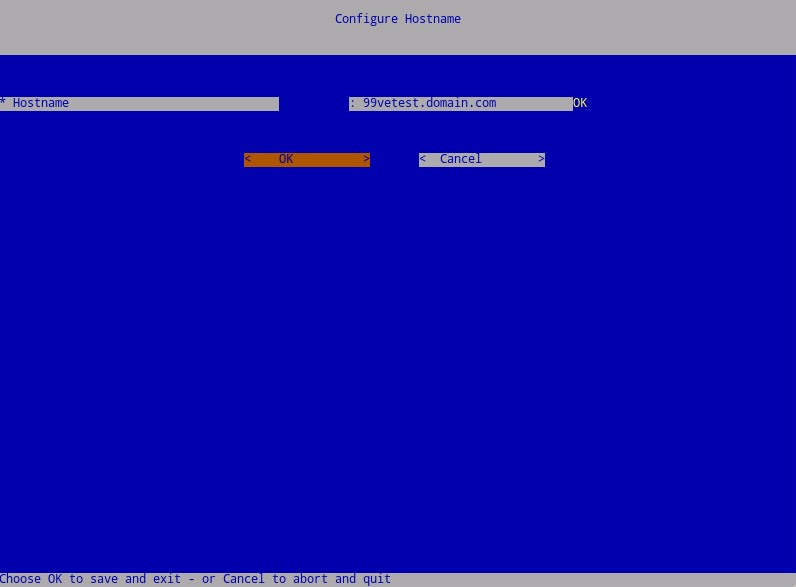
- Populate a fully qualified domain name (FQDN) for the Hostname, select OK, and then press Enter.
- In the Configure Settings menu:
- To configure Dell Security Management Server for DHCP, leave the default settings checked, select OK, press Enter, and then go to Step 7. To not use DHCP, go to Step 6b.
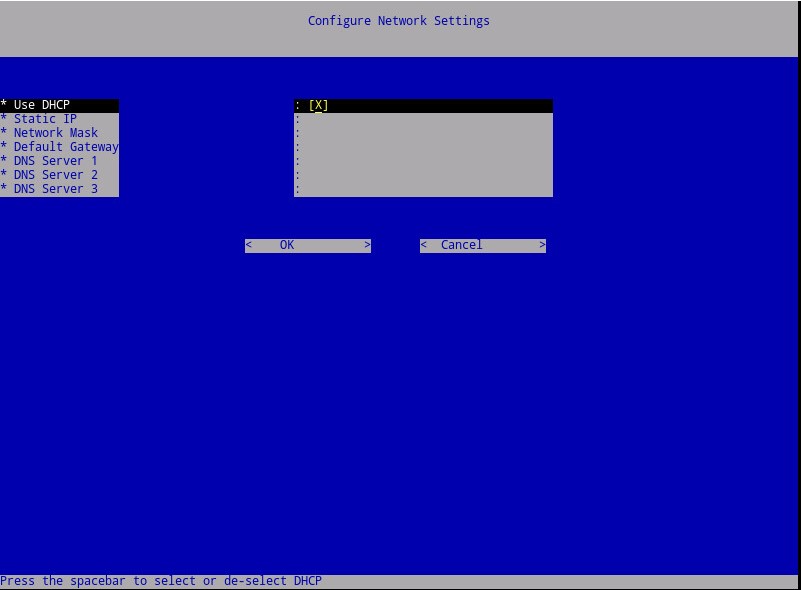
- To disable DHCP for the Dell Security Management Server, press the spacebar to the right of Use DHCP.
- Populate Static IP, Network Mask, Default Gateway, and DNS Server 1.
- Optionally populate DNS Server 2 and DNS Server 3.
- Once network settings have been populated, select OK, press Enter, and then go to Step 7.
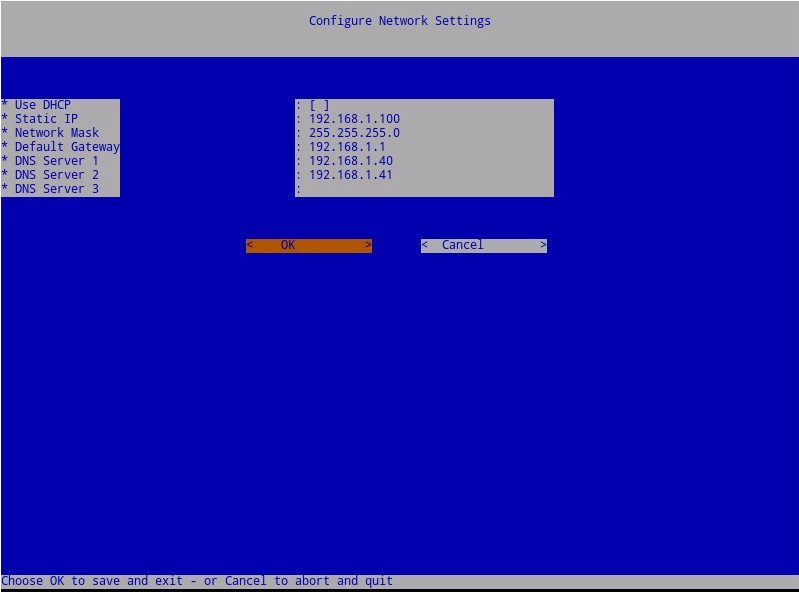 Note:
Note:- Network settings may be changed later from the administration console after installation is completed.
- The network settings in the screenshot example may differ in your environment.
- The DNS server is intended for a DNS server internal to your environment, as opposed to a public DNS.
- To configure Dell Security Management Server for DHCP, leave the default settings checked, select OK, press Enter, and then go to Step 7. To not use DHCP, go to Step 6b.
- Select the time zone where the server resides and then press Enter.
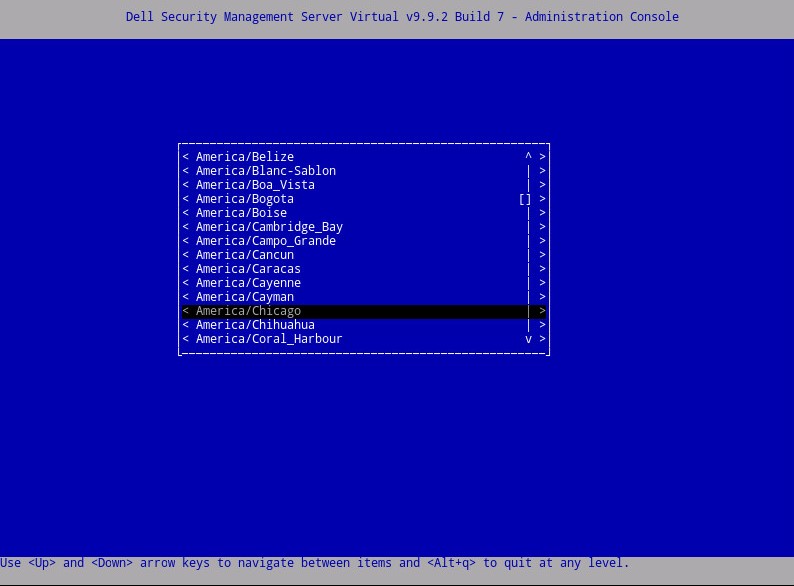 Note: The time zone may be changed later from the administration console after installation is completed.
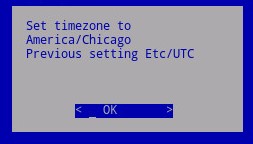
 - Press Enter on OK to confirm the time zone selected.
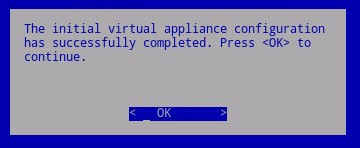
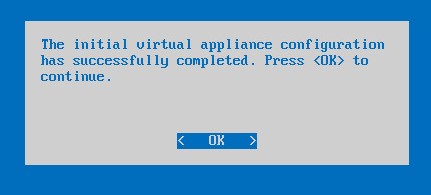
- Press Enter on OK to confirm successful configuration.
9.4.0 to 9.7.0
- Select the language to display by pressing the spacebar on the appropriate option. Once the language is chosen, scroll down to Display EULA and then press Enter.
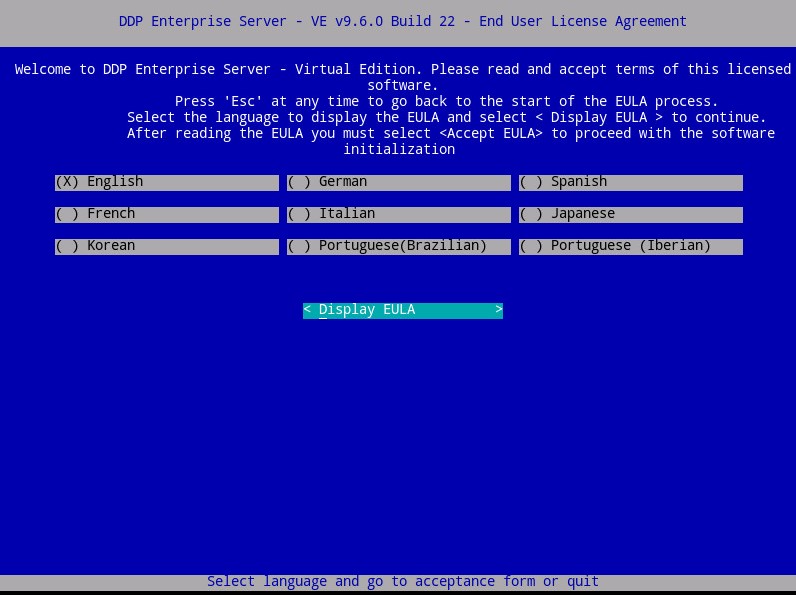 Note: Language settings may be changed later from the administration console after installation is completed.
 - Review the End User License Agreement (EULA) by using the arrow keys or page down to scroll down. At the end of the EULA menu, select Accept EULA, and then press Enter.
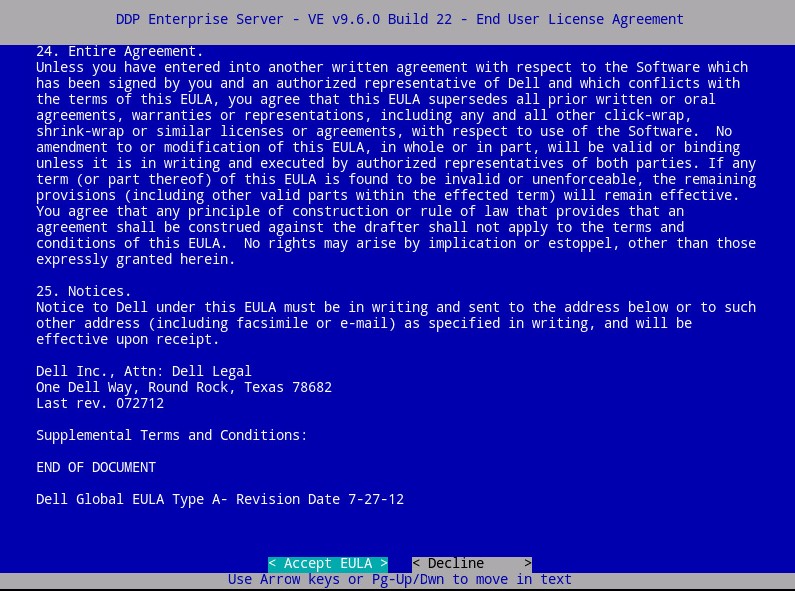
- Select Default Mode and then press Enter.
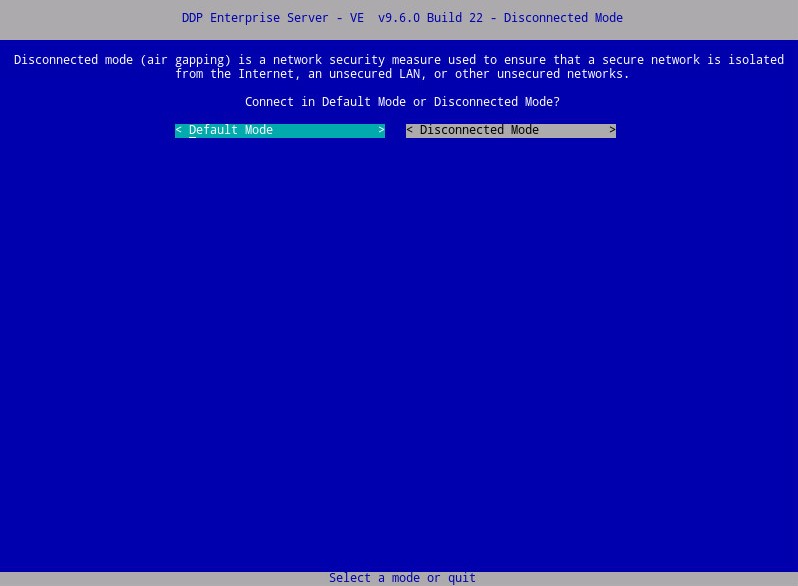 Note: This article only covers how to install in Default Mode. Due to the complexity, Dell Technologies recommends a client services engagement for Disconnected Mode (air-gap mode). Client service engagements can be purchased through your sales representative.
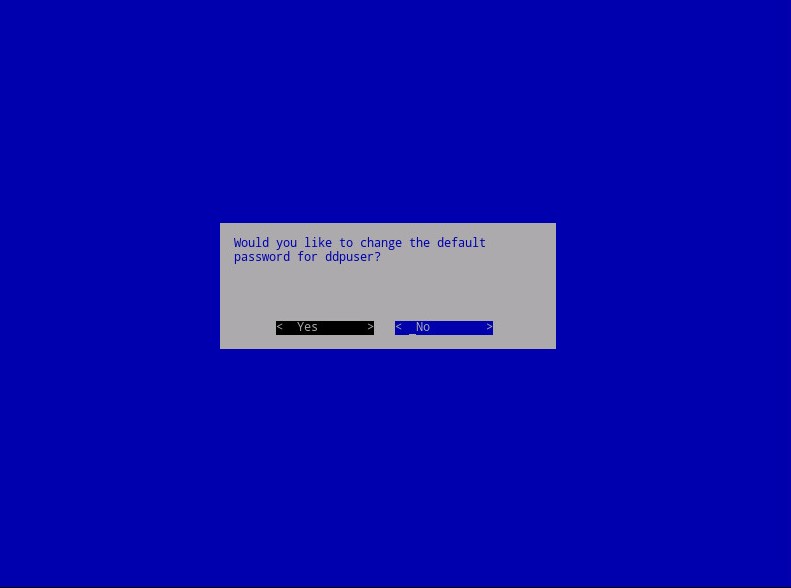
 - Optionally select Yes and then press Enter to change the default password for
ddpuser. If Yes was selected, go to Step 4a. To leave the default password forddpuser, select No, press Enter, and then go to Step 5.
 Note:
Note:- This password, along with the passwords for
ddpconsoleandddpsupport, may be changed later from the administration console after installation is completed. - The default credentials for Dell Data Protection Enterprise Server Virtual Edition are:
- Username:
ddpuser - Password:
ddpuser
- Username:
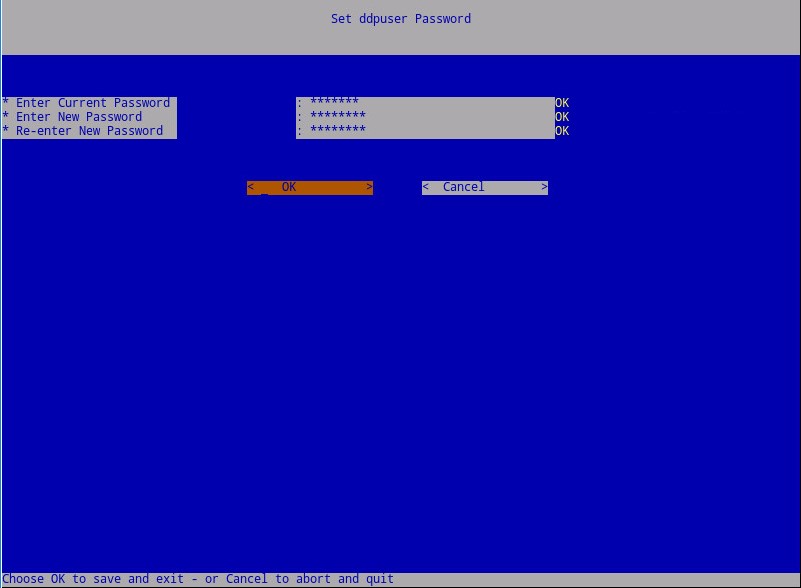
- In the Set
ddpuserPassword menu, populate the Current Password forddpuser. - Populate New Password and Re-enter New Password.
- Select OK and then press Enter.
- This password, along with the passwords for
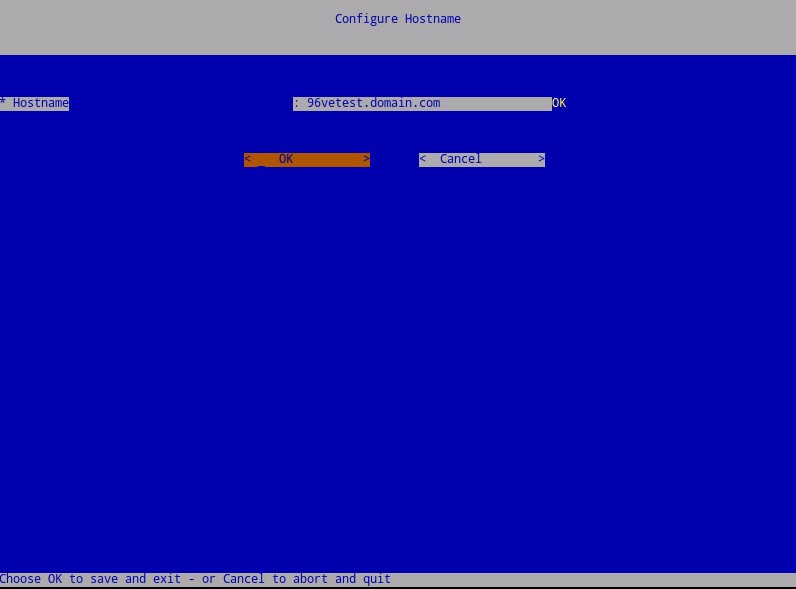
- Populate a fully qualified domain name (FQDN) for the Hostname, select OK, and then press Enter.
- In the Configure Settings menu:
- To configure Dell Security Management Server for DHCP, leave the default settings checked, select OK, press Enter, and then go to Step 7. To not use DHCP, go to Step 6b.
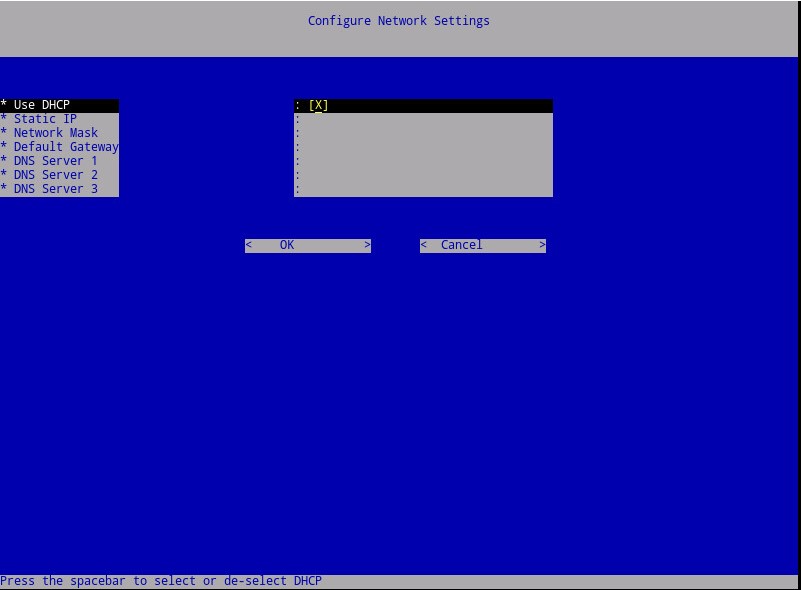
- To disable DHCP for the Dell Security Management Server, press the spacebar to the right of Use DHCP.
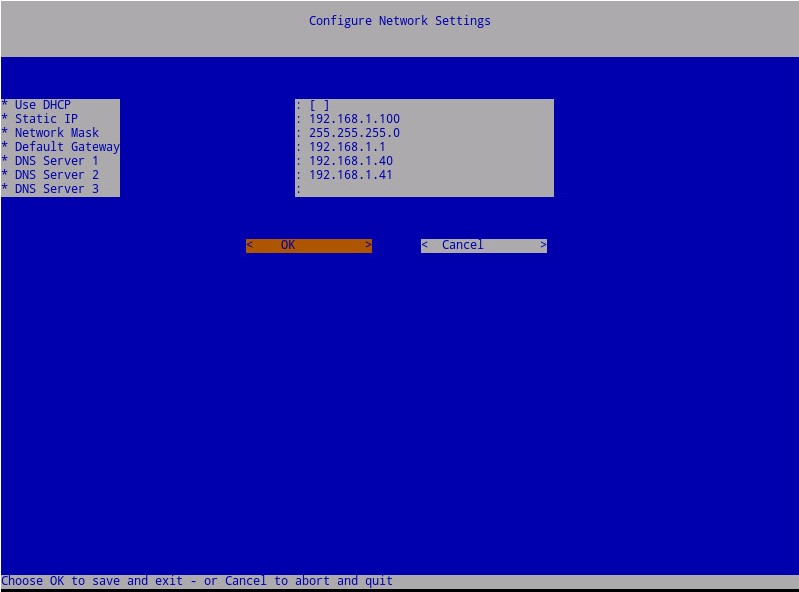
- Populate Static IP, Network Mask, Default Gateway, and DNS Server 1.
- Optionally populate DNS Server 2 and DNS Server 3.
- Once network settings have been populated, select OK, press Enter, and then go to Step 7.
 Note:
Note:- Network settings may be changed later from the administration console after installation is completed.
- The network settings in the screenshot example may differ in your environment.
- The DNS server is intended for a DNS server internal to your environment, as opposed to a public DNS.
- To configure Dell Security Management Server for DHCP, leave the default settings checked, select OK, press Enter, and then go to Step 7. To not use DHCP, go to Step 6b.
- Select the time zone where the server resides and then press Enter.
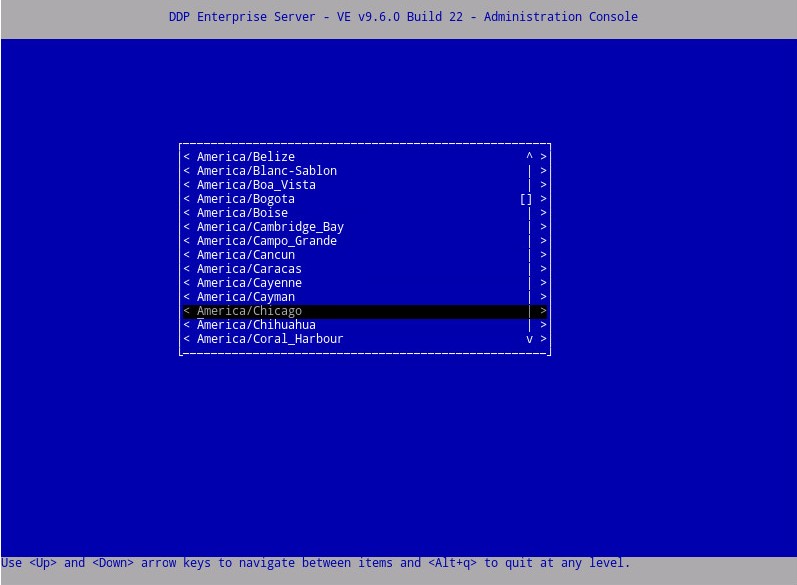 Note: The time zone may be changed later from the administration console after installation is completed.
 - Press Enter on OK to confirm the time zone selected.
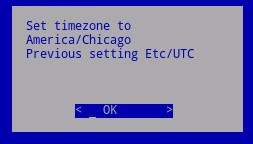
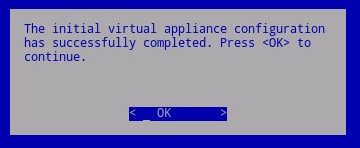
- Press Enter on OK to confirm successful configuration.
8.5.0 to 9.2.0
- Select the language to display by pressing the spacebar on the appropriate option. Once the language is chosen, scroll down to Display EULA and then press Enter.
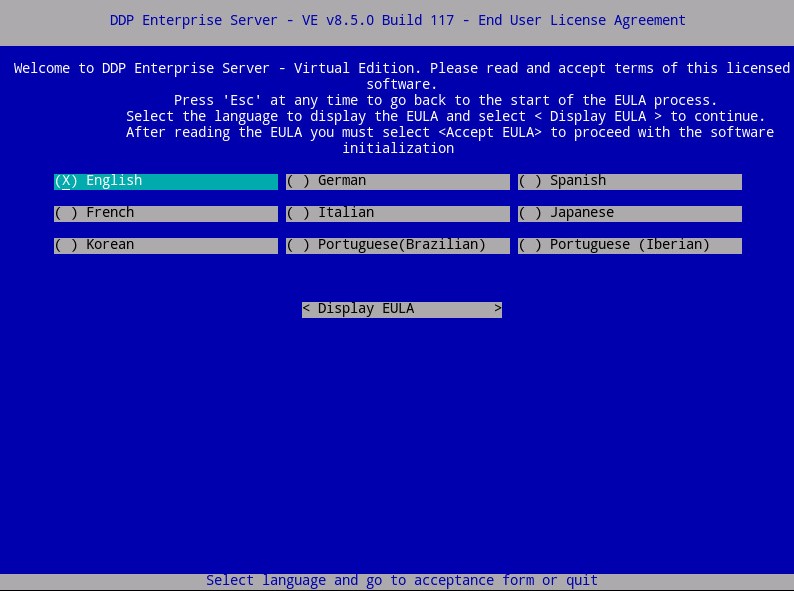 Note: Language settings may be changed later from the administration console after installation is completed.
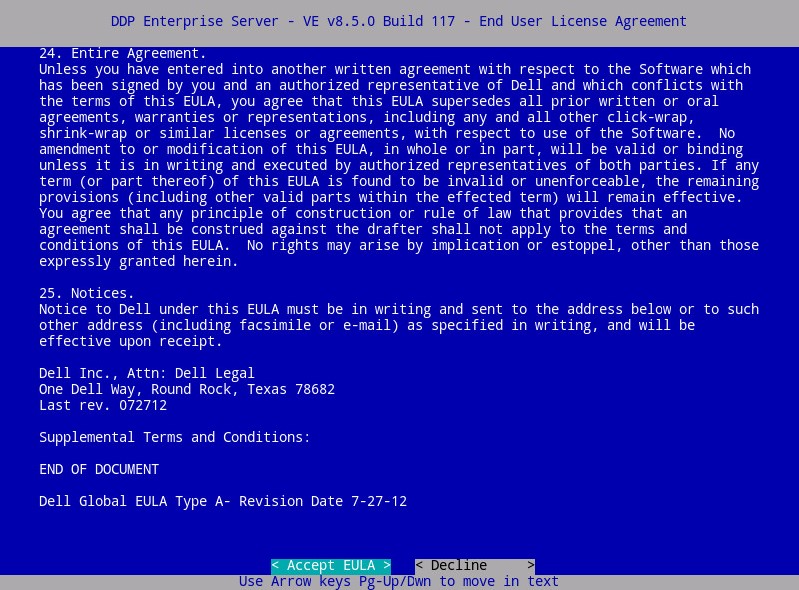
 - Review the End User License Agreement (EULA) by using the arrow keys or page down to scroll down. At the end of the EULA menu, select Accept EULA, and then press Enter.
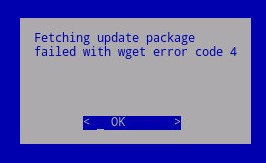
- If a "wget error code 4" is received, select OK and then press Enter.
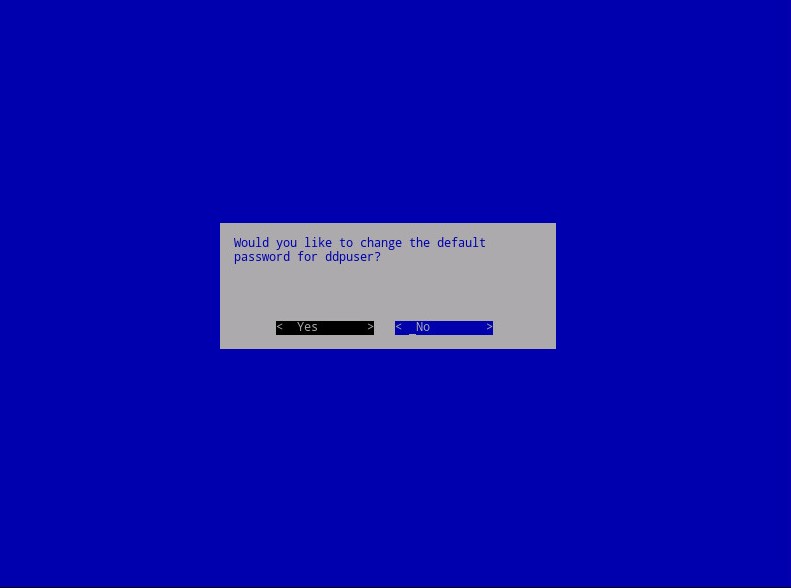
- Optionally select Yes and then press Enter to change the default password for
ddpuser. If Yes was selected, go to Step 4a. To leave the default password forddpuser, select No, press Enter, and then go to Step 5.
 Note:
Note:- This password, along with the passwords for
ddpconsoleandddpsupport, may be changed later from the administration console after installation is completed. - The default credentials for Dell Data Protection Enterprise Server Virtual Edition are:
- Username:
ddpuser - Password:
ddpuser
- Username:
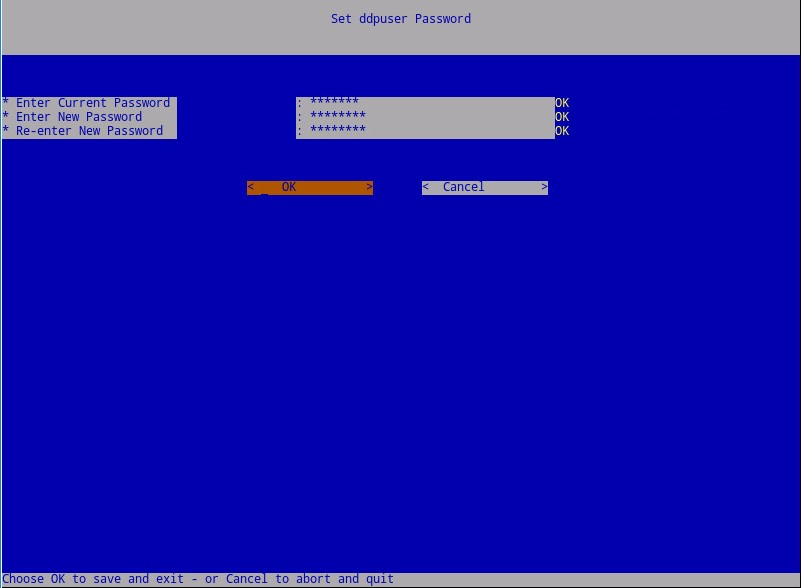
- In the Set
ddpuserPassword menu, populate the Current Password forddpuser. - Populate New Password and Re-enter New Password.
- Select OK and then press Enter.
- This password, along with the passwords for
- Populate a fully qualified domain name (FQDN) for the Hostname, select OK, and then press Enter.
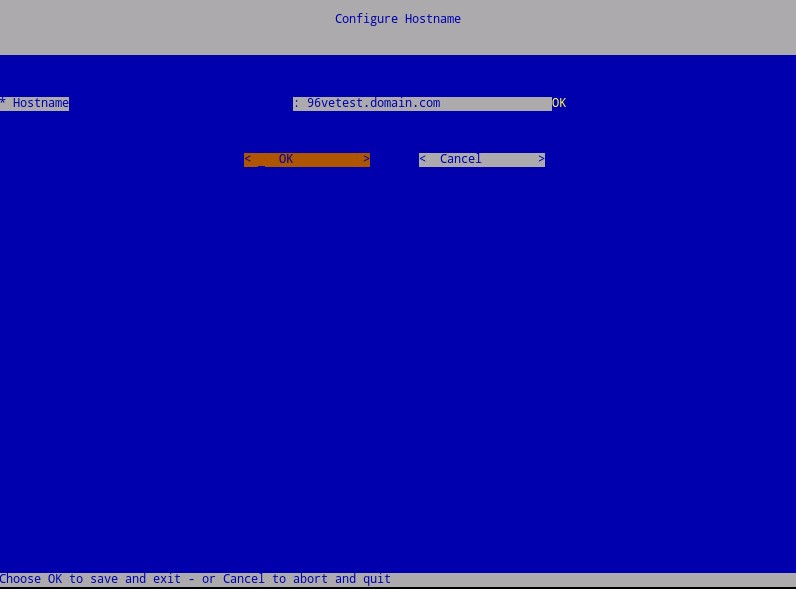
- In the Configure Settings menu:
- To configure Dell Security Management Server for DHCP, leave the default settings checked, select OK, press Enter, and then go to Step 7. To not use DHCP, go to Step 6b.
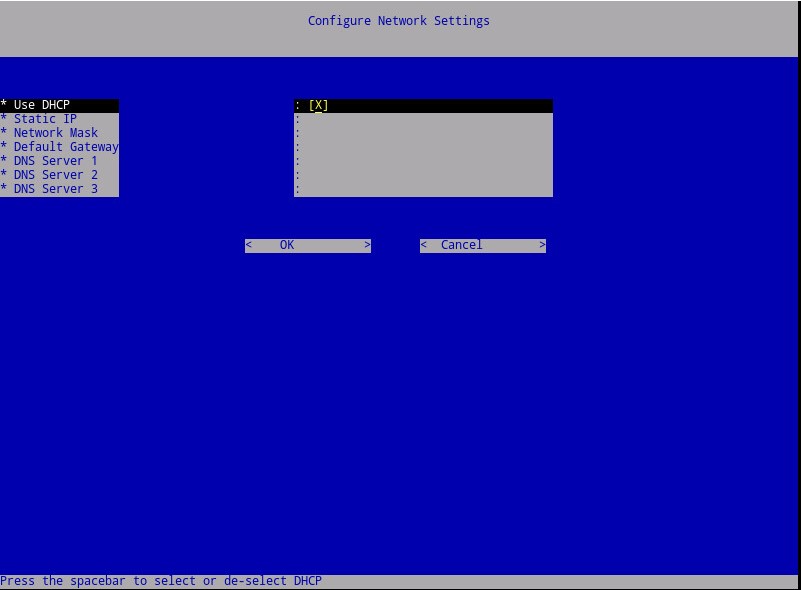
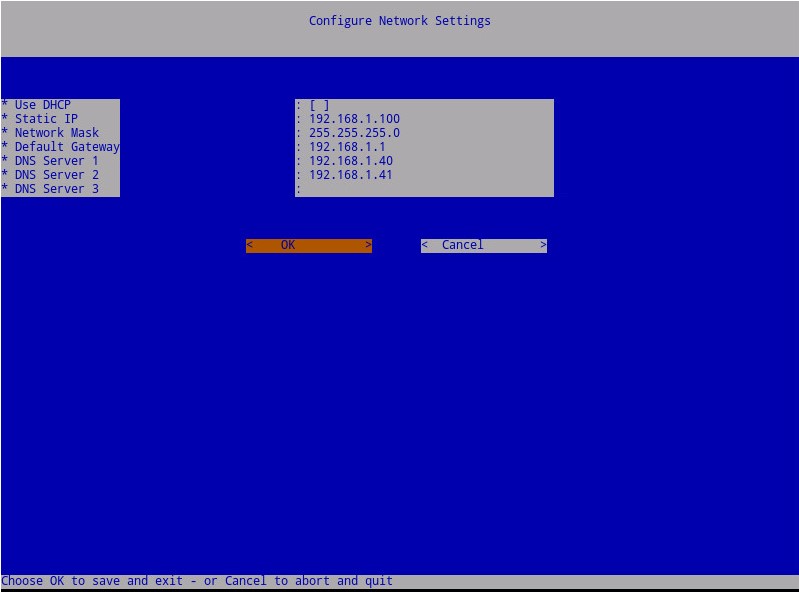
- To disable DHCP for the Dell Security Management Server, press the spacebar to the right of Use DHCP.
- Populate Static IP, Network Mask, Default Gateway, and DNS Server 1.
- Optionally populate DNS Server 2 and DNS Server 3.
- Once network settings have been populated, select OK, press Enter, and then go to Step 7.
 Note:
Note:- Network settings may be changed later from the administration console after installation is completed.
- The network settings in the screenshot example may differ in your environment.
- The DNS server is intended for a DNS server internal to your environment, as opposed to a public DNS.
- To configure Dell Security Management Server for DHCP, leave the default settings checked, select OK, press Enter, and then go to Step 7. To not use DHCP, go to Step 6b.
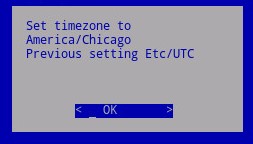
- Select the time zone where the server resides and then press Enter.
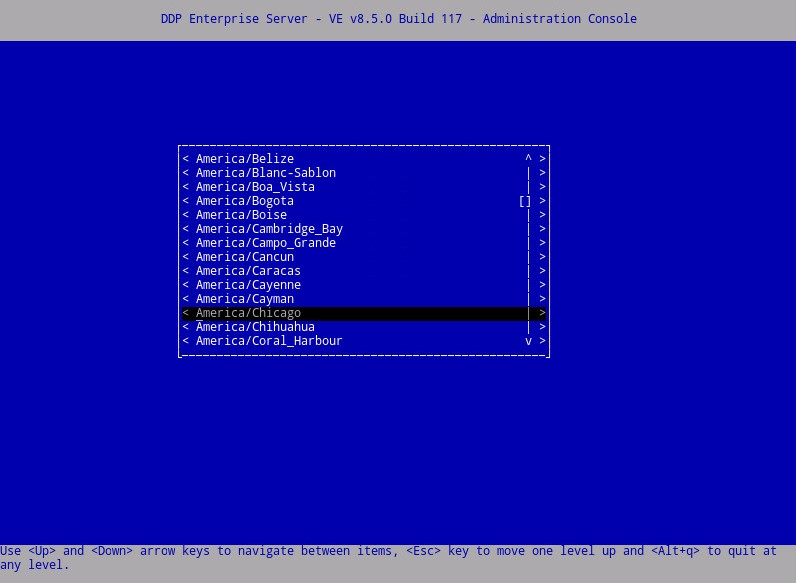 Note: The time zone may be changed later from the administration console after installation is completed.
 - Press Enter on OK to confirm the time zone selected.
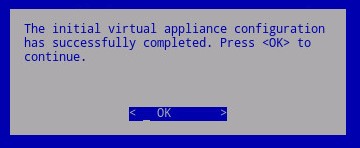
- Press Enter on OK to confirm successful configuration.
8.4.0
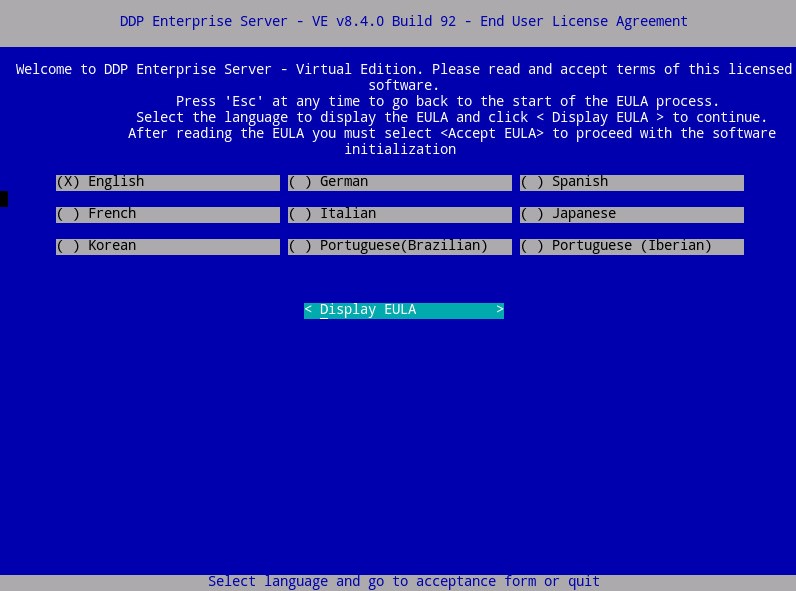
- Select the appropriate language by pressing the spacebar on the appropriate option. Once the appropriate language is chosen, scroll down to Display EULA and then press Enter.
 Note: Language settings may be changed later from the administration console after installation is completed.
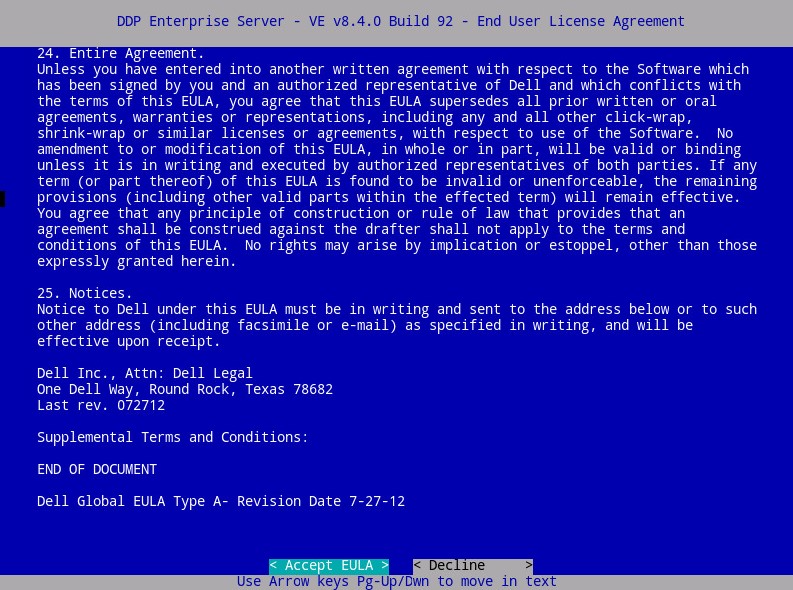
 - Review the End User License Agreement (EULA) by using the arrow keys or page down to scroll down. At the end of the EULA menu, select Accept EULA, and then press Enter.
- Select OK and press Enter unless if you must change the Update Server Hostname.
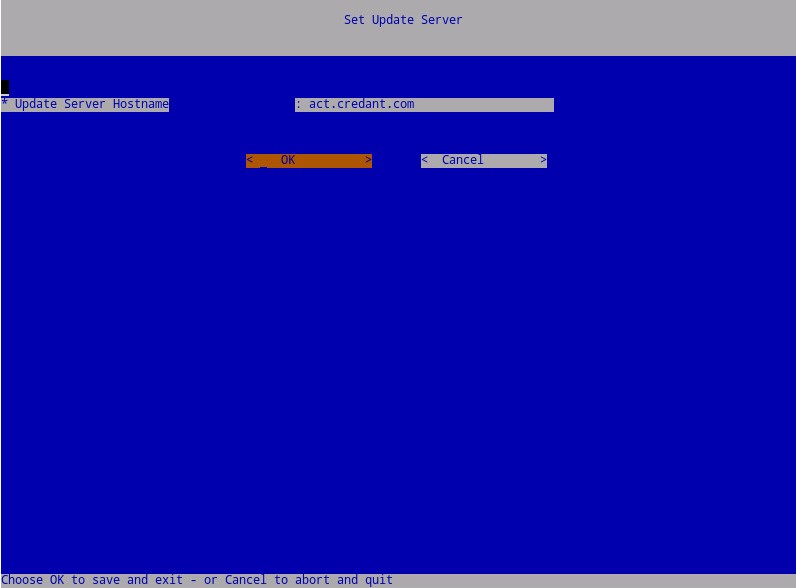
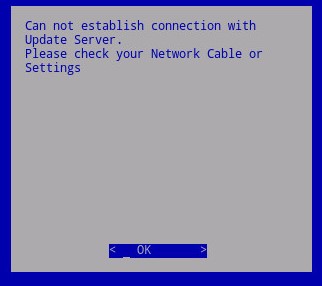
- If a "Can not establish connection with Update Server" message is received, press Enter on OK.
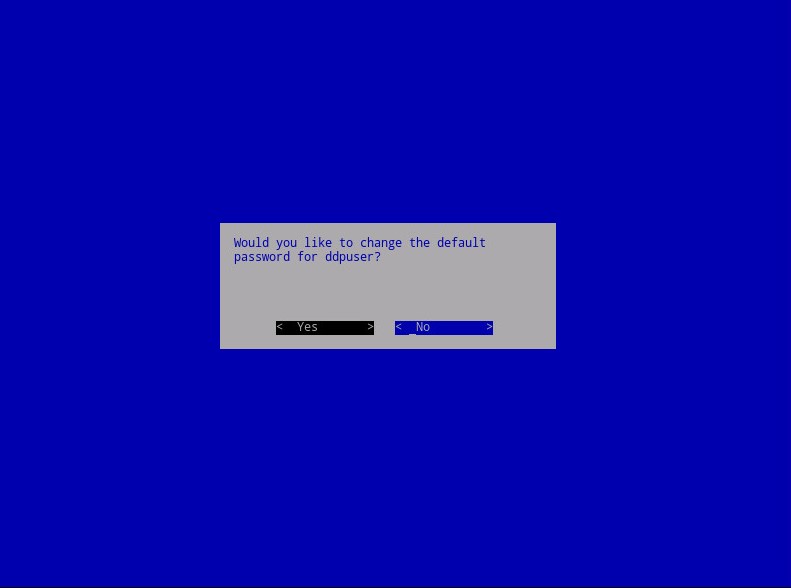
- Optionally select Yes and then press Enter to change the default password for
ddpuser. If Yes was selected, go to Step 5a. To leave the default password forddpuser, select No, press Enter, and then go to Step 6.
 Note:
Note:- This password, along with the passwords for
ddpconsoleandddpsupport, may be changed later from the administration console after installation is completed. - The default credentials for Dell Data Protection Enterprise Server Virtual Edition are:
- Username:
ddpuser - Password:
ddpuser
- Username:
- In the Set
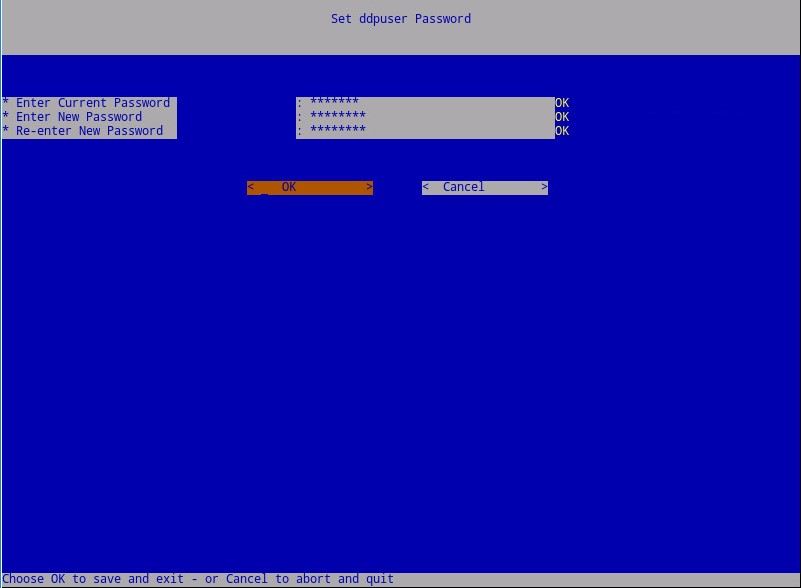
ddpuserPassword menu, populate the Current Password forddpuser. - Populate New Password and Re-enter New Password.
- Select OK and then press Enter.
- This password, along with the passwords for
- Populate a fully qualified domain name (FQDN) for the Hostname, select OK, and then press Enter.
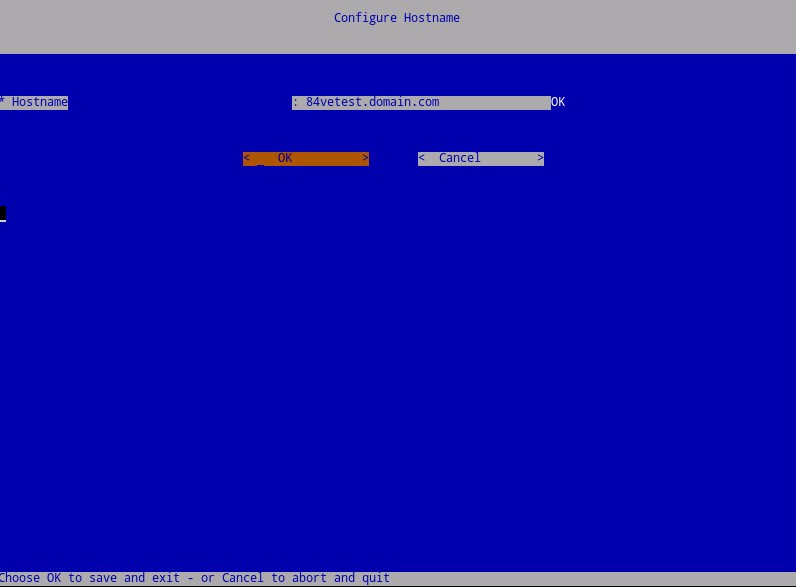
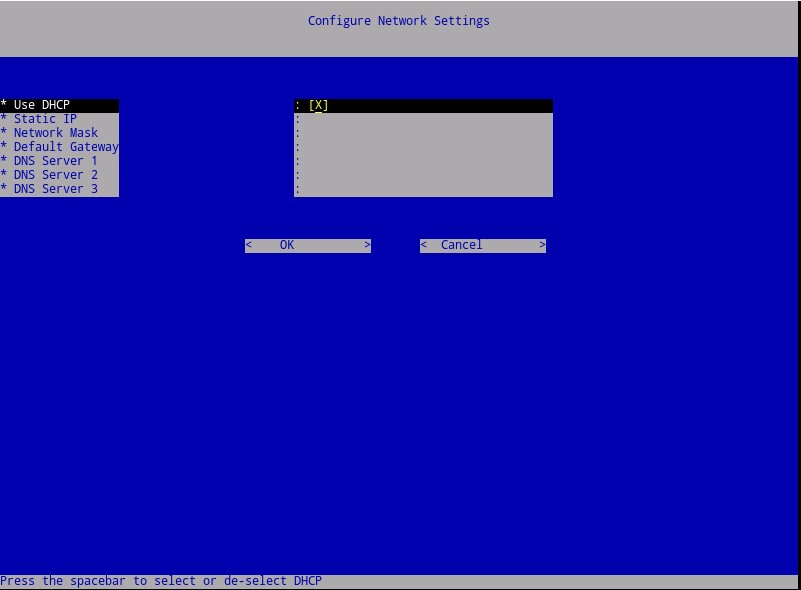
- In the Configure Settings menu:
- To configure Dell Security Management Server for DHCP, leave the default settings checked, select OK, press Enter, and then go to Step 8. To not use DHCP, go to Step 7b.
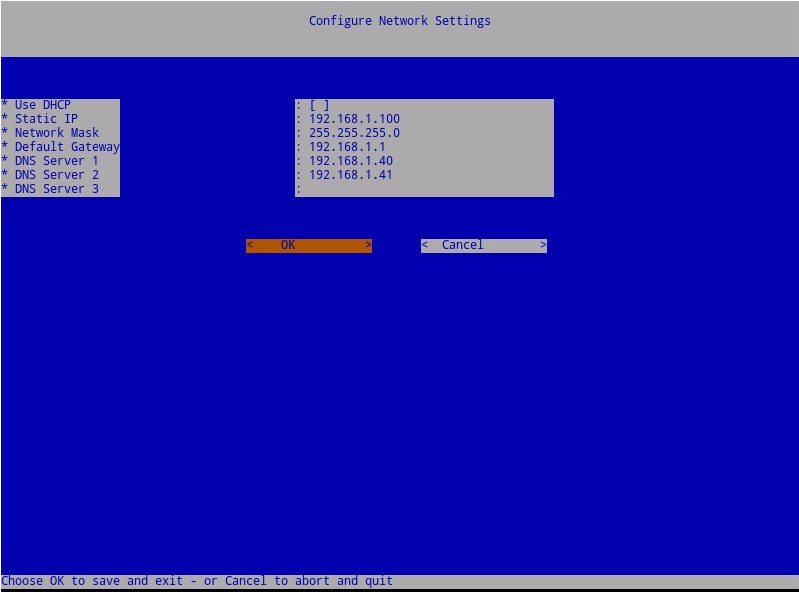
- To disable DHCP for the Dell Security Management Server, press the spacebar to the right of Use DHCP.
- Populate Static IP, Network Mask, Default Gateway, and DNS Server 1.
- Optionally populate DNS Server 2 and DNS Server 3.
- Once network settings have been populated, select OK, press Enter, and then go to Step 8.
 Note:
Note:- Network settings may be changed later from the administration console after installation is completed.
- The network settings in the screenshot example may differ in your environment.
- The DNS server is intended for a DNS server internal to your environment, as opposed to a public DNS.
- To configure Dell Security Management Server for DHCP, leave the default settings checked, select OK, press Enter, and then go to Step 8. To not use DHCP, go to Step 7b.
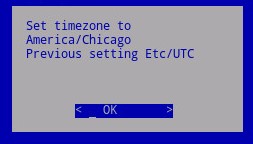
- Select the time zone where the server resides and then press Enter.
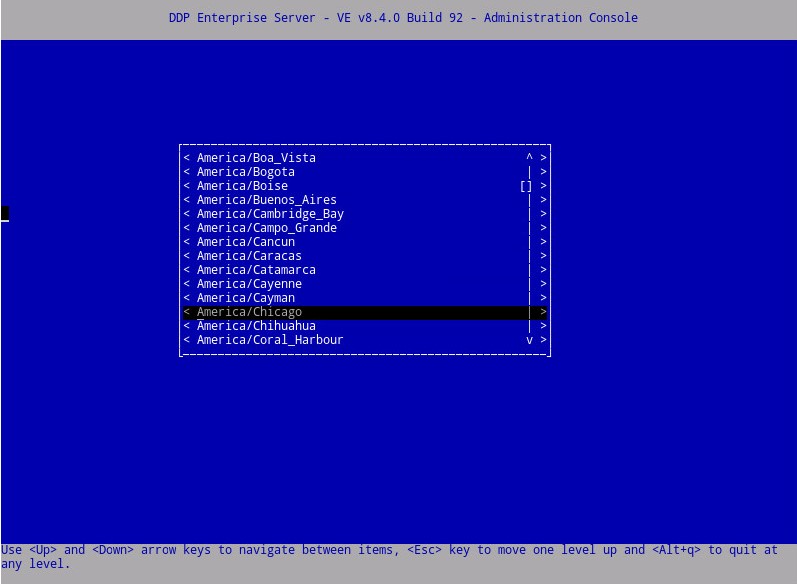 Note: The time zone may be changed later from the administration console after installation is completed.
 - Press Enter on OK to confirm the time zone selected.
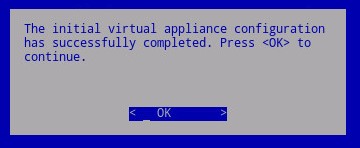
- Press Enter on OK to confirm successful configuration.
8.2.0 to 8.2.3
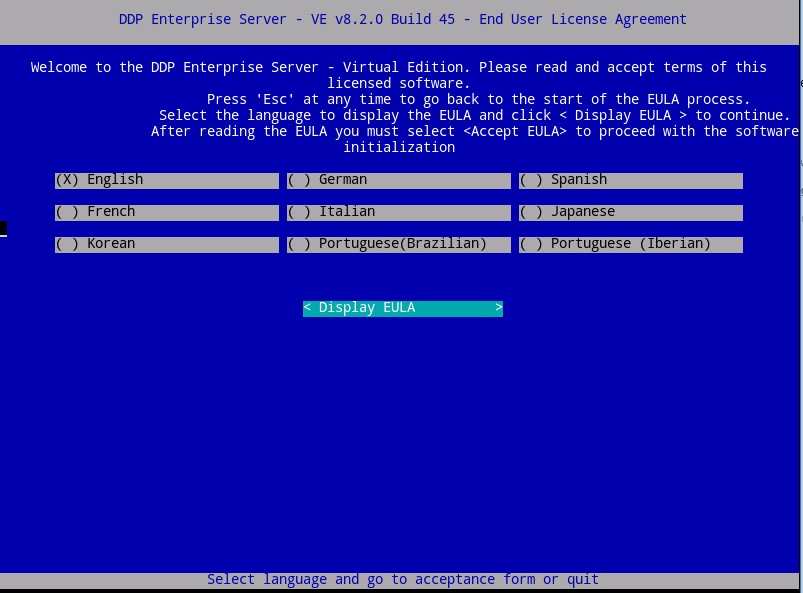
- Select the appropriate language by pressing the spacebar on the appropriate option. Once the appropriate language is chosen, scroll down to Display EULA and then press Enter.
 Note: Language settings may be changed later from the administration console after installation is completed.
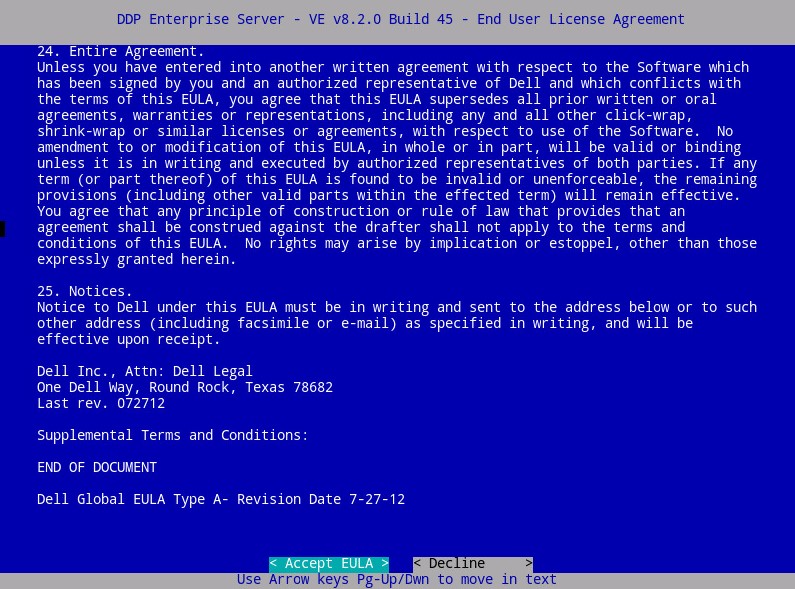
 - Review the End User License Agreement (EULA) by using the arrow keys or page down to scroll down. At the end of the EULA menu, select Accept EULA, and then press Enter.
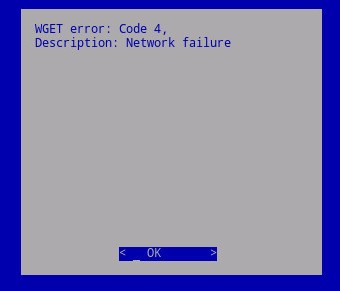
- If a "WGET error: Code 4, Description: Network failure" is received, select OK and then press Enter.
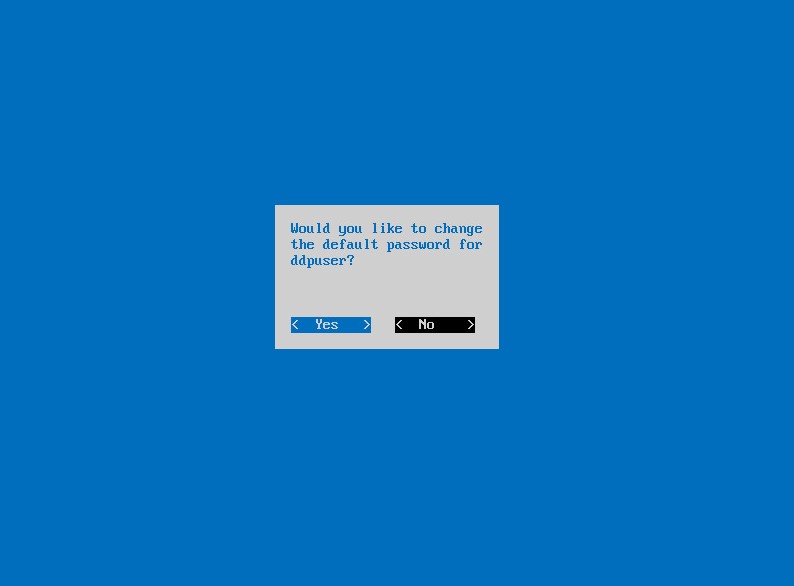
- Optionally select Yes and then press Enter to change the default password for
ddpuser. If Yes was selected, go to Step 4a. To leave the default password forddpuser, select No, press Enter, and then go to Step 5.
 Note:
Note:- This password, along with the passwords for
ddpconsoleandddpsupport, may be changed later from the administration console after installation is completed. - The default credentials for Dell Data Protection Enterprise Server Virtual Edition are:
- Username:
ddpuser - Password:
ddpuser
- Username:
- In the Set
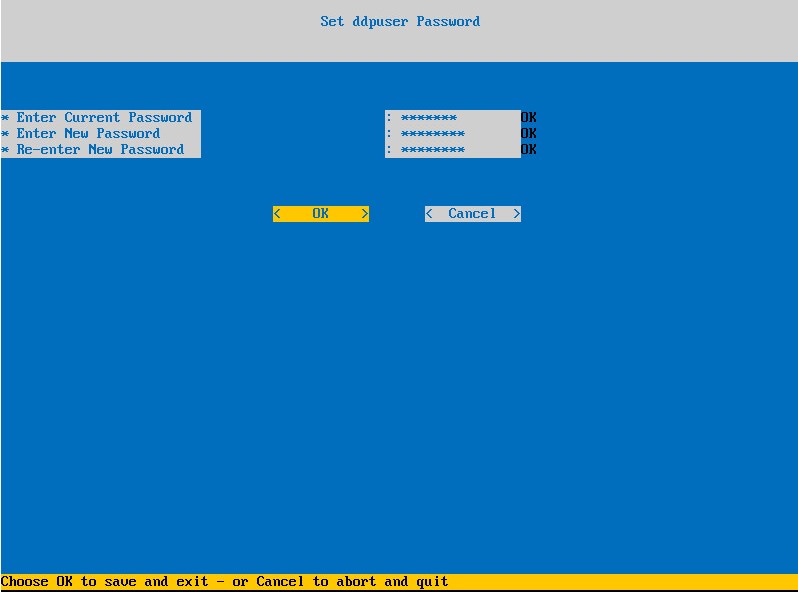
ddpuserPassword menu, populate the Current Password forddpuser. - Populate New Password and Re-enter New Password.
- Select OK and then press Enter.
- This password, along with the passwords for
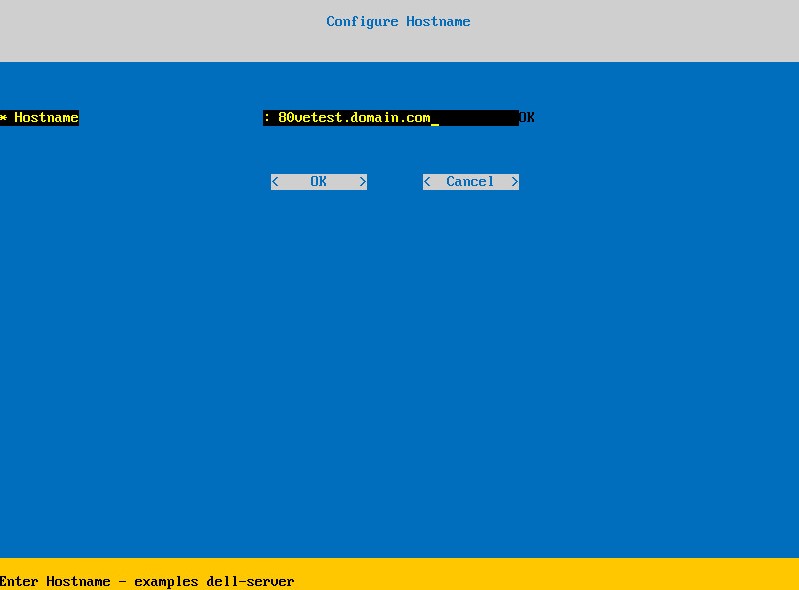
- Populate a fully qualified domain name (FQDN) for the Hostname, select OK, and then press Enter.
- In the Configure Settings menu:
- To configure Dell Security Management Server for DHCP, leave the default settings checked, select OK, press Enter, and then go to Step 7. To not use DHCP, go to Step 6b.
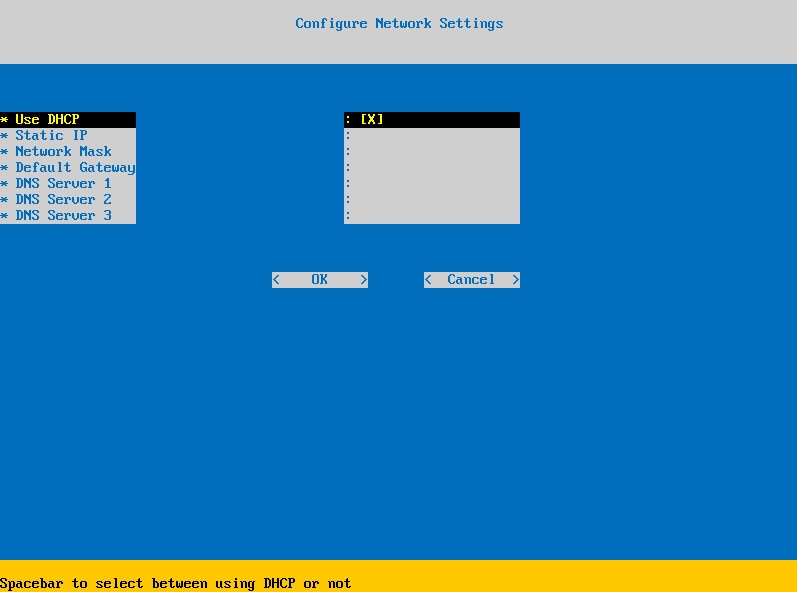
- To disable DHCP for the Dell Security Management Server, press the spacebar to the right of Use DHCP.
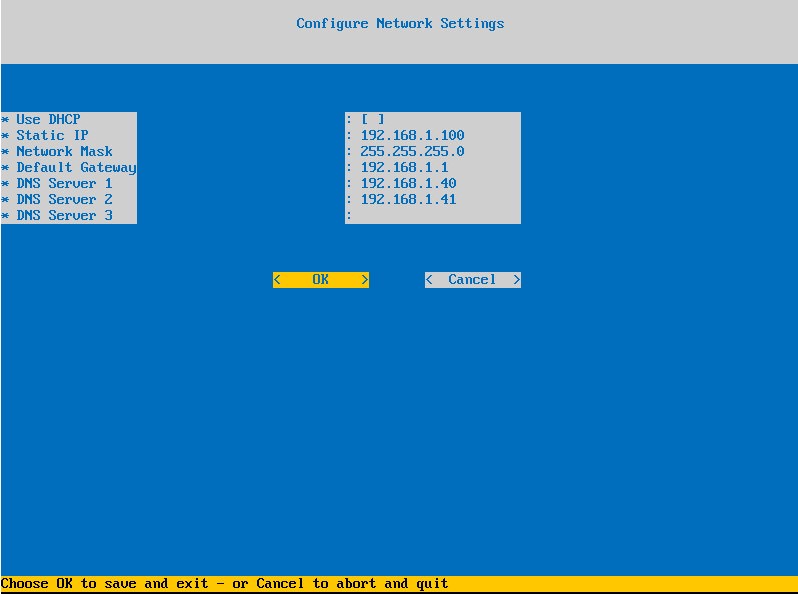
- Populate Static IP, Network Mask, Default Gateway, and DNS Server 1.
- Optionally populate DNS Server 2 and DNS Server 3.
- Once network settings have been populated, select OK, press Enter, and then go to Step 7.
 Note:
Note:- Network settings may be changed later from the administration console after installation is completed.
- The network settings in the screenshot example may differ in your environment.
- The DNS server is intended for a DNS server internal to your environment, as opposed to a public DNS.
- To configure Dell Security Management Server for DHCP, leave the default settings checked, select OK, press Enter, and then go to Step 7. To not use DHCP, go to Step 6b.
- Select the time zone where the server resides and then press Enter.
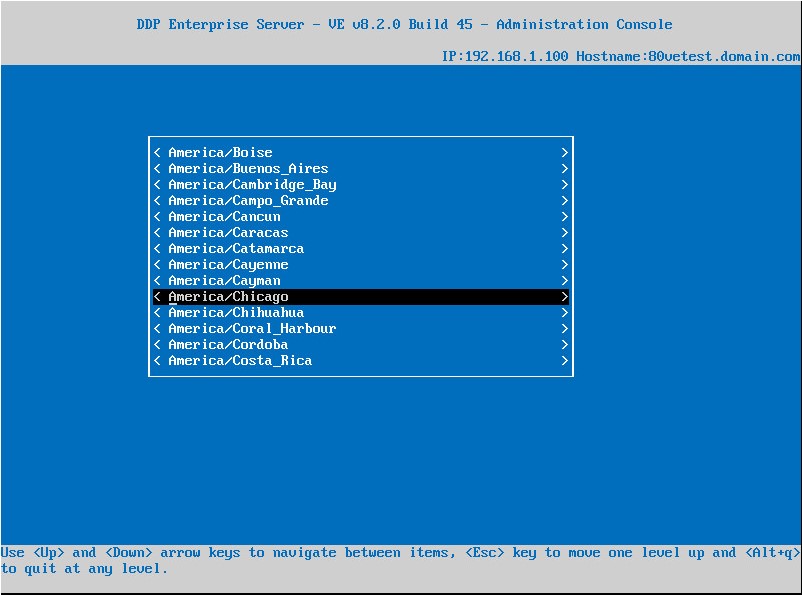 Note: The time zone may be changed later from the administration console after installation is completed.
 - Press Enter on OK to confirm the time zone selected.
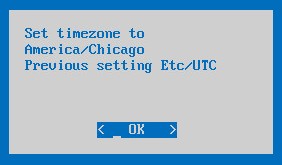
- Press Enter on OK to confirm successful configuration.
Affected Products
Dell EncryptionArticle Properties
Article Number: 000123789
Article Type: How To
Last Modified: 10 Jul 2026
Version: 14
Find answers to your questions from other Dell users
Support Services
Check if your device is covered by Support Services.