How To Configure Multiple Displays on a Dell Computer Using the Ubuntu Operating System
Summary: The following article provides information about setting up multiple screens using the Ubuntu operating system on your Dell computer.
This article applies to
This article does not apply to
This article is not tied to any specific product.
Not all product versions are identified in this article.
Instructions
Table of Contents:
Introduction
Many people now expect to have multiple displays or monitors working from their computer as a base level specification. Dell has always built this capability into their Windows Computers. (Both in the hardware that is offered and in the utilities that are installed from the factory.)
You can get multiple screens to work on your computer. However, you must have both the correct hardware and the correct software installed along with the support of the operating system.
Hardware Requirements:
- The obvious first requirement is that you have more than one display or monitor.
- The second is that your computer has more than one video output:
- For a Laptop, this could be a Visual Graphics Adapter (VGA) and either a DisplayPort (DP), or High-Definition Multi-Media Interface (HDMI) connector that is built into the computer.
- For a Docked Laptop using a port replicator, this could be multiple VGA, HDMI, DP, and Digital Visual Interface (DVI) connectors.
- For a Desktop, this could be either VGA or DVI and either DP or HDMI connector on the Motherboard.
- For a Desktop, use an Add-on Video card. This is only limited to the type of card that you buy and the kind of money you are willing to spend.
- You need the correct video cables to go between the personal computer video connectors and the monitor or display.
Software Requirements:
- An operating system that supports multiple displays.
- Installing the correct drivers and software:
- If you are using onboard video, you must have the correct software or driver that is installed from the Graphical Processor Unit (GPU)s manufacturer. (Commonly Intel or AMD)
- If you are using a discrete or add-on video card, you need the appropriate software from the GPUs' manufacturer. (Commonly NVIDIA, Radeon, Matrox or one of the other manufacturers.)
Note: I recommend you look over the type of video in use across the different connectors. Before you attempt to connect multiple displays using different types of video connector, or by using additional adapters or converters. (For example: VGA is analog only. Some DVI is both analog and digital, while some DVI is only digital.) Knowing what type of DVI connector you have is key to knowing what type of video it supports. HDMI and DisplayPort are digital-only. HDMI carries sound and video, whereas DisplayPort carries only video. Some issues can be avoided if you get the connectors and cabling correct here.
Configuring Multiple Displays on Ubuntu
Ensure that your Graphics drivers and software are installed and up to date. (They are open-source drivers which install by default and you can install proprietary drivers at need. ) You can find out more on the following article:
When everything is up to date, reboot your computer and the Ubuntu Desktop.
-
Connect the additional monitor or display to your computer. Ubuntu should attempt to automatically configure the additional screens.
-
To configure the additional screens yourself, go to System Settings > Display.
-
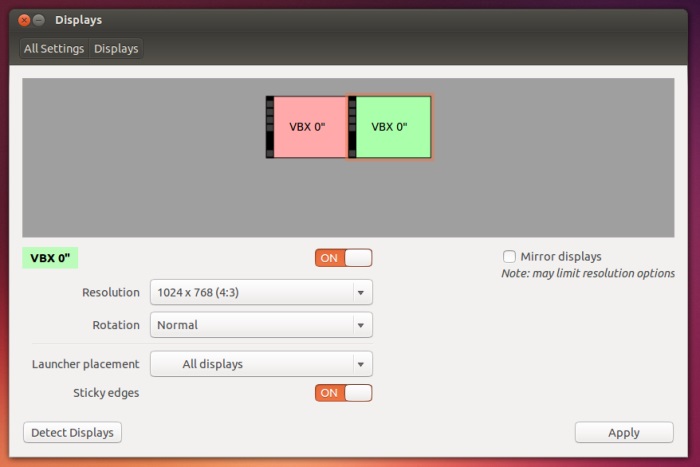
The top part of the configuration window displays the detected monitors or displays along with their names. (You can click the monitors and drag them into the correct alignment for how you have them set up.)
-
The bottom of the configuration window shows several options:
-
There is a checkbox at the upper right-hand side corner of the bottom half of the configuration window that switch the screens between Extend and Mirrored. (Extend is the default. Be aware of setting the screens to Mirror as this may restrict the possible resolutions in use.)
-
The first option down the middle is Resolution: This has a drop-down menu of choices. (It matches whichever screen that you have clicked at the top of the window.) The resolution is how big or small the screen appears, the detail is shown and the aspect of the screen.
-
The second option down the middle is Rotation: This also has a drop-down menu of choices. (Again it matches whichever screen that you have clicked.) The rotation decides which edge of the screen the display regards as being the bottom. This is useful if you have one or more of your displays that are mounted on their side. Where they give a Portrait, rather than a Landscape view.
-
The third option down the middle is Launcher Placement: This has a drop-down menu which gives a choice between the launcher being visible on only on one of the displays or on all displays. (The default setting is All Displays. The Launcher is the vertical taskbar in Ubuntu.)
-
The fourth option down the middle is Sticky Edges: This has a toggle between on and off. (The default setting is ON.) The purpose of Sticky Edges is to allow applications to dock to the edge where two monitors meet. It slows the mouse to give you more time to align the application correctly.
-
There is a button at the lower left-hand side corner of the configuration window that is named Detect Displays. It attempts to detect any screens plugged to your computer and assign an ID on each screen so you can see if your configuration is working.
-
There is a button at the lower right-hand side corner of the configuration window that is named Apply Settings that save your configuration.
-
-
-
Use this window and its various options to configure the multiple screens the way you want them. How you set your screens up is purely down to your preferences and needs.
Tips and fixes for common issues
Note: Dell only supports the hardware that ships with the computer and the factory-installed version of the Ubuntu Operating system. What if the hardware checks out OK and an Operating System reinstall from the recovery partition does not resolve the issue? Then you could be directed to contact Canonical for further Software support. If the hardware in question is a third-party device, you may be directed to contact the manufacturer of the device for further help. Are you still having trouble? You may be directed to contact the Ubuntu community forum with the information about your hardware for further support. I give some general troubleshooting steps in the section below, but this information is used at your own risk.
Tips
Use a different wallpaper on each screen or extend one across them all
There are two applications which can be used to achieve this sort of thing:
-
The first application is SynchWall. Use the command below to install it:
sudo add-apt-repository ppa:milarimogard/webupd8sudo apt-get updatesudo apt-get install synchwall-
Open the snychwall app and go to Preferences > Display parameters. Go to Multi-Monitor Display and select Extend image on the page below. Check the box next to share image between monitors to put the wallpaper across all your screens.
-
synchwall can also rotate wallpapers, apply effects, and more.
-
-
The second application is Nitrogen. You can search for it in the Ubuntu Software center or use the command below:
sudo apt-get install nitrogenNitrogen does not have a desktop launcher, so open it from the command line:
nitrogen-
Go to Preferences and add your wallpaper folder. Select Full Screen at the bottom of the preferences window to stretch the same wallpaper across the monitors.
-
To get individual wallpapers on each screen select screen 1, 2, so on at the bottom of the preferences page to set each wallpaper on each screen.
Note: To set a different wallpaper for each monitor, you must disable the file manager from handling the desktop. This means you do not have folders on the desktop.You must install the GNOME Tweak Tool:
sudo apt=get install gnome-tweak-toolGo to the Desktop section in the GNOME tweak tool and set the Have file manager handle the desktop option to OFF.
-
To have your configuration saved past a reboot, remember and add nitrogen --restore to your startup applications.
-
Get Flash videos to remain full-screen on one monitor when using the desktop on another monitor
Most Flash videos and Games are shown within either the Chrome or Firefox browser. There are a couple of extensions that you can use that resolves this issue:
-
For Google Chrome or Chromium: MaximizeFlash resizes the flash video or game to fill the whole browser. If you press F11, it makes the browser full-screen on the monitor you selected.
-
For Firefox: Flash Game Maximizer adds a button to the addon bar that resizes the flash video or game to fill the whole browser. If you press F11, it makes the browser full-screen on the monitor you selected. (Be aware there are known issues with this extension and YouTube.)
Fixes
Issues with Video drivers
You may not achieve the configuration that you want with the open-source drivers that default install on your computer. You may want to try the proprietary driver and utility that comes from the video GPU manufacturer. Sometimes going from the proprietary driver to the open-source driver can achieve the results that you want, depending on what you are trying to do. The basic advice is - if you are having problems with one, try installing the other instead and see if you experience the same issue?
The Ubuntu Configuration Window does not let me set up my displays as I need them
As in Windows, you can use the software that installs with the proprietary driver to configure your video devices and to configure your multiple displays. Each manufacturer has more information about their support site about how to use their specific software.
Ubuntu does not detect all the displays correctly
-
Install Compiz Config Settings Manager (CCSM):
sudo apt-get install compizconfig-settings-manager -
Open CCSM and go to General Options > Display Settings.
-
Clear the Detect Outputs box.
-
In the outputs array, set each of your display screen resolutions.
-
Go back to section 2 and configure your display again in Ubuntu's display settings.
Ubuntu does not keep the display position past a restart
There are a series of steps below. They take you through creating a script that allows you to fix the positions of your multiple monitors. It keeps them past a restart or coming out of suspend:
-
Delete your old monitors.xml file and create one using the Gnome display settings tool:
rm ~/.config/monitors.xmlgnome-control-centerGo to Displays and change the positions to how you want them.
-
Open the file ~/.config/monitors.xml in an editor and ensure that the primary display has a yes for the primary flag.
-
Install the libxml2-utils package if it is not already installed:
sudo apt-get install libxml2-utils -
Use the commands below to copy the script to a directory on your path and make it executable:
sudo wget -O /usr/local/sbin/update-monitor-position http://www.calgorithms.com/assets/files/update-monitor-positionchmod +x /usr/local/sbin/update-monitor-position -
Use the System > Startup Applications tool to add update-monitor-position so that it runs when you log in.
-
Reboot your computer and check the script works.
Additional Information
Note:
Software support for Canonical is through the following methods:
Dell provides Technical Support:
Software support for Canonical is through the following methods:
-
Search for Frequently Asked Questions (FAQs) on Ubuntu
Dell provides Technical Support:
Affected Products
Inspiron, Latitude, Vostro, XPS, Fixed WorkstationsArticle Properties
Article Number: 000130979
Article Type: How To
Last Modified: 22 Jul 2025
Version: 7
Find answers to your questions from other Dell users
Support Services
Check if your device is covered by Support Services.