How to Troubleshoot Inkjet Cartridge Issues on Your Dell Printer
Summary: Resolving the printer not recognizing one or more ink cartridges with Cartridge Errors (Alignment, Missing and Unsupported) or only prints in one color.
This article applies to
This article does not apply to
This article is not tied to any specific product.
Not all product versions are identified in this article.
Symptoms
Table of Contents:
- Verify That Ink Cartridges Are the Proper Cartridges and Have Not Been Refilled
- Verify that Packing Tape has Been Removed From Ink Cartridge
- Verify That the Ink Cartridges Are Installed in the Correct Slots
- Ensure that the Printer Preferences are Set to Use all Available Ink
- Perform a Power On Reset of the Printer
This article provides information about how to resolve the printer not recognizing one or more ink cartridges or only prints in one color. The error messages may include Cartridge Alignment, Cartridge Error, Cartridge Missing, or Unsupported Cartridge.
1: Verify That Ink Cartridges Are the Proper Cartridges and Have Not Been Refilled
Dell does not recommend the use of refilled or third-party ink cartridges. These cartridges can potentially damage the printer.
To verify the cartridges are Dell-branded, take the cartridges out of the printer and look at the top. Verify that the cartridge has the word Dell molded into the cartridge case (Figure 1). For more information about identifying the proper printer cartridges, refer to the Online User's Guide.
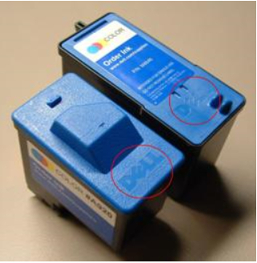
Figure 1: Dell-branded ink cartridges
Note: The 725 and 810 printers only have one ink cartridge.
2: Verify that Packing Tape has Been Removed From Ink Cartridge
Note: The ink cartridges are in the up/loading position unless the printer is busy.
- Ensure that the printer is turned on.
- Lift the printer's front cover.
- Squeeze the tabs on the cartridge lids and lift the cartridge lids up.
The cartridges pop up when the lids are fully lifted.
- Remove the cartridges.
- Inspect and remove any remaining blue packaging tape from the ink cartridge.
- Shake the Dell series cartridges before reseating them.
- Reinstall the cartridges.
- Ensure that the lip is in the correct position (Figure 2).

Figure 2: Ink cartridge lip location
- Snap the lids closed.
- Close the printer's front cover.
3: Verify That the Ink Cartridges Are Installed in the Correct Slots
The Dell All-In-One printers come with two separate ink compartments that are not interchangeable. The black ink cartridge cannot be used in the color ink cartridge slot and conversely.
- Turn the printer on.
-
Raise the front cover of the printer so that the ink cartridge carrier moves to the center.
-
Inspect the ink cartridges ensuring that the black ink cartridge is inserted into the leftmost side of the ink compartment and that the color ink cartridge is inserted into the far right ink compartment.
Note: If the ink cartridges are not in their correct slots, carefully remove the ink cartridges and reinsert them into the correct slots. Ensure that the lip is in the correct position (Figure 3).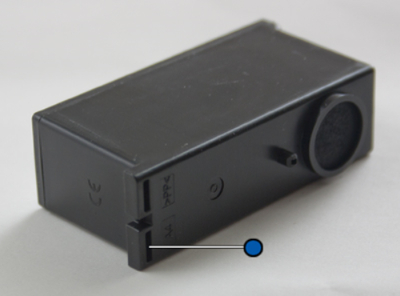
Figure 3: Ink cartridge lip location - Close the front cover of the printer.
4: Ensure that the Printer Preferences is Set to Use all Available Ink
Click the Operating System from the list below that is on the computer.
Windows 10
-
In the Search box, type Devices and Printers (Control panel).
-
Touch and hold or right-click your printer to open the Options menu.
-
Touch or click Printing Preferences.
-
Select Print using all available ink from the lower right corner.
-
Touch or click OK.
5: Perform a Power On Reset of the Printer
-
Turn the printer off.
-
Disconnect the power and data cables from the printer.
-
Wait at least five seconds.
-
Reconnect the power and data cables to the printer.
-
Turn the printer on.
Cause
N/A
Resolution
N/A
Affected Products
Dell 720 Color Printer, Dell 725 Personal Inkjet Printer, Dell 810 All In One Inkjet Printer, Dell A920 All In One Personal Printer, Dell 922 All In One Photo Printer, Dell 924 All-in-One Photo Printer, Dell 926 All In One Inkjet Printer
, Dell 928 All In One Inkjet Printer, Dell A940 All In One Personal Printer, Dell 942 All In One Inkjet Printer, Dell 944 All In One Inkjet Printer, Dell 946 All In One Printer, Dell 948 All In One Printer, Dell 948w All In One Photo Printer, Dell A960 All In One Personal Printer, Dell 962 All In One Photo Printer, Dell 964 All In One Photo Printer, Dell 966 All In One Inkjet Printer, Dell 968 All In One Photo Printer, Dell J740 Personal Inkjet Printer, Dell P513w All In One Photo Printer, Dell P703w All In One Photo Printer, Dell P713w All In One Photo Printer, Dell V305 All In One Inkjet Printer, Dell V305w All In One Wireless Inkjet Printer, Dell V313 All In One Inkjet Printer, Dell V313w All In One Wireless Inkjet Printer, Dell V505 All In One Inkjet Printer, Dell V515w All In One Wireless Inkjet Printer, Dell V715w All In One Wireless Inkjet Printer
...
Article Properties
Article Number: 000136082
Article Type: Solution
Last Modified: 30 Apr 2026
Version: 8
Find answers to your questions from other Dell users
Support Services
Check if your device is covered by Support Services.