How to Integrate PowerStore with PowerProtect Data Domain for Data Backup
Summary: This article explains how to integrate PowerStore with PowerProtect Data Domain using PowerStore Manager to enable direct snapshot-based backup and recovery.
This article applies to
This article does not apply to
This article is not tied to any specific product.
Not all product versions are identified in this article.
Instructions
Protection using Storage Direct using PowerStore can have two different options to be implemented:
- PowerProtect Data Manager (PPDM) integrated
- PowerStore Manager integrated
ATTENTION - Do Not use both combined!
This article guides you on PowerStore Manager integration - (Option 2)
With PowerStoreOS, you can backup a point-in-time snapshot directly to PowerProtect Data Domain (PPDD).
From PowerStoreOS 3.5 and above customers can backup and recover volume snapshots without the need for a backup tool.
The integration of PowerStore with PowerProtect DD is accomplished using PowerStore Manager user interface.
This integration is supported with the following:-
- PowerProtect Data Domain OS v6.2.1.x and newer
- PowerProtect Data Domain Virtual Edition (DDVE)
- Supports only PowerStore volumes and volume groups on PowerStore T models
Note: PowerStoreOS 3.5 do not support PowerStore X models. Check compatibility matrix for the latest supported versions!
Verify the data transfer connectivity between PowerStore and Data Domain.
Management and data transfer connectivity must be established between the PowerStore appliance and PowerProtect DD (PPDD) appliance.
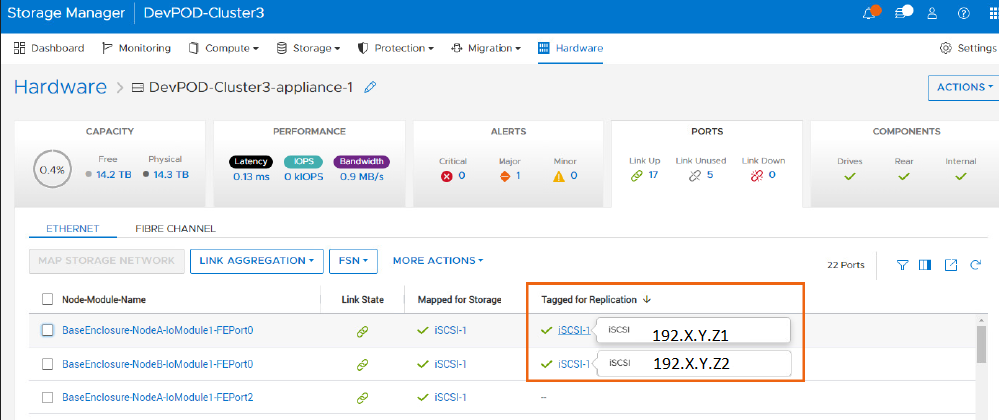
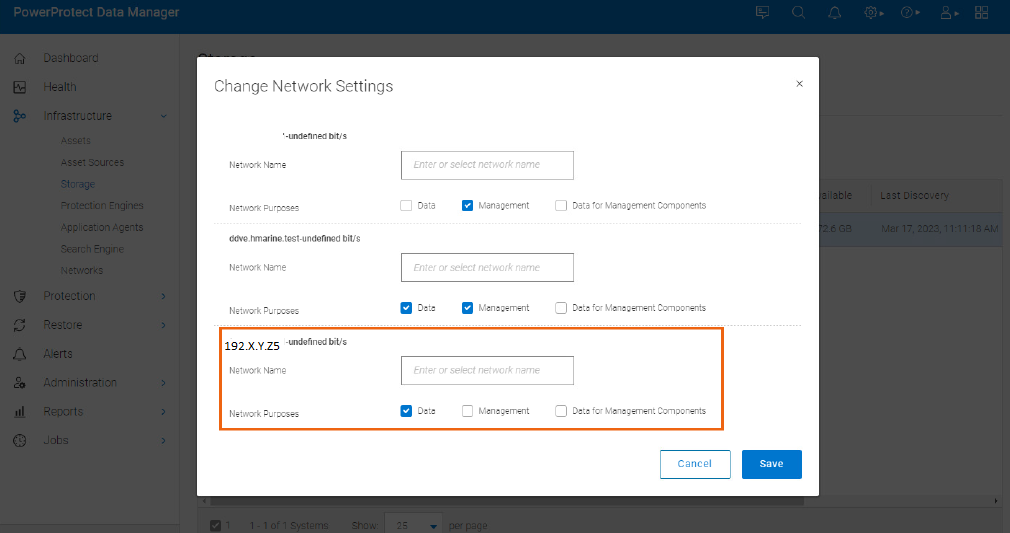
The connectivity is IP-based, hence the PowerStore storage ports must be on the same physical network as the PPDD data transfer ports. In PowerStore, storage ports that are "tagged for replication" are used for data transfer to and from PPDD.
See the images below to know where exactly the data network must be verified on both PowerProtect Data Domain and PowerStore.
 |
 |
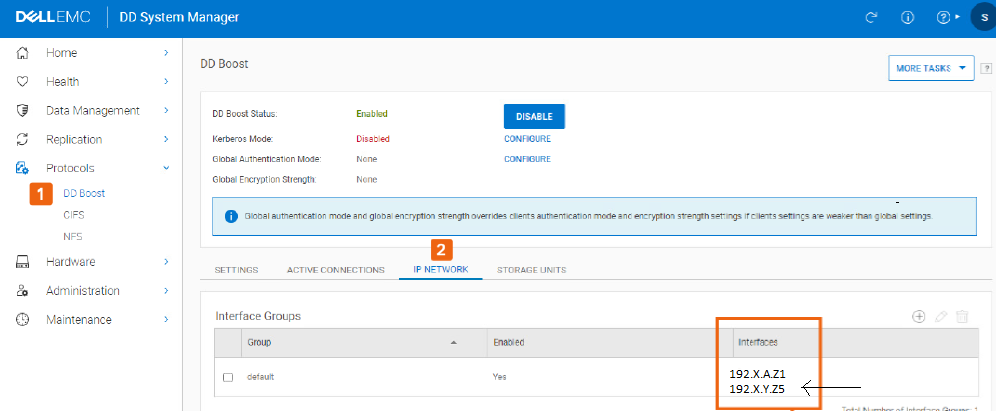
To check the data port IP in PPDD, directly login to PPDD System Manager using sysadmin credentials to check the data ports IP addresses if they are in the same network as PowerStore storage ports.
Login to PPDD System Manager UI > Protocols > DD Boost > IP NETWORK
The steps to integrate and configure PowerStore with PowerProtect Data Domain are as follows:-
Step 1: Create Protection Storage in PowerProtect Data Domain (PPDD).
Note: The storage unit is the target for a PowerStore Protection Policy and is needed when adding the PowerProtect Data Domain as a remote system in PowerStore.
-
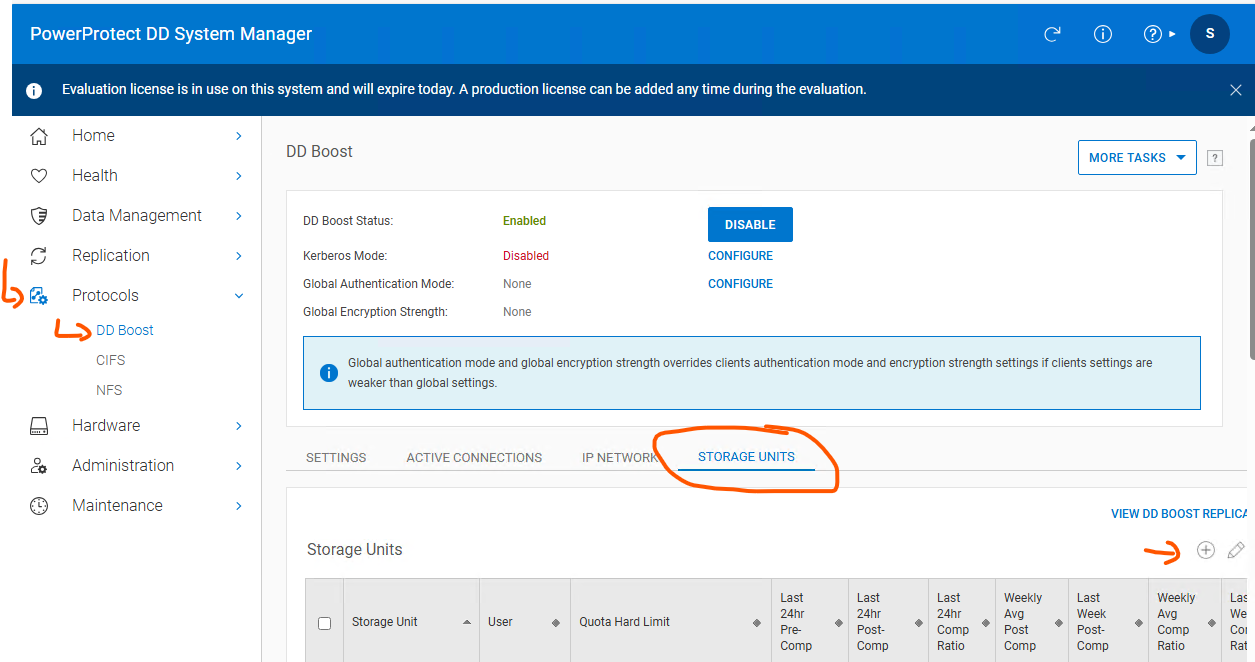
Login to PPDD with an administrator account like "sysadmin" user then select Protocols > DD Boost > Storage Units
-
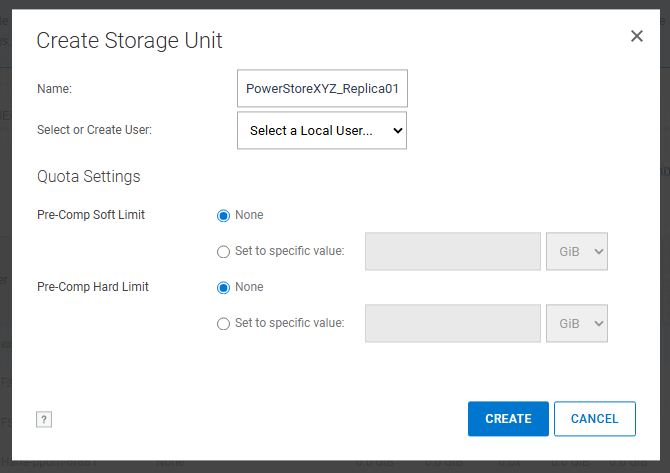
Click the "+" sign to open "Create Storage Unit" window
-
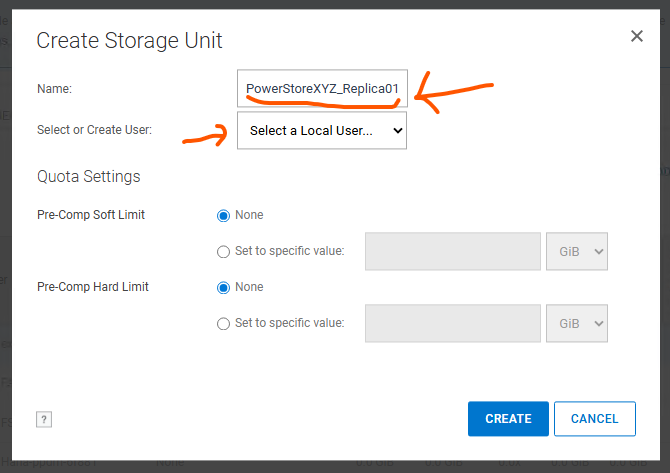
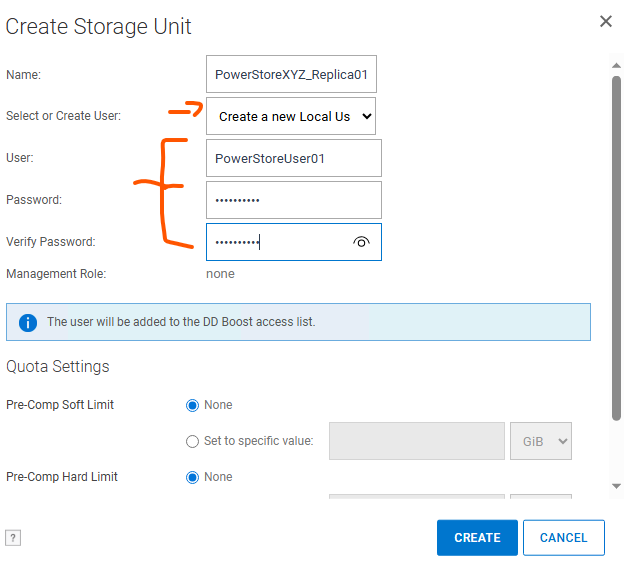
Enter the required details.
- Name - Name the storage unit
- User - Select existing local user or create new, in this below screenshot, a new local user is created and automatically added to DD Boost access list. It is preferred to use "admin" user as it creates the snapshots on DD during the replication.
- Password - Type in the password for the local user or the admin user
- Quota - Optional
-
Click "CREATE," Task status window opens up.
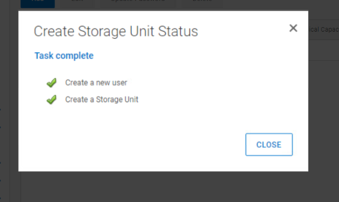 Note: The storage unit has been created on the PowerProtect Data Domain. Refer to this storage unit when adding the Data Domain as a remote system in PowerStore.
Step 2: Verify the connectivity and IP addresses from PowerStore and PowerProtect Data Domain. Ensure in the PowerStore, the replication-tagged ports have the IP address from the same network as PowerProtect Data Domain data transfer network.
Step 3: Add the PowerProtect Data Domain as a remote system in PowerStore.
-
Log in to the PowerStore storage system using admin credentials.
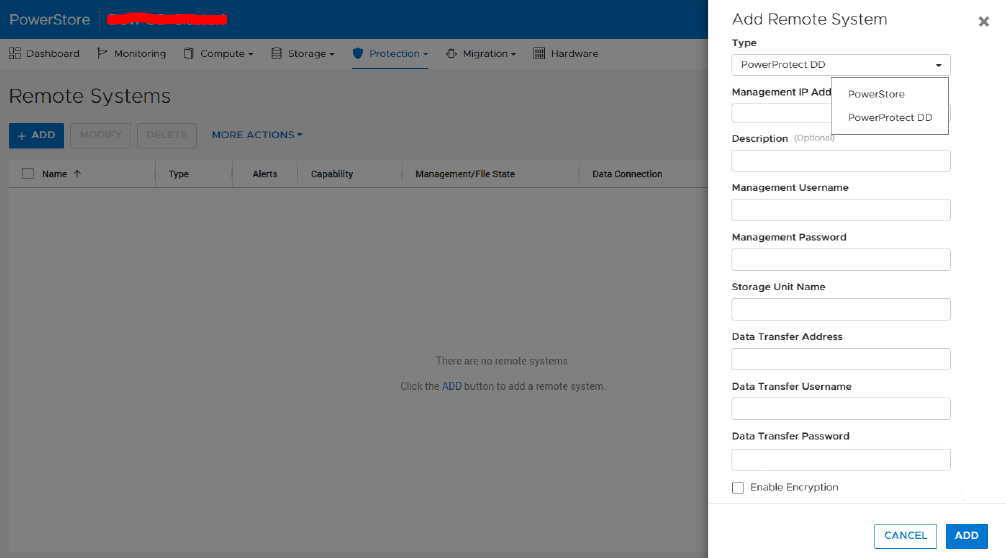
Go to: Protection > Remote Systems > ADD "Add Remote System" window opens. -
Enter the required information and click "ADD"
- Type - Select PowerProtect DD
- Management IP address - Management IP address of the PPDD
- Management username - username used to log in to PPDD
- Management password - type in the password
- Storage Unit Name - Name of the storage unit created earlier on the PPDD
- Data Transfer Address - IP address of the data transfer network of the PPDD which is used to data transfer between PowerStore and Data Domain
- Data Transfer username - username created locally earlier during the storage unit creation step which is a part of DD Boost access list
- Data Transfer password - password for the above username for data transfer
- Enable Encryption - This is recommended when using Data Domain Virtual Edition (DDVE) over AWS.
-
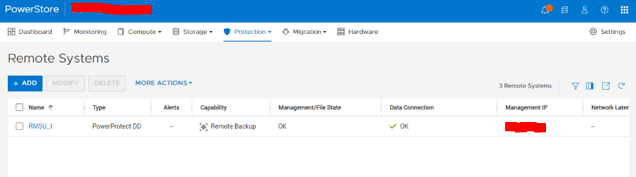
If any certificate verification window comes up, click "CONFIRM," the PowerProtect DD system should be added as a remote system in PowerStore.
Step 4: Create a Protection Policy remote backup rule in PowerStore.
-
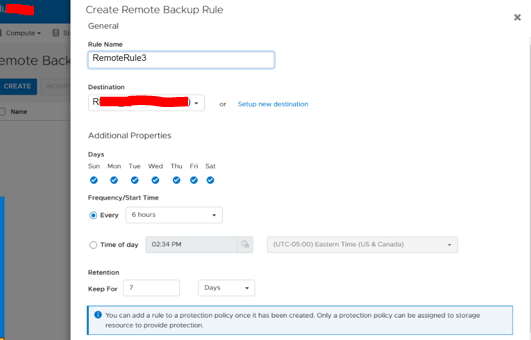
Go to: Protection > Protection Policies > Remote Backup Rules, Click "CREATE"
Select the 'Destination' as the remote storage unit name that you have already created in PPDM and added in the PowerStore.
-
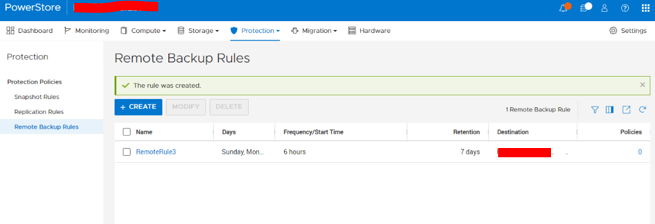
The remote backup rule is created like the below example screenshot.
Step 5: Apply the Remote Backup Rule created above to the required Protection Policy.
Protection > Protection Policies > Click the Protection Policy.
Scroll down to the Remote Backup Rules section > Select the remote backup rule > Apply
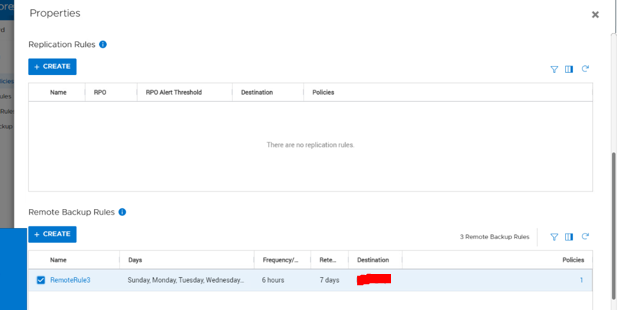
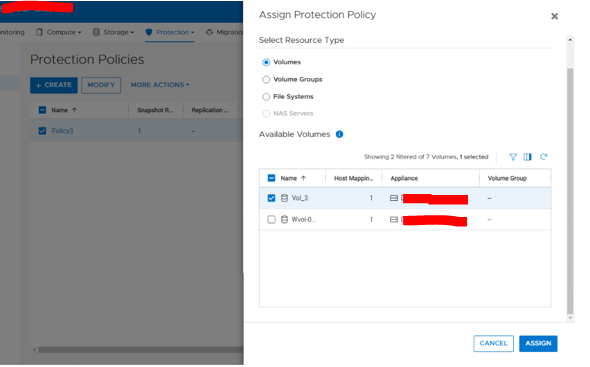
Step 6: Now there is a Protection Policy with a Remote Backup Rule. Apply the policy to the volume or volume group that must be backed up to the PowerProtect Data Domain.
Select the Protection Policy > More Actions > Assign Protection Policy.
In the "Assign Protection Policy" window, select the required volume or volume group and click "ASSIGN"
Note: File Systems are not supported for PowerProtect DD backup. Only volumes and volume groups are supported.
Additional Information
- For more information about PowerProtect Data Manager, see PowerProtect Data Manager Administration and User Guide
- For more information about Data Protection on PowerStore, see Dell PowerStore Protecting Your Data
Affected Products
PowerStore, Data Domain Boost, Data Domain Virtual Edition, PowerProtect Data Manager, PowerStoreOSArticle Properties
Article Number: 000215639
Article Type: How To
Last Modified: 16 Jun 2026
Version: 6
Find answers to your questions from other Dell users
Support Services
Check if your device is covered by Support Services.