PowerStore:如何在仅限 SMB 的 NAS 服务器上启用 SFTP 无密码登录
Summary: 本文将指导您在适用于 PowerStore 的仅限 SMB 的 NAS 服务器上为 SMB 帐户启用 SFTP 无密码登录。
This article applies to
This article does not apply to
This article is not tied to any specific product.
Not all product versions are identified in this article.
Instructions
-
在任何 Linux 服务器上生成 SSH 密钥对
[administrator@my-linux-server ~]$ ssh-keygen -t rsa
Generating public/private rsa key pair.
Enter file in which to save the key (/home/administrator/.ssh/id_rsa):
Enter passphrase (empty for no passphrase):
Enter same passphrase again:
Your identification has been saved in /home/administrator/.ssh/id_rsa.
Your public key has been saved in /home/administrator/.ssh/id_rsa.pub.
The key fingerprint is:
SHA256:FGwVwmaboco...GC86v+4pc administrator@my-linux-server
The key's randomart image is:
+---[RSA 3072]----+
|     . =+o+o     |
|    . + @o.      |
| o + . O.*       |
|* . = +.B        |
|.= + o =So       |
|o . . o . .      |
|o. o ..          |
|+ +..E           |
|   :)            |
+----[SHA256]-----+
这是您应该在 .ssh 文件夹中看到的内容:
[administrator@my-linux-server .ssh]# ls /home/administrator/.ssh/
id_rsa
id_rsa.pub
known_hosts
-
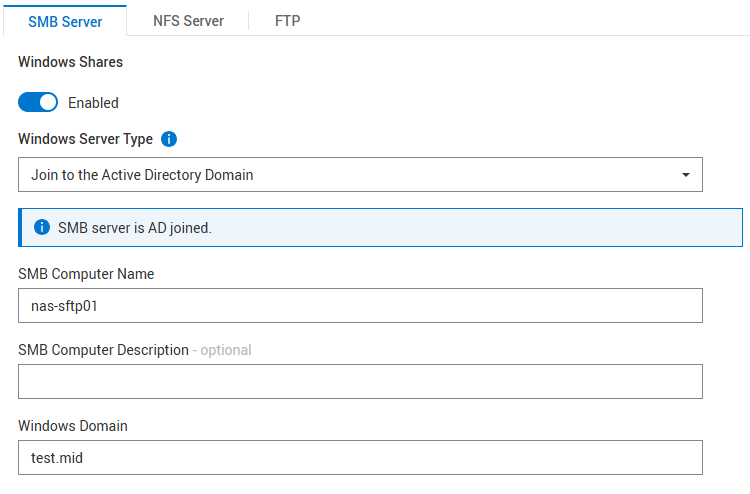
创建 SMB NAS 服务器,已加入 Windows AD
例如,NAS 服务器 nas-sftp01:
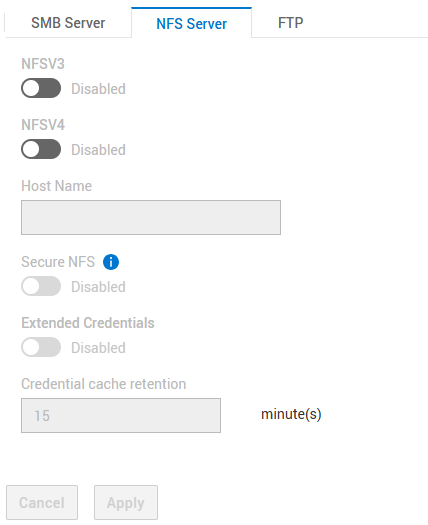
不需要 NFS
SFTP 的设置:
- SFTP 已启用
- FTP/SFTP 服务器访问:SMB 用户
- 主目录限制:Enabled
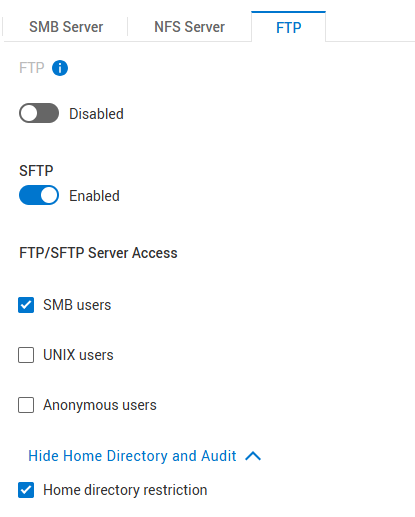
“Home Directory Restriction”允许用户仅打开 /Home/ 文件夹,但看不到高于此文件夹的任何内容。如果用户应有权访问 NAS 服务器和文件系统的根目录,则取消选中此项。
-
创建文件系统
在上面创建的 NAS 服务器下创建文件系统,并创建一个 SMB 共享。
文件系统名称示例:nas-sftp-fs01。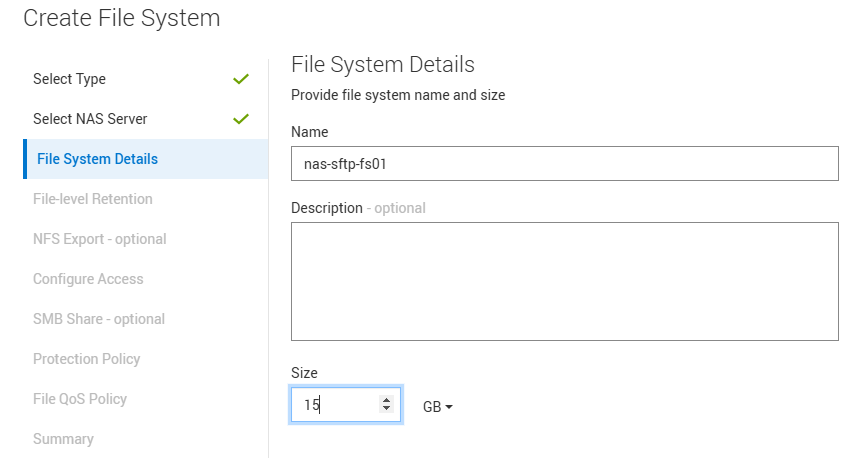
-
为 NAS 服务器 nas-sftp01 启用 HomeDir
将 homedir 配置文件上传到 NAS 服务器 > 命名服务 > 本地文件。
请注意,您仅在此处输入文件系统名称 nas-sftp-fs01。使用此模板获得一些指导:Examples: mydomain:*:/fs2/<d>/<u>:regex:create mydomain:usr1:/fs1/usr1 !:tom:/fs1/tom test:*:/nas-sftp-fs01/<d>/<u>:regex:create
-
在 Windows AD 上创建用户
以用户 测试仪 为例进行演示。
使用用户 测试人员 从任何 Windows 客户端(已加入 Windows AD)登录,并访问主目录 \\nas-sftp01\HOME 以创建用户 测试人员的主目录。 -
转至在其上创建 SSH 密钥对的 Linux 服务器,然后转至密钥的存储位置。
您必须将文件 id_rsa.pub 重命名为 autorized_keys
[administrator@my-linux-server]$ cd /home/administrator/.ssh/
[administrator@my-linux-server .ssh]$ pwd
/home/administrator/.ssh

[administrator@my-linux-server .ssh]$ ls -la
total 16
drwx------.  2 administrator administrator   57 Mar  4 09:58 .
drwx------. 20 administrator administrator 4096 Jan 23 08:21 ..
-rw-------.  1 administrator administrator 2622 Mar  3 08:19 id_rsa
-rw-r--r--.  1 administrator administrator  582 Mar  3 08:19 id_rsa.pub
-rw-r--r--.  1 administrator administrator  909 Mar  4 08:34 known_hosts

[administrator@my-linux-server .ssh]$ mv id_rsa.pub authorized_keys
-
使用新创建的用户打开到 NAS 服务器的 sftp 连接
创建一个 .ssh 文件夹,然后将新文件authorized_keys从上述位置移动到 .ssh/ 文件夹中(在此示例中为其 /home/administrator/.ssh/)。
将 xx.xx.xx.xx替换为 NAS 服务器的 IP 或名称。[administrator@my-linux-server .ssh]$ sftp test\\tester@xx.xx.xx.xx test\tester@xx.xx.xx.xx's password: Connected to xx.xx.xx.xx. sftp> sftp> mkdir .ssh sftp> cd .ssh/ sftp> put /home/administrator/.ssh/authorized_keys Uploading /home/administrator/.ssh/authorized_keys to /.ssh/authorized_keys /home/administrator/.ssh/authorized_keys 100% 582 863.0KB/s 00:00 sftp> ls -la drwxrwxrwx 2 2147483653 2147483653 2147483653 152 Mar 4 10:19 . drwxr-xr-x 3 2147483653 2147483653 2147483653 152 Mar 4 10:19 .. -rw-r--r-- 1 2147483653 2147483653 2147483653 582 Mar 4 10:19 authorized_keys
-
在 SFTP 中使用 chmod 将权限 700 设置为文件夹 .ssh,将权限 600 设置为文件 .ssh/authorized_keys
sftp> ls -la
drwxr-xr-x   3 2147483650 2147483650 2147483650           8192 Mar  4 12:30 .
drwxr-xr-x   3 2147483650 2147483650 2147483650           8192 Mar  4 12:30 ..
drwxrwxrwx   2 2147483650 2147483650 2147483650            152 Mar  4 12:30 .ssh
-rw-r--r--   1 2147483650 2147483650 2147483650              9 Mar  4 12:22 TESTER_HOME_dir.txt

sftp> chmod 700 .ssh/
Changing mode on /.ssh/
sftp> chmod 600 .ssh/authorized_keys
Changing mode on /.ssh/authorized_keys
sftp> ls -la
drwxr-xr-x   3 2147483650 2147483650 2147483650           8192 Mar  4 12:30 .
drwxr-xr-x   3 2147483650 2147483650 2147483650           8192 Mar  4 12:30 ..
drwx------   2 2147483650 2147483650 2147483650            152 Mar  4 12:30 .ssh
-rw-r--r--   1 2147483650 2147483650 2147483650              9 Mar  4 12:22 TESTER_HOME_dir.txt

sftp> cd .ssh/
sftp> ls -la
drwx------   2 2147483650 2147483650 2147483650            152 Mar  4 12:30 .
drwxr-xr-x   3 2147483650 2147483650 2147483650           8192 Mar  4 12:30 ..
-rw-------   1 2147483650 2147483650 2147483650            582 Mar  4 12:30 authorized_keys
-
测试访问
您现在应该能够在不提供任何密码的情况下打开 sftp。
您可以使用 sftp -v选项显示登录详细信息。[administrator@my-linux-server .ssh]$ sftp -v test\\tester@xx.xx.xx.xx OpenSSH_8.0p1, OpenSSL 1.1.1k FIPS 25 Mar 2021 debug1: Reading configuration data /etc/ssh/ssh_config debug1: Reading configuration data /etc/ssh/ssh_config.d/05-....conf debug1: Reading configuration data /etc/crypto-policies/back-ends/openssh.config debug1: configuration requests final Match pass debug1: re-parsing configuration debug1: Reading configuration data /etc/ssh/ssh_config debug1: Reading configuration data /etc/ssh/ssh_config.d/05-....conf debug1: Reading configuration data /etc/crypto-policies/back-ends/openssh.config debug1: Connecting to xx.xx.xx.xx [xx.xx.xx.xx] port 22. debug1: Connection established. debug1: identity file /home/administrator/.ssh/id_rsa type -1 debug1: identity file /home/administrator/.ssh/id_rsa-cert type -1 debug1: identity file /home/administrator/.ssh/id_dsa type -1 debug1: identity file /home/administrator/.ssh/id_dsa-cert type -1 debug1: identity file /home/administrator/.ssh/id_ecdsa type -1 debug1: identity file /home/administrator/.ssh/id_ecdsa-cert type -1 debug1: identity file /home/administrator/.ssh/id_ed25519 type -1 debug1: identity file /home/administrator/.ssh/id_ed25519-cert type -1 debug1: identity file /home/administrator/.ssh/id_xmss type -1 debug1: identity file /home/administrator/.ssh/id_xmss-cert type -1 debug1: Local version string SSH-2.0-OpenSSH_8.0 debug1: Remote protocol version 2.0, remote software version OpenSSH_8.4 debug1: match: OpenSSH_8.4 pat OpenSSH* compat 0x04000000 debug1: Authenticating to xx.xx.xx.xx:22 as 'test\\tester' debug1: SSH2_MSG_KEXINIT sent debug1: SSH2_MSG_KEXINIT received debug1: kex: algorithm: curve25519-sha256 debug1: kex: host key algorithm: ecdsa-sha2-nistp256 debug1: kex: server->client cipher: aes256-gcm@openssh.com MAC: <implicit> compression: none debug1: kex: client->server cipher: aes256-gcm@openssh.com MAC: <implicit> compression: none debug1: kex: curve25519-sha256 need=32 dh_need=32 debug1: kex: curve25519-sha256 need=32 dh_need=32 debug1: expecting SSH2_MSG_KEX_ECDH_REPLY debug1: Server host key: ecdsa-sha2-nistp256 SHA256:xyc9xUOiKbYg4TEvY8wahgq9ous3ocRTbTWBEmK5wgk debug1: Host 'xx.xx.xx.xx' is known and matches the ECDSA host key. debug1: Found key in /home/administrator/.ssh/known_hosts:6 debug1: rekey out after 4294967296 blocks debug1: SSH2_MSG_NEWKEYS sent debug1: expecting SSH2_MSG_NEWKEYS debug1: SSH2_MSG_NEWKEYS received debug1: rekey in after 4294967296 blocks debug1: Will attempt key: /home/administrator/.ssh/id_rsa debug1: Will attempt key: /home/administrator/.ssh/id_dsa debug1: Will attempt key: /home/administrator/.ssh/id_ecdsa debug1: Will attempt key: /home/administrator/.ssh/id_ed25519 debug1: Will attempt key: /home/administrator/.ssh/id_xmss debug1: SSH2_MSG_EXT_INFO received debug1: kex_input_ext_info: server-sig-algs=<ssh-ed25519,sk-ssh-ed25519@openssh.com,ssh-rsa,rsa-sha2-256,rsa-sha2-512,ssh-dss,ecdsa-sha2-nistp256 ,ecdsa-sha2-nistp384,ecdsa-sha2-nistp521,sk-ecdsa-sha2-nistp256@openssh.com,webauthn-sk-ecdsa-sha2-nistp256@openssh.com> debug1: SSH2_MSG_SERVICE_ACCEPT received debug1: Authentications that can continue: publickey,password debug1: Next authentication method: publickey debug1: Trying private key: /home/administrator/.ssh/id_rsa debug1: Authentication succeeded (publickey). Authenticated to xx.xx.xx.xx ([xx.xx.xx.xx]:22). debug1: channel 0: new [client-session] debug1: Requesting no-more-sessions@openssh.com debug1: Entering interactive session. debug1: pledge: network debug1: Sending environment. debug1: Sending env LANG = en_IE.UTF-8 debug1: Sending subsystem: sftp Connected to xx.xx.xx.xx. sftp> ls TESTER_HOME_dir.txt
Affected Products
PowerStore 1200TProducts
PowerStore, PowerStore 3200Q, PowerStore 3200T, PowerStore 500T, PowerStore 5200T, PowerStore 9200T, PowerStore Employee and PartnerArticle Properties
Article Number: 000276740
Article Type: How To
Last Modified: 22 Jan 2026
Version: 5
Find answers to your questions from other Dell users
Support Services
Check if your device is covered by Support Services.