如何在 Dell Security Management Server Virtual 中配置代理设置
Summary: 参阅以下说明,了解如何在 Dell Security Management Server Virtual(以前称为 Dell Data Protection Virtual Edition)中配置代理设置。
This article applies to
This article does not apply to
This article is not tied to any specific product.
Not all product versions are identified in this article.
Instructions
本文介绍如何在 Dell Security Management Server Virtual(以前称为 Dell Data Protection | Virtual Edition)中配置代理设置。
受影响的产品:
- Dell Security Management Server Virtual
- Dell Data Protection Virtual Edition
可能需要配置 Dell Security Management Server Virtual 代理设置才能:
- 下载虚拟设备更新。
- 验证开箱即用的产品许可证。
- 与 Advanced Threat Prevention (ATP) 租户通信。
提醒:
- 批量产品许可证不需要外部验证。
- ATP 租户仅与 Dell Endpoint Security Suite Enterprise 一起使用。
- 代理设置可能需要配置多个功能。
单击虚拟设备更新或产品许可证和高级威胁防护 (ATP) 租户,了解有关设置代理的更多信息。
虚拟设备更新
Dell Security Management Server Virtual 的代理设置在 v9.11.0 和更高版本、 v9.7.0 到 9.10.1、 v9.5.0 到 9.6.0、 v9.0.0 到 9.4.1 以及 v8.2.0 到 8.5.0 之间变化。单击相应的版本,了解特定的步骤。有关版本信息,请参阅 如何确定 Dell Data Security 服务器版本。
v9.11.0 及更高版本
提醒:在 Dell Security Management Server Virtual v9.11 及更高版本中,为虚拟设备更新、产品许可证和 ATP 租户更新代理的步骤是相同的。
- 登录到 Dell Security Management Server Virtual 管理控制台。
 提醒:
提醒:- Dell Security Management Server Virtual 的默认凭据为:
- Username:
delluser - 密码:
delluser
- Username:
- 管理员可以更改产品的虚拟设备菜单中的默认密码。
- Dell Security Management Server Virtual 的默认凭据为:
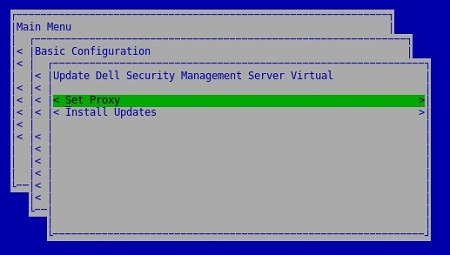
- 从 主菜单中,选择 Basic Configuration ,然后按 Enter 键。
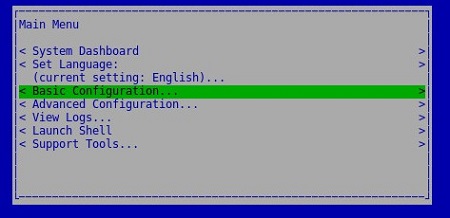
- 选择 Update Dell Security Management Server Virtual,然后按 Enter 键。
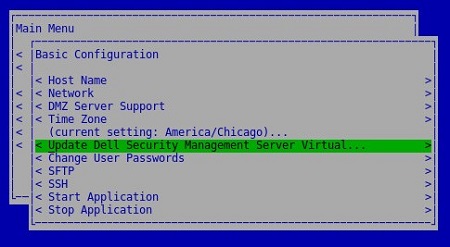
- 选择 Set Proxy,然后按 Enter 键。

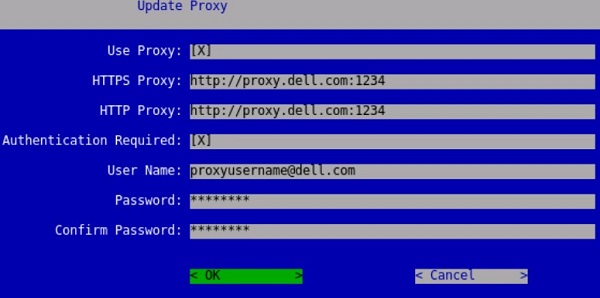
- 在 “Update Proxy ”菜单中:
- 在 Use Proxy 右侧按空格键以启用此功能。
- 填充 HTTPS 代理和 HTTP 代理。
- 如果需要代理身份验证,请按 Authentication Required 右侧的空格键以启用此安全功能,然后转至步骤 5D。如果不需要代理身份验证,请转至步骤 5E。
- 填充用户名、密码并确认密码。
- 选择 OK,然后按 Enter 键。
 提醒:有关升级过程的更多信息,请参阅 如何升级 Dell Security Management Server Virtual。
v9.7.0 至 9.10.1
- 登录到 Dell Security Management Server Virtual 管理控制台。
 提醒:
提醒:- Dell Security Management Server Virtual 的默认凭据为:
- Username:
ddpuser - 密码:
ddpuser
- Username:
- 管理员可以更改产品的虚拟设备菜单中的默认密码。
- Dell Security Management Server Virtual 的默认凭据为:
- 从 主菜单中,选择 Basic Configuration ,然后按 Enter 键。

- 选择 Update Dell Security Management Server Virtual,然后按 Enter 键。

- 选择 Set Proxy Settings,然后按 Enter 键。

- 在 “Proxy Settings ”菜单中:
- 在 Use Proxy 右侧按空格键以启用此功能。
- 填充 HTTPS 代理、HTTP 代理和 FTP 代理。
- 如果需要代理身份验证,请按 Authentication Required 右侧的空格键以启用此安全功能,然后转至步骤 5D。如果不需要代理身份验证,请转至步骤 5E。
- 填充用户名、密码并确认密码。
- 选择 OK,然后按 Enter 键。
 提醒:有关升级过程的更多信息,请参阅 如何升级 Dell Security Management Server Virtual。
v9.5.0 至 9.6.0
- 登录到 Dell Enterprise Server Virtual 管理控制台。
 提醒:
提醒:- Dell Data Protection Enterprise Server Virtual Edition 的默认凭据为:
- Username:
ddpuser - 密码:
ddpuser
- Username:
- 管理员可以更改产品的虚拟设备菜单中的默认密码。
- Dell Data Protection Enterprise Server Virtual Edition 的默认凭据为:
- 从 主菜单中,选择 Basic Configuration ,然后按 Enter 键。

- 选择 Update DDP Enterprise Server - VE,然后按 Enter 键。

- 选择 Set Proxy Settings,然后按 Enter 键。

- 在 “Proxy Settings ”菜单中:
- 在 Use Proxy 右侧按空格键以启用此功能。
- 填充 HTTPS 代理、HTTP 代理和 FTP 代理。
- 如果需要代理身份验证,请按 Authentication Required 右侧的空格键以启用此安全功能,然后转至步骤 5D。如果不需要代理身份验证,请转至步骤 5E。
- 填充用户名、密码并确认密码。
- 选择 OK,然后按 Enter 键。
 提醒:有关升级过程的更多信息,请参阅 如何升级 Dell Security Management Server Virtual。
v9.0.0 至 9.4.1
- 登录到 Dell Enterprise Server Virtual 管理控制台。
 提醒:
提醒:- Dell Data Protection Enterprise Server Virtual Edition 的默认凭据为:
- Username:
ddpuser - 密码:
ddpuser
- Username:
- 管理员可以更改产品的虚拟设备菜单中的默认密码。
- Dell Data Protection Enterprise Server Virtual Edition 的默认凭据为:
- 从 主菜单中,选择 Basic Configuration ,然后按 Enter 键。
- 选择 Update DDP Enterprise Server - VE,然后按 Enter 键。

- 选择 Set Proxy Settings,然后按 Enter 键。

- 在 “Proxy Settings ”菜单中:
- 在 Use Proxy 右侧按空格键以启用此功能。
- 填充 HTTPS 代理、HTTP 代理和 FTP 代理。
- 如果需要代理身份验证,请按 Authentication Required 右侧的空格键以启用此安全功能,然后转至步骤 5D。如果不需要代理身份验证,请转至步骤 5E。
- 填充用户名、密码并确认密码。
- 选择 OK,然后按 Enter 键。
 提醒:有关升级过程的更多信息,请参阅 如何升级 Dell Security Management Server Virtual。
v8.2.0 至 8.5.0
提醒:如果您对执行这些步骤感到不安,请联系支持部门。有关详细信息,请参阅 Dell Data Security 国际支持电话号码。
- 登录到 Dell Enterprise Server Virtual 管理控制台。
 提醒:
提醒:- Dell Data Protection Enterprise Server Virtual Edition 的默认凭据为:
- Username:
ddpuser - 密码:
ddpuser
- Username:
- 管理员可以更改产品的虚拟设备菜单中的默认密码。
- Dell Data Protection Enterprise Server Virtual Edition 的默认凭据为:
- 从 主菜单中,选择 Launch Shell ,然后按 Enter 键。

- 键入
su ddpsupport分析文件,然后按 Enter 键。
- 键入以下项的密码 :
ddpsupport分析文件,然后按 Enter 键。 提醒:
提醒:- Dell Data Protection Enterprise Server Virtual Edition 的默认凭据为:
- Username:
ddpsupport - 密码:
ddpsupport
- Username:
- 管理员可以更改产品的虚拟设备菜单中的默认密码。
- Dell Data Protection Enterprise Server Virtual Edition 的默认凭据为:
- 键入
sudo nano /etc/environment分析文件,然后按 Enter 键。
- 按向下箭头转到新的空白行。

- 键入以下文本,填充代理服务器和端口,其中
proxy.company.com和1234所示为:http_proxy=https://proxy.company.com:1234/ https_proxy=https://proxy.company.com:1234/ ftp_proxy=https://proxy.company.com:1234/ no_proxy="localhost,127.0.0.1" HTTP_PROXY=https://proxy.company.com:1234/ HTTPS_PROXY=https://proxy.company.com:1234/ FTP_PROXY=https://proxy.company.com:1234/ NO_PROXY="localhost,127.0.0.1"
提醒:Proxy.company.com和端口1234仅作为示例。您环境中的代理服务器 FQDN 和端口配置将会不同。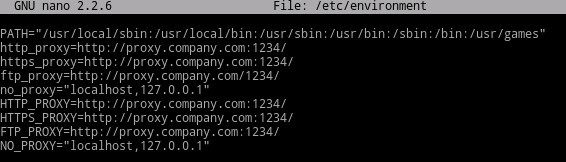
- 按 CTRL+X 以退出。系统提示保存时,按 Y键以继续。

- 按 Enter 键以保存而不更改文件名。

- 键入
exit然后按 Enter 键注销ddpsupport。
- 键入
exit,然后按 Enter 键从 shell 注销到 UI。
- 从主菜单中选择 Basic Configuration,然后按 Enter 键。

- 选择 Reboot Appliance 并按 Enter 键。

- 选择 Yes,然后按 Enter 键。
 提醒:有关升级过程的更多信息,请参阅 如何升级 Dell Security Management Server Virtual。
产品许可证和高级威胁防护 (ATP) 租户
Dell Security Management Server Virtual 的代理设置在 v9.11.0 和更高版本、 v9.7.0 到 9.10.1 以及 v8.2.0 到 9.6.0 之间有所不同。单击相应的版本,了解特定的步骤。有关版本信息,请参阅 如何确定 Dell Data Security 服务器版本。
v9.11.0 及更高版本
提醒:在 Dell Security Management Server Virtual v9.11 及更高版本中,为虚拟设备更新、产品许可证和 ATP 租户更新代理的步骤是相同的。
- 登录到 Dell Security Management Server Virtual 管理控制台。
 提醒:
提醒:- Dell Security Management Server Virtual 的默认凭据为:
- Username:
delluser - 密码:
delluser
- Username:
- 管理员可以更改产品的虚拟设备菜单中的默认密码。
- Dell Security Management Server Virtual 的默认凭据为:
- 从 主菜单中,选择 Basic Configuration ,然后按 Enter 键。

- 选择 Update Dell Security Management Server Virtual,然后按 Enter 键。

- 选择 Set Proxy,然后按 Enter 键。
- 在 “Update Proxy ”菜单中:
- 在 Use Proxy 右侧按空格键以启用此功能。
- 填充 HTTPS 代理和 HTTP 代理。
- 如果需要代理身份验证,请按 Authentication Required 右侧的空格键以启用此安全功能,然后转至步骤 5D。如果不需要代理身份验证,请转至步骤 5E。
- 填充用户名、密码并确认密码。
- 选择 OK,然后按 Enter 键。
 提醒:有关升级过程的更多信息,请参阅 如何升级 Dell Security Management Server Virtual。
v9.7.0 至 9.10.1
提醒:如果您对执行这些步骤感到不安,请联系支持部门。有关详细信息,请参阅 Dell Data Security 国际支持电话号码。
- 登录到 Dell Security Management Server Virtual 管理控制台。
 提醒:
提醒:- Dell Security Management Server Virtual 的默认凭据为:
- Username:
ddpuser - 密码:
ddpuser
- Username:
- 管理员可以更改产品的虚拟设备菜单中的默认密码。
- Dell Security Management Server Virtual 的默认凭据为:
- 从 主菜单中,选择 Launch Shell ,然后按 Enter 键。

- 键入
su ddpsupport分析文件,然后按 Enter 键。
- 键入以下项的密码 :
ddpsupport分析文件,然后按 Enter 键。 提醒:
提醒:- Dell Data Protection Enterprise Server Virtual Edition 的默认凭据为:
- Username:
ddpsupport - 密码:
ddpsupport
- Username:
- 管理员可以更改产品的虚拟设备菜单中的默认密码。
- Dell Data Protection Enterprise Server Virtual Edition 的默认凭据为:
- 键入
sudo nano /opt/dell/server/security-server/conf/application.properties分析文件,然后按 Enter 键。
- 向下滚动到
proxy server settings使用箭头键。
- At
proxy.server.enabled=false删除false和类型true。
- At
proxy.server.host=,请键入代理服务器的完全限定域名 (FQDN)。 提醒:您环境中的 FQDN 可能不同于图像中的示例 proxy.company.com。
 - At
proxy.server.port.ssl=,键入代理服务器的 SSL 端口。 提醒:您环境中的端口可能不同于图像中的示例端口 443。
 - At
proxy.server.port.http=,键入代理服务器的 HTTP 端口。 提醒:您环境中的端口可能不同于图像中的示例端口 80。
 - 如果代理服务器需要身份验证,请转至步骤 11a。如果代理服务器不需要身份验证,请转至步骤 12。
- At
proxy.server.username=,键入代理服务器的用户名。 提醒:图中的示例是
proxyusername@company.com,可能与您环境中的用户名不同。 - At
proxy.server.password=取代ENC跟CLR。
- At
proxy.server.password=,替换CLR()密码为proxyusername@company.com。 提醒:图中的示例是
proxypassword,可能与您环境中的密码不同。
- At
- 按 CTRL+X 以退出。在提示保存时,键入
Y以继续。
- 按 Enter 键以保存而不更改文件名。

- 键入
exit然后按 Enter 键注销ddpsupport。
- 键入
exit,然后按 Enter 键从 shell 注销到 主菜单。
- 从 主菜单中,选择 Basic Configuration ,然后按 Enter 键。

- 选择 Stop Application,然后按 Enter 键。

- 选择 Yes,然后按 Enter 键。

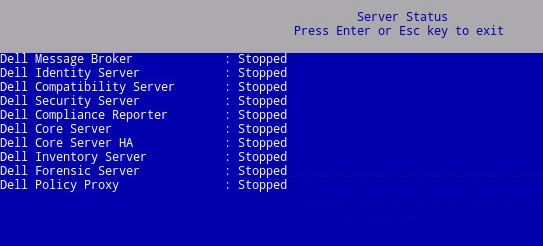
- 停止所有服务后,按 ESC 键返回 到 Basic Configuration 菜单。
- 选择 Start Application,然后按 Enter 键。

- 选择 Yes,然后按 Enter 键。

- 启动所有服务后,按 ESC 键返回 到 Basic Configuration 菜单。

v8.2.0 至 9.6.0
提醒:如果您对执行这些步骤感到不安,请联系支持部门。有关详细信息,请参阅 Dell Data Security 国际支持电话号码。
- 登录到 Dell Enterprise Server Virtual 管理控制台。
 提醒:
提醒:- Dell Data Protection Enterprise Server Virtual Edition 的默认凭据为:
- Username:
ddpuser - 密码:
ddpuser
- Username:
- 管理员可以更改产品的虚拟设备菜单中的默认密码。
- Dell Data Protection Enterprise Server Virtual Edition 的默认凭据为:
- 从 主菜单中,选择 Launch Shell ,然后按 Enter 键。

- 键入
su ddpsupport分析文件,然后按 Enter 键。
- 键入以下项的密码
ddpsupport分析文件,然后按 Enter 键。 提醒:
提醒:- Dell Data Protection Enterprise Server Virtual Edition 的默认凭据为:
- Username:
ddpsupport - 密码:
ddpsupport
- Username:
- 管理员可以更改产品的虚拟设备菜单中的默认密码。
- Dell Data Protection Enterprise Server Virtual Edition 的默认凭据为:
- 键入
sudo nano /opt/dell/server/security-server/conf/application.properties分析文件,然后按 Enter 键。
- 向下滚动到
Proxy server settings使用箭头键。
- At
proxy.server.enabled=false删除false和类型true。
- At
proxy.server.host=,请键入代理服务器的完全限定域名 (FQDN)。 提醒:您环境中的 FQDN 可能不同于图像中的示例 proxy.company.com。
 - At
proxy.server.port.ssl=,键入代理服务器的 SSL 端口。 提醒:您环境中的端口可能不同于图像中的示例端口 443。
 - At
proxy.server.port.http=,键入代理服务器的 HTTP 端口。 提醒:您环境中的端口可能不同于图像中的示例端口 80。
 - 如果代理服务器需要身份验证,请转至步骤 11a。如果代理服务器不需要身份验证,请转至步骤 12。
- At
proxy.server.username=,键入代理服务器的用户名。 提醒:图中的示例是
proxyusername@company.com,可能与您环境中的用户名不同。 - At
proxy.server.password=取代ENC跟CLR。
- At
proxy.server.password=,替换CLR()密码为proxyusername@company.com。 提醒:图中的示例是
proxypassword,可能与您环境中的密码不同。
- At
- 按 CTRL+X 以退出。在提示保存时,按
Y以继续。
- 按 Enter 键以保存而不更改文件名。

- 键入
exit然后按 Enter 键注销ddpsupport。
- 键入
exit,然后按 Enter 键从 shell 注销到 主菜单。
- 从 主菜单中,选择 Basic Configuration ,然后按 Enter 键。

- 选择 Stop Application,然后按 Enter 键。

- 选择 Yes,然后按 Enter 键。

- 停止所有服务后,按 ESC 键返回 到 Basic Configuration 菜单。

- 选择 Start Application,然后按 Enter 键。

- 选择 Yes,然后按 Enter 键。

- 启动所有服务后,按 ESC 键返回 到 Basic Configuration 菜单。

要联系支持部门,请参阅 Dell Data Security 国际支持电话号码。
转至 TechDirect,在线生成技术支持请求。
要获得更多见解和资源,请加入戴尔安全社区论坛。
Additional Information
Videos
Affected Products
Dell EncryptionArticle Properties
Article Number: 000131892
Article Type: How To
Last Modified: 10 Jul 2025
Version: 15
Find answers to your questions from other Dell users
Support Services
Check if your device is covered by Support Services.