How to Install and Configure VMware Carbon Black Cloud Syslog Connector
Summary: Learn about how to install and configure a VMware Carbon Black Cloud syslog connector on a CentOS or Red Hat Enterprise Linux-based server.
Instructions
This article guides the process of installation, configuration, and validation of the VMware Carbon Black Cloud Syslog connector on Red Hat Enterprise Linux-based operating systems.
Affected Products:
- VMware Carbon Black Cloud
Administration of multiple security products is eased by transferring data from security platforms into a centralized Security Information and Event Management (SIEM) solution. Carbon Black allows for data to be downloaded through APIs, converted into syslog format, and then forwarded to any number of SIEM solutions.
VMware Carbon Black Standard or higher allows for APIs to be configured, pulling this data into customer environments allowing for advanced rulesets and consumption of data in custom-built dashboards to be possible.
VMware Carbon Black’s Syslog Connector supports RPM-based Linux operating systems, such as Red Hat Enterprise Linux or CentOS.
To install and configure the syslog connector, an administrator must first address Prerequisites, Install the connector, and then Configure the connector. Afterwards, the administrator may Validate and Automate the syslog connector. Click the appropriate process for more information.
- Log in to the Linux server that the syslog connector is being installed on using SSH.
Note: For information about connecting through SSH, reference Securing networks
.
- Validate the server is up to date by running
sudo yum update. - A repository must be added to install PIP, as PIP may not be in the core operating system repositories. Type
sudo yum install epel-releaseand then press Enter.
 Note: If
epel-releaseis not found, add the repository by running the following commands:sudo dnf install https://dl.fedoraproject.org/pub/epel/epel-release-latest-[VERSION].noarch.rpmsudo rpm -ql epel-release
[VERSION]matches the release of Red Hat Enterprise Linux or CentOS that you are running:- If running Red Hat Enterprise Linux 8 or CentOS 8:
sudo dnf install https://dl.fedoraproject.org/pub/epel/epel-release-latest-8.noarch.rpm - If running Red Hat Enterprise Linux 7 or CentOS 7:
sudo dnf install https://dl.fedoraproject.org/pub/epel/epel-release-latest-7.noarch.rpm
- Type
Yand then press Enter. - Install PIP by typing
sudo yum install python3and then pressing Enter.

- Install Python3 build utilities by typing
sudo yum install gcc python3-develand then pressing Enter.

- Update all packages within the host operating system by typing
sudo yum updateand then pressing Enter.

- Log in as an account with sudo access on the server that the connector is being installed on.
- Open Terminal.
- Type
pip3 install cbc-syslogand then press Enter.
 Note:
Note:- This example leverages PIP3 on CentOS 8. The command may slightly vary depending on the version of Python, and as a result, the version of PIP that is being used.
- If installing without root, the default install location is:
/usr/lib/python{version}/site-packages/cbc_syslog
- If installing with root, the default install location is:
/usr/local/lib/python{version}/site-packages/cbc_syslog
An administrator must configure both VMware Carbon Black Cloud and the Syslog Connector itself. Click the appropriate process for more information.
VMware Carbon Black Cloud
VMware Carbon Black Cloud must be configured to use the syslog connector. An administrator must first Generate API and SIEM Keys, then Generate Notifications for API. Click the appropriate process for more information.
Generate API and SIEM Keys
- In a web browser, go to [REGION].conferdeploy.net.
Note: [REGION] = Region of tenant
- Americas = https://defense-prod05.conferdeploy.net/
- Europe = https://defense-eu.conferdeploy.net/
- Asia Pacific = https://defense-prodnrt.conferdeploy.net/
- Australia and New Zealand = https://defense-prodsyd.conferdeploy.net
- Americas = https://defense-prod05.conferdeploy.net/
- Sign In to the VMware Carbon Black Cloud.

- In the left menu pane, expand Settings and then click API Access.
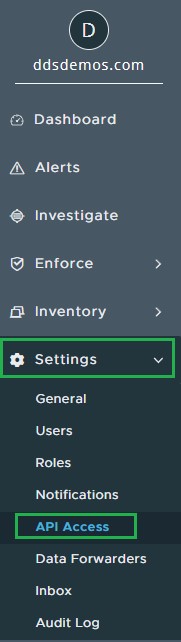
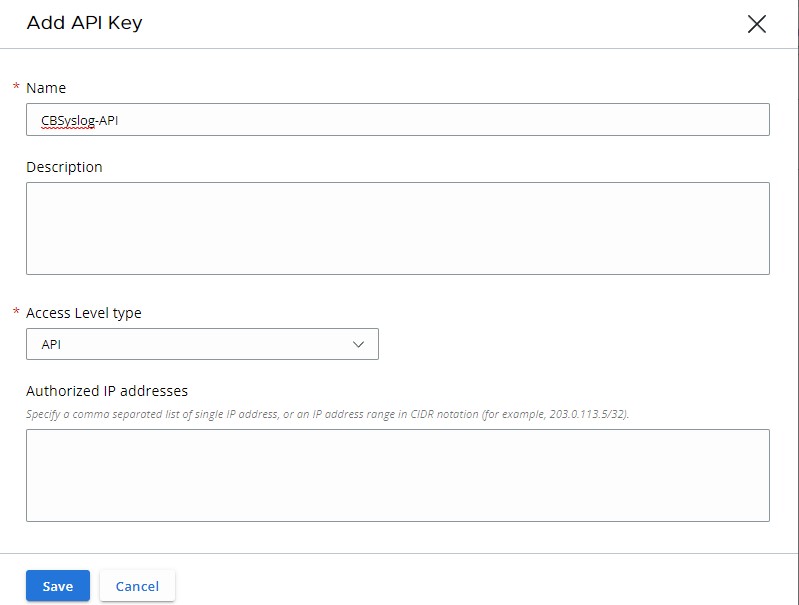
- Select Add API Key.

- From the Add API Key menu:
- Populate a Name.
- Populate a Description.
- Select an Access Level type.
- Populate external Authorized IP addresses that should request information from VMware Carbon Black Cloud.
- Click Save.
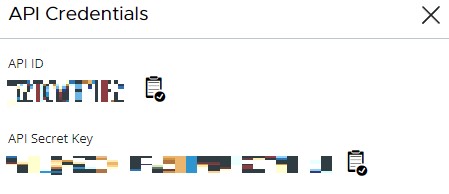
- From API Credentials:
- Click the clipboard icon to the right of the API ID to copy the ID to the clipboard.
- Record the API ID.
- Click the clipboard icon to the right of the API Secret Key to copy the key to the clipboard.
- Record the API Secret Key.
- Click the X in the upper-right corner.

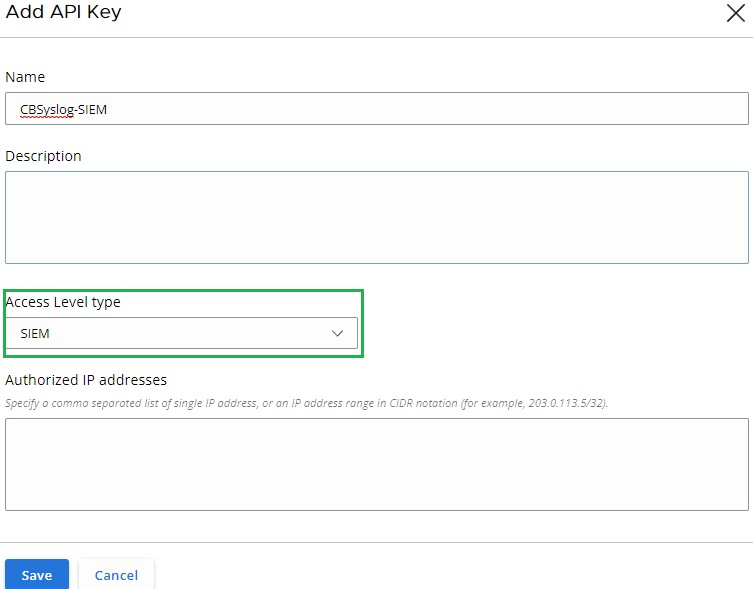
- Select Add API Key.

- From the Add API Key menu:
- Populate a Name.
- Populate a Description.
- Select an Access Level type.
- Populate external Authorized IP addresses that should request information from VMware Carbon Black Cloud.
- Click Save.
- From API Credentials:
- Click the clipboard icon to the right of the API ID to copy the ID to the clipboard.
- Record the API ID.
- Click the clipboard icon to the right of the API Secret Key to copy the key to the clipboard.
- Record the API Secret Key.
- Click the X in the upper-right corner.
Generate Notifications for API
Information is sent to the previously configured API through notifications that are set within the VMware Carbon Black Cloud console.
- In a web browser, go to [REGION].conferdeploy.net.
Note: [REGION] = Region of tenant
- Americas = https://defense-prod05.conferdeploy.net/
- Europe = https://defense-eu.conferdeploy.net/
- Asia Pacific = https://defense-prodnrt.conferdeploy.net/
- Australia and New Zealand = https://defense-prodsyd.conferdeploy.net
- Americas = https://defense-prod05.conferdeploy.net/
- Sign In to the VMware Carbon Black Cloud.

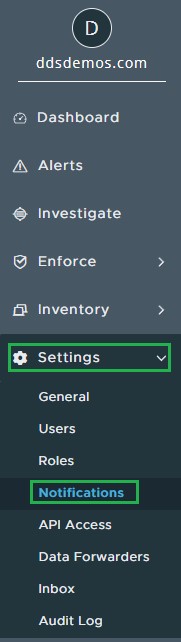
- In the left menu pane, expand Settings and then click Notifications.
- Click Add Notification.

- From the Add Notification menu:
- Populate a Name.
- Determine When do you want to be notified.
- Select the appropriate Policy to be notified on.
- Populate an Email to be notified at and optionally select to Send only 1 email for each threat type per day.
- Populate the API Keys with the API ID that was previously generated.
- Click Add.
 Note: Customers with Carbon Black Enterprise EDR can also specify watchlists that are sent through SIEM. This allows for a more targeted approach to information gathering.
Syslog Connector
- Connect to the server hosting the Syslog Connector through SSH.
Note:
- For information about connecting through SSH using CentOS 8, reference Securing networks
- For information about connecting through SSH with CentOS 7, reference Configuration Files
- For information about connecting through SSH using CentOS 8, reference Securing networks
- Generate a backup directory for the syslog output by typing
sudo mkdir /tmp/output/and then press Enter.

- Create the configuration file by typing
sudo touch /tmp/cbsyslog-config.txtand then press Enter.

- Create the log file by typing
sudo touch /tmp/cbsyslog-log.logand then press Enter.

- Open the previously created configuration file using nano with sudo privileges by typing
sudo nano /tmp/cbsyslog-config.txtand then press Enter.

- Copy the following text and then Paste it into the text editor.
[general] # Template for syslog output. # This is a jinja 2 template # NOTE: The source variable corresponds to the Carbon Black Cloud Server used to retrieve results template = {{source}} {{version}}|{{vendor}}|{{product}}|{{dev_version}}|{{signature}}|{{name}}|{{severity}}|{{extension}} #Location of the Backup Directory #This will be the location of back up files in the event that results fail to send to Syslog back_up_dir = /tmp/output/ # This sets the default severity level for POLICY_ACTION notifications. By default it is 4. # 0 - Emergency: System is unusable. # 1 - Alert: Action must be taken immediately. # 2 - Critical: Critical conditions. # 3 - Error: Error conditions. # 4 - Warning: Warning conditions. # 5 - Notice: Normal but significant condition. # 6 - Informational: Informational messages. # 7 - Debug: Debug-level messages. policy_action_severity = 4 # Output format of the data sent. Currently support json or cef formats # Warning: if using json output_format, we recommend NOT using UDP output_type output_format=cef # Configure the specific output. # Valid options are: 'udp', 'tcp', 'tcp+tls', 'http' # udp - Have the events sent over a UDP socket # tcp - Have the events sent over a TCP socket # tcp+tls - Have the events sent over a TLS+TCP socket # http - Have the events sent over a HTTP connection output_type=tcp # tcpout=IP:port - ie 1.2.3.5:514 tcp_out= # udpout=IP:port - ie 1.2.3.5:514 #udp_out= # httpout=http/https endpoint - ie https://server.company.com/endpoint # http_headers= {'key1': 'value1', 'key2': 'value2'} - ie {'content-type': 'application/json'} # https_ssl_verify = True or False #http_out= #http_headers= {'content-type': 'application/json'} #https_ssl_verify=True # Override ca file for self signed certificates when using https # This is typically a .pem file #requests_ca_cert=/usr/share/cb/integrations/cbc-syslog/cert.pem [tls] # Specify a file containing PEM-encoded CA certificates for verifying the peer server when using TLS+TCP syslog #ca_cert = /etc/cb/integrations/cbc-syslog/ca.pem # Optionally specify a file containing PEM-encoded client certificate for verifying this client when using TLS+TCP syslog # If cert is specified, key is a required parameter #cert = /etc/cb/integrations/cbc-syslog/cert.pem # Optionally specify a file containing PEM-encoded private key for verifying this client when using TLS+TCP syslog # If key is specified, cert is a required parameter #key = /etc/cb/integrations/cbc-syslog/cert.key # Optionally specify the password to decrypt the given private key when using TLS+TCP syslog #key_password = p@ssw0rd1 # Uncomment tls_verify and set to "false" in order to disable verification of the peer server certificate #tls_verify = true [CarbonBlackCloudServer1] # Carbon Black Cloud API Connector ID api_connector_id = EXAMP13 # Carbon Black Cloud API Key api_key = EXAMP13EXAMP13EXAMP13 # Carbon Black Cloud SIEM Connector ID siem_connector_id = EXAMP131234 # Carbon Black Cloud SIEM Key siem_api_key = EXAMP13EXAMP13EXAMP13 # Carbon Black Cloud Server URL # NOTE: this is not the url to the web ui, but to the API URL # For more than one Carbon Black Cloud Server, add another server using the following template including the stanza #[CarbonBlackCloudServer2] #api_connector_id = KJARWBZ111 #api_key = CQF35EIH2WDF69PTWKGC4111 #server_url = https://defense-prod05.conferdeploy.net - To have the output sent using TCP, populate the host and port with
output_typeset toTCP.
 Note: The example image has the settings redacted.
 - Update the
api_connector_idandapi_keyaccording to the API type’s API ID and API type’s API Secret Key.
 Note: For information about where the API and SIEM keys are created, reference the Generate API and SIEM Keys section above.
 - Update the
siem_connector_idandsiem_api_keyaccording to the SIEM type’s API ID, and SIEM type’s API Secret Key.
 Note: For information about where the API and SIEM keys are created, reference the Generate API and SIEM Keys section above.
 - Save the file by holding CTRL, then press X. Confirm to save the file by pressing
Y.

- Confirm the filename by pressing Enter.

Administrators must Test and then Validate the output from the syslog connector. Click the appropriate process for more information.
Test
- From the Linux server, open Terminal.
- Type
sudo python[VER] [INSTALLDIRECTORY]/cbc_syslog.py -l [LOGFILELOCATION] -c [CONFIGFILELOCATION]and then press Enter.Note:[VER]= Version of Python[INSTALLDIRECTORY]= Directory where the syslog connector is installed[LOGFILELOCATION]= Location of the log file[CONFIGFILELOCATION]= Location of the config file
Example:
sudo python3 /usr/local/lib/python3.6/site-packages/cbc_syslog/cbc_syslog.py -l /tmp/cbsyslog-log.log -c /tmp/cbsyslog-config.txt

This command performs a one-time run of the syslog connector that is based on the defined configuration file and outputs to the defined log file.
Once a test run is performed, inspect the output based on the log file that is generated in the test options. Inspect the log file to confirm the success or failure of the connection.
Validate
- From the Linux server, open Terminal.
- Type
cat [LOGFILELOCATION]and then press Enter.Note:[LOGFILELOCATION]= Location of the log file
Example:
cat /tmp/cbsyslog-log.log
A successful run returns a response similar to:
Carbon Black Cloud Syslog 2.0
Carbon Black Cloud Syslog 2.0
Found 1 Carbon Black Cloud Servers in config file
Handling notifications for https://defense-prod05.conferdeploy.net
Sending Notifications
Done Sending Notifications
Sending Audit Logs
Done Sending Audit Logs

The receiving SIEM or Syslog instance outputs any events that have occurred since the notification was created within the VMware Carbon Black Cloud console.
Validate within the configured SIEM or Syslog server that information was properly captured. This varies with each application.
Automation of running the syslog connector to regularly pull information can be done with cron.
- Generate a script that to be used for the automation by typing
sudo nano /tmp/cbsyslogrun.shand then press Enter.
 Note: The example generates a shell script of
/tmp/cbsyslogrun.sh. - Copy the validation script that was used within the Validate section, then Paste that script within the text editor.

- Press CTRL+X to exit.
- On prompt to save, press Y to continue, saving the changes.

- Update the script to allow for it to run as a script by typing
sudo chmod a+x /tmp/cbsyslogrun.shand then press Enter.

- Open the crontab file to add the script as an automated task by typing
sudo crontab -eand then press Enter. - Crontab leverages a VI-based syntax for editing text. Press the Insert key to add characters.
- Type
*/[MINUTES] * * * * /tmp/cbsyslogrun.shand then press ESC to cancel the text insertion phase.
 Note:
Note:[MINUTES]= Number of minutes to wait before running the command again- In the example image, the example runs every 15 minutes.
- Press the colon (:) key to enter a command.
- Type
wqand then press Enter to write and exit the crontab editor. - Confirm the change by typing
sudo crontab -land then press Enter. - Verify that the scheduled task (Step 7) appears in the list. If the task appears, the automation is configured. If the task does not appear, go to Step 13.

- Type
sudo systemctl start crond.serviceand then press Enter. - Type
sudo systemctl enable crond.serviceand then press Enter. - Type
sudo crontab -land then press Enter.

- Verify that the scheduled task appears in the list.
To contact support, reference Dell Data Security International Support Phone Numbers.
Go to TechDirect to generate a technical support request online.
For additional insights and resources, join the Dell Security Community Forum.